SimpleSolutionsDiva.com

Searching for "Halloween"

Easy Halloween Treats & Decor

halloween-ssd


Halloween is almost here! Whether you are going to a Halloween party this year or you are hosting one this weekend, the Simple Solutions Diva has some simple Halloween snacks and décor you can make yourself!

Witches Broom Snacks

brooms

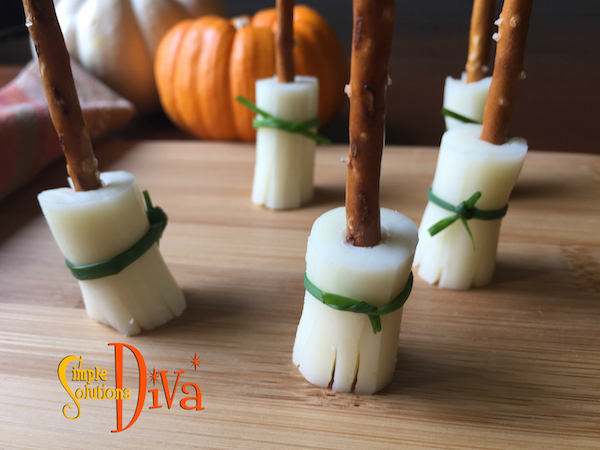
These are as simple as 3 ingredients – and they aren’t full of sugar! String cheese, pretzel sticks and fresh chives make up this adorable and tasty Halloween treat!

Instructions – Cut the string cheese into thirds. Slice the pieces of cheese 2/3 of the way to the top, creating the bristles of the broom. Stick a pretzel stick into the top (uncut) side of the broom. Tie the chive just above the cuts of the “broom” bristles. Keep refrigerated until ready to serve.
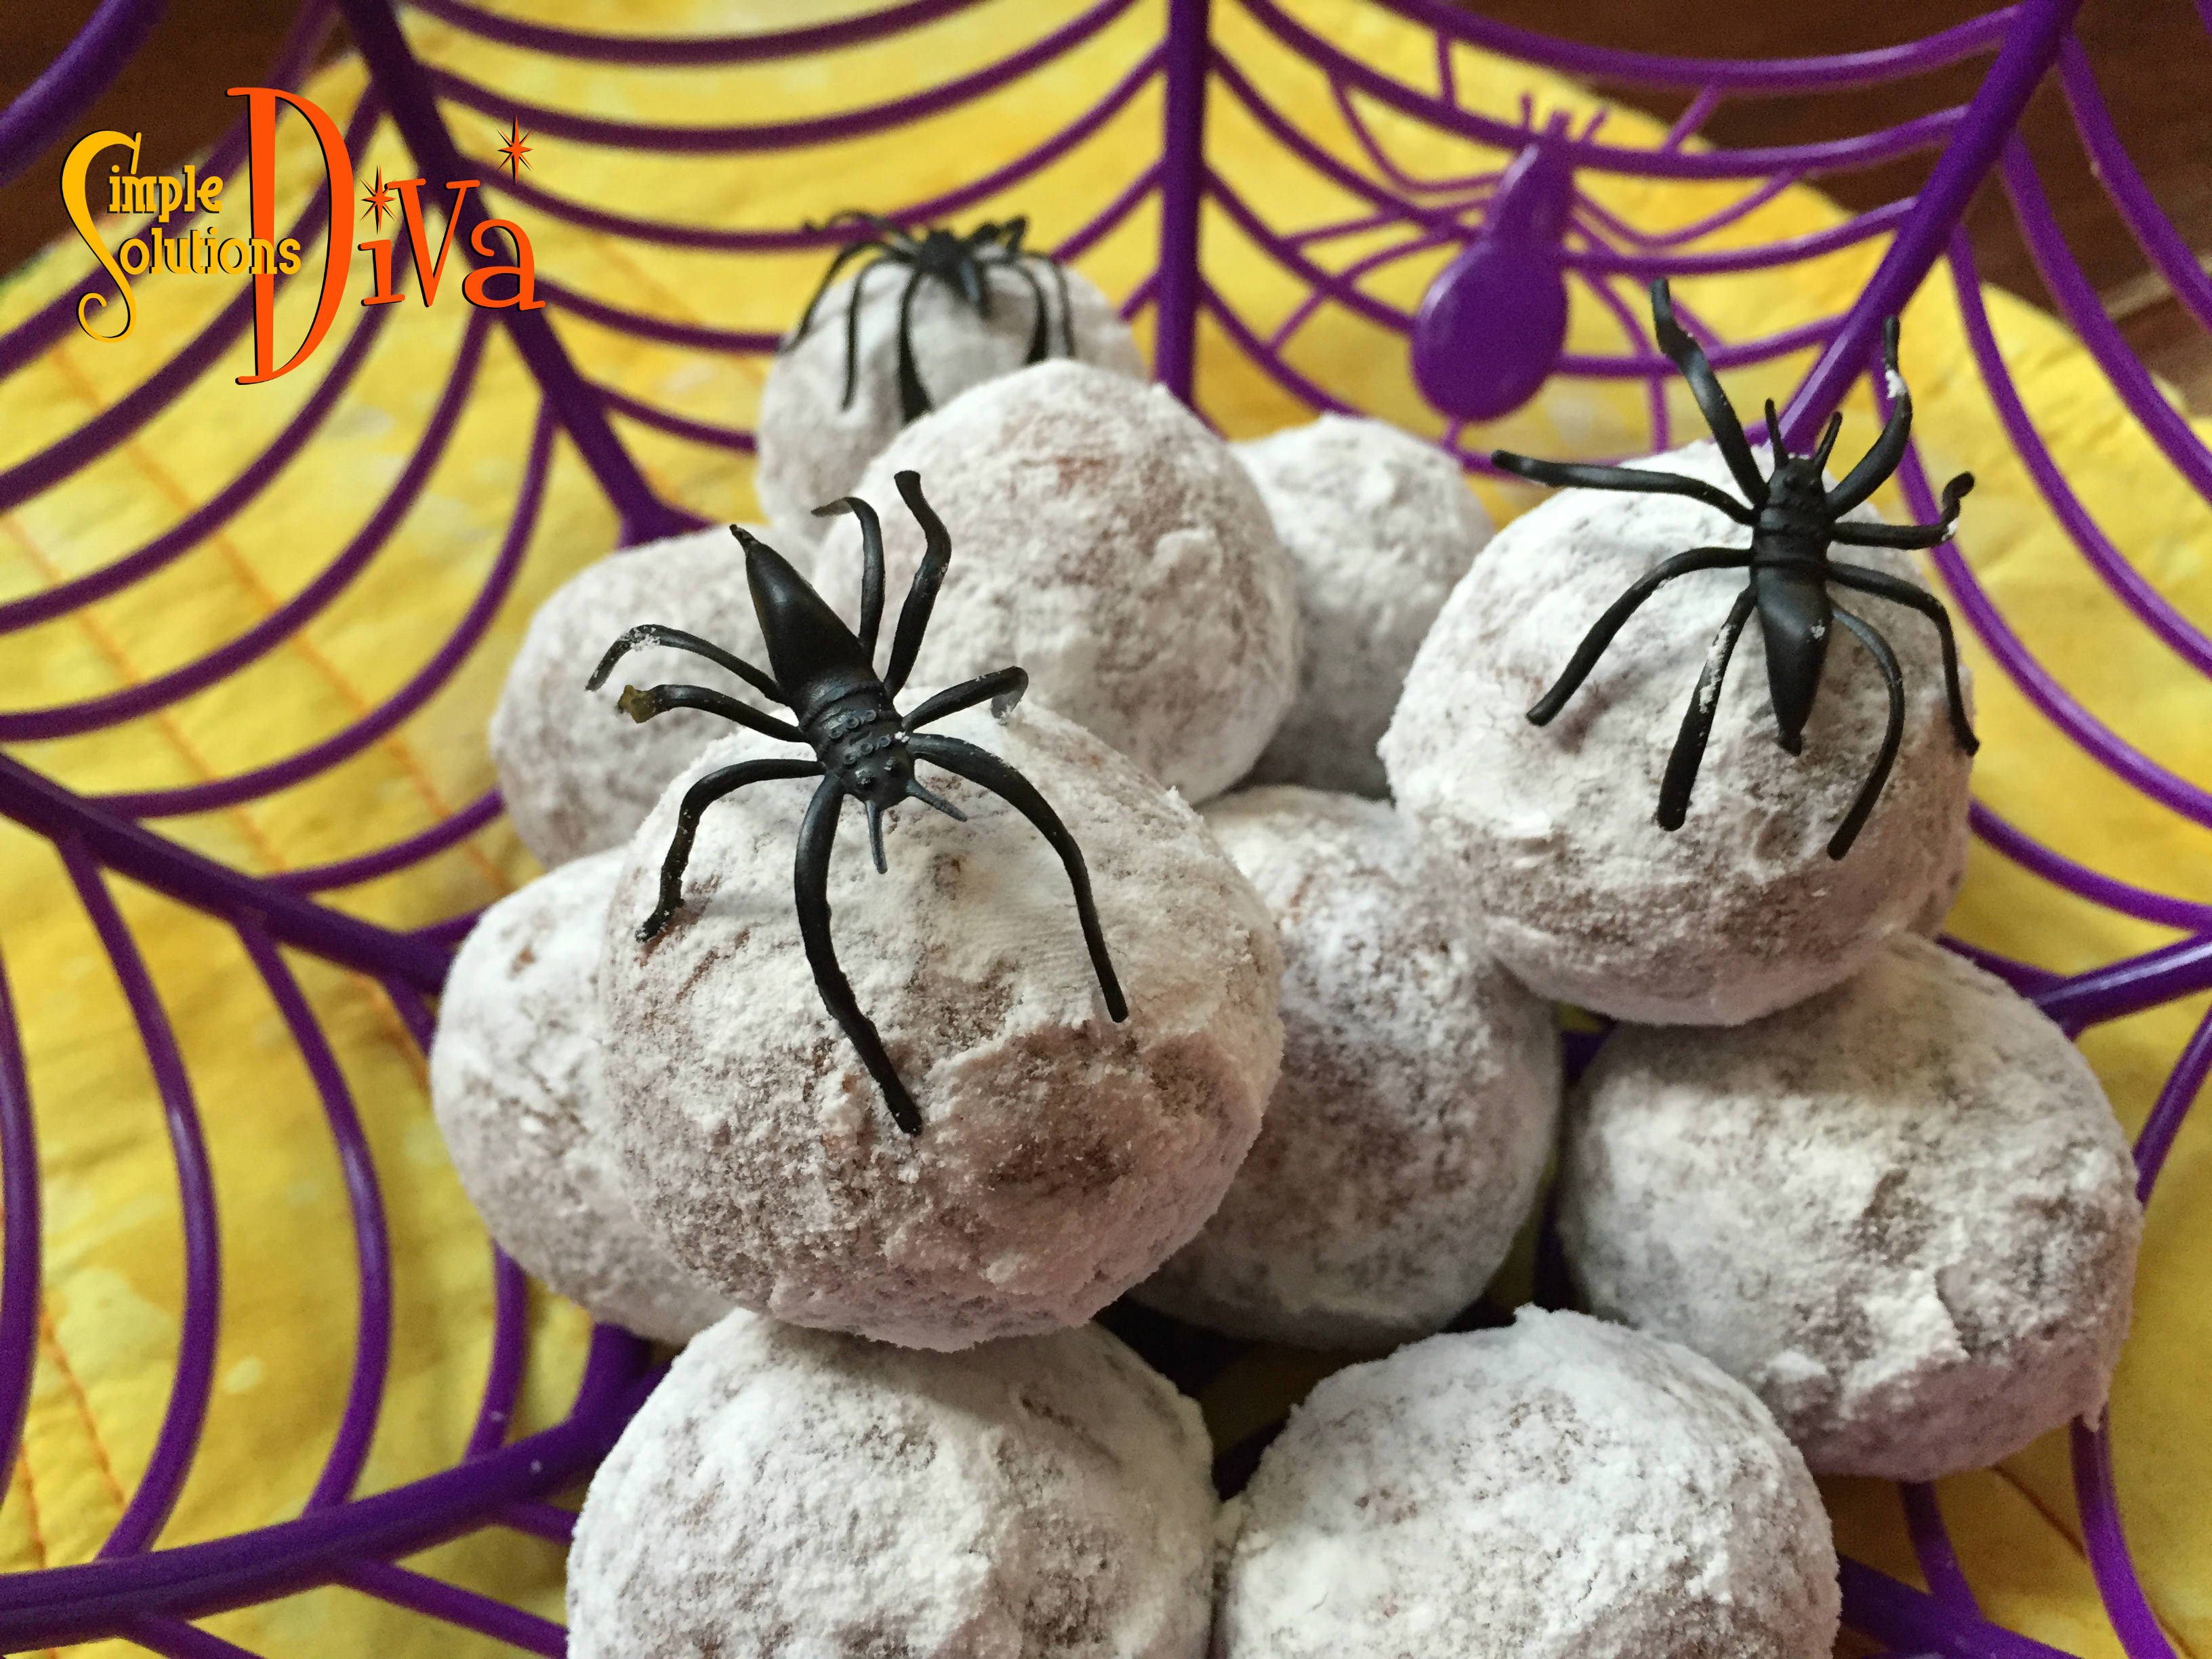
Spider Ice Cubes

spiders

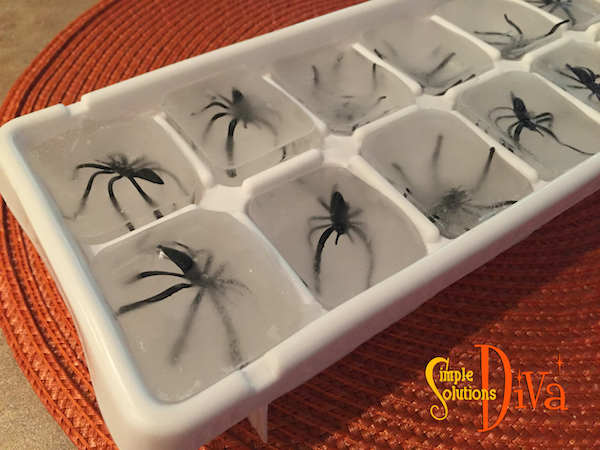
Create a surprise in your party cocktails with these creepy ice cubes! 

Instructions – Take (new) plastic spiders and wash them in soapy water, rinse and let dry. Place a spider into each space in an ice cube tray and fill with water. Freeze overnight, pop them out and use in your Halloween drinks or cocktails. (Note: If you want crystal clear ice cubes, boil the water before filling the ice cube tray.)

Carrot Finger Food – “Don’t Stick Your Fingers in The Dip” doesn’t apply here!

fingers1

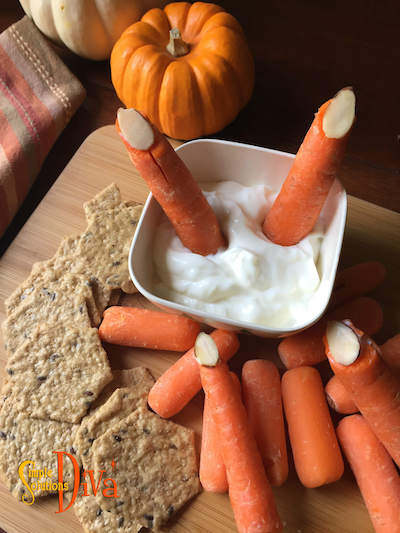
Carrots carved into fingers, complete with slivered almond nails, make the perfect “Finger Food”! You only have to create a few to make the impact. Stick a few in your favorite dip and place them in and around the other veggies you supply with the dip!

Instructions – Peel and wash the carrots. Cut the carrots into finger-sized pieces. Using a knife or a vegetable peeler, carve out a “nail bed”. Secure the almond “nail” with a dot of sour cream.

Foam Pipe Insulation “Chains” 

chains

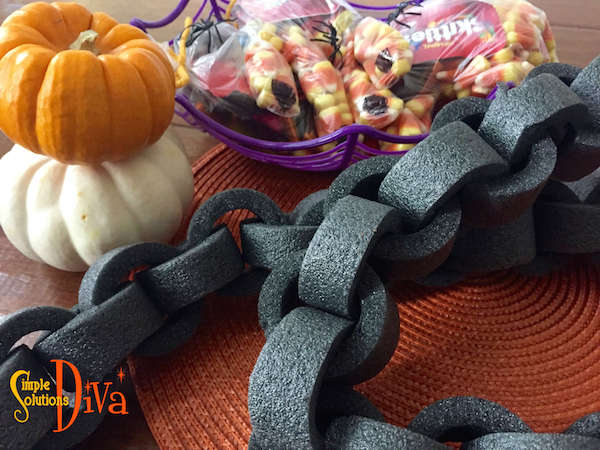
These make for some great table decor or to make your home look creepy. Simply purchase foam pipe insulation (it is dark grey). Slice the insulation into small rounds – these are the chain “links”. Attach the links together to make a chain. Hang on your stair railing, decorate your Halloween party table, or use as part of a costume! If you do decide to use them as part of a costume, you will want to secure the links closed using a hot glue gun (low temperature).

Glove Hand Treat Bag

hand

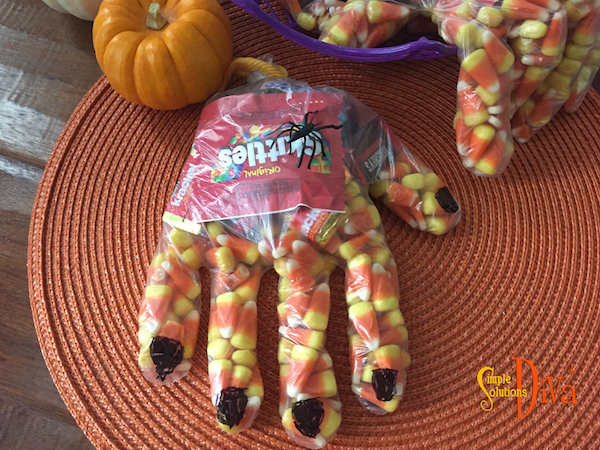
You can find plastic gloves at dollar stores or in the grocery stores. Simply fill them with favorite Halloween Candy and close and secure the bottom with string, yarn or twisty-ties.

Yarn Pumpkin

yarnpumpkin

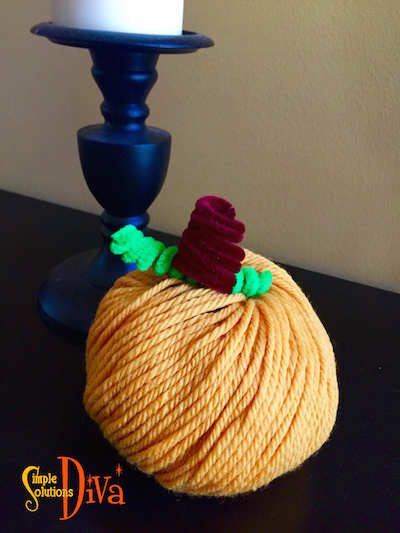
My Confession: Sometimes, my projects don’t go as planned! Originally, I was going to create a paper mache pumpkin using yarn instead of paper. But honestly, it just didn’t work! The yarn stuck to the balloon – I couldn’t deflate the balloon without ruining the “pumpkin”. As I tried to figure out what else I could do, I realized the ball of orange yarn looked exactly like a pumpkin! So I added a pipe cleaner stem and leaf and, Voila! A cute yarn pumpkin! Couldn’t have been easier!


Thank you to WTLV-TV/NBC 12 First Coast Living for inviting me on to share these ideas!

Super Easy Halloween Party Foods

It is the day before Halloween, and you get invited at the last minute for a Halloween Party. You need to bring something to share, but you want to do something easy! Try one of these simply ghoulish treats – they are tasty, easy to make, and are kind of creepy! They are so easy, the kids can even make them!

SSD Halloween Party Foods


Spider Eggs

These are the EASIEST food to bring by far! It is as simple as getting powdered donut holes, stacking them on a plate or bowl, and placing plastic spiders around and on the donut holes. (If there are little kids at the party, they need to be supervised so they don’t eat the spiders!)

SSD Spider eggs


Witch’s Broom

Another super simple, little party treat! Reese’s minis, unwrapped and placed upside down on a serving plate. Insert into what is now the top of the Reese’s (actually the bottom), insert a small pretzel stick. Easy Peasy! (Note: You may want to use a toothpick to make a small hole first – the size of the pretzel stick may crack the Reese’s – as seen below!)

SSD Witch Broom


“Blood-Splattered” Cupcakes

You can make your own, or use store-bought, white frosted cupcakes for this treat! Using red GEL food coloring (it adds a little thickness to the “blood”), squeeze into a small bowl and add a little water. Take a BRAND NEW toothbrush (use an old one? YUCK!), dip it into the red mixture, then splatter the cupcakes with it. Looks gruesome! (Be sure to not wear a white or other light colored shirt – protect your shirt while doing this!)

SSD Blood cupcake


Pumpkin Pizza

No, not pumpkin flavored pizza, just pizza decorated to look like a Jack-0-Lantern! Take any frozen, round cheese pizza and add toppings (choose your favorites) to decorate! Here is a great example from the Papa Murphy’s Restaurant website:

Pumpkin Pizza: Photo Courtesy of Papa Murphy's Restaurant.
Pumpkin Pizza: Photo Courtesy of Papa Murphy’s Restaurant.


Spider Dogs

These cute little guys are probably the most time consuming of the bunch here(it took me 10 minutes to whip up and assemble them), but they are just so cute! Preheat your oven to 400 degrees. Cover a cookie sheet with parchment paper. Start with one hot dog (one hotdog will make 4 spider dogs), slice it length-wise. Cut each length in half. See illustration below:

hot dog

Lay each quarter dog flat. Slice 3 slits on each end of the quarters (leaving about 1/2 inch or so solid in the middle. These will make the eight legs for the spiders!

Using crescent roll dough, take slices of the dough and wrap around the middle of each spider and place on the parchment paper covered cook sheet. Black sesame seeds make the eyes. Place in the oven for 8-12 minutes, until the spiders are light brown (ovens will vary so be sure to watch them!).

SSD spider dogs


Thank you to WTLV-TV’s First Coast Living for inviting me on to share these simple Halloween recipes!

No Trick! Simple Halloween Treat Recipes

Halloween is all about the Tricks or Treats – Well, I love the treats! I have some simple recipes here for Halloween that will put a smile on your goblin’s face!

Halloween Treats

Pumpkin Peeps Brownie S’mores

There’s no pumpkin or pumpkin flavoring in these – just adorable Pumpkin Peeps!

Pumpkin Peeps Brownie S'Mores from SimpleSolutionsDiva.com.
Pumpkin Peeps Brownie S’Mores from SimpleSolutionsDiva.com.

Ingredients:

  • 1 ½ Cup Graham Cracker Crumbs
  • 1 stick butter – melted
  • 2 teaspoons sugar
  • 1 box favorite brownie mix (plus ingredients instructed on box!)
  • ¾ cup chocolate chips
  • 2 boxes marshmallow Pumpkin Peeps

Directions:

Set oven to 350 degrees. Grease the bottom of an 8×8 square baking dish.

In a microwave safe bowl, melt the butter. Add to the melted butter the sugar and graham crackers. Mix thoroughly and press into bottom of pan. Bake for 10 minutes and remove from oven.

Prepare brownie mix as directed on box. Pour batter over graham crackers, and bake according to directions on box.

In last five minutes of baking, cover top of brownie with chocolate chips. Add pumpkin peeps to top of brownie and bake for another 5 minutes, until the peeps get puffy. Remove from oven and cool. Cut carefully and serve!


Yogurt Jack-O-Lanterns/Monsters

So easy!! Almost feel guilty about this one!! 😉

Yogurt Jack-O-Lanterns from SimpleSolutionsDiva.com.

What You Need:

  • 2 large (24 oz) containers favorite vanilla yogurt
  • Green and Orange food coloring
  • Chocolate cookie wafers, smashed into crumbs (my favorite part!)
  • Clear 9 oz. plastic cups
  • Black permanent marker

Directions:

Using the back permanent marker, draw a jack-o-lantern face or Frankenstein face on the outside of the plastic cup. Divide the yogurt into two bowls. Add food coloring to each bowl (green for Frankenstein; orange for pumpkin). Fill the cups with the appropriate color yogurt. Top the Frankenstein cup with crushed chocolate wafers (his hair!). You can use the chocolate wafer crumbs to draw lines on the top of the pumpkin.

Oh so cute and easy!

Pumpkin Spice Snack Mix

Chex Mix with a pumpkin spice twist!

Pumpkin Spice Snack Mix

Ingredients:

  • 2 Cups Rice Chex
  • 2 Cups Corn Chex
  • 2 Cups Cinnamon Chex
  • 1 Cup Pretzel Twists
  • ½ Cup Pumpkin Seeds (also called “pepitas”)
  • 1/4 Cup butter
  • 1/4 Cup Canned Pumpkin
  • 1/4 Cup Packed Brown Sugar
  • 1 Tablespoon Pumpkin Pie Spice
  • 2 teaspoons Vanilla Extract

Directions:

Line a cookie sheet with wax paper. Set aside.

Combine in a large, microwave-safe bowl the Chex, pretzels, and pumpkin seeds.

In a separate microwave-safe bowl, melt butter (approx. 30-60 seconds). Add to the melted butter the pumpkin, sugar, spice and microwave another minute or so until bubbly. Add vanilla and stir.

Drizzle the butter mixture over the Chex mixture, stirring gently. Microwave on high for 5 minutes, stirring every minute. Spread out on wax paper lined pan, breaking up large pieces. Allow to cool for 10 minutes. Store in air tight container. Enjoy!

Thank you to WTLV-TV’s First Coast Living for inviting me on to share these simple recipes!

Simple Halloween Games For Kids

Everyone loves a good game or activity to do with their kids – even better when it is a Halloween party! Here are a few favorites from our family! One of our children has an October birthday, so we often had a Halloween-themed party when she was little. Thanks to WTLV-TV’s First Coast Living for inviting me on to share these activities!

Toilet Paper Mummy Race

TP Mummy Race
TP Mummy Race

Break into teams of three (or four) people. One person in each group is the mummy. Using toilet paper rolls, wrap up the person head to toe to look like a mummy. The first team done wins!

Eye Of Newt Relay Race

Screenshot 2014-10-29 17.28.59
Who’s Looking At You? Eye Of Newt Relay Race!

Purchase chocolate eyeballs (or use white grapes!), enough plastic spoons for each participant. Divide the participants into teams of three people or more. Each team splits in half and separate with about 10 feet between the two groups. They face each other. Put two “eyeballs” into the starter’s plastic spoon and begin the relay race – first person runs the 10 feet to their partner, passes the eyeballs from their spoon to their partner’s (without using their hands), and then that partner runs back across the 10 feet to do the same with the next team member. If they drop an eyeball, they need to pick it up with the spoon, not their hands. First team to pass their eyeballs through all their team members wins!

Pass The Pumpkin

Pumpkin Relay Race
Pumpkin Relay Race

Divide kids into equal teams. Each team lines up so you have each team member behind the next. Give the person in front of the line a pumpkin (you want it somewhat big, but not too big for the age group!). At the count of three, first person in line passes pumpkin backwards over their head to next in line. That person then passes it through their legs to the next person – they alternate like this until the end! First line to finish wins!

Make Halloween Fun For Kids With Food Allergies

Imagine Trick or Treating on Halloween and not being able to eat anything you have in your bag! That is Halloween for the child with food allergies.  But you can make Halloween fun again for those kids with food allergies – and it is as simple as a Teal pumpkin!

The Teal Pumpkin Project

The Teal Pumpkin Project, created by the Food Allergy Research & Education Organization (FARE), was developed to encourage communities to promote food allergy awareness. The Teal Pumpkin Project encourages families to make non-food treats — like pencils, glowsticks, bracelets, or other items from the Dollar Tree — available to Trick or Treaters, in addition to their candy offerings.

By simply painting a pumpkin teal (the color of food allergy awareness), and/or using the free printable flyer that FARE offers, they can let others know about the food allergy awareness program and that they are participating.

Such a simple way to make Halloween fun (and inclusive) for everyone! See below for links to the flyers:

To Download the “We have both candy and non-food treats” flyer, click here.

To Download the “We have non-food treats” flyer, click here.

For more information on the Teal Pumpkin Project, visit http://www.FoodAllergy.org.

A great selection of non-food items for Halloween Trick or Treaters w/Food Allergies!

My neighbors, Sadie and Josie, came down to show me examples of the items they have to offer trick or treaters with food allergies.  The basket contains items like temporary tattoos, rubber snakes and bats, pencils and stickers! Good job girls!

Sadie And Josie showing off their Teal Pumpkin Project!
Sadie And Josie showing off their Teal Pumpkin!

Simple Kids Halloween Craft Ideas

Simple Halloween Craft ideas for kids are the best! I especially enjoy making things that are not expensive – utilizing items from around the home! Thanks to WTLV-TV’s First Coast Living for inviting me on to share these Halloween ideas!

Spider Pops

Halloween Spider Pops from SimpleSolutionsDiva.com.

Got Black pipe cleaners, Tootsie Roll lollipops, little wiggly eyes, and glue? Then you have the makings of spider pops! These are super simple and the kids don’t need much help. Take your Tootsie Pop, and wrap 4 black pipe cleaners around the stick near the base of the lollipop. It will now look like the spider has 8 legs – bend each leg to look realistic. Glue on a pair of wiggly eyes and there you have it – Spider Pop!


TP Mummy Roll

Halloween Toilet Paper Tube Mummies from SimpleSolutionsDiva.com.

Something about these little guys makes me grin – maybe it is their wiggly eyes!  Simply take an empty toilet paper tube, draw a black rectangle near one end.  Using strips of paper towels (1/2 inch wide strips work well), wrap the tube up like a mummy, gluing as you go and leaving an opening so the black is exposed. Next, taker a pair of wiggly eyes and glue them in place.


Paper Plate Monsters

Halloween Paper Plate Monsters from SimpleSolutionsDiva.com.


A white paper plate, glue and construction paper shapes, plus candy corn, will make this craft go “Boo”! I cut out several different body styles for monsters – each in a different color construction paper. I cut out black mouths, white eye balls in different shapes. I glued the bodies on different plates, glued the black mouths on, then I had the kids pick their favorite eyeballs (I drew different irises on each eyeball!) and design their monsters.  I offered candy corn as teeth, which were glued in place! The kids drew the arms and legs of their creature! Kind of creepy/cute aren’t they?!

Halloween Paper Plate Monsters from SimpleSolutionsDiva.com.

Easy Halloween Party Decorations

I love finding ways to add a spooky fun Halloween motif without spending too much money! These little tips are cost effective and fun to make! Thank you to WTLV-TV’s First Coast Living for inviting me on to share these ideas!

SSD Halloween Candles 2Ghoulish Bleeding Candles

These are simple and you can use items you already have at home! Click here for the video and instructions.

Boo pumpkin


Crafty Halloween Pumpkin

For something a little less ghoulish and a little more sparkly, try this simple craft idea! I used an artificial pumpkin, Halloween ribbon, and sparkly purple sequins to create a Blinged-Out Pumpkin! I used a marker to write out my word of choice (you can choose any frightening word you want.), used a hot glue gun to attach the sequins, then topped it with the bow! (you can use craft glue, instead)


Flying Bats photo and idea from DanaMadeIt.com.

Flying Bats!

Something about the sight of a colony of bats just gives me chills! This idea from DanaMadeIt.com does the trick! It is as simple as cutting out of black card stock a lot of different sized bats and sticking them to the wall with double-sided tape! Easy Peasy! You can also set them up outside, just use duct tape – it will hold better outside!

Happy Halloween!

Simple Halloween Costumes For Kids, Under $10


Screenshot 2014-10-18 10.32.58Halloween is coming and the kids all want costumes, right?  But who has the money to buy expensive ones that will be worn once? Well, I found the solution!  My friends at Dollar Tree asked me to create some fun and inexpensive Halloween costumes using items from their stores! Best thing about it? Everything is a $1 at Dollar Tree, so you and I leave happy because we didn’t have to break the bank this year!

How To Get Creative Ideas

Before you head to Dollar Tree, I recommend you browse Pinterest for Halloween costume ideas for kids (here is a link to some great costumes). This really helps you get your creative juices flowing. When you get to Dollar Tree, you can see what is available in your store and then apply it to some of the Pinterest Ideas.

My Costume Ideas


Dollar Tree Cowgirl by SimpleSolutionsDiva.com.
Dollar Tree Cowgirl by SimpleSolutionsDiva.com. Total Cost: $5

Cowgirl: Cowgirls have style, too! I’ve used a shirt, leggings and pink bandana our adorable model already had. I added items from Dollar Tree – Pink Cowboy hat, cowboy vest (black and white), Pink Tutu (I’m using two so it is fluffy!), black and white houndstooth bow w/pink trim (for cowboy hat). Total Cost: $5


Dollar Tree Military Man by SimpleSolutionsDiva.com
Dollar Tree Military Man by SimpleSolutionsDiva.com. Total Cost: $4

Military Man:  For our Mighty Military Man, I paired a long sleeve black T-Shirt with these items from Dollar Tree – Camo helmet, camo vest, military action play set, walkie talkie. Total Cost: $4


Dollar Tree Knight by SimpleSolutionsDiva.com. Total Cost: $5

Knight: I had so much fun creating this costume! I used a long sleeve, black T-Shirt, then added from Dollar Tree – Knight Chest Plate, knight shield, knight gloves, sword, black ninja hood with red trim removed, Creepy Cloth. Total Cost: $6


Dollar Tree Flower Pot Costume by SimpleSolutionsDiva.com. Total Cost: $9

Flower Pot:  This sweet little costume blossomed when put on our adorable model! She brought the white shirt and green leggings from home, and I added from Dollar Tree – Blue beverage tub with handles (bottom cut out), red and yellow silk flower stems (6 total duct-taped to the inside of the tub), green grosgrain ribbon for suspenders(also duct-taped to inside of tub), orange sparkle headband with 2 of the flowers hot-glued on it. Total Cost: $9

Don’t Forget Halloween Accessories, Too!

Dollar Tree has a very wide assortment of glow sticks, bracelets, wands and other glowing accessories that are not only fun and fashionable but will keep your family safe this Halloween season. Plus, they have some great looking candy pails, including my favorite – the Glow in The Dark Pumpkin Pail! All for a Dollar!

Additional Costume Ideas


Dollar Tree "Elsa" Costume by SimpleSolutionsDiva.com. Total Cost: $4
Dollar Tree “Elsa” Costume by SimpleSolutionsDiva.com. Total Cost: $4


Improvised Elsa Costume: The hottest little girls costume this year is Elsa, from Disney’s Frozen. While I was at Dollar Tree, I found the perfect pieces to create the must-have costume of the year!  Pair this little costume with a white, long-sleeved leotard and tights (or  long-sleeved white T-shirt, shorts and tights)! Dollar Tree Items used – 2 blue tutus, one package snowflake forms (glued on with hot glue gun), one blonde “hair extensions” headband (braided). Total Cost: $4

For More Information

Check out a Dollar Tree store near you and you will be even more amazed at what one dollar can buy. Dollar Tree is my Halloween headquarters – a one-stop shop for affordable spook-tacular decorations and costume accessories. Happy Haunting, I mean, Hunting!

To shop for more products for Halloween or the upcoming Holidays, visit your local Dollar Tree store or visit DollarTree.com.  For terrific project ideas (with details on the products used to make them!), visit their project website at  ILeaveHappy.com!

Thank you to Dollar Tree for sponsoring this project, and to WTLV-TV’s First Coast Living for bringing us on to model the costumes! And a BIG thank you to our wonderful child models!

DT Costumes 2

Simple Halloween Decoration: Ghoulish Candles

What I loved about this project is I used items I had hanging around the house, so there was no expense involved in the project!


There’s just something about the romance of “bleeding” candles really screams Halloween!


SSD Halloween Candles 4
Ghoulish Halloween Candles from SimpleSolutionsDiva.com


What You Need:

  • White candle of choice – I used used pillar candles that I was about to get rid of, but you can use brand new candles as well.
  • Red candle – Make sure the candle you use is NOT a dripless candle! I used red tea lights I had hanging around (I had a bunch left over from Christmas).

Directions:

Place white candle in or on candle holder of choice. Light the red candle, and very gently drip the hot wax down the sides of the white candle until it looks ghoulish enough to your liking!  That is it!

So simple, yet so creepy!

SSD Halloween Candles 2
Bleeding, Ghoulish Halloween Candles from SImpleSolutionsDiva.com.

Note/Disclaimer:

  • As with any project that involves a flame, keep lit candles in a safe place, away from potential fire hazards.
  • Do not leave home with candles lit – you don’t want to come back from trick or treating and find your house in flames!
  • Supervise children if they are doing this project. Hot wax and flames can be harmful to children, their clothes, their hair and eyebrows! (Take it from someone who lost an eyebrow as a kid!)


1 2

© 2015 SIMPLESOLUTIONSDIVA.COM Designed by The Web Design Chic | ADMIN LOGIN