SimpleSolutionsDiva.com

DIY

Simple DIY Projects For Our Feathered Friends

SSD Bird Projects

Spring is here and the birds are all aflutter! How about trying a few small DIY projects that are for the birds, literally! With a little creativity and a little elbow grease, you can make some adorable (AND Simple!) projects that will have all the birds tweeting! Best of all, these projects are perfect for the kids to make – with a little adult help!
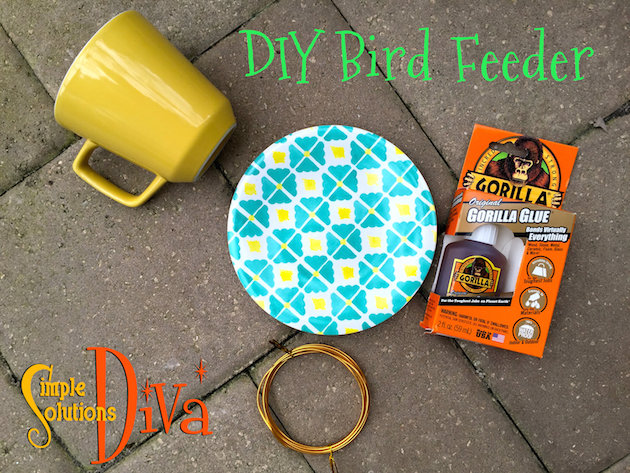
DIY Bird Feeder

SSD Bird Feeder 2This simple feeder can be made with any teacup and saucer!

What You Need:

  • Teacup & Saucer (I used a mug small enough to fit on saucer)
  • Gorilla Glue (or other waterproof adhesive that works with ceramics)
  • Copper Floral Wire (optional)
  • Bird Seed
All you need for this little project!

Directions:

Clean and remove all stickers from the teacup and saucer. Dry thoroughly.

With a spray bottle or damp cloth, moisten the saucer. Using the Gorilla Glue, draw a thin line of glue on the side of the teacup opposite of the handle. Place the teacup, glue side down, on the saucer. Hold in place for two hours. (I used a small hand weight to keep constant pressure and to keep teacup in place.) NOTE: These instructions are specific to using Gorilla Glue as your adhesive. If using something other than Gorilla Glue, follow the directions for that product.

You can use the handle of the cup as a hook, or you can create an extended hanger by using copper floral wire (optional). Use the Gorilla Glue to secure the wire in place on the cup handle.

Add birdseed and hang in location where you can enjoy watching the birds visit!

DIY Birdhouse

SSD Birdhouse 2
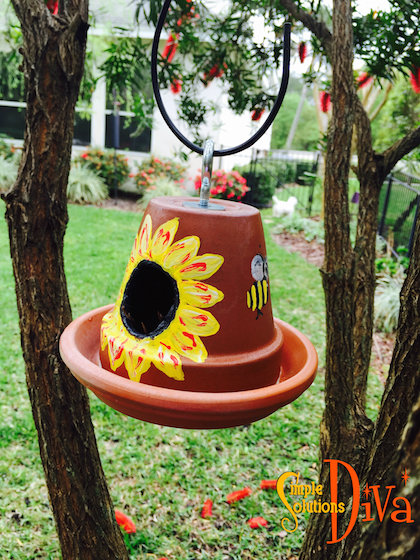
A little clay pot, a clay saucer, a hole cutter drill bit and you’ve got one cute Birdhouse! This project requires the use of power tools (a drill), so gather your materials before beginning the project!

What You Need:

  • Clay Pot – I had several on hand in case I broke one while drilling (which I did!).
  • Clay Saucer that is a bit larger than the top of clay pot.
  • Electric Drill
  • Hole Cutter Drill Bit, or progressively larger series of drill bits. I used an adjustable hole saw by Skil – Click link to find a Skil Adjustable Dial Saw
  • Sandpaper
  • Protective Eyewear
  • Gorilla Glue
  • Eye Bolt & Nut
  • Two Fender Washers
  • Clear, Protective Coating Spray Paint (I used Krylon Fusion, Clear UV Protection)
  • Acrylic paints, small paintbrushes (optional)
Everything you need to build a simple little birdhouse!

Directions:

Remove all labels from pots and saucers. Soak the pots in water for approximately 5-10 minutes. This will soften the clay and will lessen the likelihood of the pot breaking into shards. (Keep a bucket of water handy while drilling – you may need to dunk the pot in the water occasionally to keep things damp.)

On a safe, flat work surface, using something to secure the pot in place on the work surface, use the drill and hole cutter drill bit to cut the hole in the pot. Be sure to use protective eyewear! Size of hole will depend on the size of the pot. I cut a hole about 1.5 inches in diameter. I also used sand paper to smooth out the edges of the hole.

Turn the pot upside down on a clean, flat work surface. Feed one washer onto the eyebolt, then feed eyebolt through bottom of the pot. Turn pot right side up, feed second washer onto eyebolt. Add the nut and secure the eyebolt to the pot.

Using the Gorilla Glue, and following the directions on the label, glue the saucer to the top of the pot. Allow 2 hours to affix completely.

If desired, paint the birdhouse with acrylic paints. Spray clear, protective coasting spray over entire birdhouse. Hang in a tree and enjoy the new visitors!


Laundry Tips: Is Your Dryer Too Slow?

Dryer Too Slow

Is your dryer slow to dry? Try these simple tips to get clothes dryer, faster: (Note-These are not meant to replace good maintenance of your dryer by a professional!)

Lint Trap Issue #1– Check the lint trap. Between every use, you should remove the lint that is trapped there, but there may be some lint still caught down inside. Use a lint trap brush to get in there and remove all that gross lint!

Lint Trap Issue #2 – This is something I did not know about until recently, but if you use dryer sheets when drying clothes, they can deposit a substance on your lint trap that will make it more difficult to filter the lint, making your dryer work harder. Just scrub that lint trap with warm soapy water and a scrub brush, rinse thoroughly, and allow to dry before placing it back in the dryer.

Lint Trap Issue #3 – Check the vent that leads from the lint trap to the outside – the air is pushed outside and some of that lint can be carried through, or there may be something blocking it from venting properly. Check the outside while the dryer is running; see if anything is hanging out of vent, if sufficient air flow is coming out. If there is no airflow, and you can’t remove it with your hands, you can try using a shop vac to suck out the blockage. You may need to call a professional to service the dryer and the vent outside.

Throw the Towel In (Literally!) – Finally, if you just have an old dryer like I have, the element that heats just may not be doing as good of a job anymore! So toss a clean, dry towel in with your wet load of clothes. It will help speed up the drying process!

Thanks to WTLV-TV’s First Coast Living for inviting me on to share these simple laundry tips!

Simple Halloween Games For Kids

Everyone loves a good game or activity to do with their kids – even better when it is a Halloween party! Here are a few favorites from our family! One of our children has an October birthday, so we often had a Halloween-themed party when she was little. Thanks to WTLV-TV’s First Coast Living for inviting me on to share these activities!

Toilet Paper Mummy Race

TP Mummy Race
TP Mummy Race

Break into teams of three (or four) people. One person in each group is the mummy. Using toilet paper rolls, wrap up the person head to toe to look like a mummy. The first team done wins!

Eye Of Newt Relay Race

Screenshot 2014-10-29 17.28.59
Who’s Looking At You? Eye Of Newt Relay Race!

Purchase chocolate eyeballs (or use white grapes!), enough plastic spoons for each participant. Divide the participants into teams of three people or more. Each team splits in half and separate with about 10 feet between the two groups. They face each other. Put two “eyeballs” into the starter’s plastic spoon and begin the relay race – first person runs the 10 feet to their partner, passes the eyeballs from their spoon to their partner’s (without using their hands), and then that partner runs back across the 10 feet to do the same with the next team member. If they drop an eyeball, they need to pick it up with the spoon, not their hands. First team to pass their eyeballs through all their team members wins!

Pass The Pumpkin

Pumpkin Relay Race
Pumpkin Relay Race

Divide kids into equal teams. Each team lines up so you have each team member behind the next. Give the person in front of the line a pumpkin (you want it somewhat big, but not too big for the age group!). At the count of three, first person in line passes pumpkin backwards over their head to next in line. That person then passes it through their legs to the next person – they alternate like this until the end! First line to finish wins!

Simple Kids Halloween Craft Ideas

Simple Halloween Craft ideas for kids are the best! I especially enjoy making things that are not expensive – utilizing items from around the home! Thanks to WTLV-TV’s First Coast Living for inviting me on to share these Halloween ideas!

Spider Pops

Halloween Spider Pops from SimpleSolutionsDiva.com.

Got Black pipe cleaners, Tootsie Roll lollipops, little wiggly eyes, and glue? Then you have the makings of spider pops! These are super simple and the kids don’t need much help. Take your Tootsie Pop, and wrap 4 black pipe cleaners around the stick near the base of the lollipop. It will now look like the spider has 8 legs – bend each leg to look realistic. Glue on a pair of wiggly eyes and there you have it – Spider Pop!


TP Mummy Roll

Halloween Toilet Paper Tube Mummies from SimpleSolutionsDiva.com.

Something about these little guys makes me grin – maybe it is their wiggly eyes!  Simply take an empty toilet paper tube, draw a black rectangle near one end.  Using strips of paper towels (1/2 inch wide strips work well), wrap the tube up like a mummy, gluing as you go and leaving an opening so the black is exposed. Next, taker a pair of wiggly eyes and glue them in place.


Paper Plate Monsters

Halloween Paper Plate Monsters from SimpleSolutionsDiva.com.


A white paper plate, glue and construction paper shapes, plus candy corn, will make this craft go “Boo”! I cut out several different body styles for monsters – each in a different color construction paper. I cut out black mouths, white eye balls in different shapes. I glued the bodies on different plates, glued the black mouths on, then I had the kids pick their favorite eyeballs (I drew different irises on each eyeball!) and design their monsters.  I offered candy corn as teeth, which were glued in place! The kids drew the arms and legs of their creature! Kind of creepy/cute aren’t they?!

Halloween Paper Plate Monsters from SimpleSolutionsDiva.com.

Simple Project: Make Your Own Chalkboard Sign

This is such a simple little project! You can make this using the following supplies:

  • Chalkboard Paint (purchase at any craft supply stores or many hardware stores)
  • Small paint brush (I recommend using one with bristles, not a sponge applicator, just to have a smooth finish)
  • A dish or plate (I used one from the dollar store!)

Depending on how large the plate is, you can use it to serve and identify appetizers (like a cheese plate), use it to list the dinner menu, use it as an ever-changing welcome sign, a humorous sign for family, and so much more!

SSD DIY Chalkboard

Simple Ways To Bring The Garden Indoors

Right about this time of year (late January), I start imagining all the things I want to do in my garden. Lush plantings, beautiful and colorful flowers, clever statues or topiaries. Now mind you, most of those things never actually happen, but a girl can dream, right?!

So to satisfy my need for soil under my nails, I’m featuring a few, simple ways to bring the garden indoors, even in winter!

For The Cook: An Indoor Herb Garden


Herb Planter

If you love to cook with fresh herbs and you have a room that has enough bright light, you can have a mini garden at your fingertips.  I selected some healthy looking herbs that I use when cooking (oregano, peppermint and thyme), planted them in a beautiful pot, and added cute plant markers I made from leftover wine corks and long wooden skewers.

Herb Planter 2

A decorative and useful planting that has a touch of whimsy!

For The Brown Thumb Gardener:  A Colorful Cactus Garden


cactus

Cactus  are easy, don’t require much, and if you choose the right ones, they can be very colorful!  The key is to have a soil that supports the cactus’ needs – Think sandy! I mix together potting soil and simple play sand from the hardware store. Add a base layer at the bottom of the pot of pea stone to allow for good drainage.  Once I have the stone, soil and cactus in place, I add a top layer of decorative stone (I used polished, black river rocks) to make it attractive and to help keep the soil in place.  A little bit of water goes a long way to keep the cactus alive. A good, sunny spot in the house will help keep the cactus happy and healthy.

Bulb Happy!


paperwhites1

A burst of Spring in the middle of Winter – I love using fast growing bulbs and setting them up in shallow glass containers with river rocks and water. They grow so quickly and it is wonderfully satisfying to see them change from brown, ugly bulbs to fragrant, flowering plants in a matter of weeks! Paper Whites or Narcissus are terrific, and you can chose decorative stones to enhance the color of your flowers.  Keep an eye on the water level – you want it to just touch the very bottom of your bulbs. It is also a fun project to do with kids – they can see the roots of the plants growing daily. A suggestion: Be sure to rotate your container so the plants don’t grow sideways.

Create A Simple Seed Starter Kit


Seed Starter Kit

All you need is a sunny window, potting soil, an old ice cube tray or empty egg carton, and your selection of seeds. Fill the ice cube tray’s reservoirs with potting soil, plant your seeds to the proper depth according to the back of the seed packet, water and place in a sunny window! Monitor the water, and you should see your plants growing within a week or two (depending on the types of seeds you selected). Another great project to do with the kids – select some veggie seeds and get your kids interested in growing their own veggies (if they grow them, they may eat them!).

Encourage Stealth Gardening With Seed Bombs

Image 3

A great project to do with your kids! As I walk along the public sidewalks in my home town, I’m always impressed when I see wildflowers growing where nothing else grows. They are a beautiful pop of color. Try helping nature along by making your own Seed Bombs! In the Spring, you can do a little stealth gardening with the kids – plant or throw your seed bombs into open or bare areas around your neighborhood or town! The newspaper cocoon gives the seeds a medium in which to start growing, and once wildflowers get growing, WATCH OUT! Flowers everywhere!

IMG_4842You need:

  • 4 Sheets of Newspaper, shredded into small pieces
  • A tall glass container (you will be mixing in this)
  • Warm Water (approximately 1 cup)
  • An Immersion Blender
  • Cheese cloth (or you can use an old, thin rag)
  • A selection of wildflower seeds or other hearty flower seeds (if in doubt, ask your garden center for recommendations).
  • Ice cube tray or other molds (I used ice cube tray and I experimented with small, decorative cookie cutters that worked out well)


IMG_4846Place shredded newspaper into the tall glass container and add warm water until the newspaper is covered. Using immersion blender, blend until the paper is completely shredded.


IMG_4853Add seeds and mix using hands so seeds are dispersed through the mixture. place cheese cloth into a strainer and pour mixture into the cheese cloth. wrap the cloth around the mixture and squeeze out as much moisture as you can.


IMG_4856 Take small balls of the mixture and press into the trays (or molds). Let dry overnight. Remove the seed bombs from the tray and let them continue to dry until there is no moisture left. (I actually had them sit on my dryer while a load was drying!)


Now you have a bunch of seed bombs you can use to share with the community!


Thank you to WTLV-TV for inviting me on to First Coast Living to speak on this topic!


1 2 3 4 5

© 2015 SIMPLESOLUTIONSDIVA.COM Designed by The Web Design Chic | ADMIN LOGIN