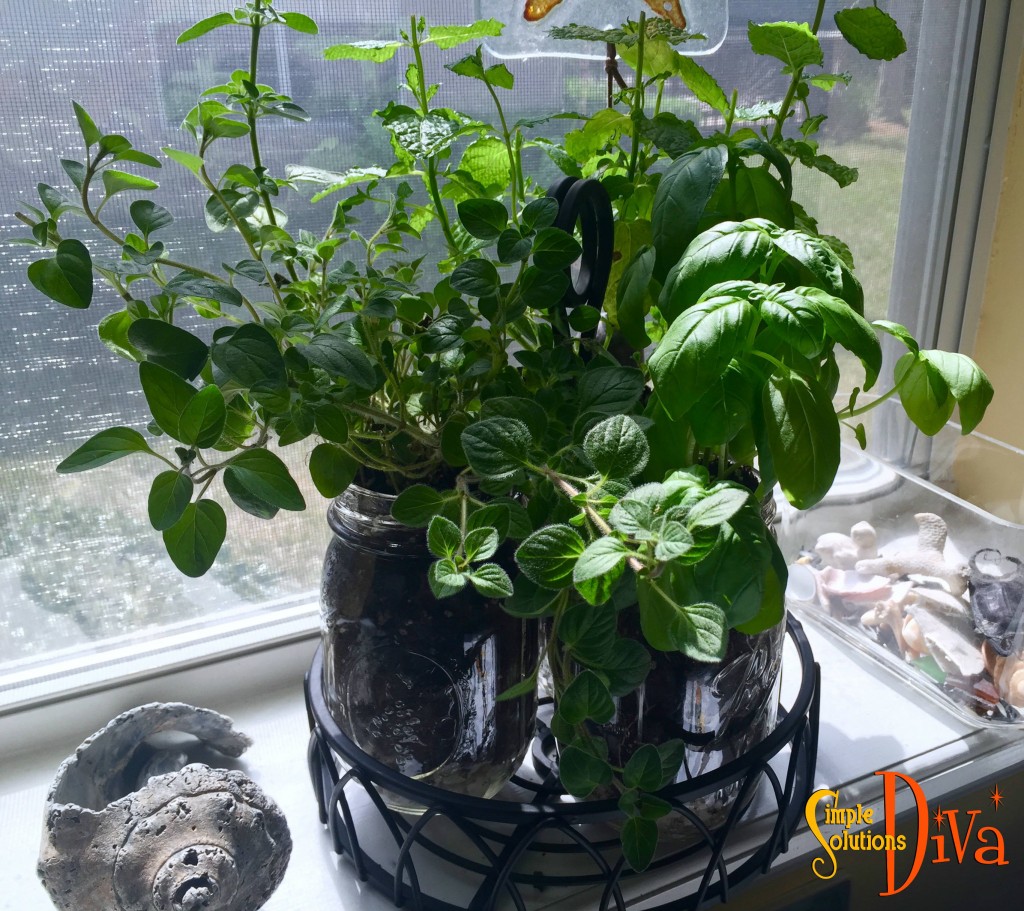
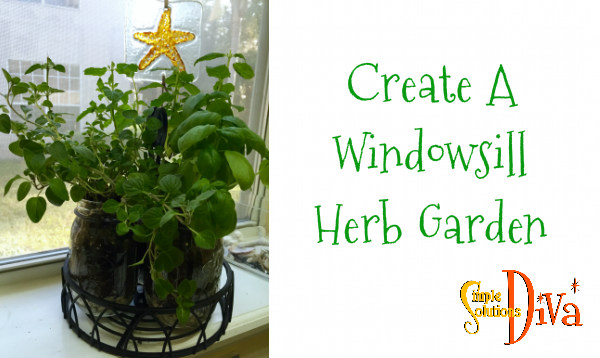
I love to cook with fresh herbs, and this little windowsill herb garden features my favorites I use all the time! The plant holder is something (an iron condiment holder!) I picked up on sale at Tuesday Morning. You could also use a square, wire napkin holder as well! Check out dollar stores near you to find an inexpensive one!
i suggest you use moisture control potting soil (I used Miracle Grow Moisture Control). It helps keep the plant from being over-watered or under-watered!
I wish I had this simple little tip when I first started gardening! I was so enthusiastic, I went and bought lots of plants, planted them, then promptly forgot what each plant was! So when Spring came the next year, I had no idea what worked in my garden and what didn’t!
Simple Solutions Diva will be at the Jacksonville Home + Patio Show on Thursday, March 3 at 1:30 pm!You can find her on the Jacksonville Magazine Cooking Stage, cooking up one of her simple recipes!
Get your Home + Patio Show tickets online (vs. box office) and save $2 per ticket ($9 VS $11) Click HERE!
Spring is here and it is time to get in and prune out those dead leaves and branches from plants and shrubs. But look closely at them – there might be fungus or other disease on the plants that could be transmitted to healthy plants just by using your garden tools! Check out today’s video to see how to disinfect your garden tools!
Spring is here and the birds are all aflutter! How about trying a few small DIY projects that are for the birds, literally! With a little creativity and a little elbow grease, you can make some adorable (AND Simple!) projects that will have all the birds tweeting! Best of all, these projects are perfect for the kids to make – with a little adult help!
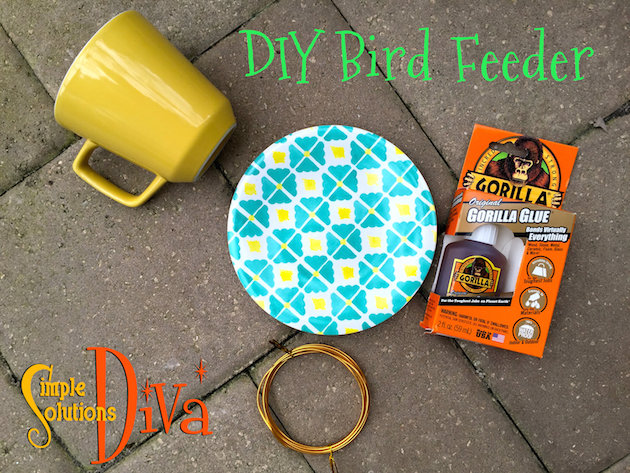
DIY Bird Feeder
This simple feeder can be made with any teacup and saucer!
What You Need:
Teacup & Saucer (I used a mug small enough to fit on saucer)
Gorilla Glue (or other waterproof adhesive that works with ceramics)
Copper Floral Wire (optional)
Bird Seed
All you need for this little project!
Directions:
Clean and remove all stickers from the teacup and saucer. Dry thoroughly.
With a spray bottle or damp cloth, moisten the saucer. Using the Gorilla Glue, draw a thin line of glue on the side of the teacup opposite of the handle. Place the teacup, glue side down, on the saucer. Hold in place for two hours. (I used a small hand weight to keep constant pressure and to keep teacup in place.) NOTE: These instructions are specific to using Gorilla Glue as your adhesive. If using something other than Gorilla Glue, follow the directions for that product.
You can use the handle of the cup as a hook, or you can create an extended hanger by using copper floral wire (optional). Use the Gorilla Glue to secure the wire in place on the cup handle.
Add birdseed and hang in location where you can enjoy watching the birds visit!
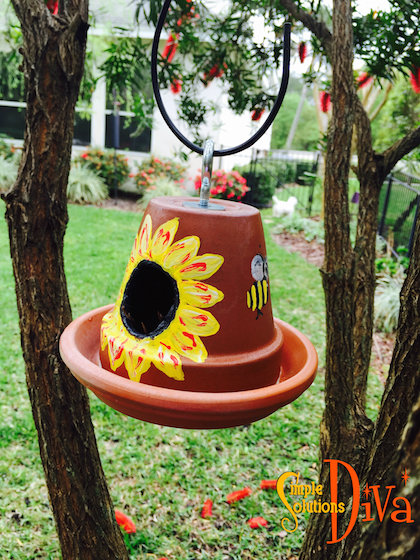
DIY Birdhouse
A little clay pot, a clay saucer, a hole cutter drill bit and you’ve got one cute Birdhouse! This project requires the use of power tools (a drill), so gather your materials before beginning the project!
What You Need:
Clay Pot – I had several on hand in case I broke one while drilling (which I did!).
Clay Saucer that is a bit larger than the top of clay pot.
Electric Drill
Hole Cutter Drill Bit, or progressively larger series of drill bits. I used an adjustable hole saw by Skil – Click link to find a Skil Adjustable Dial Saw
Sandpaper
Protective Eyewear
Gorilla Glue
Eye Bolt & Nut
Two Fender Washers
Clear, Protective Coating Spray Paint (I used Krylon Fusion, Clear UV Protection)
Acrylic paints, small paintbrushes (optional)
Everything you need to build a simple little birdhouse!
Directions:
Remove all labels from pots and saucers. Soak the pots in water for approximately 5-10 minutes. This will soften the clay and will lessen the likelihood of the pot breaking into shards. (Keep a bucket of water handy while drilling – you may need to dunk the pot in the water occasionally to keep things damp.)
On a safe, flat work surface, using something to secure the pot in place on the work surface, use the drill and hole cutter drill bit to cut the hole in the pot. Be sure to use protective eyewear! Size of hole will depend on the size of the pot. I cut a hole about 1.5 inches in diameter. I also used sand paper to smooth out the edges of the hole.
Turn the pot upside down on a clean, flat work surface. Feed one washer onto the eyebolt, then feed eyebolt through bottom of the pot. Turn pot right side up, feed second washer onto eyebolt. Add the nut and secure the eyebolt to the pot.
Using the Gorilla Glue, and following the directions on the label, glue the saucer to the top of the pot. Allow 2 hours to affix completely.
If desired, paint the birdhouse with acrylic paints. Spray clear, protective coasting spray over entire birdhouse. Hang in a tree and enjoy the new visitors!
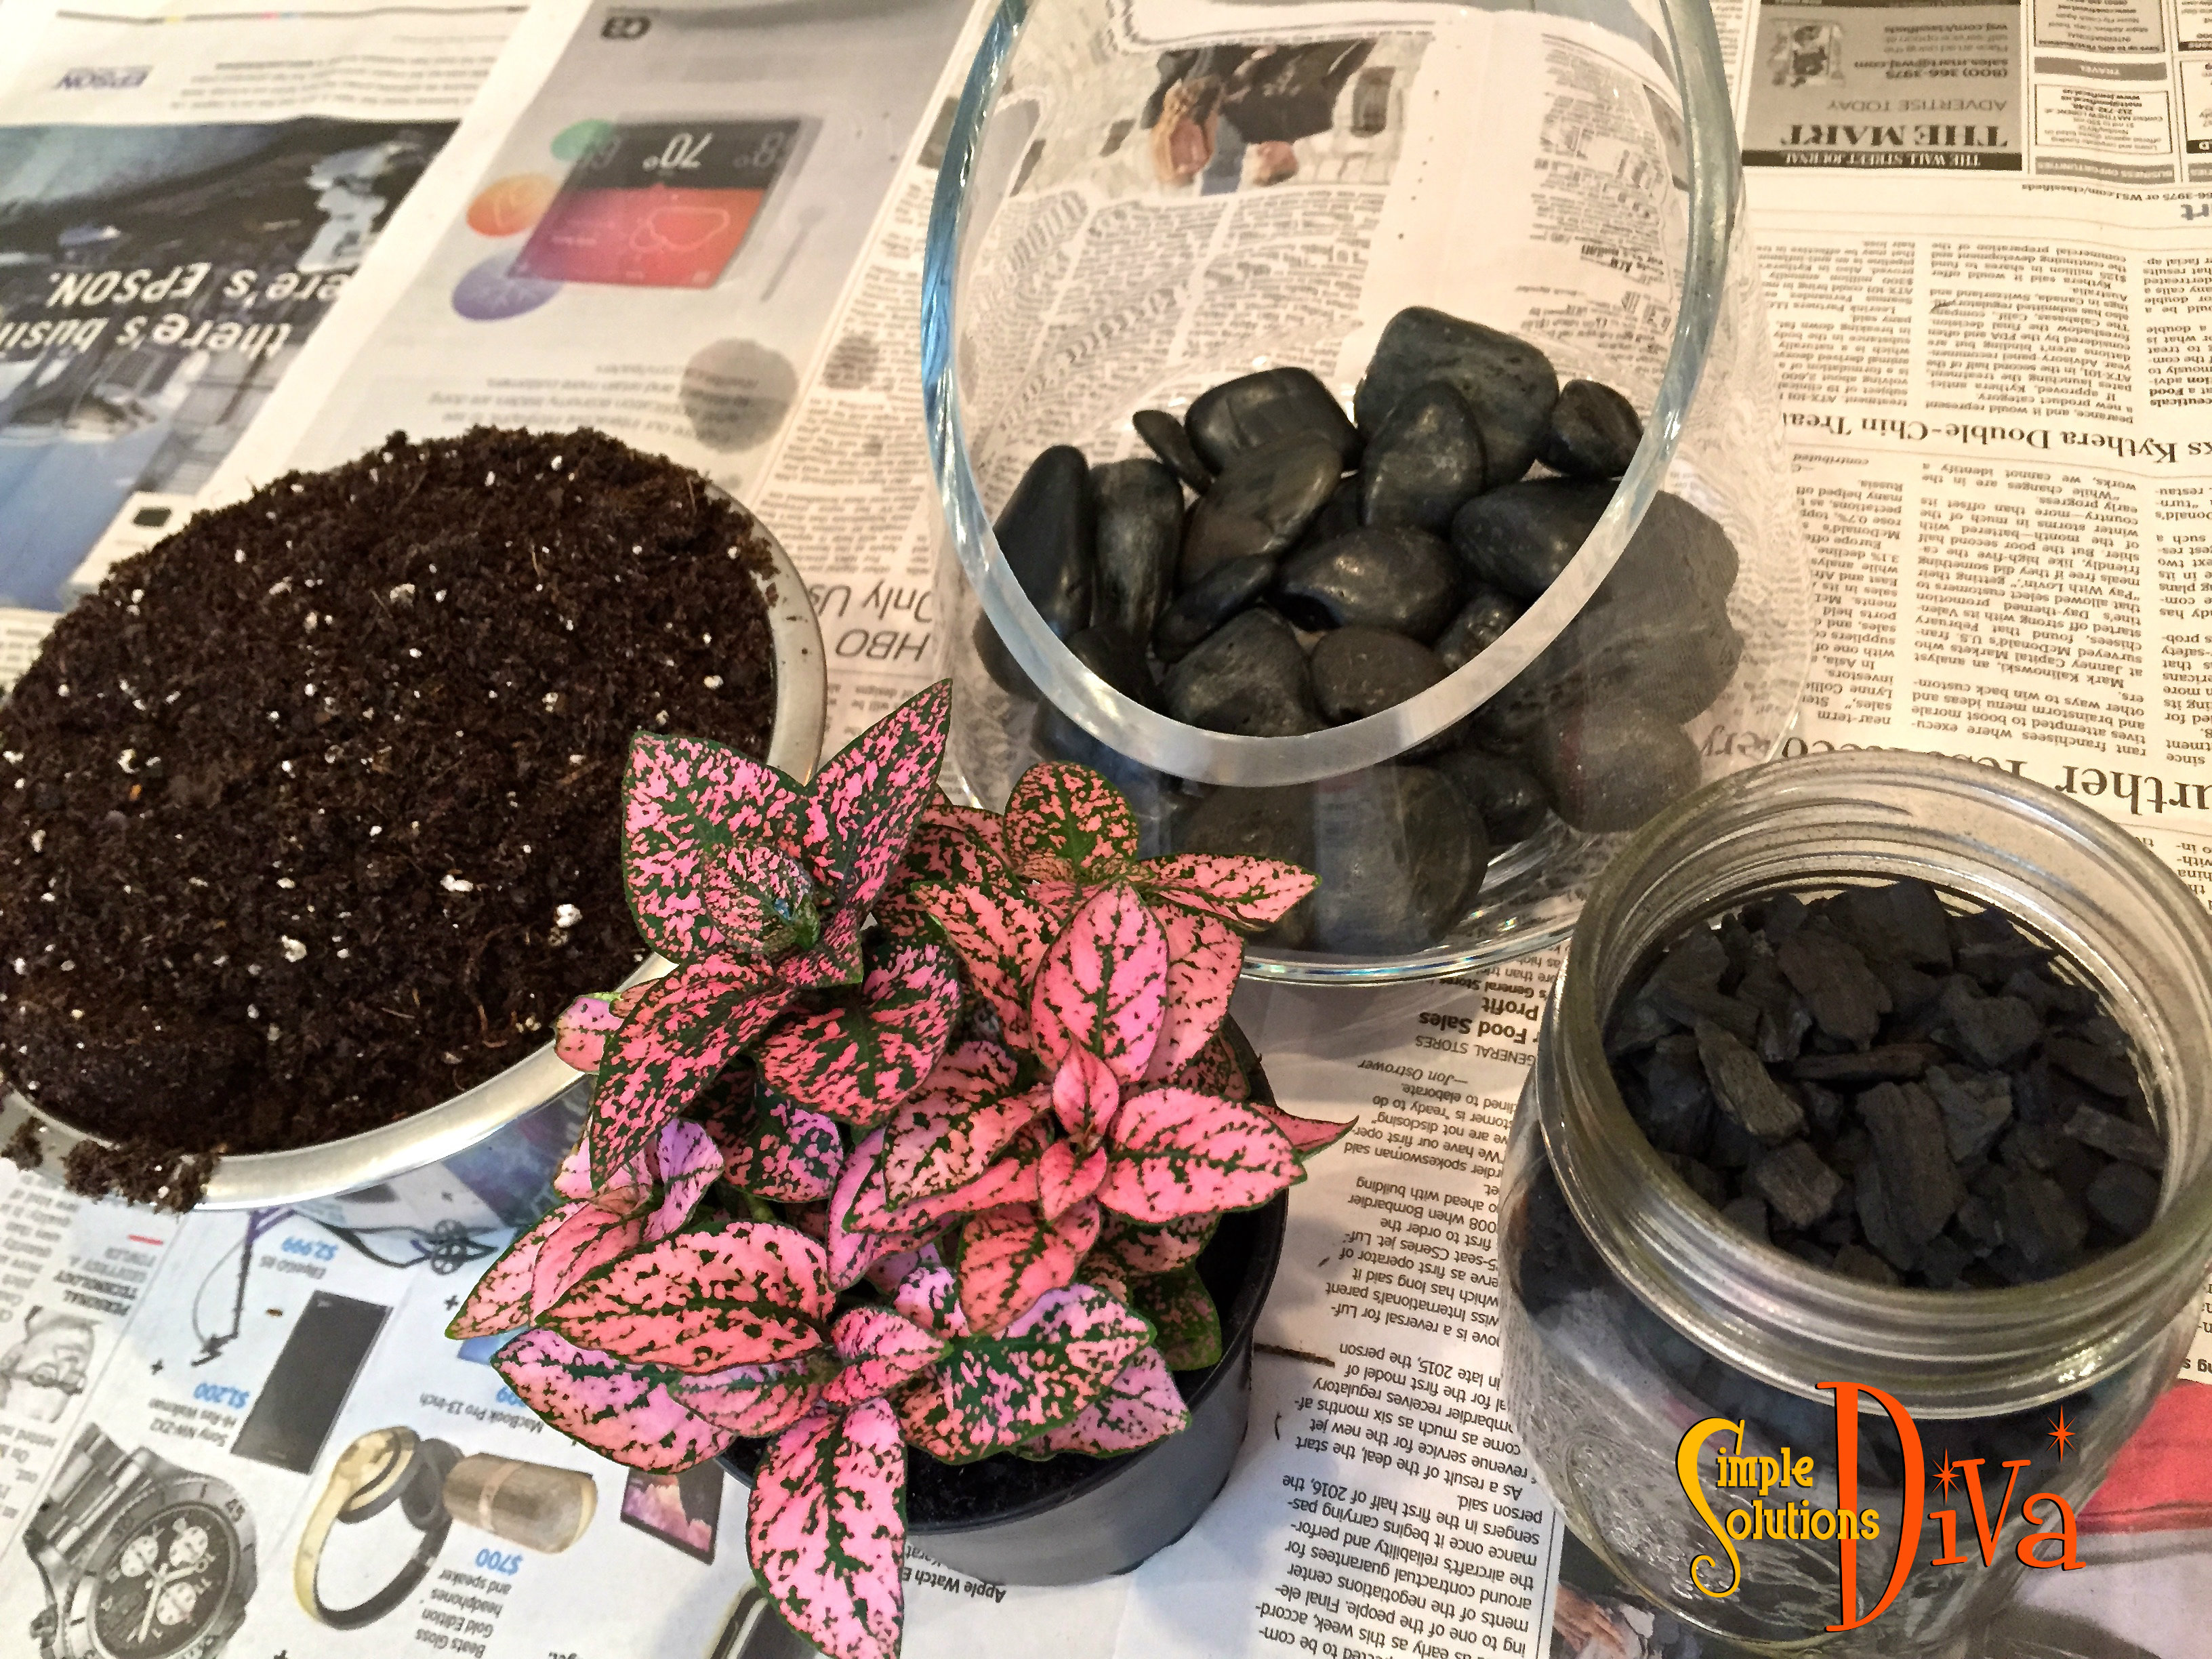
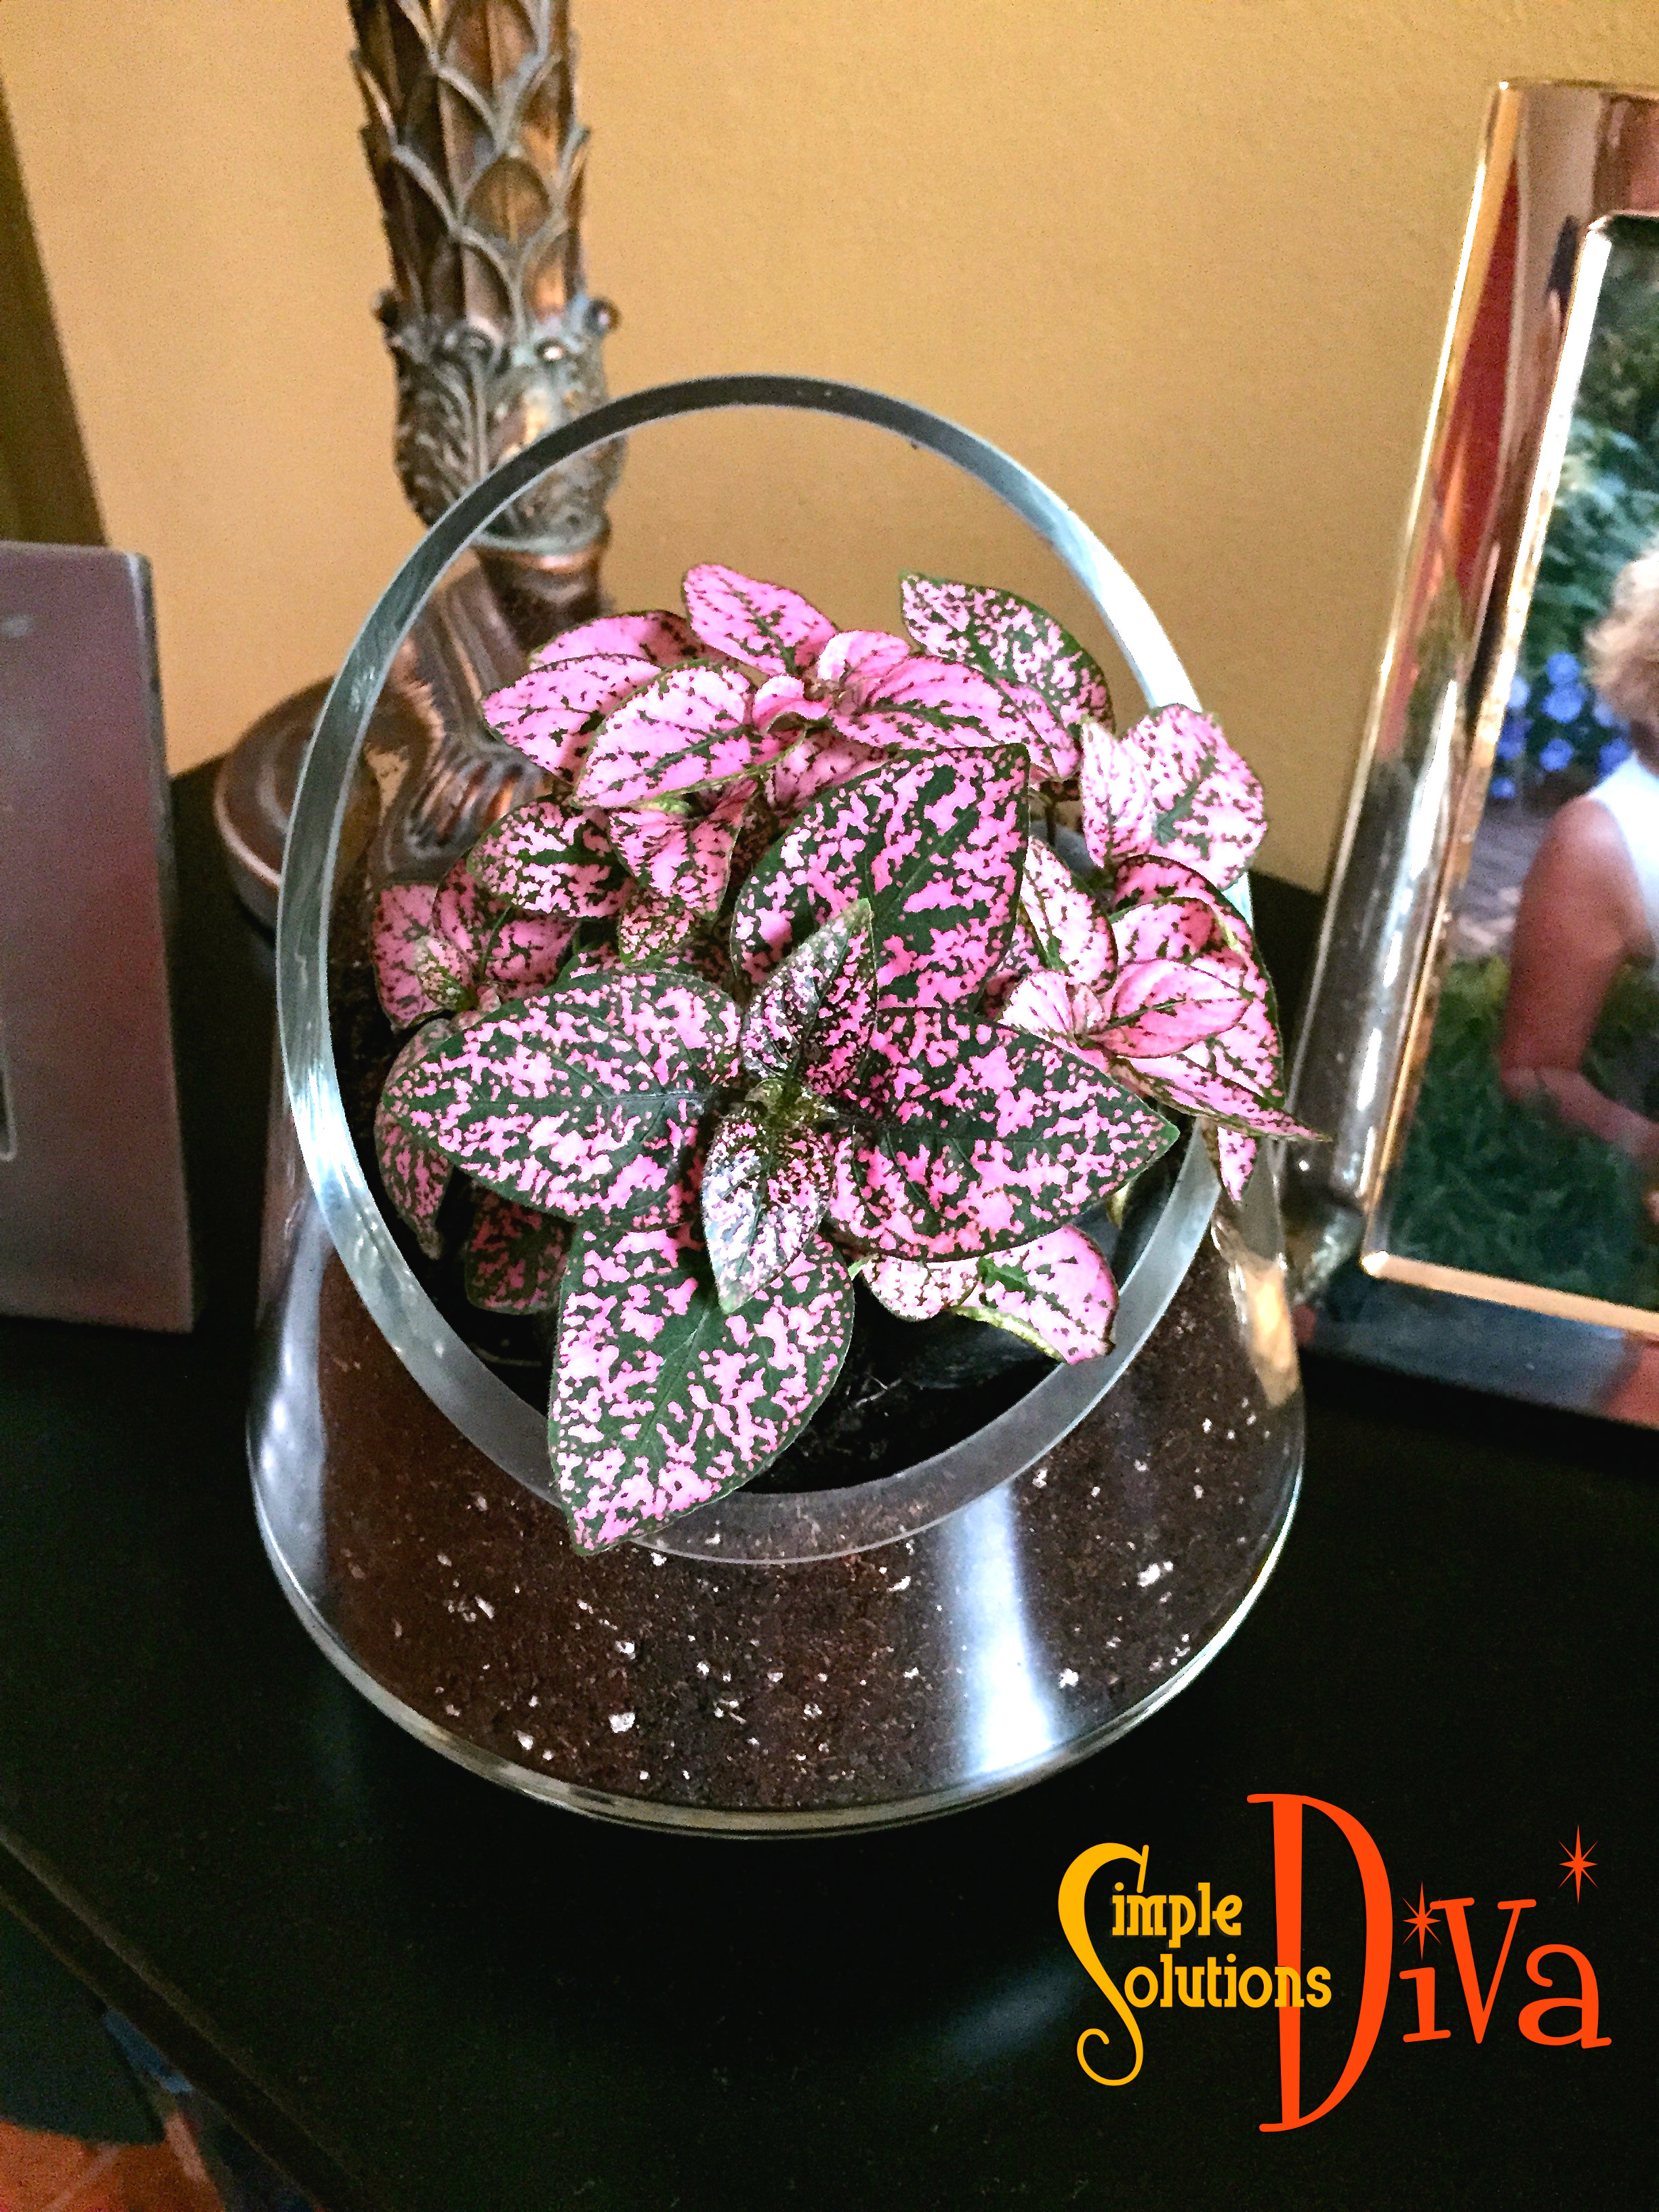
All You Need For A Terrarium: Charcoal, rocks for drainage, a beautiful bowl, soil, and a plant perfect for your lighting conditions!
An indoor garden? Why YES! A terrarium IS an indoor garden! The Diva shows you a few simple tips to create a beautiful display that will remain lovely for years to come!
Here are a few basic tips from About.com on how to care for your terrarium:
Caring for your terrarium is easy. Check every couple of weeks to see if your terrarium needs water. Feel the soil to see if it is dry and add water if it is.
If your terrarium is closed, take off the top at least once a month to air it out. If you see lots of condensation or have added too much water, leave the top off until it has had a chance to dry out.
Pull off any leaves that show signs of yellowing or damage and prune plants if they grow too large.
Don’t fertilize your terrarium because you don’t want to encourage growth.
With Easter and Passover fast approaching, we will have lots of family time – what can you do that’s fun with the kids and adults to keep everyone busy? Try some springtime crafts!
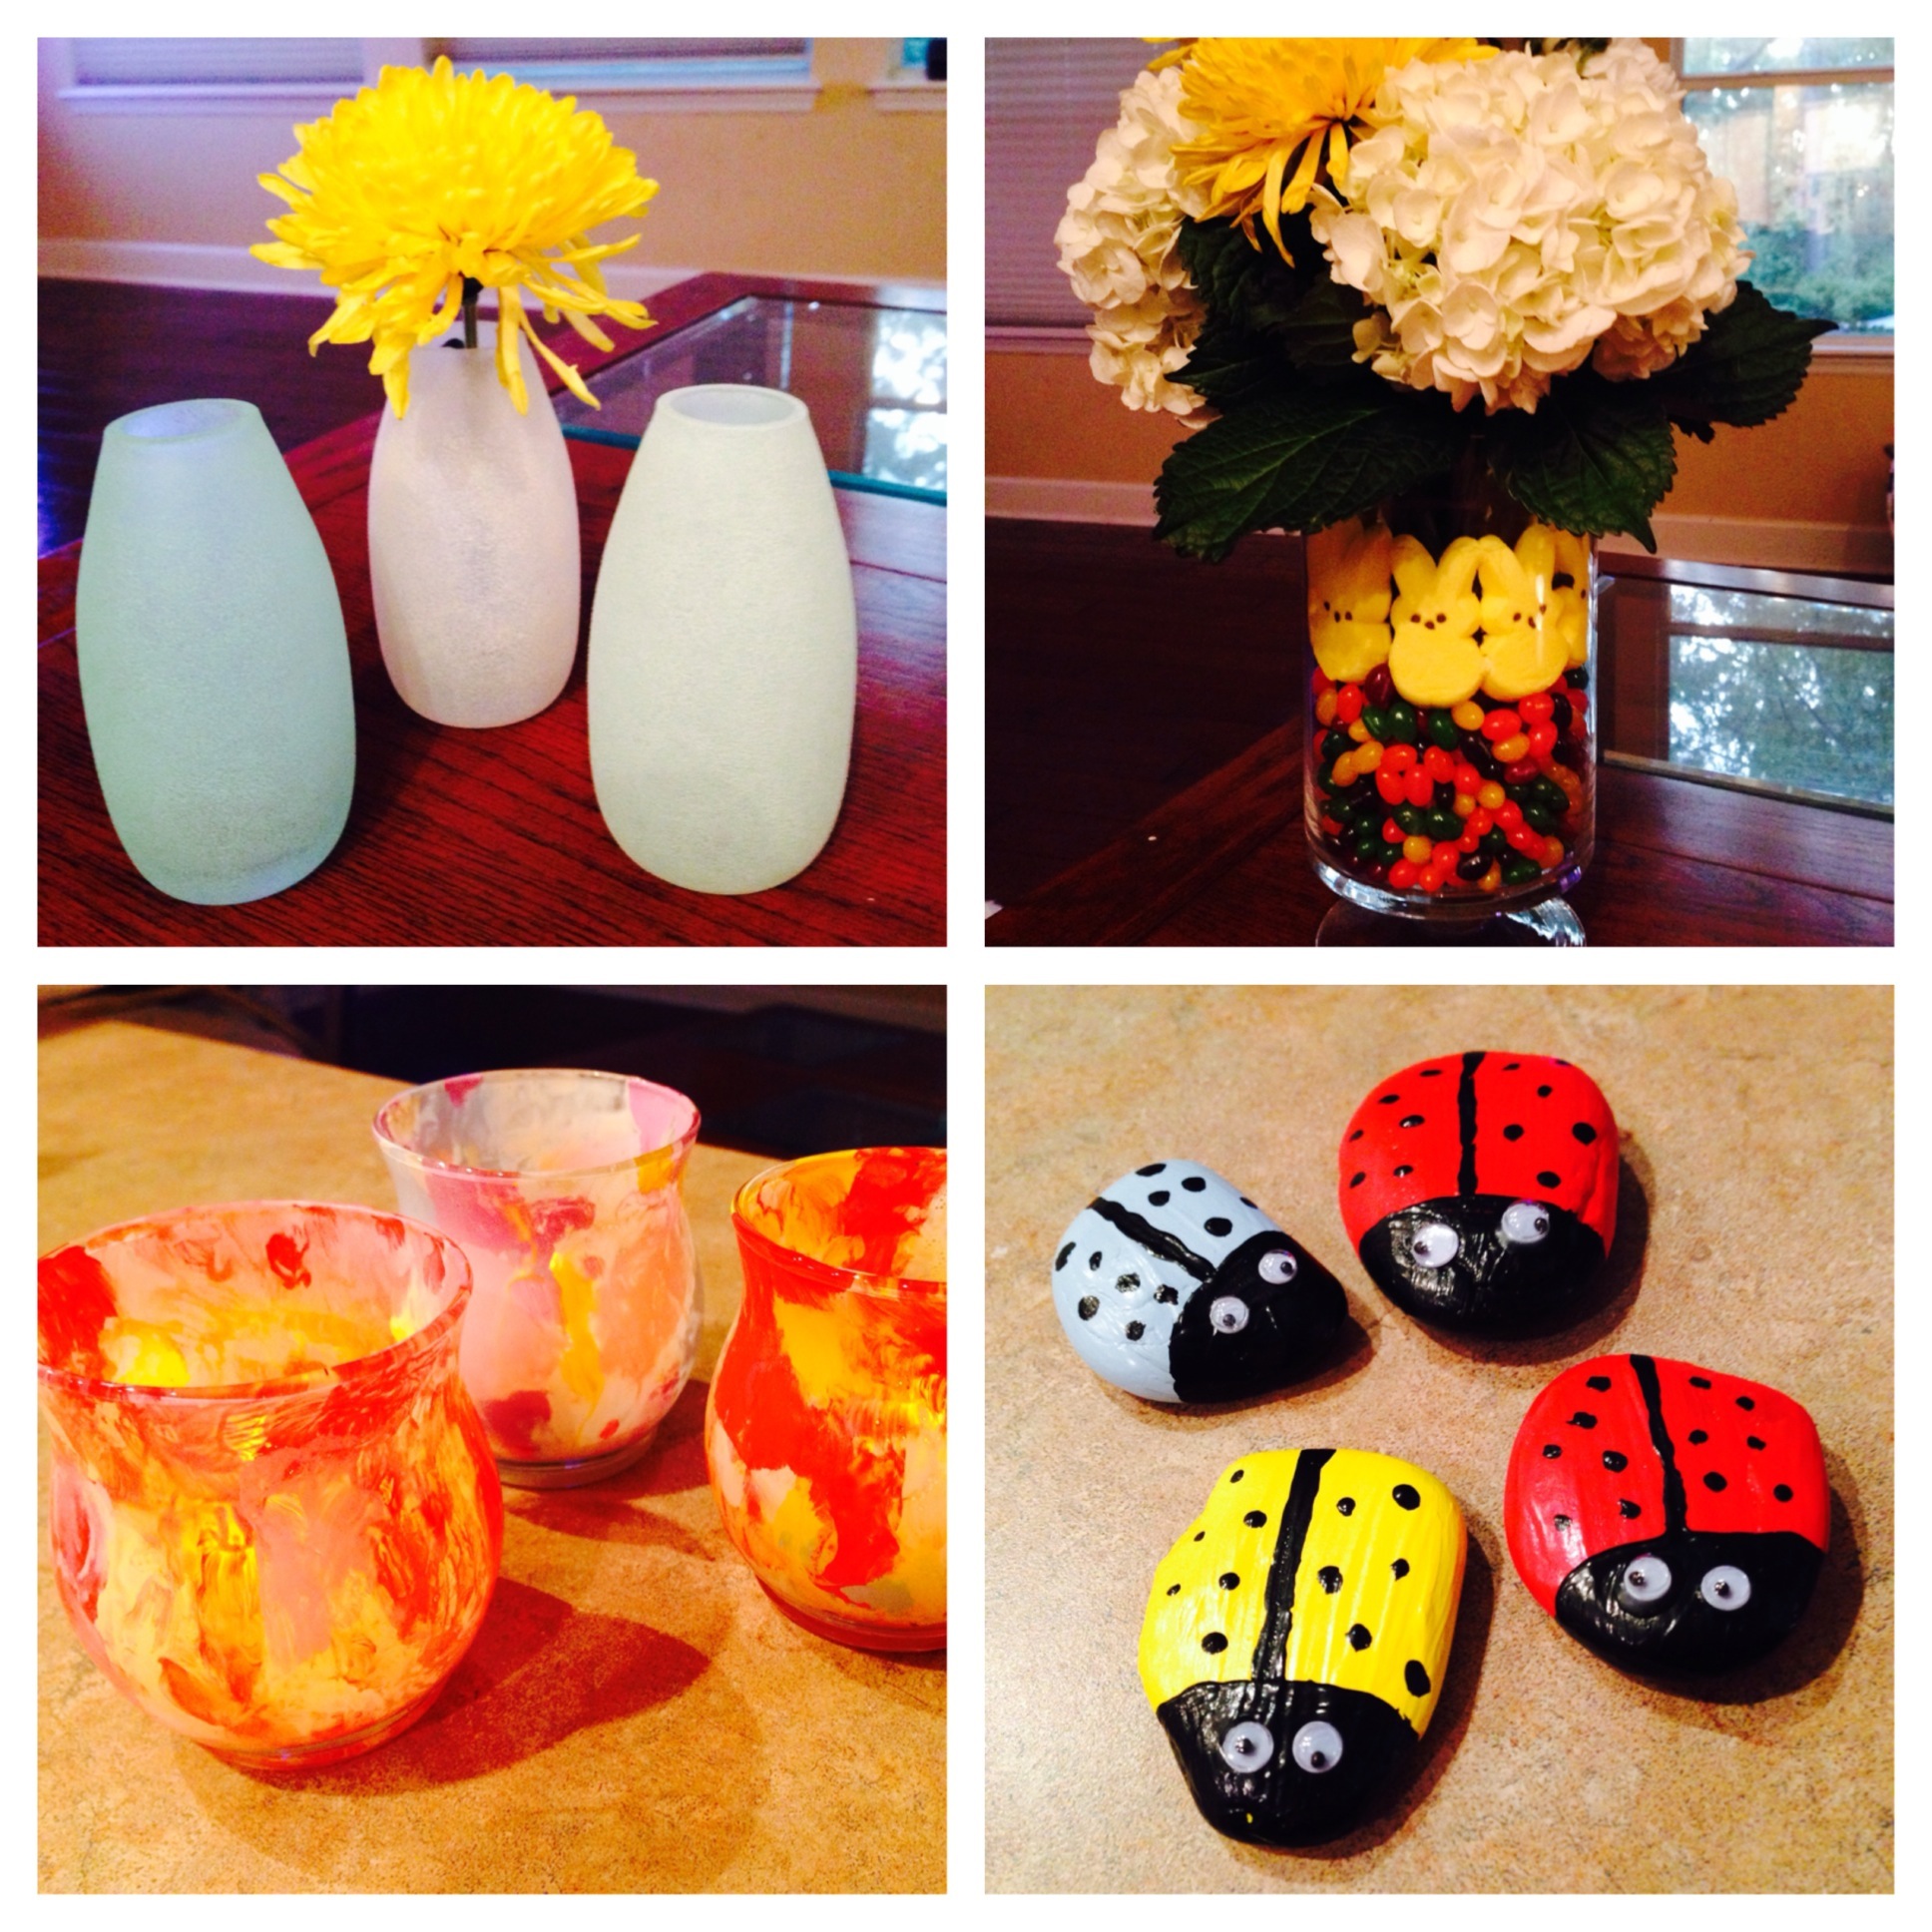
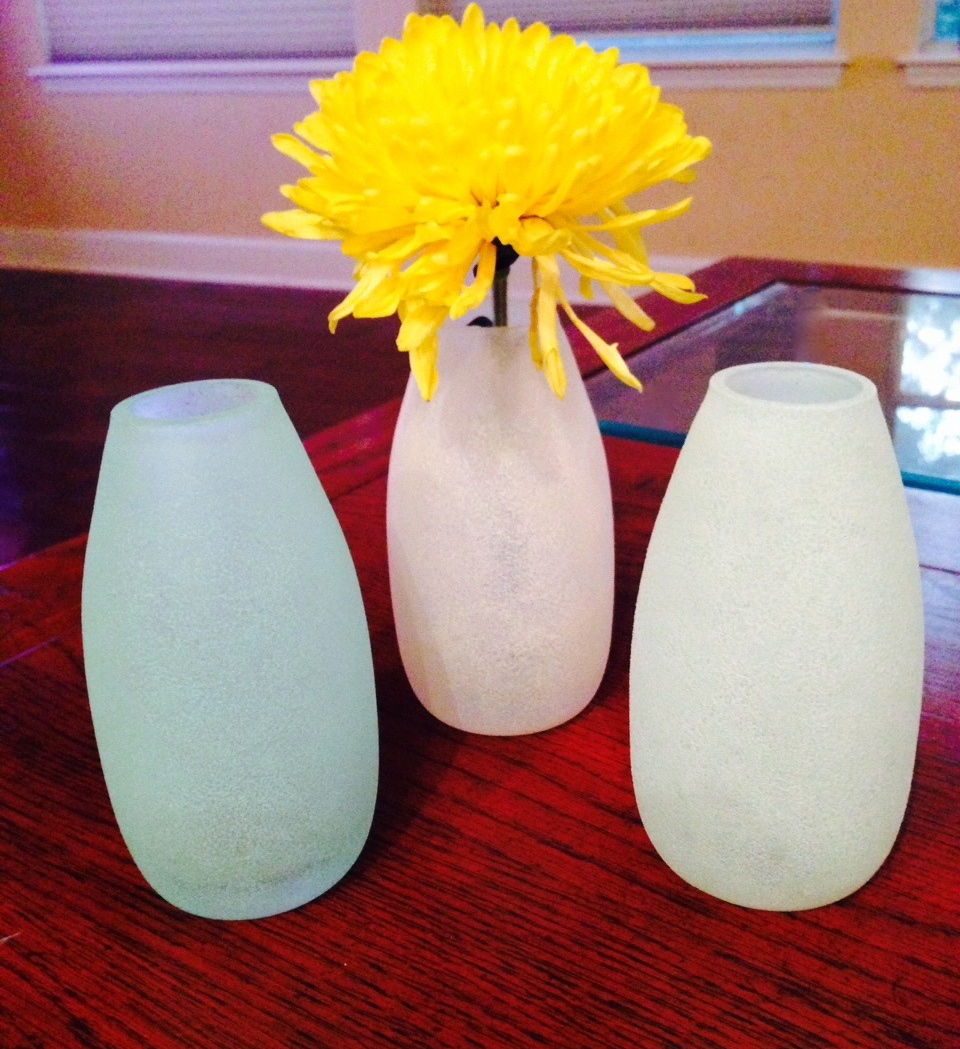
“Beach Glass” Vases
“Beach Glass” Vases from SimpleSolutionsDiva.com.
I love the look of beach glass. Muted hues of blues, greens and whites. You can make any glass item look like a piece of beach glass by just using special glass paint. I used Martha Stewart Crafts Frost Translucent Glass Paint — The effect is translucent, frost-like with a slight pebbly texture that resembles sea glass. Beautiful and easy!
What You Need:
Martha Stewart Crafts Frost Translucent Glass Paint (Available at most craft stores) I used colors of beach glass green, sea lavender and white. (Click Here To See Product And Color Selection Available)
Sponge applicators – I like to use sponge applicators because they leave a nice, pebbly texture behind in the paint.
Glass vase or other glass items – Check out the selection at dollar stores (love these stores!). You can find some great pieces that can be painted!
Rubbing Alcohol/cotton balls
Small paper plates or other item to squeeze paint on to
Directions:
Find a clean, flat work surface and cover with old newspapers. Wipe down the glass vase surface to be painted with rubbing alcohol and allow it to dry.
Squeeze out a dab of glass paint onto paper plate. Using the sponge applicator, dip the applicator in the glass paint and dab the paint onto the glass surface. Cover the entire surface. Allow to dry for one hour.
The paint is permanent after it has dried for 21 days. You can speed the process along by curing the paint by baking it. Here are the instructions from Martha Stewart Crafts: Let project air dry 1 hour, place in cool oven. Set temperature to 350 degrees. Once oven reaches 350 degrees, bake for 30 minutes (glass must heat gradually). After 30 minutes, turn oven off. Let glass cool completely in oven. Wait 72 hours before using. **
**NOTE: If you use the white frosted paint, baking the project might slightly darken the paint. Mine turned from a pretty white to a creamy, slightly toasted color.
Spring “Impressionist” Glass Painted Votives
Spring “Impressionist” Votives from SimpleSolutionsDiva.com.
Spring brings beautiful colors and softness to our landscape. I always think of Monet paintings when I think of Spring. I love the slightly unfocused visual and blended soft colors. THis little project makes me think of Impressionist paintings. And best of all, with this project, you don’t have to be perfect! Just keep it simple!
What You Need:
Glass votives – Again, the dollar stores are a great source for these types of items!
Glass Paint – I used Folk Art Brand Multi Surface Acrylic Paints, because I can use the paints for many other projects in the future. I would use no more than 3 complimentary colors. (I chose 2 colors, plus white.) Click Here to see product and color selection.
Paper plate to squeeze paint on
Cup of Water
Paintbrush
Rubbing Alcohol/cotton balls
Directions:
Clean the inside of glass votive with rubbing alcohol and cotton balls. Alow them to dry.
There is no one method for this – just listen your inner artist!! The first one I did I was not thrilled with, but once I limited my colors to 2 colors plus white, I found the ideal combination for me!
My technique for 3 colors: Take your paintbrush and dip in the cup of water. Swirl brush into your 1st paint of choice and apply dabs to inside of the votive. Clean the brush and repeat the “swirl and dab” process above with second color. Using the same process, finish with the white, using it to blend and swirl the other colors inside the votive. You will be really surprised when you are done how nice it looks! Just don’t use too many colors or it will start to get “muddied”.
Allow to dry 21 days or cure the glass using the same instructions under the Beach Glass Vases above.
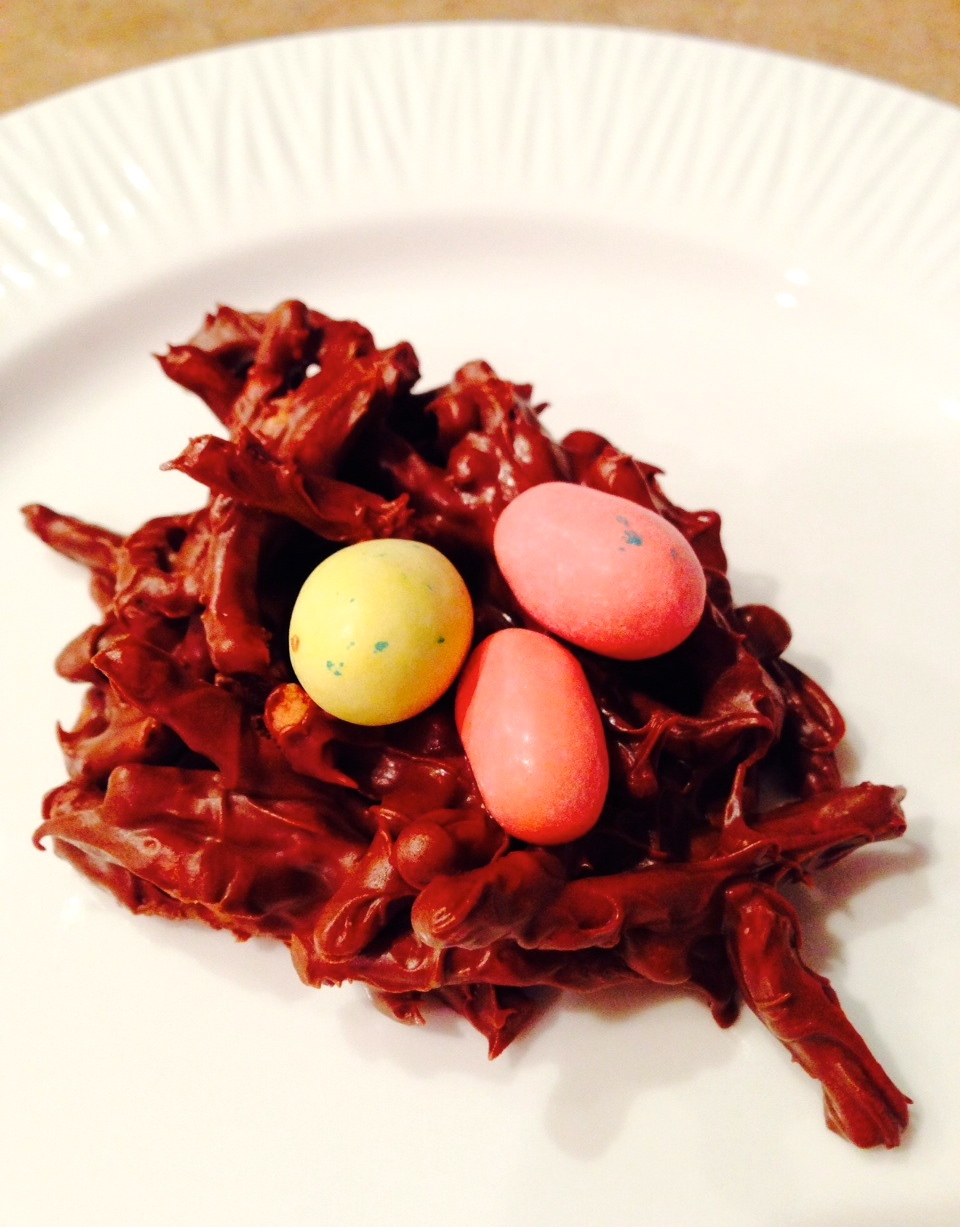
Edible Robin’s Egg Nest
Edible Bird Nests from SimpleSolutionsDiva.com.
I love making food related crafts with the kids! They love getting messy and they enjoy “cleaning” (read licking) their fingers when done. These little bird nests are adorable and pretty yummy. They are a twist on an old favorite I remember eating as a kid.
Ingredients:
1 bag semi-sweet chocolate chips (12 oz.)
1 bag butterscotch chips (11 oz)
10 oz. Crunchy Chow Mein Noodles
1 bag of bird egg shaped candies of your choice (I used Whoppers malted milk balls in the shape of bird eggs, but M&M’s or jelly beans would work, too.)
Parchment paper or wax paper
Directions:
Combine and melt both bags of chips in a microwave safe bowl, on 50% power for 60 seconds. Stir. Repeat the process until all chips are melted. Gently stir in the chow mein noodles until well coated.
On a flat work surface, spread out parchment paper/wax paper. Using clean hands, take a small handful of the chocolate/chow mein mixture and put it in a shape of a small nest on the parchment paper. Repeat the process until you have used all the mixture. Take 3 “eggs” (egg-shaped candies) and arrange on each nest. Let harden or place in fridge to speed up the hardening process.
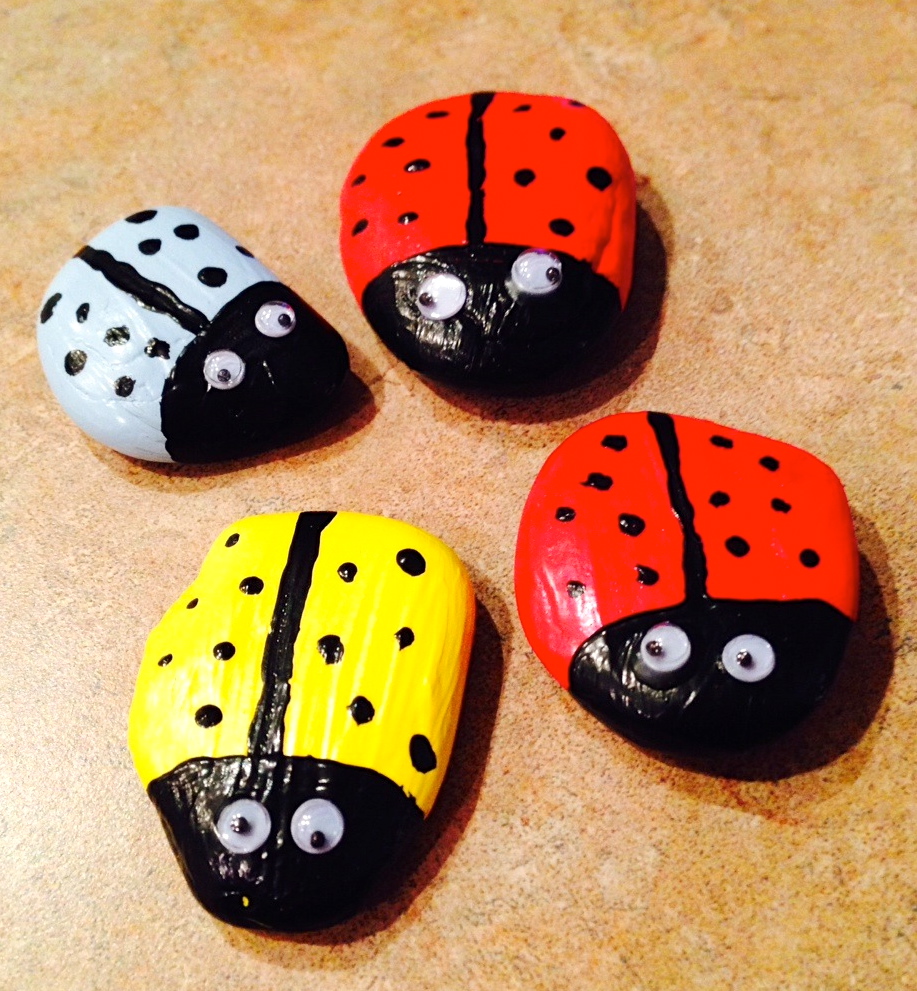
Ladybug Garden Décor
Lady Bug Garden Decor from SimpleSolutionsDiva.com.
This is a cute little project kids of all ages will enjoy and it is very simple & inexpensive to do!!
What You Need:
Flat rocks of various sizes (I used river rocks I bought at the dollar store)
Assortment of acrylic paints, including black paint. I used Folk Art Multi Surface Acrylic paints.
“Wiggly” eyes for the ladybugs.
Glue
Clear Acrylic Sealing paint to seal the rocks once painted.
Paintbrush – I used a large one for the overall colors and a fine tipped one for the ladybug dots and wing line.
Directions:
Wash and dry the rocks to be used.
On a flat, protected work surface, lay your rocks out and paint them the overall colors you want. Allow to dry for about ½ hour.
Now for the details! Taking the black color paint, paint the head of the ladybug. Draw a lie down the back of the lady bug using the black paint and the thin, small tipped brush. Add dots to the ladybug’s back. Allow to dry. Apply Clear Acrylic Sealing paint to the ladybugs and allow to dry.
Add 2 small dots of glue to the ladybug head. Place a wiggly eye on each dot and allow to dry.
Place in the garden, indoor planters, display on desk or table. They also make adorable paperweights!
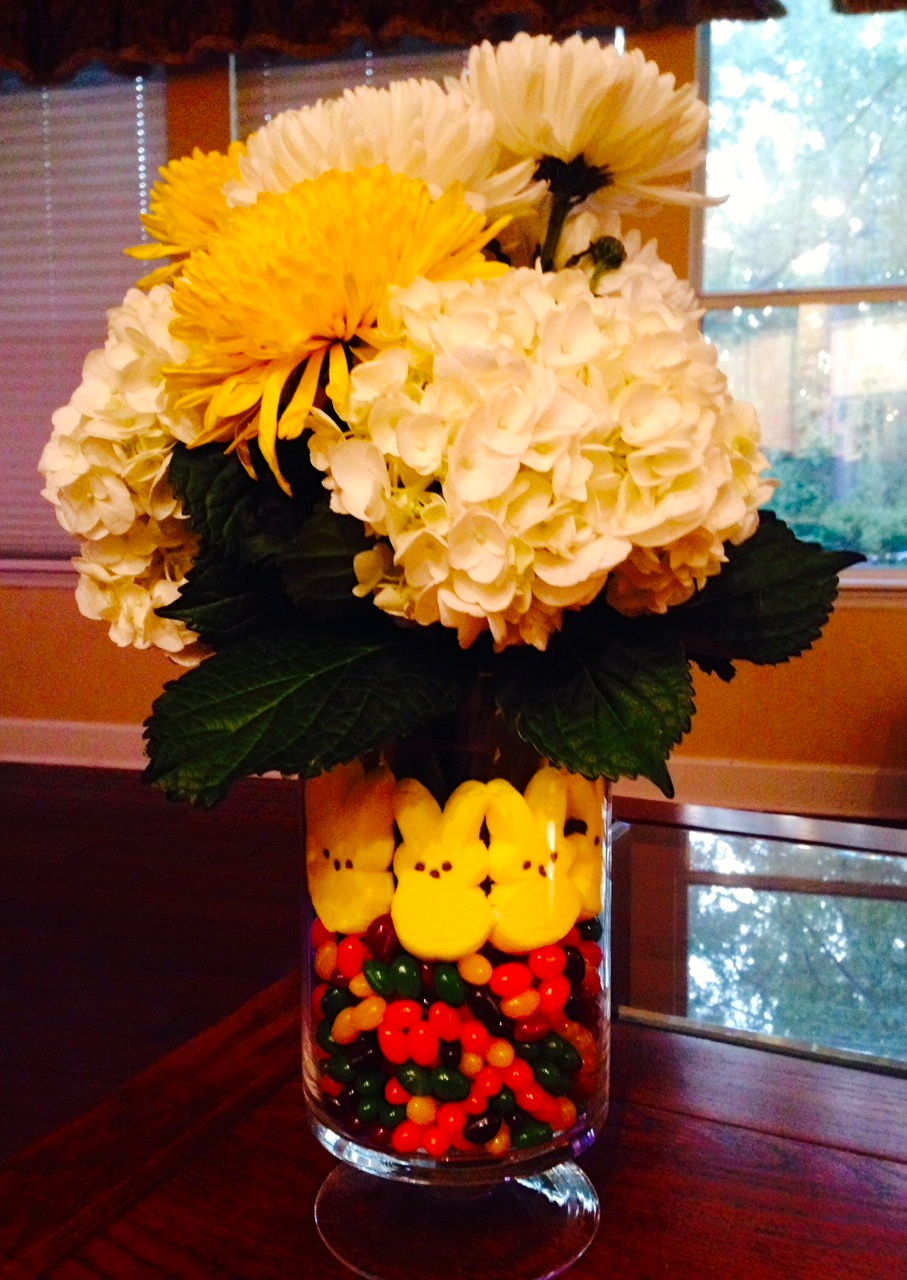
Easter Centerpiece
Easter Centerpiece from SimpleSolutionsDiva.com.
This is a fun way to bring Easter to the table and let the kids get involved! I have seen it all over Pinterest and thought I needed to try making it – SUPER simple!
What You Need:
Two vases, one smaller that can fit into the larger vase, allowing for at least a ½ inch space between the two.
1 bag of jellybeans
1-2 packages of Peeps bunnies
Flowers of choice
Instructions:
Place smaller vase inside larger vase, making sure it is centered. Pour jelly beans into space between the two vases, making sure you make it as level as possible around the vase. Take Peep bunnies out of package and slide a row of them into the space between the two vases, letting them rest on the jellybeans. Repeat the process until the bunnies go all the way around the vase.
Trim your flowers to fit the inside vase. Pour water into the inside vase and arrange flowers. Voila! You have a beautiful centerpiece the kids helped with!
Thank you to WTLV-TV’s First Coast Living for inviting me on to talk about these fun craft projects!