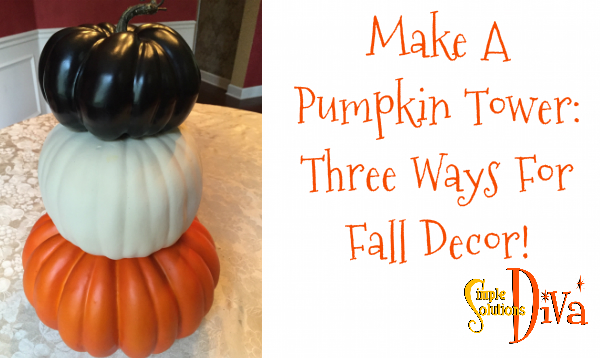
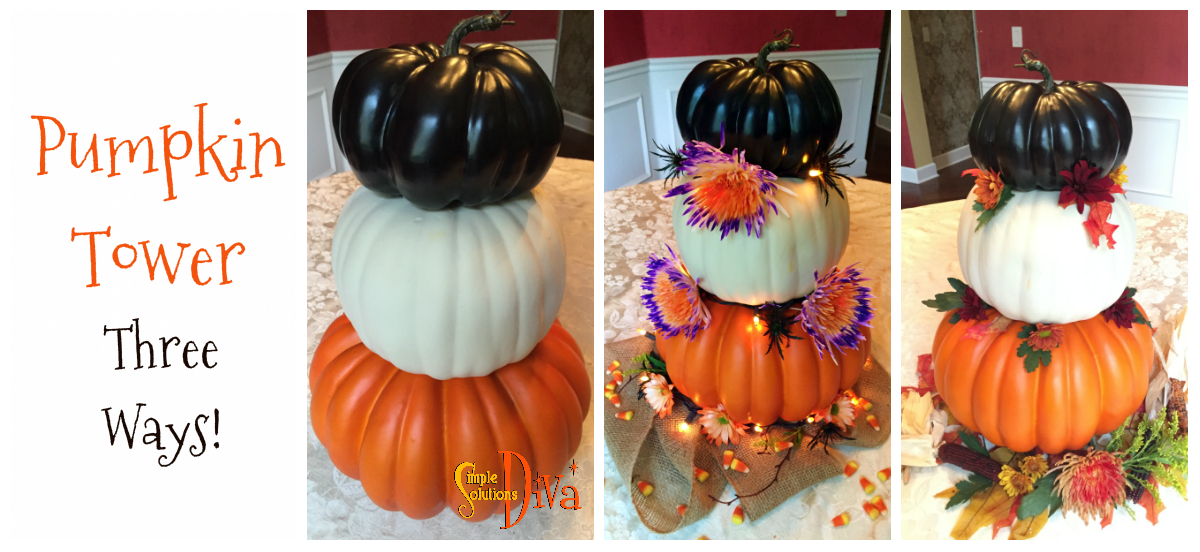
This is a great project if you have found a good deal on artificial pumpkins! (Mid-October is when they tend to go on sale, so keep your eyes out for them!)
I like to have decor I don’t have to change up much to carry me from Fall to Thanksgiving, especially since I will go crazy with Christmas decorations! This was the perfect project for me – with just a few simple changes, I have three different looks!
What You Need:
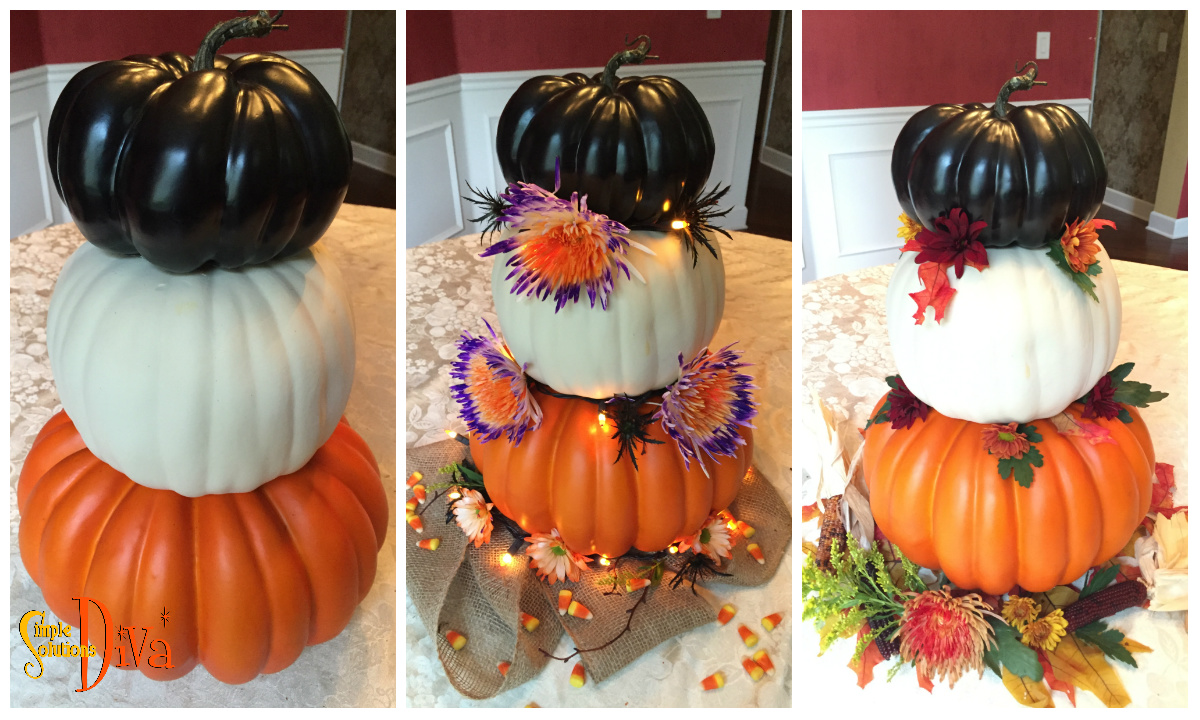
Three artificial pumpkins, three different sizes and colors.
Hot Glue Gun
Knife to remove stem from 2 pumpkins (if needed)
Decorative items to change the look of the Pumpkin Tower. (I used two different bouquets of flowers from the grocery store, fall leaves, plus some Halloween decorations and some burlap fabric I had handy.)
Instructions on how to assemble the Pumpkin Tower are in the video at the top of this post!
Another use for the Pumpkin Tower, besides as a centerpiece: Have it on display in a planter on the front porch. Place some fall leaves and branches under it and it would be adorable!
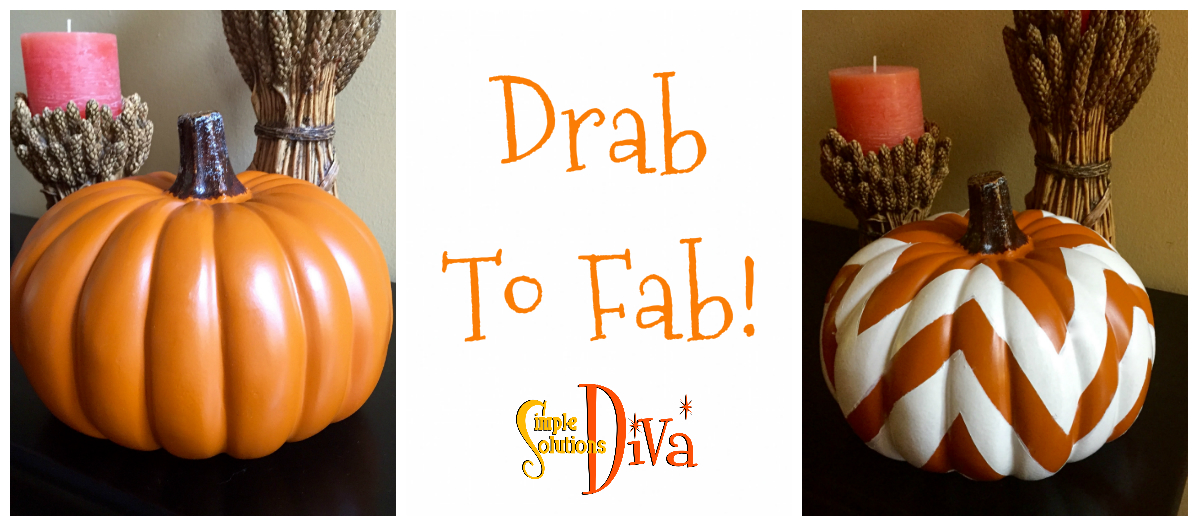
Everyone loves the chevron pattern! Here is a simple craft perfect for Halloween through Thanksgiving! It takes your regular pumpkin from Drab to Fab!
Supplies Needed:
Artificial Pumpkin
White Spray Paint or White Latex Paint (also need a brush if you are not using spray paint)
Frog Tape Multipurpose tape (green color is the multipurpose tape)
Old Newspapers to protect your work surface
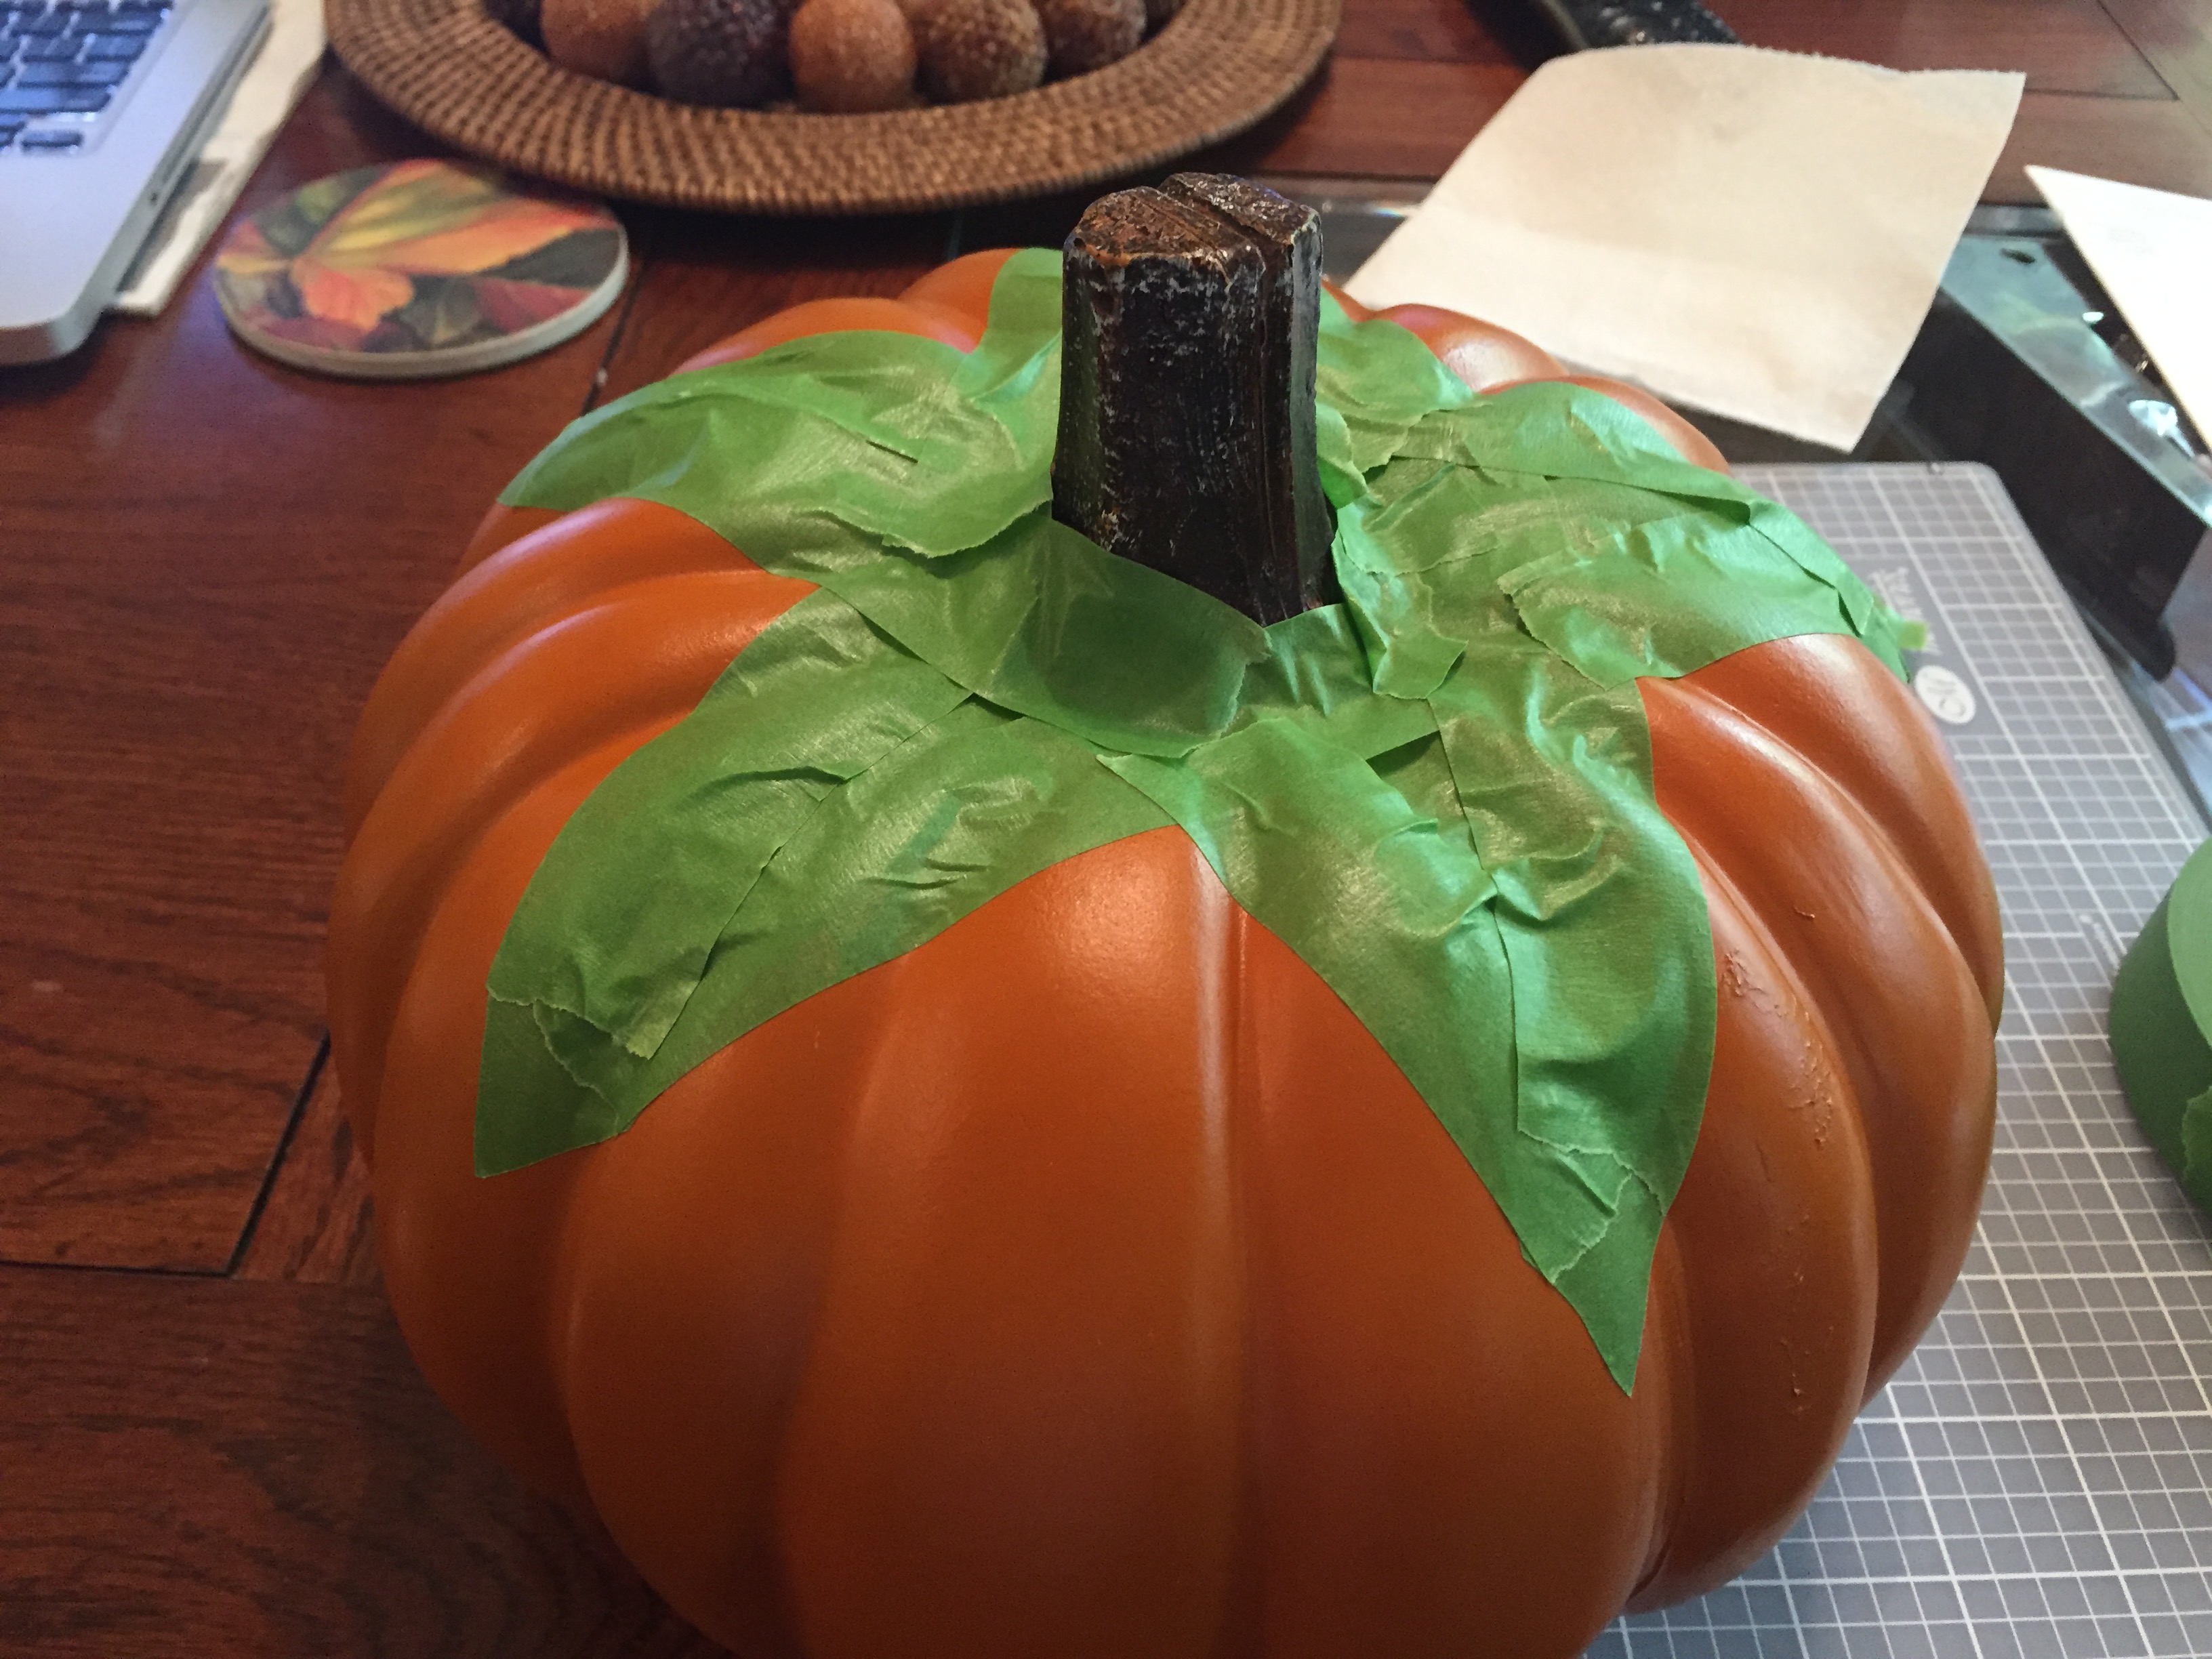
Here are some tips to make taping off your pumpkin easier:
I like to use an exact knife to cut the points in the pattern, because i like clean lines. In the photo below, I’m FINALLY using my Creative Memories cutting pad! Once I’ve cut the points I apply them to the pumpkin, building up the design from the points.
I start by taping off the top of the pumpkin, then repeating the pattern down the rest of the pumpkin (as seen below):
Today’s video is part of the “Putting Pinterest To The Test” Video Series! The Diva tests a pin that says it is easy to make your own, beautiful wall art – as easy as having some acrylic paints, a canvas and some masking tape. How easy is it? Do you need an art degree, or at least a little creativity?
Additionally, the Diva was a little wary that the masking tape might not create a good seal on the canvas, so she tested masking tape versus Frogtape Multi-surface painting tape.
To make your own wall art, you need will the following:
Simple Halloween Craft ideas for kids are the best! I especially enjoy making things that are not expensive – utilizing items from around the home! Thanks to WTLV-TV’s First Coast Living for inviting me on to share these Halloween ideas!
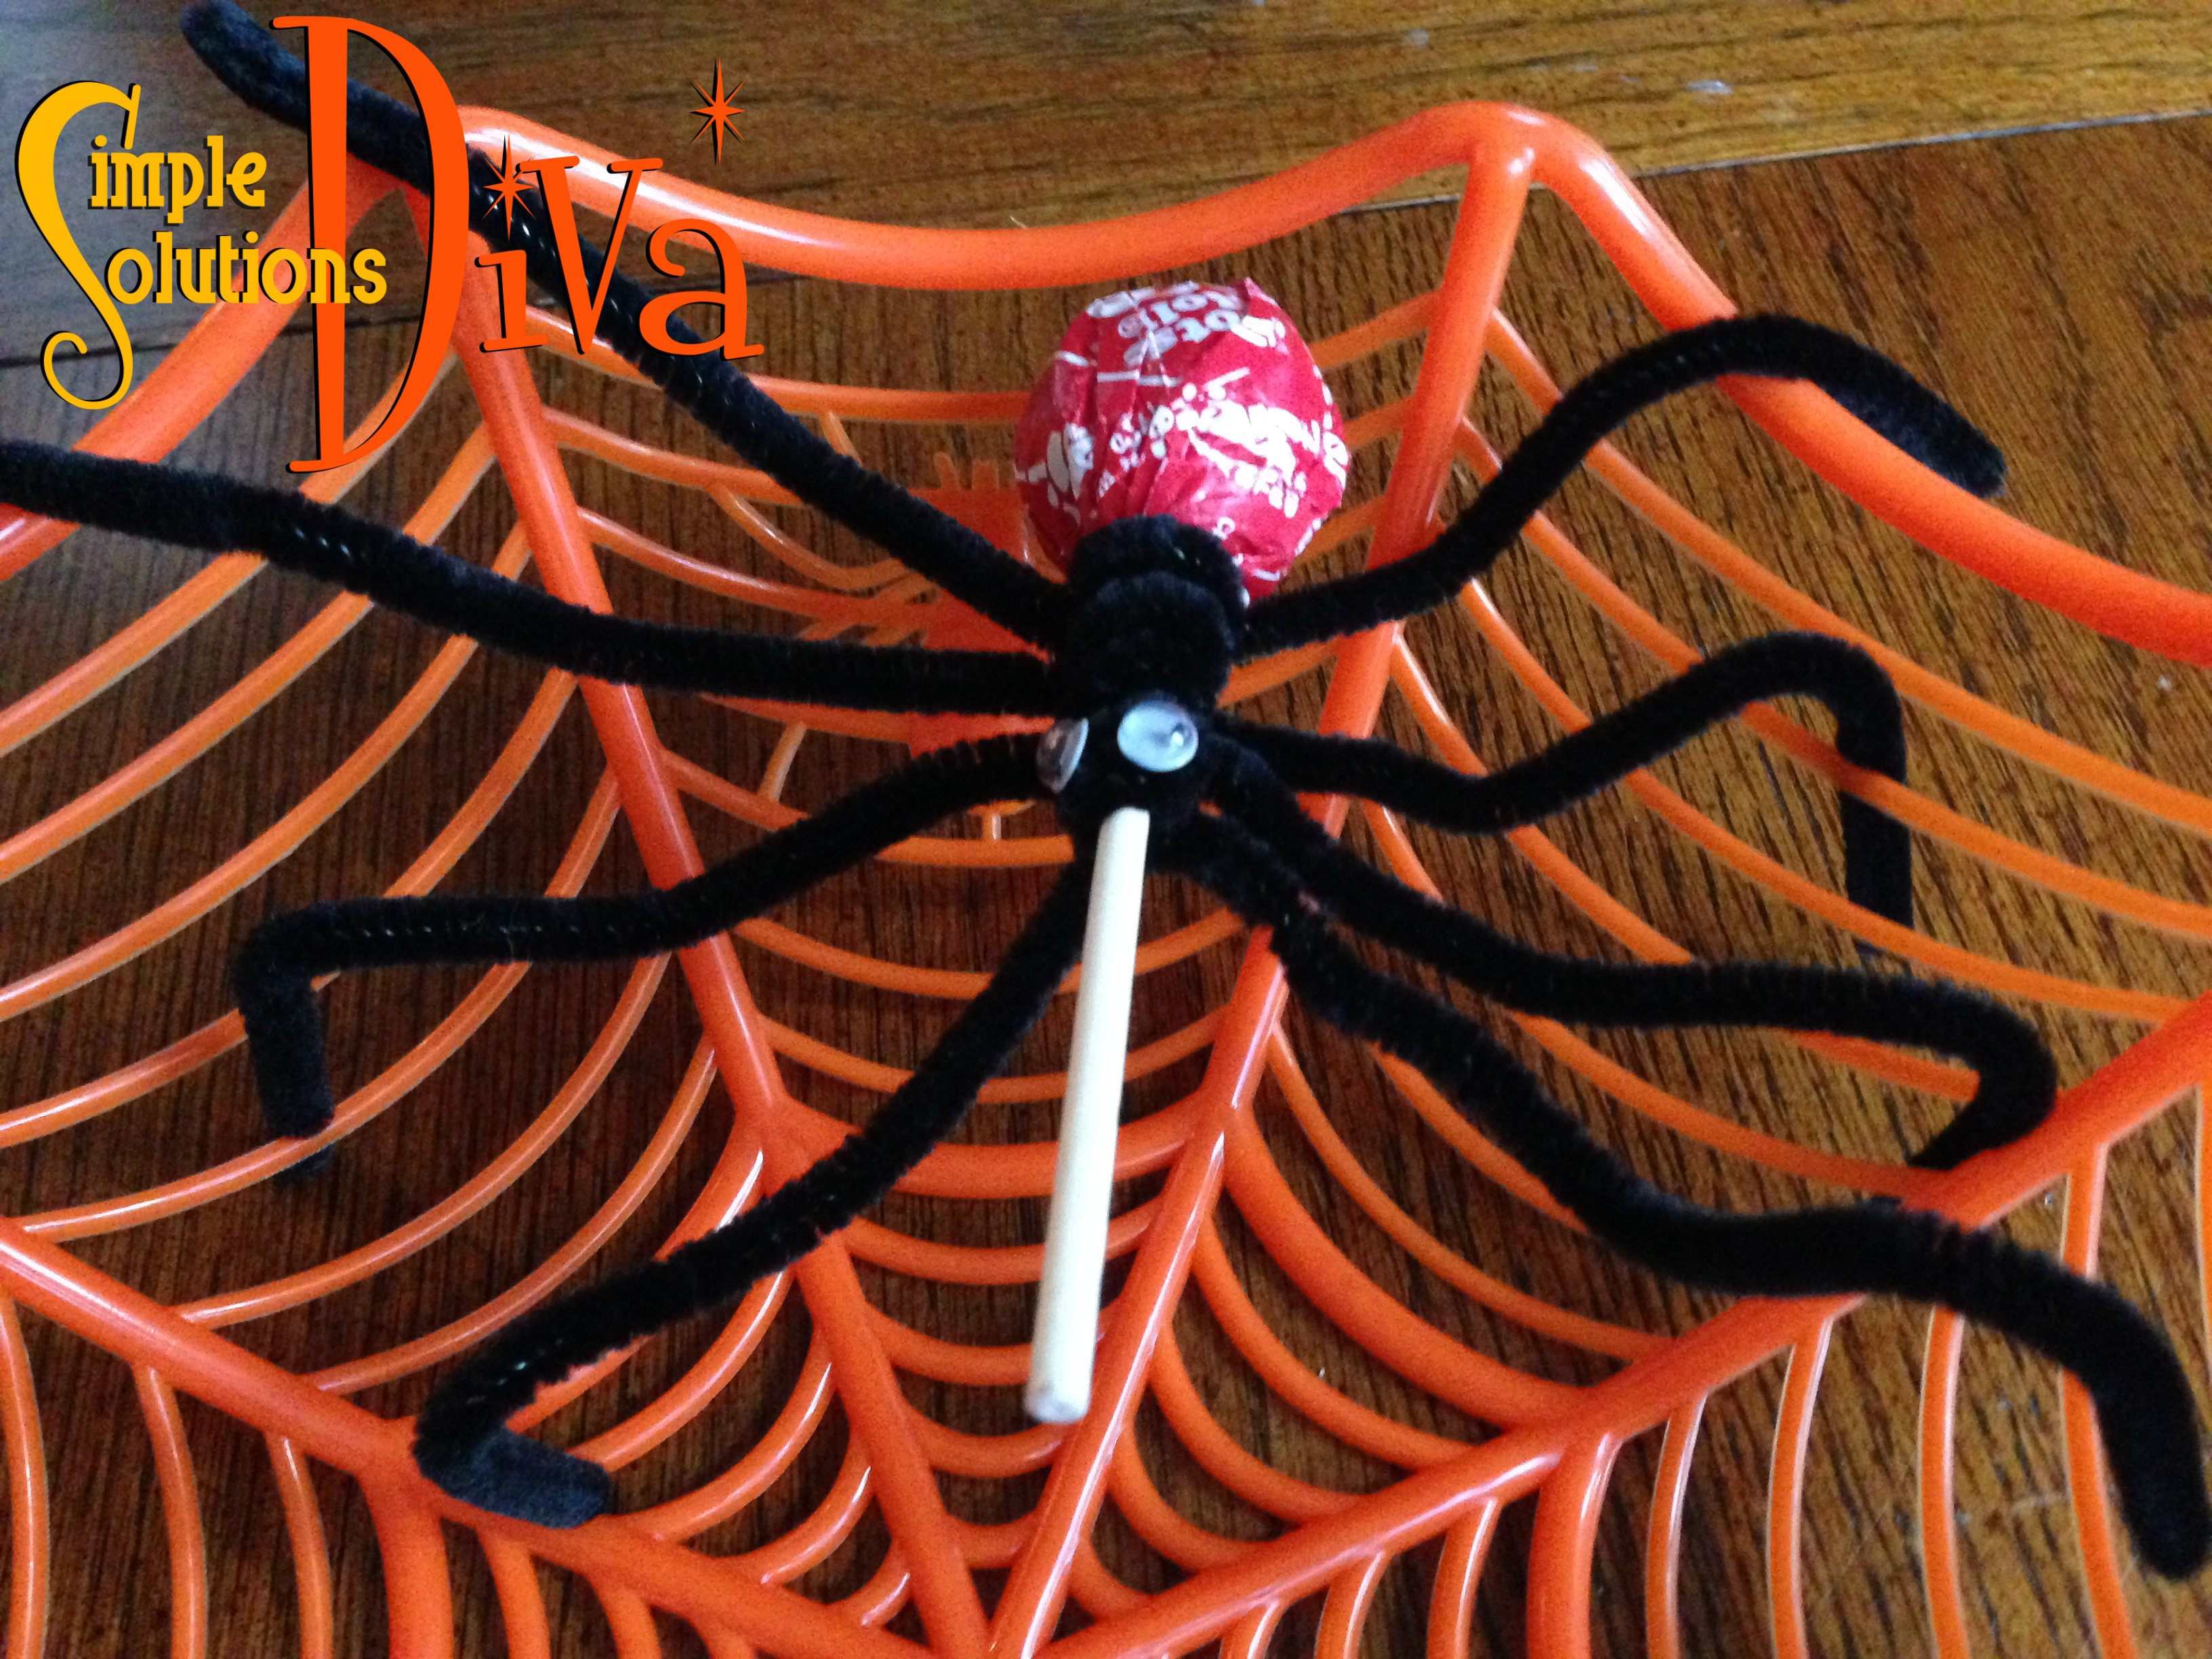
Spider Pops
Got Black pipe cleaners, Tootsie Roll lollipops, little wiggly eyes, and glue? Then you have the makings of spider pops! These are super simple and the kids don’t need much help. Take your Tootsie Pop, and wrap 4 black pipe cleaners around the stick near the base of the lollipop. It will now look like the spider has 8 legs – bend each leg to look realistic. Glue on a pair of wiggly eyes and there you have it – Spider Pop!
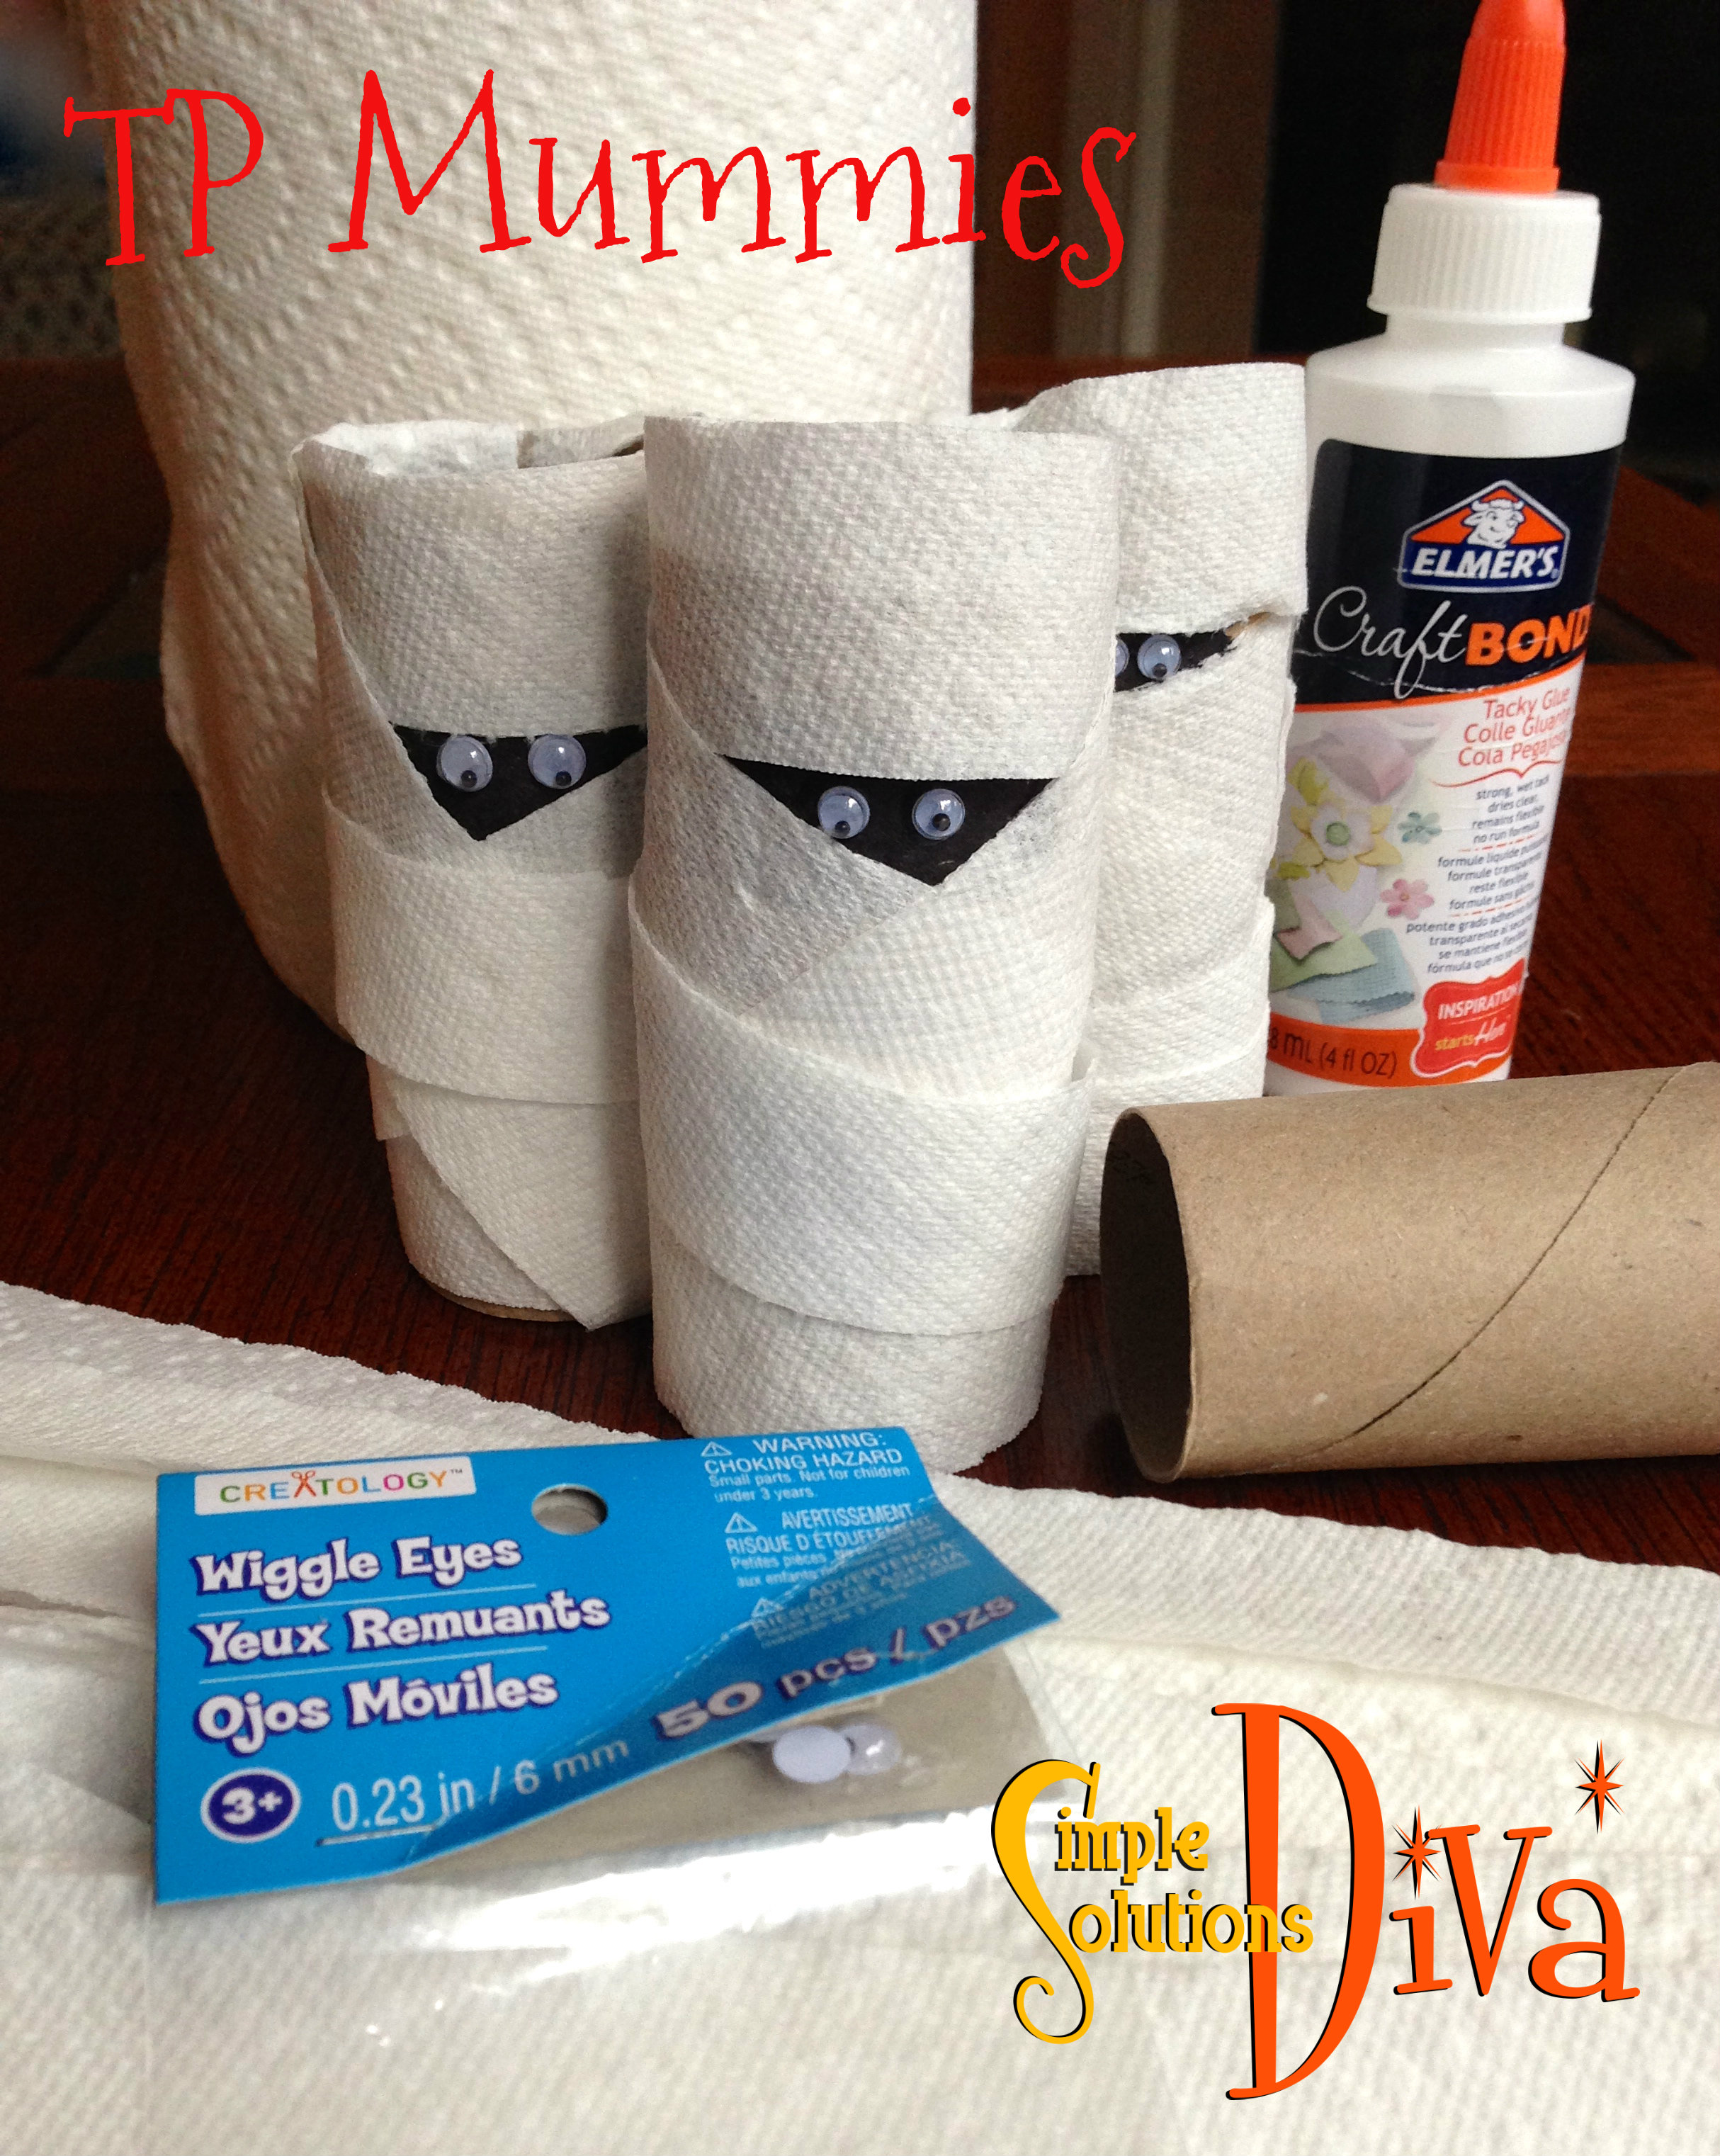
TP Mummy Roll
Something about these little guys makes me grin – maybe it is their wiggly eyes! Simply take an empty toilet paper tube, draw a black rectangle near one end. Using strips of paper towels (1/2 inch wide strips work well), wrap the tube up like a mummy, gluing as you go and leaving an opening so the black is exposed. Next, taker a pair of wiggly eyes and glue them in place.
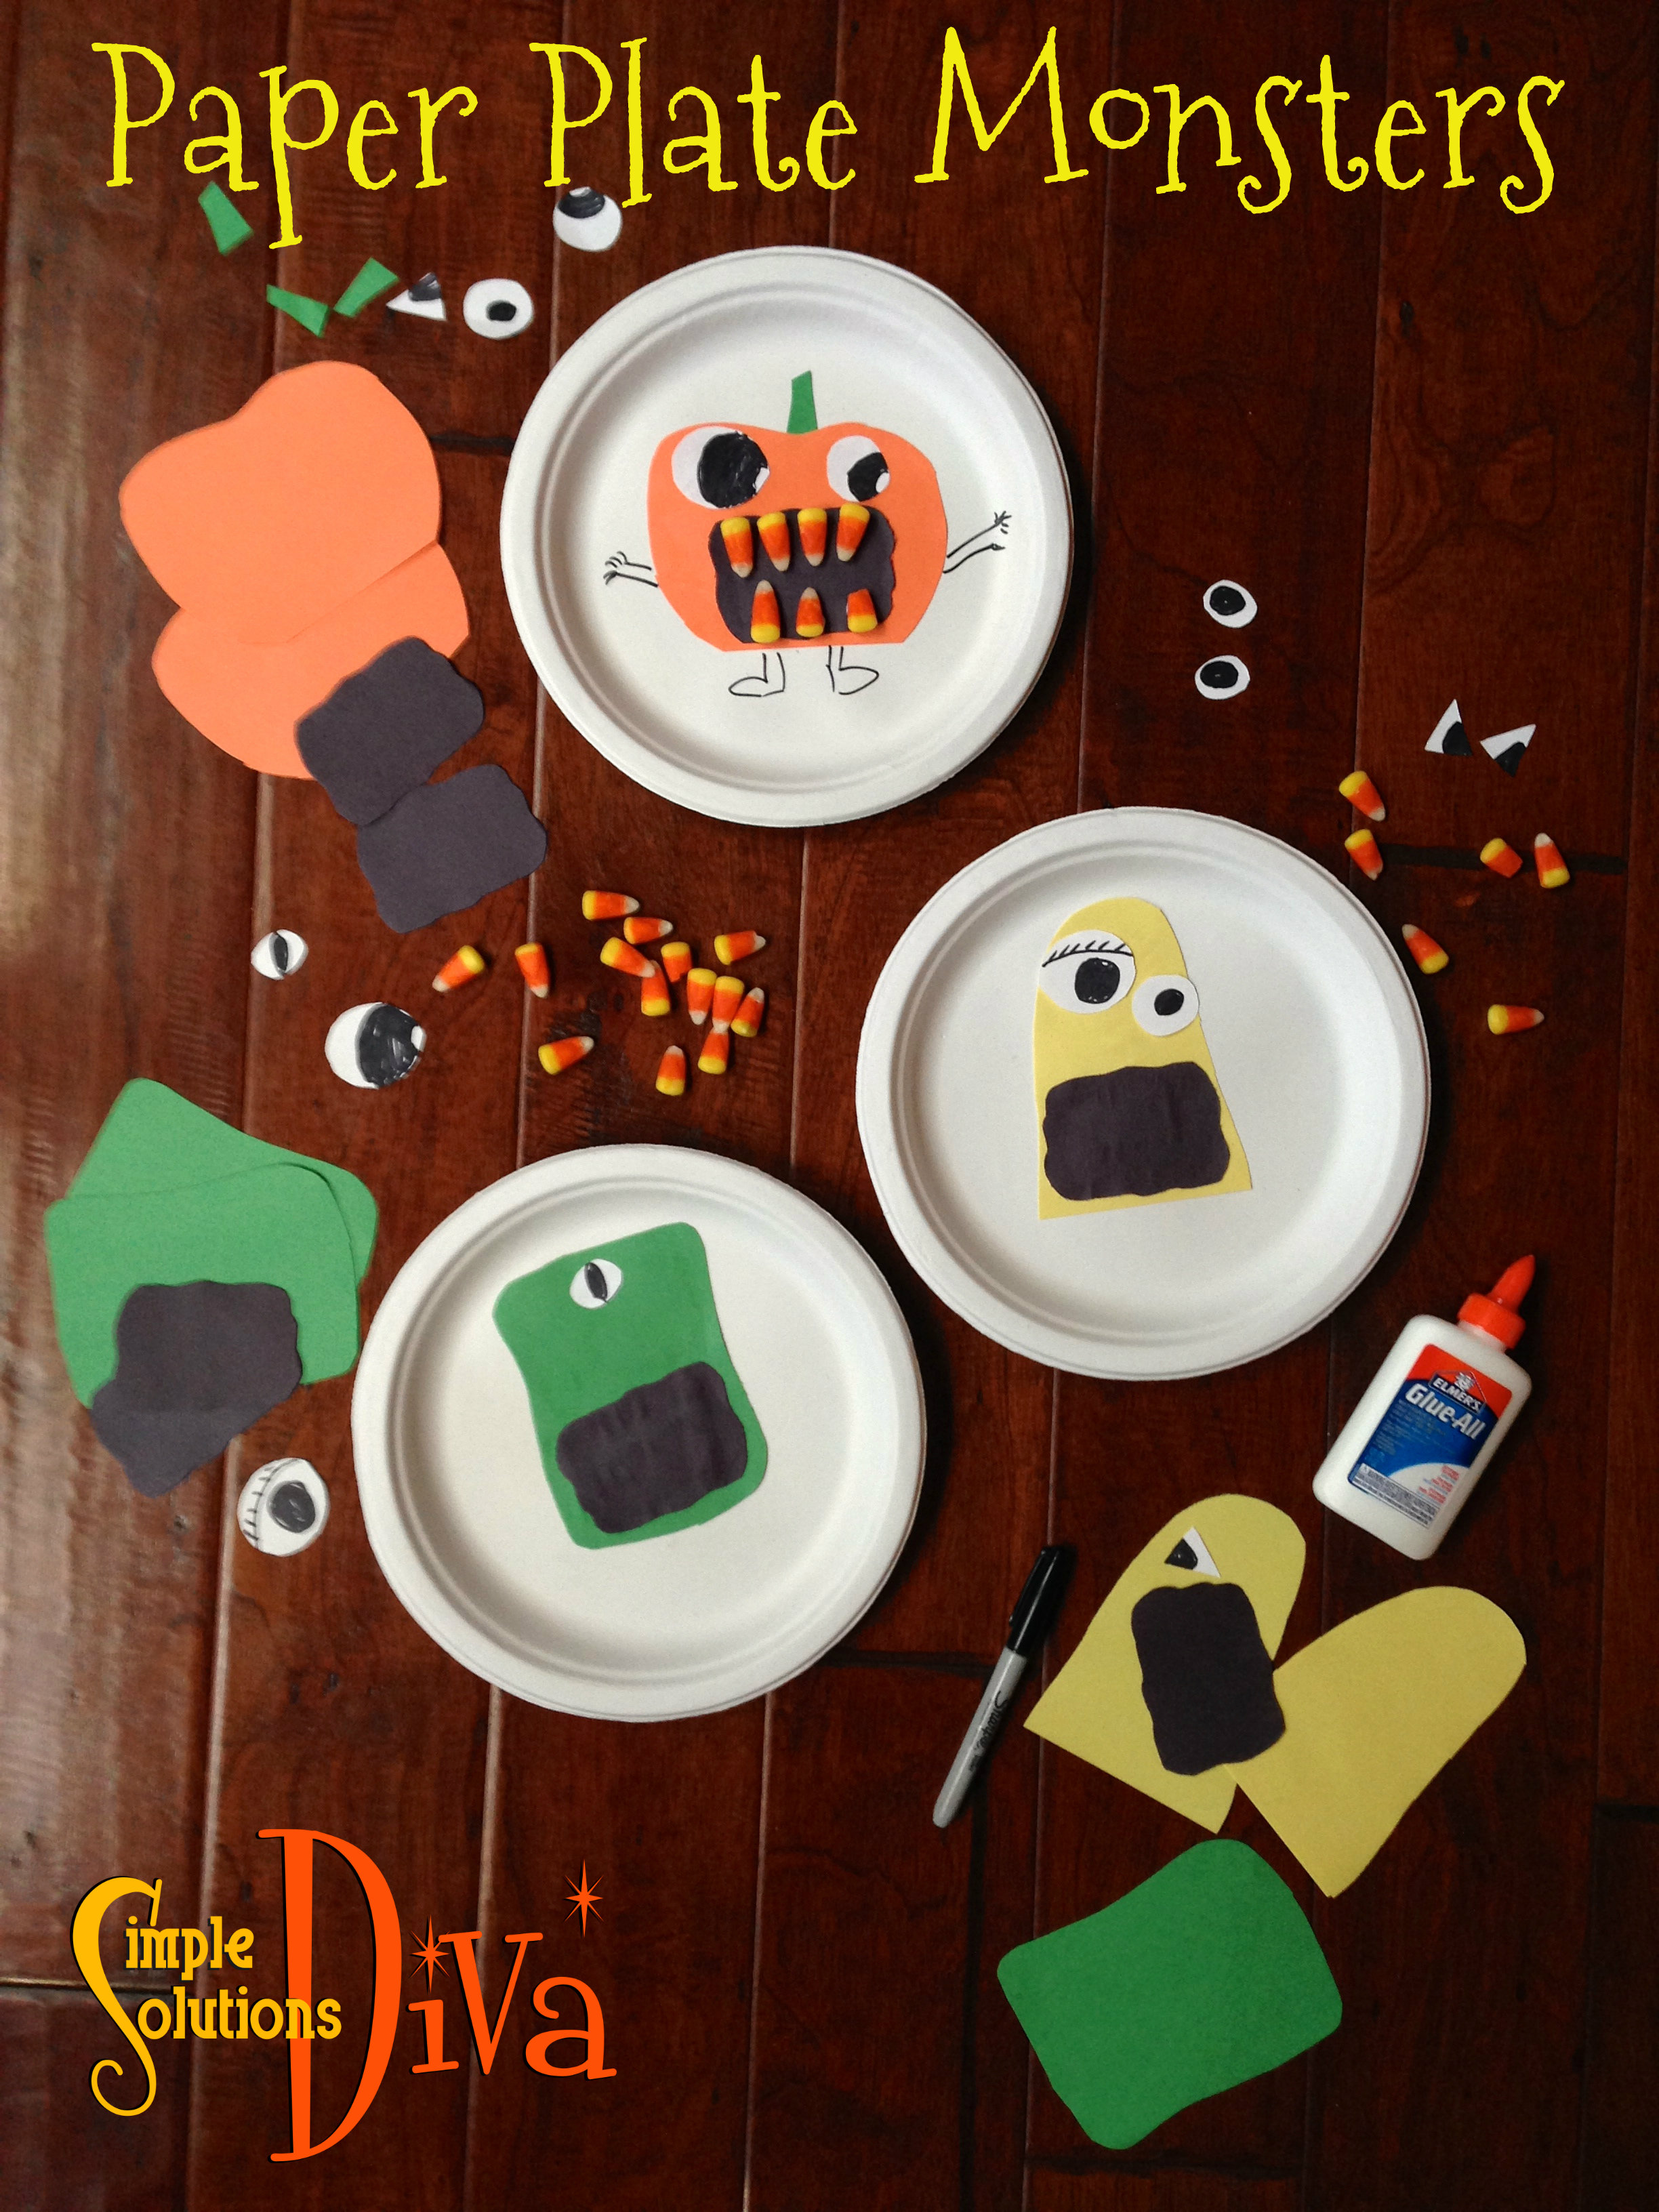
Paper Plate Monsters
A white paper plate, glue and construction paper shapes, plus candy corn, will make this craft go “Boo”! I cut out several different body styles for monsters – each in a different color construction paper. I cut out black mouths, white eye balls in different shapes. I glued the bodies on different plates, glued the black mouths on, then I had the kids pick their favorite eyeballs (I drew different irises on each eyeball!) and design their monsters. I offered candy corn as teeth, which were glued in place! The kids drew the arms and legs of their creature! Kind of creepy/cute aren’t they?!
I love finding ways to add a spooky fun Halloween motif without spending too much money! These little tips are cost effective and fun to make! Thank you to WTLV-TV’s First Coast Living for inviting me on to share these ideas!
Ghoulish Bleeding Candles
These are simple and you can use items you already have at home! Click here for the video and instructions.
Crafty Halloween Pumpkin
For something a little less ghoulish and a little more sparkly, try this simple craft idea! I used an artificial pumpkin, Halloween ribbon, and sparkly purple sequins to create a Blinged-Out Pumpkin! I used a marker to write out my word of choice (you can choose any frightening word you want.), used a hot glue gun to attach the sequins, then topped it with the bow! (you can use craft glue, instead)
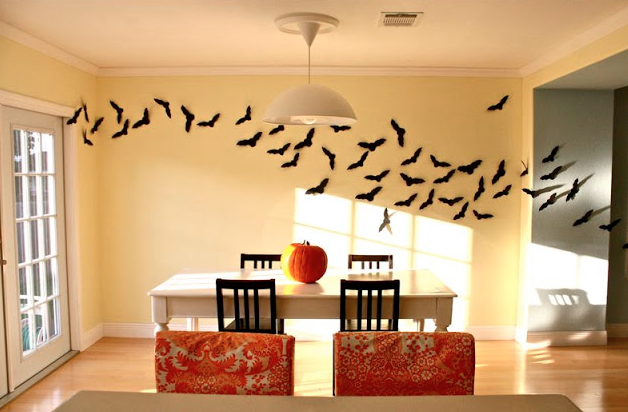
Flying Bats photo and idea from DanaMadeIt.com.
Flying Bats!
Something about the sight of a colony of bats just gives me chills! This idea from DanaMadeIt.com does the trick! It is as simple as cutting out of black card stock a lot of different sized bats and sticking them to the wall with double-sided tape! Easy Peasy! You can also set them up outside, just use duct tape – it will hold better outside!
Looking to keep the kids busy and entertained this summer? Have them make their own sidewalk chalk! This project only uses 3 ingredients and will provide hours of fun once the chalk has set! Turn those artists loose on the driveway or sidewalk and they will have a ball!
What You Need:
Water
1/4 cup Tempura Paint PER COLOR (multiple colors)
1 Cup Plaster of Paris PER COLOR (find this in any craft store)
Disposable cups – One per color you plan to use
Plastic spoons or wooden popsicle sticks, something to stir that you can throw away
Molds – It is best if you can find shaped, silicone ice cube molds or use just plain ice trays.
Instructions:
Place 3/4 cup water in the disposable cup. Add 1/4 cup tempura paint. Mix well using the plastic spoon or popsicle stick. Add 1 cup Plaster Of Paris. Mix thoroughly until most of the lumps are dissolved. SHould look like the consistency of really thick pancake batter.
Repeat the process with each color of paint you plan to use.
Pour the colored mixture into the molds. You can use one color per mold section OR you can add multiple colors to each section (just don’t stir the colors – you will get a muddy-looking chalk piece.
Allow to dry in molds for 24 hours; gently pop chalk out of molds and allow to dry another 24 hours.
Now go have a ball drawing on your driveway with your kids!
I found this recipe on PrincessPinkyGirl.com – check them out because they have some great ideas PLUS they featured some GREAT sidewalk chalk art!
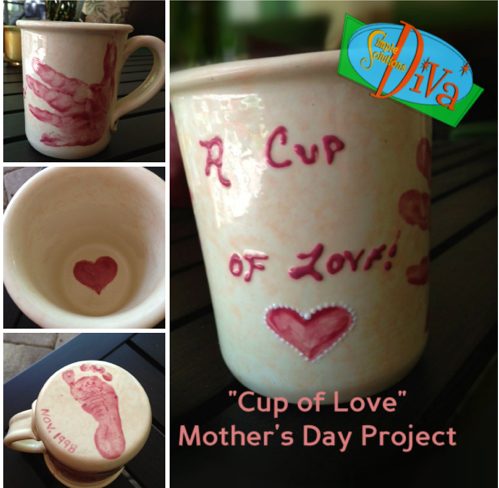
Mom loves gifts from the heart! Sometimes simple is better, and these simple crafts are perfect for mom and require very little time to do them!
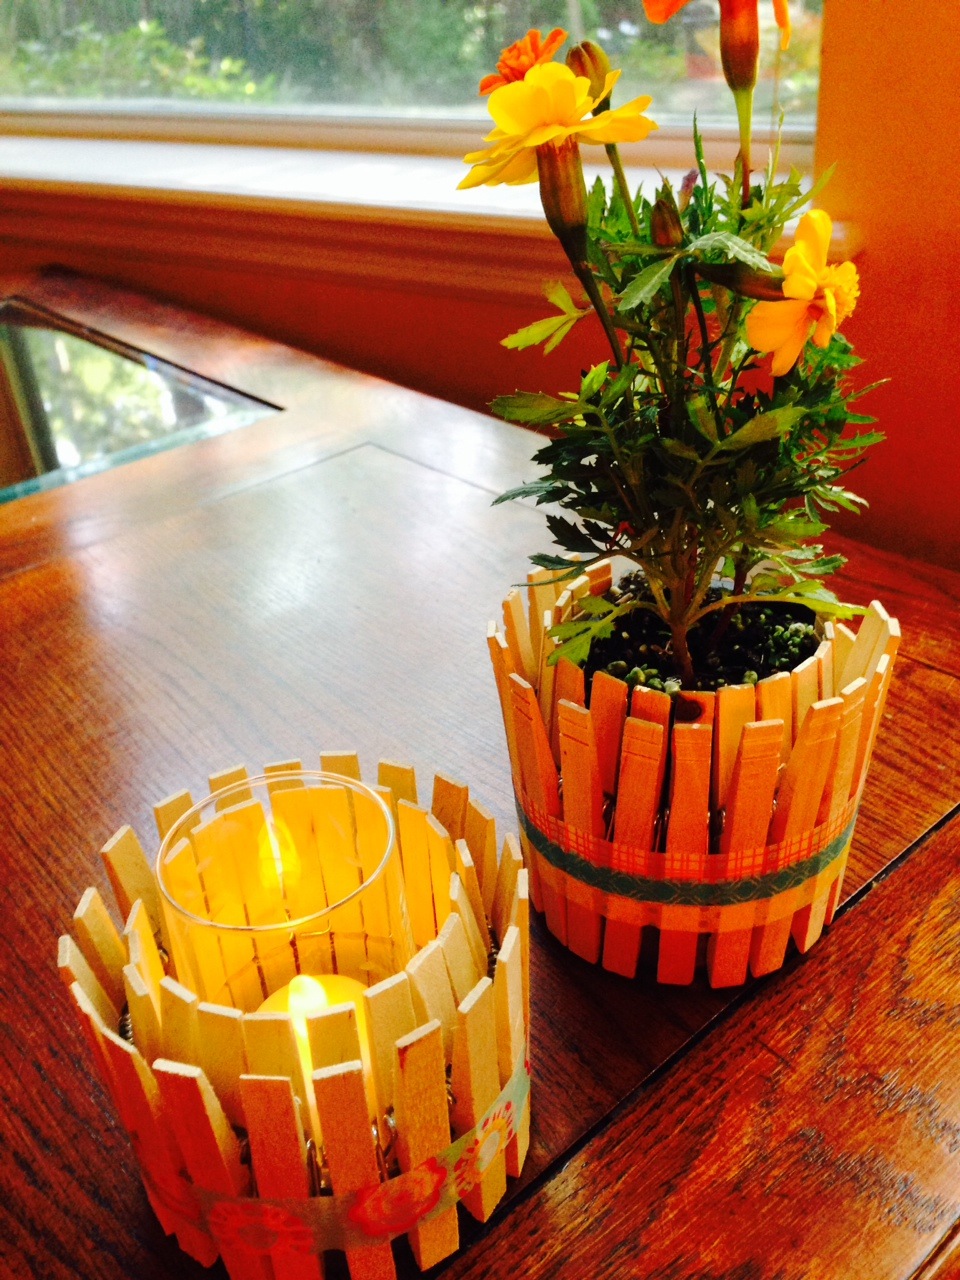
Clothes Pin Planter/Candle Holder
Clothes pin Planter/Candle Holder
This cute craft is just so easy, it is crazy! It reminds me of a picket fence!
What You Need:
Tuna fish can (or similar type of can), lid removed (and contents!) washed and dried thoroughly, label removed
Clothes Pins (I learned the hard way there are taller ones and shorter ones!)
Decorative washi tape or ribbons
Instructions:
Take clothes pins, and clip them onto the edge of the can, making sure they go all the way down to the bottom of can. Continue clipping until you have no more room.
Take a decorative ribbon or washi tape and tie/wrap it around the clothes pin-covered can. Use your imagination to make it special looking!
Place a small plant inside the center or glass votive candle holder. Voila!
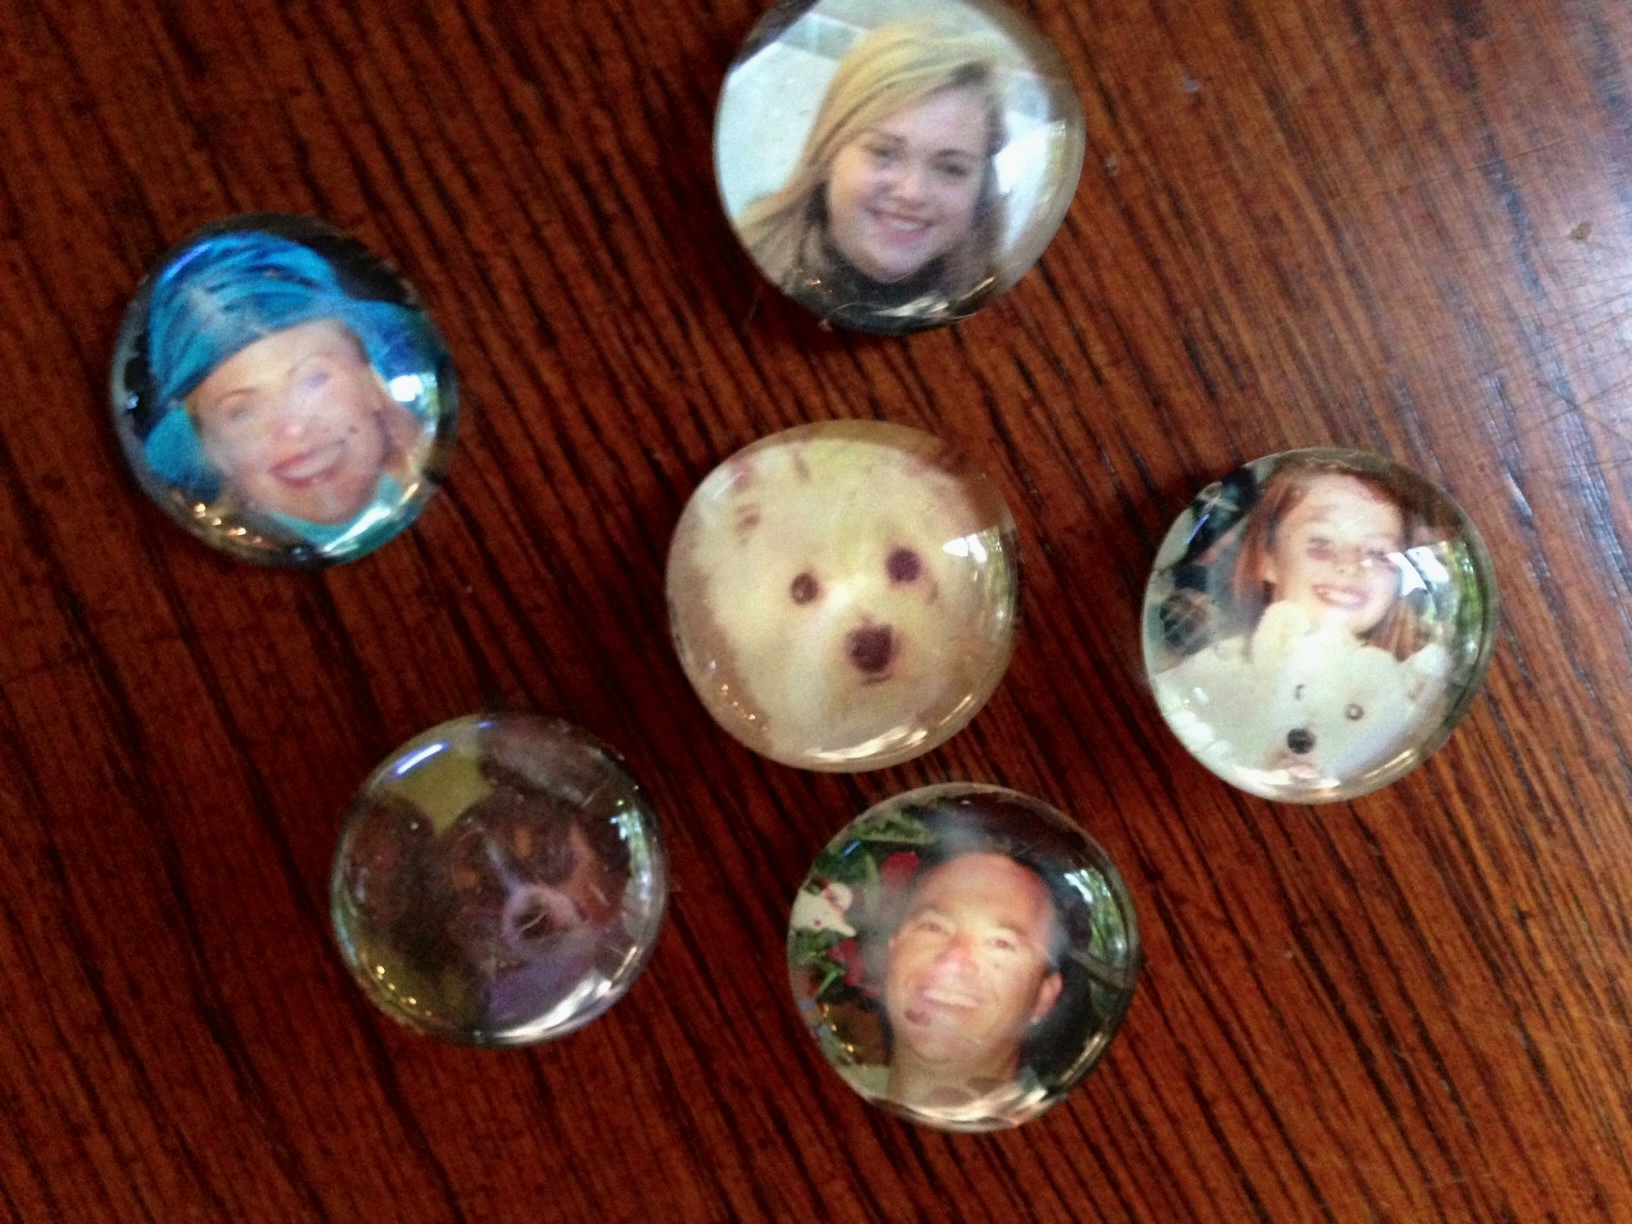
Glass Bead Photo Magnets
Glass Bead Photo Magnets, from SimpleSolutionsDiva.com.
Besides using photos, you can create small messages or words of love in colorful type on a computer and print them out to use in this project.
What You Need:
Glass Beads – I used large sized glass beads (with flat bottom) from the dollar store.
Mod Podge sealer and craft glue (available at all crafts stores)
Foam applicator
Small magnets (also available at craft stores)
Hot glue gun
Various small sized photos (or words or phrases) printed out on printer paper. I used both printer paper and actual photos – I find the printer paper works best on this project!
Instructions:
Working on a clean, flat and protected work surface, cut the photos or words into circles slightly smaller that the glass beads. You can use a glass bead to trace a circle around the photo you are using, then just trim it to fit the back of bead.
Using the sponge applicator, spread a thin amount of Mod Podge on the back of the bead. Place the photo circle, face down on the bead, pressing to eliminate any air bubbles. Turn bead over an make sure the photo is centered the way you want. Allow to dry.
Once dry, take the hot glue gun and put a small dot of glue on the magnet. Place magnet on the back of the bead/photo (glue side down). Press to adhere to back of bead. Allow to cool/harden.
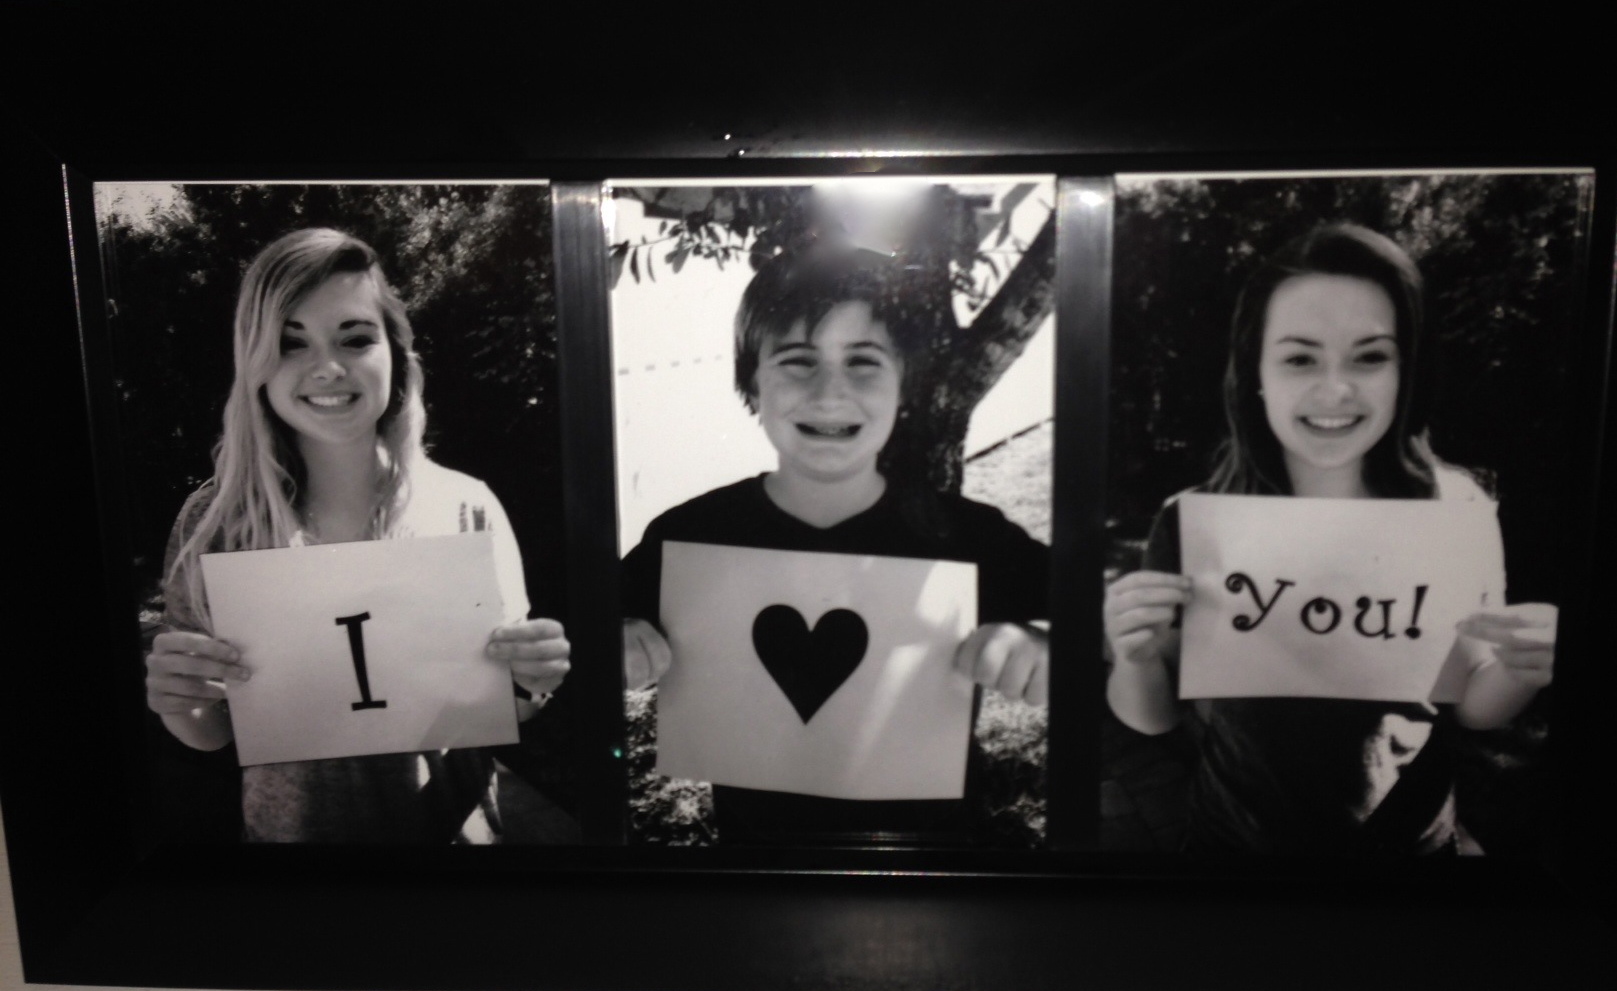
“I Love You” Photo Frame
“I Love You” Photo Frame
Again, this one is so simple, but Mom will love it!! You can also create one for the “Pet Mom” in your life!
What You Need:
Photo Frame That has multiple openings – enough openings for each child, family member or pet
Photos of family, children or pets you plan to use (make sure they are the correct size for the frame) holding signs that send the message to Mom!
Instructions:
Not many instructions – Just insert the photos in the frame and give to Mom!
I chose to use black and white, but you can use color if you prefer!
Glass Bead Candle Holder
Glass Bead Votive Candle holder
All elements of this, besides the Mod Podge and the glue, I got from the Dollar Store! Plan to make this at least 24 hours prior to when you want to give it – it takes 24 hours to dry completely!
What You Need:
Large Glass Votive
Small Glass Beads – I used clear, but you can use colored beads as well.
Aleene’s Glass & Bead Glue – You can get this from any crafts store.
Optional:
Mod Podge
Colored Tissue Paper
Foam applicator
Instructions:
Place your votive on a clean, flat and protected work surface (& well ventilated!!). Using the glass glue, glue the beads onto the votive. Tip: I flip the votive upside down, so the lip is at the bottom, and started from the bottom up. This prevented beads from slipping down the votive!
Allow 24 hours to dry completely.
Optional: If you want to add color to your votive, affix colorful strips of tissue paper to the inside of the votive using the Mod Podge. Pick the colors that work for your room! Note:If you use the Mod Podge and tissue paper on the inside, please ONLY use a battery-powered tea light. A real candle may set it on fire.
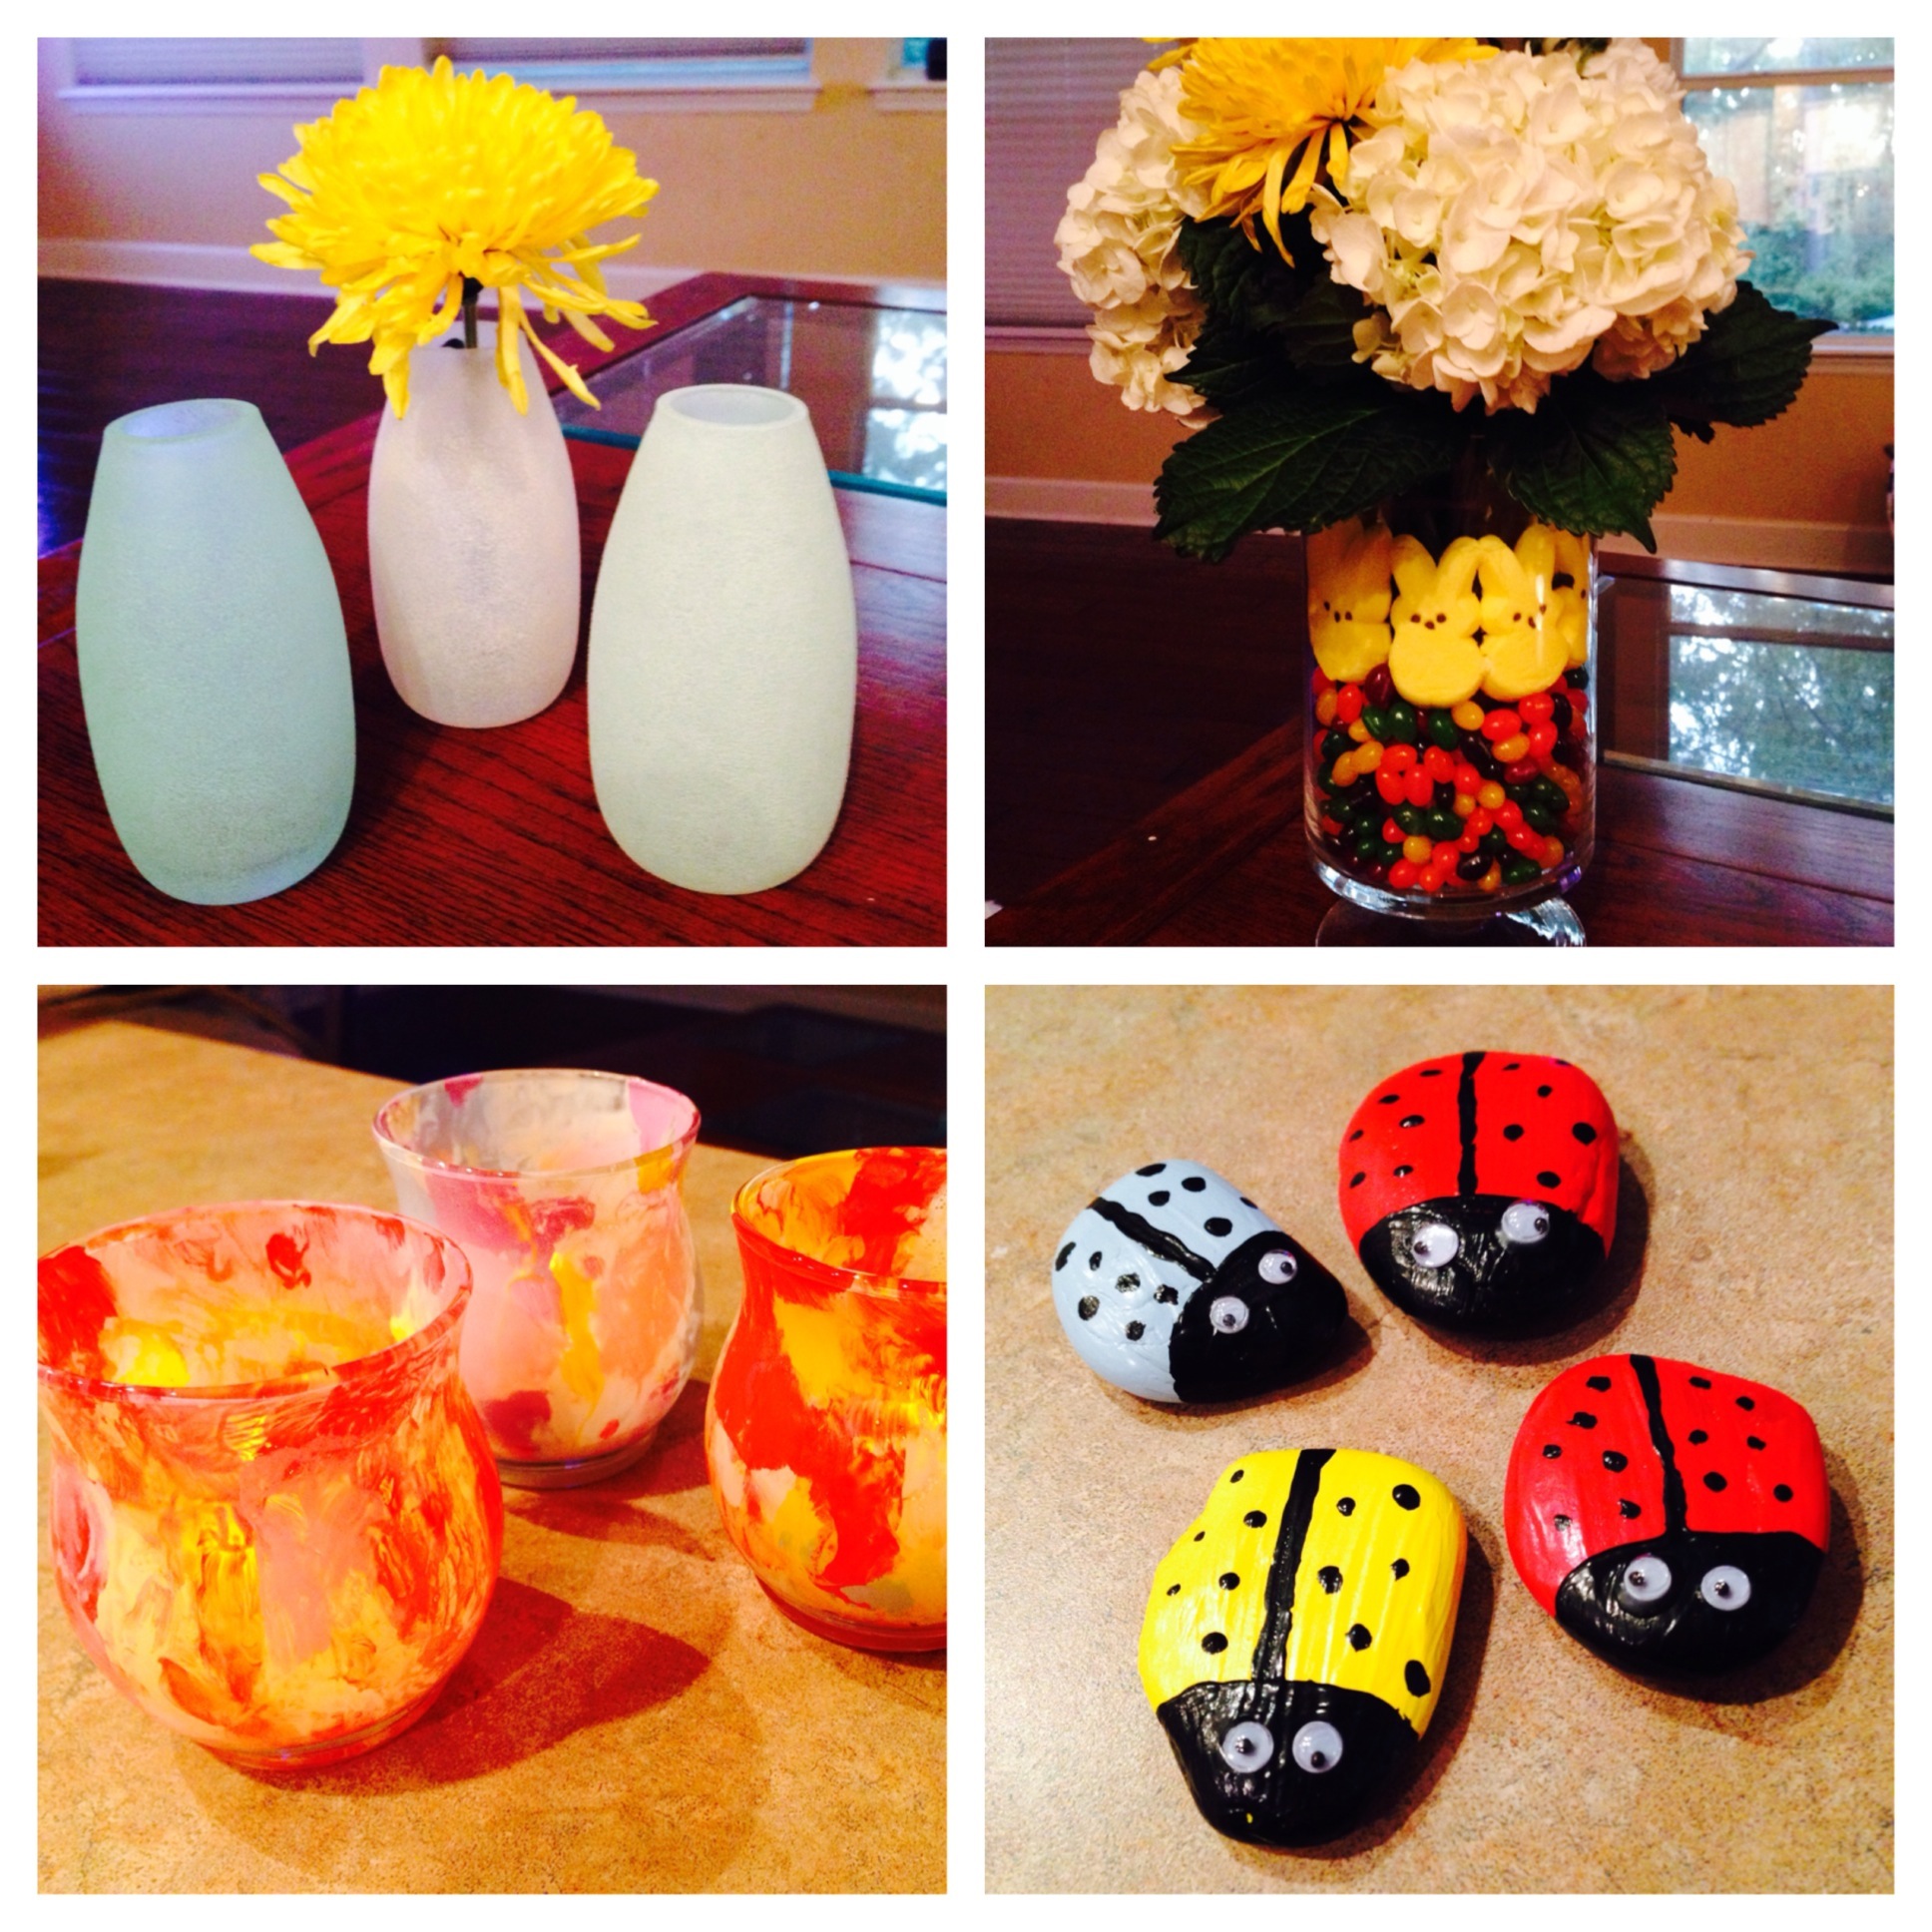
With Easter and Passover fast approaching, we will have lots of family time – what can you do that’s fun with the kids and adults to keep everyone busy? Try some springtime crafts!
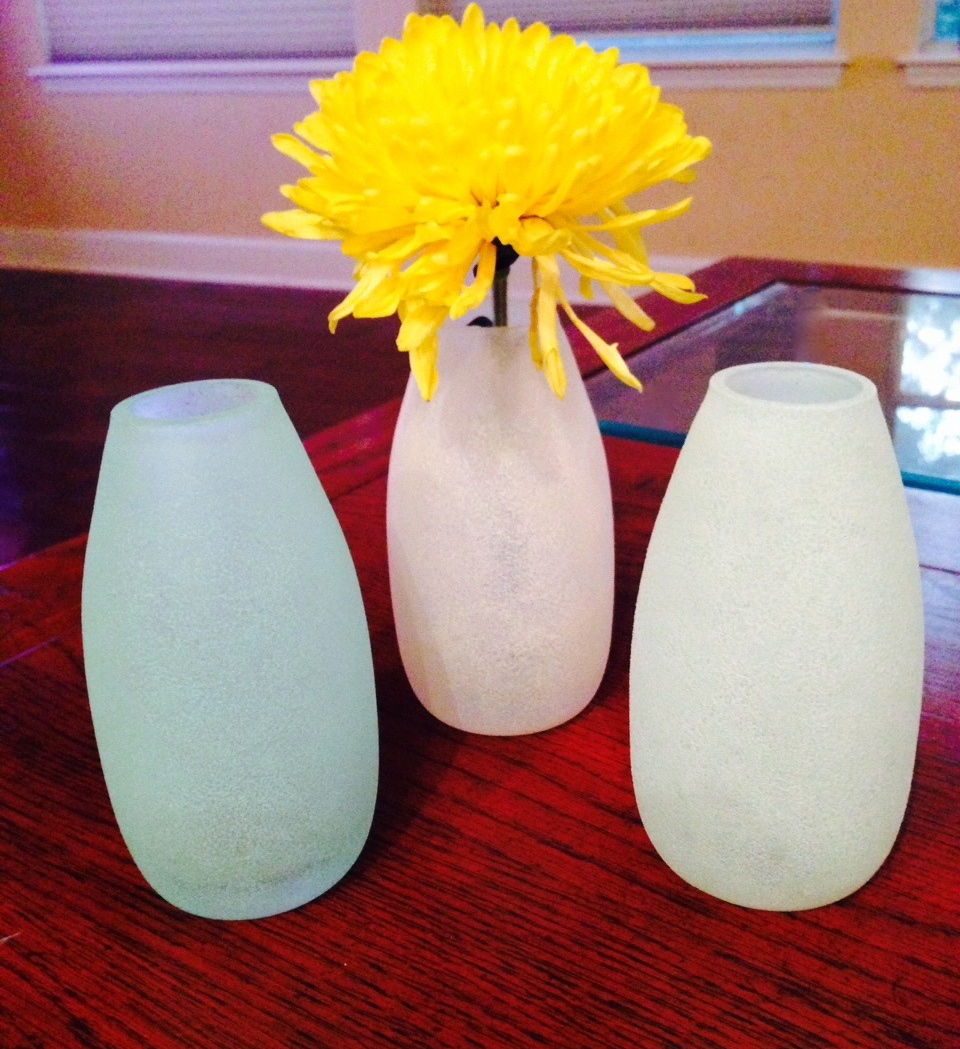
“Beach Glass” Vases
“Beach Glass” Vases from SimpleSolutionsDiva.com.
I love the look of beach glass. Muted hues of blues, greens and whites. You can make any glass item look like a piece of beach glass by just using special glass paint. I used Martha Stewart Crafts Frost Translucent Glass Paint — The effect is translucent, frost-like with a slight pebbly texture that resembles sea glass. Beautiful and easy!
What You Need:
Martha Stewart Crafts Frost Translucent Glass Paint (Available at most craft stores) I used colors of beach glass green, sea lavender and white. (Click Here To See Product And Color Selection Available)
Sponge applicators – I like to use sponge applicators because they leave a nice, pebbly texture behind in the paint.
Glass vase or other glass items – Check out the selection at dollar stores (love these stores!). You can find some great pieces that can be painted!
Rubbing Alcohol/cotton balls
Small paper plates or other item to squeeze paint on to
Directions:
Find a clean, flat work surface and cover with old newspapers. Wipe down the glass vase surface to be painted with rubbing alcohol and allow it to dry.
Squeeze out a dab of glass paint onto paper plate. Using the sponge applicator, dip the applicator in the glass paint and dab the paint onto the glass surface. Cover the entire surface. Allow to dry for one hour.
The paint is permanent after it has dried for 21 days. You can speed the process along by curing the paint by baking it. Here are the instructions from Martha Stewart Crafts: Let project air dry 1 hour, place in cool oven. Set temperature to 350 degrees. Once oven reaches 350 degrees, bake for 30 minutes (glass must heat gradually). After 30 minutes, turn oven off. Let glass cool completely in oven. Wait 72 hours before using. **
**NOTE: If you use the white frosted paint, baking the project might slightly darken the paint. Mine turned from a pretty white to a creamy, slightly toasted color.
Spring “Impressionist” Glass Painted Votives
Spring “Impressionist” Votives from SimpleSolutionsDiva.com.
Spring brings beautiful colors and softness to our landscape. I always think of Monet paintings when I think of Spring. I love the slightly unfocused visual and blended soft colors. THis little project makes me think of Impressionist paintings. And best of all, with this project, you don’t have to be perfect! Just keep it simple!
What You Need:
Glass votives – Again, the dollar stores are a great source for these types of items!
Glass Paint – I used Folk Art Brand Multi Surface Acrylic Paints, because I can use the paints for many other projects in the future. I would use no more than 3 complimentary colors. (I chose 2 colors, plus white.) Click Here to see product and color selection.
Paper plate to squeeze paint on
Cup of Water
Paintbrush
Rubbing Alcohol/cotton balls
Directions:
Clean the inside of glass votive with rubbing alcohol and cotton balls. Alow them to dry.
There is no one method for this – just listen your inner artist!! The first one I did I was not thrilled with, but once I limited my colors to 2 colors plus white, I found the ideal combination for me!
My technique for 3 colors: Take your paintbrush and dip in the cup of water. Swirl brush into your 1st paint of choice and apply dabs to inside of the votive. Clean the brush and repeat the “swirl and dab” process above with second color. Using the same process, finish with the white, using it to blend and swirl the other colors inside the votive. You will be really surprised when you are done how nice it looks! Just don’t use too many colors or it will start to get “muddied”.
Allow to dry 21 days or cure the glass using the same instructions under the Beach Glass Vases above.
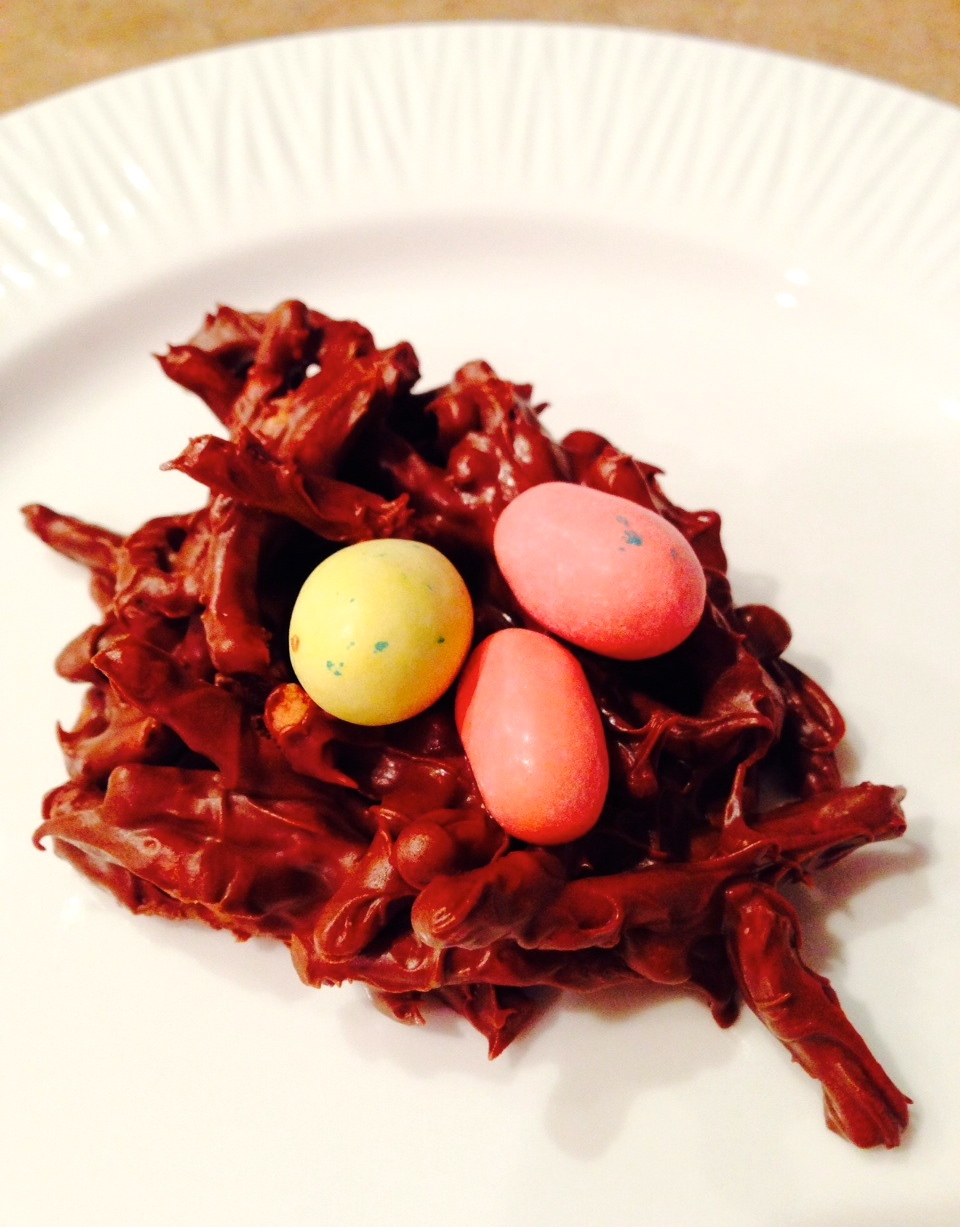
Edible Robin’s Egg Nest
Edible Bird Nests from SimpleSolutionsDiva.com.
I love making food related crafts with the kids! They love getting messy and they enjoy “cleaning” (read licking) their fingers when done. These little bird nests are adorable and pretty yummy. They are a twist on an old favorite I remember eating as a kid.
Ingredients:
1 bag semi-sweet chocolate chips (12 oz.)
1 bag butterscotch chips (11 oz)
10 oz. Crunchy Chow Mein Noodles
1 bag of bird egg shaped candies of your choice (I used Whoppers malted milk balls in the shape of bird eggs, but M&M’s or jelly beans would work, too.)
Parchment paper or wax paper
Directions:
Combine and melt both bags of chips in a microwave safe bowl, on 50% power for 60 seconds. Stir. Repeat the process until all chips are melted. Gently stir in the chow mein noodles until well coated.
On a flat work surface, spread out parchment paper/wax paper. Using clean hands, take a small handful of the chocolate/chow mein mixture and put it in a shape of a small nest on the parchment paper. Repeat the process until you have used all the mixture. Take 3 “eggs” (egg-shaped candies) and arrange on each nest. Let harden or place in fridge to speed up the hardening process.
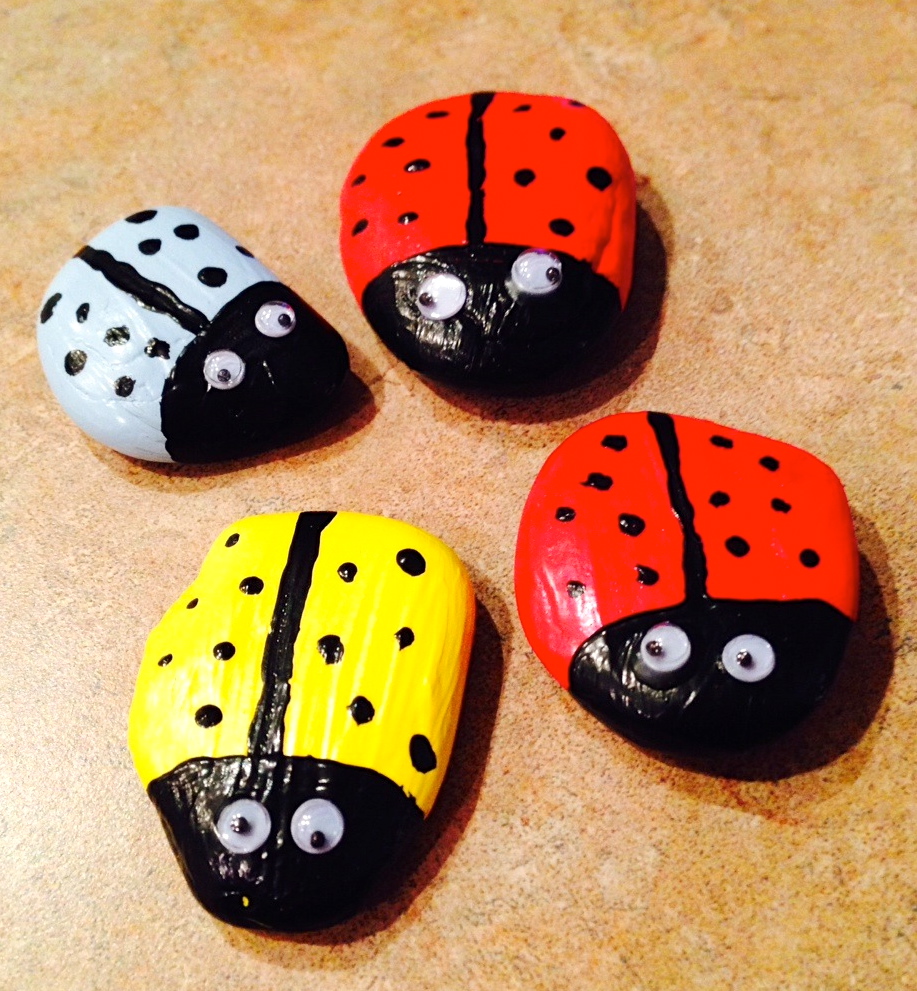
Ladybug Garden Décor
Lady Bug Garden Decor from SimpleSolutionsDiva.com.
This is a cute little project kids of all ages will enjoy and it is very simple & inexpensive to do!!
What You Need:
Flat rocks of various sizes (I used river rocks I bought at the dollar store)
Assortment of acrylic paints, including black paint. I used Folk Art Multi Surface Acrylic paints.
“Wiggly” eyes for the ladybugs.
Glue
Clear Acrylic Sealing paint to seal the rocks once painted.
Paintbrush – I used a large one for the overall colors and a fine tipped one for the ladybug dots and wing line.
Directions:
Wash and dry the rocks to be used.
On a flat, protected work surface, lay your rocks out and paint them the overall colors you want. Allow to dry for about ½ hour.
Now for the details! Taking the black color paint, paint the head of the ladybug. Draw a lie down the back of the lady bug using the black paint and the thin, small tipped brush. Add dots to the ladybug’s back. Allow to dry. Apply Clear Acrylic Sealing paint to the ladybugs and allow to dry.
Add 2 small dots of glue to the ladybug head. Place a wiggly eye on each dot and allow to dry.
Place in the garden, indoor planters, display on desk or table. They also make adorable paperweights!
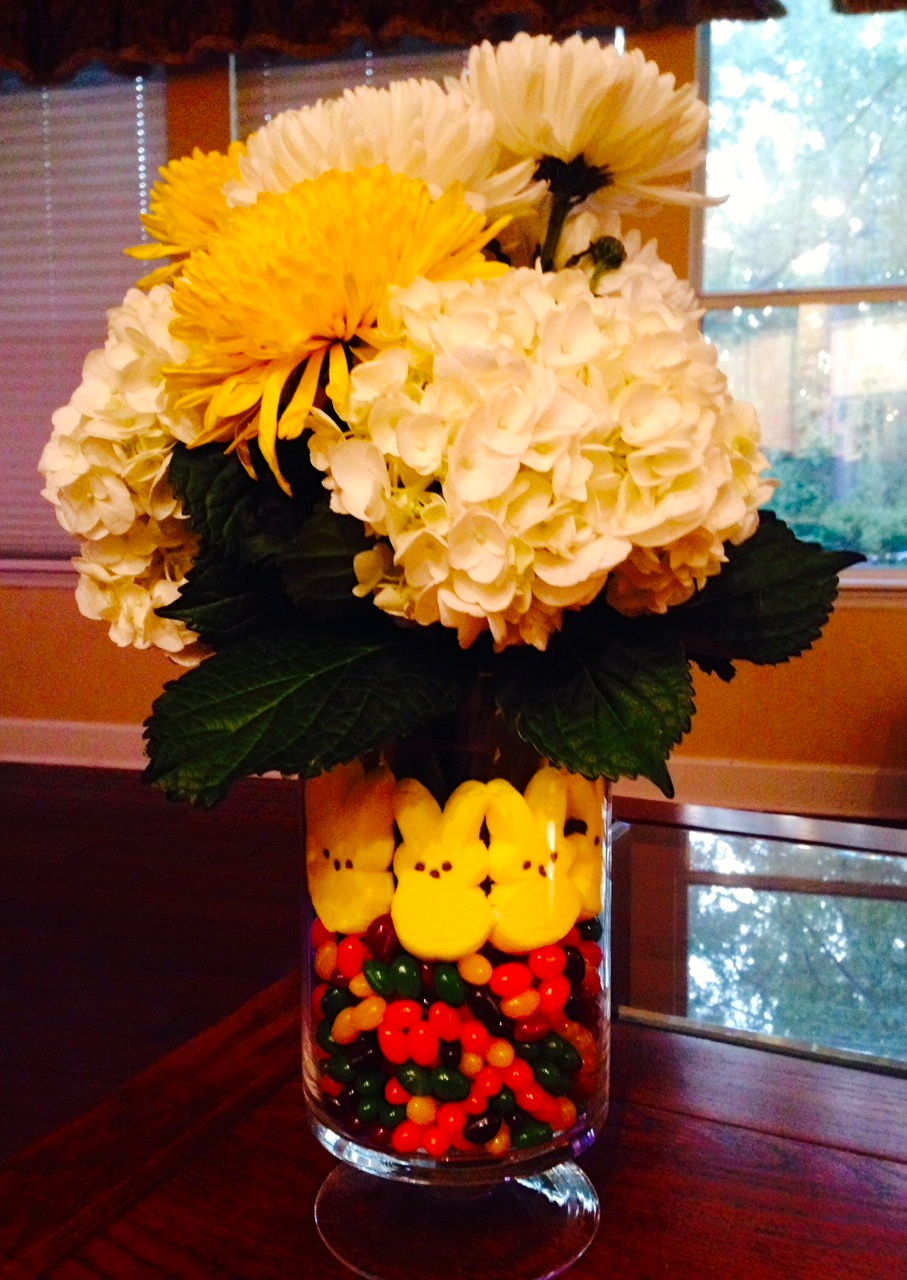
Easter Centerpiece
Easter Centerpiece from SimpleSolutionsDiva.com.
This is a fun way to bring Easter to the table and let the kids get involved! I have seen it all over Pinterest and thought I needed to try making it – SUPER simple!
What You Need:
Two vases, one smaller that can fit into the larger vase, allowing for at least a ½ inch space between the two.
1 bag of jellybeans
1-2 packages of Peeps bunnies
Flowers of choice
Instructions:
Place smaller vase inside larger vase, making sure it is centered. Pour jelly beans into space between the two vases, making sure you make it as level as possible around the vase. Take Peep bunnies out of package and slide a row of them into the space between the two vases, letting them rest on the jellybeans. Repeat the process until the bunnies go all the way around the vase.
Trim your flowers to fit the inside vase. Pour water into the inside vase and arrange flowers. Voila! You have a beautiful centerpiece the kids helped with!
Thank you to WTLV-TV’s First Coast Living for inviting me on to talk about these fun craft projects!