SimpleSolutionsDiva.com

Kids

Simple Halloween Costumes For Kids, Under $10


Screenshot 2014-10-18 10.32.58Halloween is coming and the kids all want costumes, right?  But who has the money to buy expensive ones that will be worn once? Well, I found the solution!  My friends at Dollar Tree asked me to create some fun and inexpensive Halloween costumes using items from their stores! Best thing about it? Everything is a $1 at Dollar Tree, so you and I leave happy because we didn’t have to break the bank this year!

How To Get Creative Ideas

Before you head to Dollar Tree, I recommend you browse Pinterest for Halloween costume ideas for kids (here is a link to some great costumes). This really helps you get your creative juices flowing. When you get to Dollar Tree, you can see what is available in your store and then apply it to some of the Pinterest Ideas.

My Costume Ideas


Dollar Tree Cowgirl by SimpleSolutionsDiva.com.
Dollar Tree Cowgirl by SimpleSolutionsDiva.com. Total Cost: $5

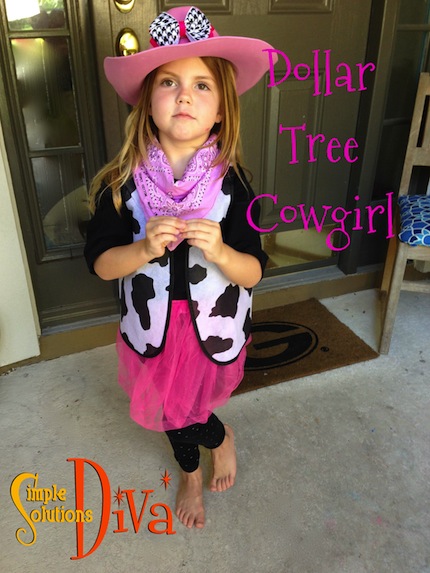
Cowgirl: Cowgirls have style, too! I’ve used a shirt, leggings and pink bandana our adorable model already had. I added items from Dollar Tree – Pink Cowboy hat, cowboy vest (black and white), Pink Tutu (I’m using two so it is fluffy!), black and white houndstooth bow w/pink trim (for cowboy hat). Total Cost: $5


Dollar Tree Military Man by SimpleSolutionsDiva.com
Dollar Tree Military Man by SimpleSolutionsDiva.com. Total Cost: $4

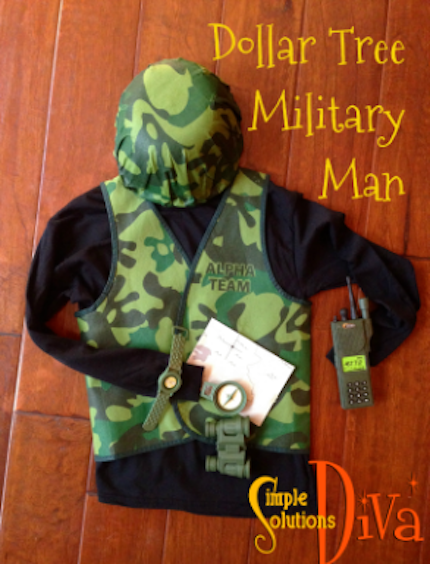
Military Man:  For our Mighty Military Man, I paired a long sleeve black T-Shirt with these items from Dollar Tree – Camo helmet, camo vest, military action play set, walkie talkie. Total Cost: $4


Dollar Tree Knight by SimpleSolutionsDiva.com. Total Cost: $5

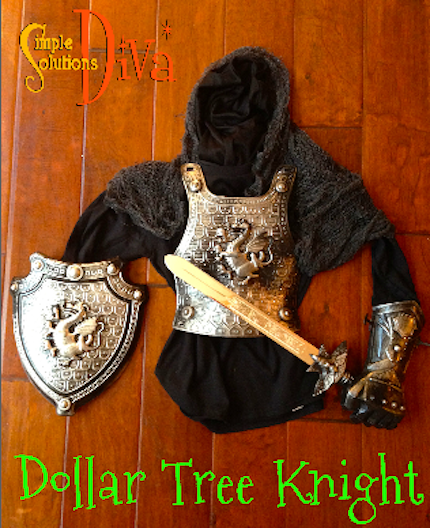
Knight: I had so much fun creating this costume! I used a long sleeve, black T-Shirt, then added from Dollar Tree – Knight Chest Plate, knight shield, knight gloves, sword, black ninja hood with red trim removed, Creepy Cloth. Total Cost: $6


Dollar Tree Flower Pot Costume by SimpleSolutionsDiva.com. Total Cost: $9

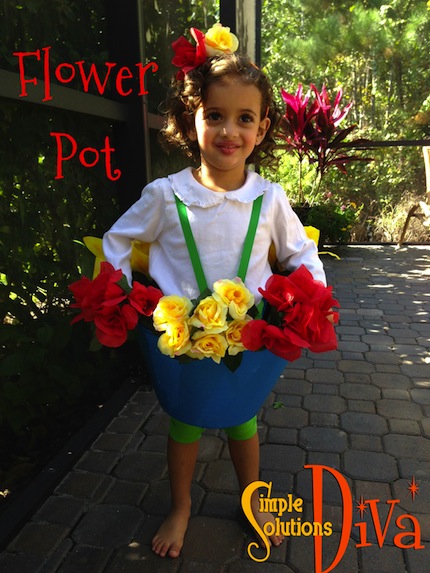
Flower Pot:  This sweet little costume blossomed when put on our adorable model! She brought the white shirt and green leggings from home, and I added from Dollar Tree – Blue beverage tub with handles (bottom cut out), red and yellow silk flower stems (6 total duct-taped to the inside of the tub), green grosgrain ribbon for suspenders(also duct-taped to inside of tub), orange sparkle headband with 2 of the flowers hot-glued on it. Total Cost: $9

Don’t Forget Halloween Accessories, Too!

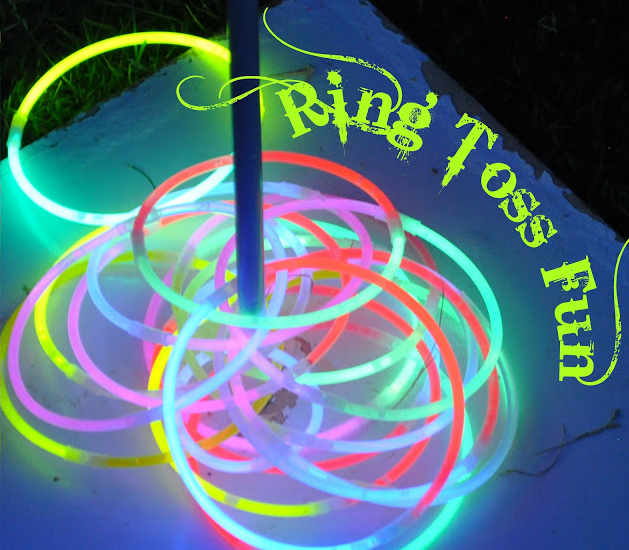
Dollar Tree has a very wide assortment of glow sticks, bracelets, wands and other glowing accessories that are not only fun and fashionable but will keep your family safe this Halloween season. Plus, they have some great looking candy pails, including my favorite – the Glow in The Dark Pumpkin Pail! All for a Dollar!

Additional Costume Ideas


Dollar Tree "Elsa" Costume by SimpleSolutionsDiva.com. Total Cost: $4
Dollar Tree “Elsa” Costume by SimpleSolutionsDiva.com. Total Cost: $4


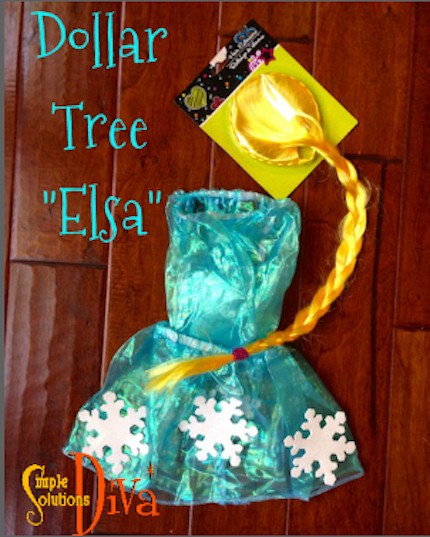
Improvised Elsa Costume: The hottest little girls costume this year is Elsa, from Disney’s Frozen. While I was at Dollar Tree, I found the perfect pieces to create the must-have costume of the year!  Pair this little costume with a white, long-sleeved leotard and tights (or  long-sleeved white T-shirt, shorts and tights)! Dollar Tree Items used – 2 blue tutus, one package snowflake forms (glued on with hot glue gun), one blonde “hair extensions” headband (braided). Total Cost: $4

For More Information

Check out a Dollar Tree store near you and you will be even more amazed at what one dollar can buy. Dollar Tree is my Halloween headquarters – a one-stop shop for affordable spook-tacular decorations and costume accessories. Happy Haunting, I mean, Hunting!

To shop for more products for Halloween or the upcoming Holidays, visit your local Dollar Tree store or visit DollarTree.com.  For terrific project ideas (with details on the products used to make them!), visit their project website at  ILeaveHappy.com!

Thank you to Dollar Tree for sponsoring this project, and to WTLV-TV’s First Coast Living for bringing us on to model the costumes! And a BIG thank you to our wonderful child models!

DT Costumes 2

Back To School/After School Treats: A Recipe Round-Up!

The kids are heading off to school early in the morning, and coming home STARVING! How do we give them treats that are filling, are good for them, and will not ruin their dinner? Simple Solutions Diva has gathered a few recipes from friends and her social media circles that are sure to be easy, fun, and great snacks!

Peanut Butter Banana Chocolate Chip Cookies!

Screen Shot 2013-08-19 at 2.18.40 PMWarm muffins fresh out of the oven just melt my heart every time!  Make them in mini muffin tins (or in heart shaped muffin tins, as illustrated in the photo!) for a perfect child-sized treat.

Ingredients:

3-4 ripe bananas, mushed
1/2 cup peanut butter
1/2 cup sugar
1/2 cup milk
2 cup all-purpose flour
2 teaspoons baking powder
1 teaspoons baking soda
1 cup mini chocolate chips

Preparation:
Preheat oven to 350°.  Mix together bananas, peanut butter, sugar, and milk.  Add in flour, powder, and soda.  Stir in chips.  Prepare pans with cooking spray or oil.  Pour into prepared pan(s).

Bake mini muffins or heart-shaped muffins for approximately 15 minutes.  Bake loaf for 45-50 minutes and regular muffins for 15-18 minutes.

This yummy recipe (and photo) is courtesy of Annette at ThisSimpleHome.com.  She always has wonderful recipes, homemaking tips, craft ideas, and so much more on her website.  If you have a chance, please visit her!

Simple, Small-Sized Pizza

SImple Pizza Using Stonefire NaanWhat kid does not like pizza? And decorating your own mini pizza to bake can be a healthy treat for the kids, because YOU control the ingredients!

Provide the kids with sauce, your favorite mozzarella or other cheese, fresh cut veggies, turkey pepperoni (Hormel has a mini-sized turkey pepperoni that is terrific-70% less fat than regular pepperoni!), and they have their own pizza pie shop!

Now, because I’m the SIMPLE Solutions Diva, I love to use pre-baked breads for the base of my small pizza – you can use 1/2 an english muffin (PERFECT small size!), small pitas, or one of my favorites, StoneFire Naan Flatbreads (See photo above).

Once assembled, these little pizzas cook up quickly in the oven or toaster oven – Cook at 400 degrees, for 5-10 minutes. Not much of a recipe, but you get the idea! And in my book, the simpler, the better!

Trail Mix Sprinkle Cracker Snack

Trail Mis Sprinkle Cracker Snack from LunchBoxBunch.com.
Trail Mix Sprinkle Cracker Snack from LunchBoxBunch.com.

Another great recipe where the kids can take a break from studying to make a tasty snack.  And it is Vegan, so you can feel good about giving it to your kids!

Ingredients:

8 extra large ‘entertaining’ size crackers, multi or whole grain
4 Tbsp vegan cream cheese or nut butter (you can use regular cream cheese instead of vegan if you prefer)
1 Tbsp maple syrup
1 1/2 cups of “trail mix” sprinkle – Basically a mixture of your favorite combo of dried fruits/nuts/seeds. A few ideas: dried apricots, dried blueberries, salted sunflower seeds, almonds, cashews, poppy seeds, pumpkin seeds, dried cherries, dried figs, sesame seeds, goji berries, shredded coconut, dried cranberries, walnuts, pecans, Brazil nuts, pistachios and hazelnuts.  For large items like dried apricots and large nuts-be sure to chop them into pea sized bits.

Preparation:

1. Assemble your trail mix sprinkle of choice in a bowl, making sure you chop extra large pieces into smaller pieces.

2. “Whip” your maple syrup into your cream cheese or nut butter into a smooth “frosting”.

3. Line a cookie sheet or other flat surface with wax paper (this will catch any wayward sprinkles so they can be used again!.)

4. Assemble the crackers (pack them tightly together) on the covered flat surface. Spread one teaspoon of “frosting” onto each cracker.

5. Sprinkle the trail mix mixture over the crackers and frosting. Press mixture lightly and then remove crackers to individual plates and enjoy!!

This recipe (and the photo!) is from LunchBoxBunch.com; it is a site full of tasty and terrific Vegan recipes. 

Choco-Banana-Almond Chiller

Choco-Banana-Almond Chiller from SimpleSolutionsDiva.com.

My nephew loves chocolate (What can I say? He takes after his favorite Auntie!), and since he discovered Chocolate Almond Milk, he’s hooked! I haven’t introduced this smoothie recipe to him yet, but I know he will LOVE it!

Ingredients:

8 oz. Silk Pure Almond Milk, Dark Chocolate Flavor

1 small, frozen banana

1 heaping teaspoon almond butter (I love the crunchy kind)

A handful of ice

(Optional: For an extra kick of calcium, you can get creative and add flavored yogurt, like coconut flavored for an “Almond Joy” type of flavor, or just plain vanilla yogurt.)

Preparation:

Blend all ingredients in a blend until the drink is smooth. Serve icy cold!


For more great ideas for snacks and Back-To-School snack ideas, visit Simple Solutions Diva’s Simple Snacks For Back To School Pinterest Board, where I’ve collected way too many ideas to feature here in this post!  May your kids enjoy their new school year (and may YOU enjoy a little quiet time!). 


Summer Activity: No Dye, Tie-Dye Shirts

Photo Credit: SunScholars.com

Love the look of Tie-Dye, but don’t want the hassle (or the messiness) of dye! Try this great idea from SunScholars.com: Sharpie Tie-Dyed T-Shirts! Rachel of SunScholars.com provides these instructions:

Supplies You Will Need:
  • Variety of Colorful Sharpie Permanent Markers (Tried other brands with poor success)
  • Rubbing Alcohol
  • Something to “Tie” Dye, such as a white T-shirt
  • Plastic Cups
  • Dropper
  • Rubber Bands

Instructions:

** Before you start, make sure you protect your work surface!
Prepare the Shirt!
Place cups, open-side up, underneath, securing with a rubber band.  We placed as many as we could at one time.
Design Your Shirt!
Use your favorite Sharpie colors to make designs on each ‘circle’.  We loved the way dots of color would look in the end, so we added lots of those.  You might want to test different colors, as some spread nicer then others too.
Photo Credit: SunScholars.com
Add The Alcohol! Use a dropper to add a little alcohol at a time to the center of each ‘circle’.  Don’t over-do it!  The alcohol will continue to spread for a while after it is added.
Photo Credit: SunScholars.com
Now WAIT! You need to wait a bit to allow the alcohol to dry (so not to spread on parts of your shirt you don’t want it to).
What designs look like after adding alcohol. Photo Credit: SunScholars.com
Once it is dry, you can remove the cups and rubber bands.  You may want to add designs on the opposite side of the shirt.
To take a closer look at Rachel’s instructions, Click Here.

Cooking With The Kids: Taco Cupcakes

Taco Cupcakes from SimpleSolutionsDiva.com.

Ingredients:

1 lb. extra lean ground beef
1 packet taco seasoning
2/3 cup water
1 can black beans, drained and rinsed
2 cups cheddar cheese, shredded
36 wonton wrappers
your favorite taco toppings – salsa, cheese, sour cream, lettuce, tomatoes, etc.
cooking spray

Preparation:

Preheat oven to 375.

Brown the meat in a skillet and drain off fat. Return the meat to the skillet; add the taco seasoning, water and black beans.  Mix and simmer for 5-10 minutes, until water is absorbed.

Spray 18 regular muffin pan cups with cooking spray.  Place one wonton wrapper in each muffin cup.  Divide half of the taco meat between muffin cups.  Sprinkle half of the cheese over the cupcakes.  Repeat layers – wonton, taco meat and cheese.  Bake at 375 for 20 minutes, or until cheese is bubbly.  Top with your favorite taco toppings.

Enjoy!

Boredom Busters: Kid-Friendly Summer Activity Ideas

I’M BORED! Those dreaded words that make any strong mother or father drop to their knees and scream, “What on earth can I do to keep them entertained?!” If this kind of describes you and your summer with the kids, then this topic is for you! I have pulled together some great summer entertainment ideas that will help keep your kids entertained (at least for a little while!).

I have included credit and links to websites where I found some of these ideas. I encourage you to visit the sites – they are wonderful and worth the visit!


Photo Credit: OverTheBigMoon.com
Photo Credit:
OverTheBigMoon.com

Homemade Ice Cream in a Baggie! My girls did this yummy project in elementary school, and it is a surefire winner in entertaining the kids! This project is great for older and younger children alike (even us moms and dads!). Recipe credit goes to OverTheBigMoon.com– Adorable website with great craft ideas and more!

Ingredients:

  • Half and Half
  • Sugar
  • Vanilla
  • gallon Ziploc baggies
  • quart Ziploc baggies
  • Ice
  • Rock salt

For each serving you need 1 cup of  half and half, 2 Tbsp. sugar, and 1/2 tsp. vanilla. Pour ingredients into a quart bag and seal. (Blogger did about 3/4 cup half and half and 1/4  cup whipping cream. She said, “the whipping cream made it really smooth and creamy. Do not use all whipping cream though because it kind of whips up and doesn’t freeze as well.”)

Fill a gallon Ziploc bag a little less than half way up with ice and then add 1/2 cup rock salt and the quart baggie with the ice cream ingredients. Then shake it! It takes about 5 minutes to get it a really thick consistency. (Best of all, the kids will be exhausted by the time it reaches the right consistancy!) Once is it done, you can add chopped fresh fruit to make it a little extra special.

When everyone has enjoyed their treats, ask the kids how they think it became frozen. Challenge them to research the answer online. A teachable moment!


Screen Shot 2013-06-11 at 8.20.26 AM
Photo Credit:SheriSilver.com

Crafty Orange Bird Feeders. Most kids are naturally drawn to any project that helps animals.  And the reward of creating a bird feeder that attracts beautiful, colorful birds into your yard is a real treat, plus it demonstrates the immediate benefit of the project. This idea comes from SheriSilver.com, a website full of crafty ideas!

Materials:
orange
(4) pieces of twine, yarn or string, cut into 24? lengths
bird seed

With a sharp knife, cut the orange in half – scoop out the flesh. Pierce 4 small holes on opposite sides, about 1/2? from the top edge of each half . Thread one piece of twine through a hole, and out the opposite end. Repeat with the second piece of twine in the remaining holes (you’ll have an “X”). Gather the ends together and tie in a knot. Repeat with the other half. Fill with bird seed and hang from sturdy branches outside.

Photo Credit: wallcoo.com

Family and Friend Dog Show! Gather together the sociable dogs of family and friends, a few props (you can use chairs, skateboard ramps or the slide in the backyard), and lots of treats, and you have the makings of a great dog show!

Let the kids take the dogs into the backyard and have them “train” the dogs to run an obstacle course, perform tricks, or just sit and look cute. The kids get to be creative with their pups, and the dogs get some much loved attention!


Vine Movie MakerThe Mini Movie Challenge! Encourage those budding movie directors with the Mini-Movie Challenge Using Vine. Vine is an application for your iPhone, iTouch, or iPad, that allows you to create short (6 seconds), looping videos.  I watched my teenager and her friend spend over an hour creating their perfect movie – it had drama, humor, and a murder mystery all in 6 seconds.  Best of all, you can share the movies with family and friends!

For the younger “directors”, you might want to give them a theme to start from.  For the older kids, let them do it freestyle, and just step back and let the creativity flow!

For a Challenge – Try a challenge like the international, 48 Hour Film Project: Break them up into teams. All teams must incorporate the same prop and the same phrase into their movie.  You’ll be surprised how different each film will be!


Photo Credit: MommaDidIt.blogspot.com

NightTime Ring Toss: This simple and inexpensive idea is sure to keep the kids entertained in the evening hours.  Two glow-in-the-dark bracelets, attached together with the connectors (included in packages) and reinforced with tape, make perfect rings for ring toss! Place two wooden poles approximately 10 feet apart, and you have a simple ring toss pit! To make things a little easier, paint the wooden poles with glow-in-the-dark paint.

You can find packages of glow-in-the-dark bracelets CHEAP at places like Hobby Lobby, The Dollar Store, Target, Oriental Trading Company. (15 bracelets/$1.00)

Check out MommaDidIt.Blogspot.com to see this idea, plus many more great, nighttime activities!!

For more great summertime activities, I recommend checking out a few Pinterest Boards:

Summer Ideas For Kids: Terrific ideas to keep the kids entertained throughout the summer! Compiled by Lisa from OverTheBigMoon.com.

Summer Board: Cool summer ideas for decorating, food, games, and more, compiled by Megan Mathis.

Summer Lovin’ Board – A Round up of activities, recipes, style, and decorating ideas compiled by SimpleSolutionsDiva.com.

Simple Tips To Help Kids Cope With Traumatic Stress

We are all greatly affected by events in our world that, too often, hit close to home.  Our children are so rarely prepared to deal with this kind of stress (actually, who really is?).  The National Child Traumatic Stress Network has tips for how to help children cope with how they feel during times of crisis.  To see these tips, click on their logo below:


Screen Shot 2013-04-16 at 9.26.57 AM


My own, personal favorite tip comes from Mr. Rogers:

When I was a boy, and I would see scary things in the news, my mother would say to me, ‘Look for the helpers. You will Always find people who are helping.’ — Fred Rogers

1 2

© 2015 SIMPLESOLUTIONSDIVA.COM Designed by The Web Design Chic | ADMIN LOGIN