SimpleSolutionsDiva.com

Month: October 2015

Super Easy Halloween Party Foods

It is the day before Halloween, and you get invited at the last minute for a Halloween Party. You need to bring something to share, but you want to do something easy! Try one of these simply ghoulish treats – they are tasty, easy to make, and are kind of creepy! They are so easy, the kids can even make them!
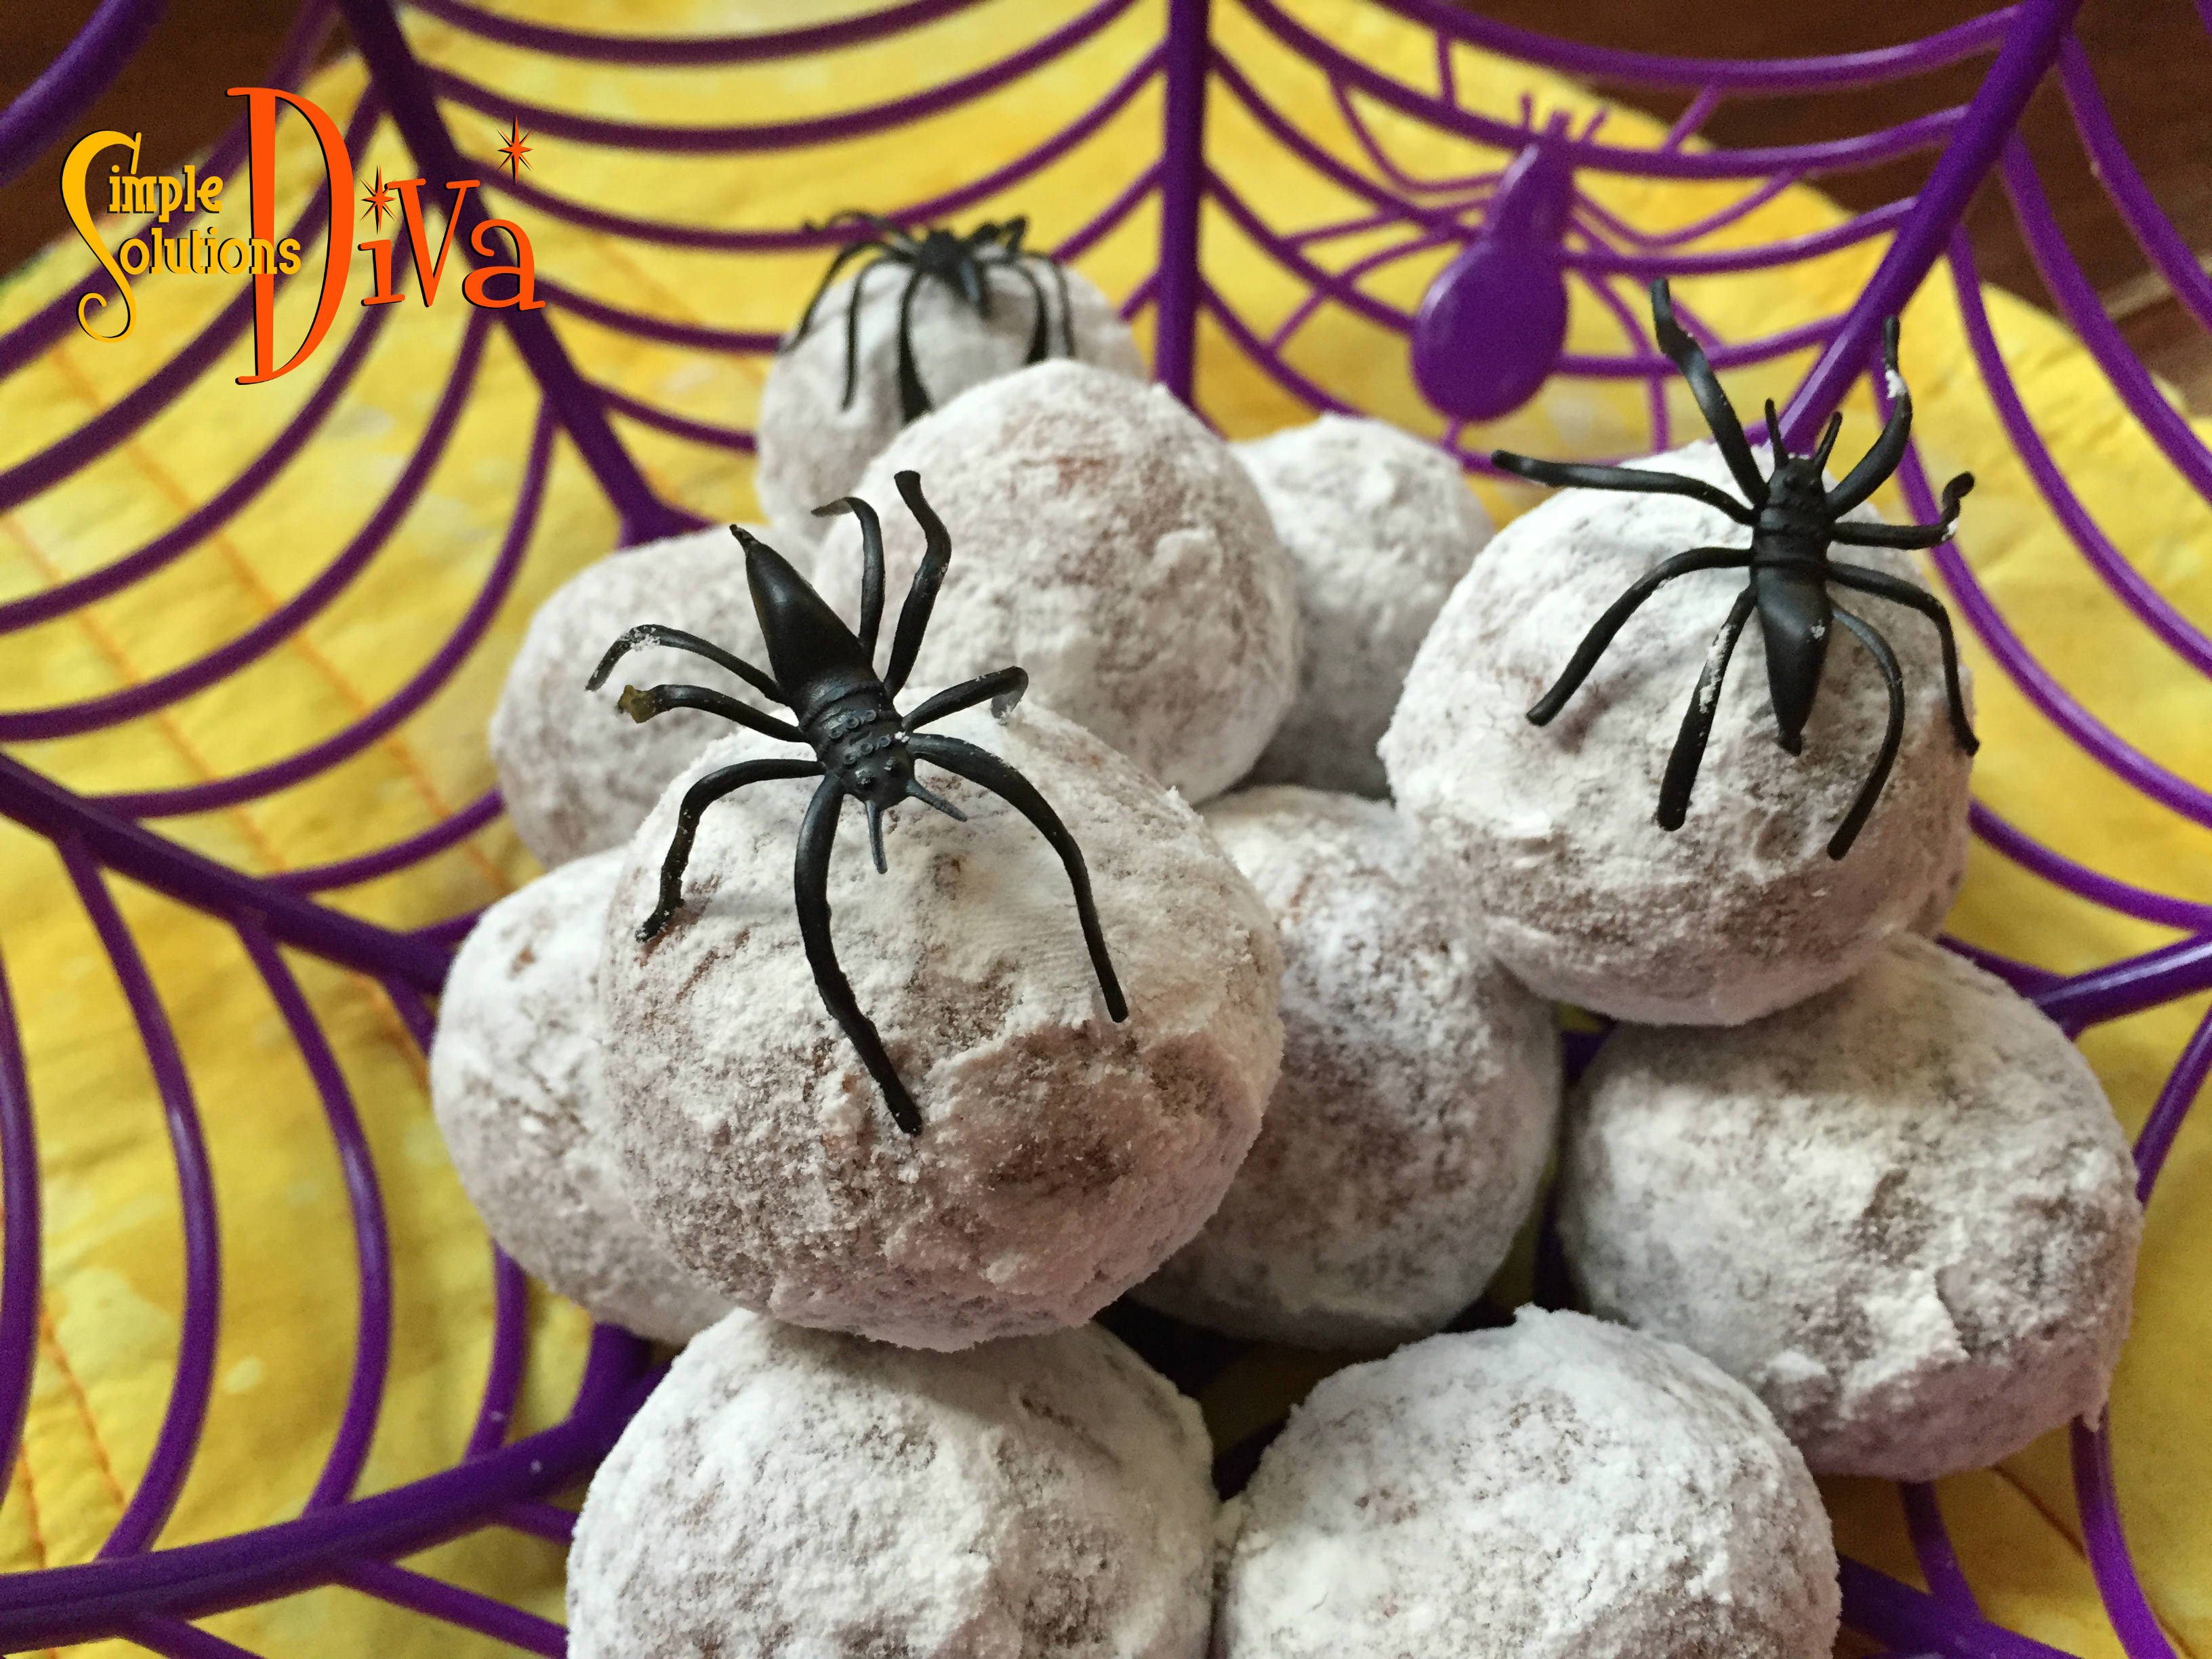
SSD Halloween Party Foods


Spider Eggs

These are the EASIEST food to bring by far! It is as simple as getting powdered donut holes, stacking them on a plate or bowl, and placing plastic spiders around and on the donut holes. (If there are little kids at the party, they need to be supervised so they don’t eat the spiders!)

SSD Spider eggs


Witch’s Broom

Another super simple, little party treat! Reese’s minis, unwrapped and placed upside down on a serving plate. Insert into what is now the top of the Reese’s (actually the bottom), insert a small pretzel stick. Easy Peasy! (Note: You may want to use a toothpick to make a small hole first – the size of the pretzel stick may crack the Reese’s – as seen below!)

SSD Witch Broom


“Blood-Splattered” Cupcakes

You can make your own, or use store-bought, white frosted cupcakes for this treat! Using red GEL food coloring (it adds a little thickness to the “blood”), squeeze into a small bowl and add a little water. Take a BRAND NEW toothbrush (use an old one? YUCK!), dip it into the red mixture, then splatter the cupcakes with it. Looks gruesome! (Be sure to not wear a white or other light colored shirt – protect your shirt while doing this!)

SSD Blood cupcake


Pumpkin Pizza

No, not pumpkin flavored pizza, just pizza decorated to look like a Jack-0-Lantern! Take any frozen, round cheese pizza and add toppings (choose your favorites) to decorate! Here is a great example from the Papa Murphy’s Restaurant website:
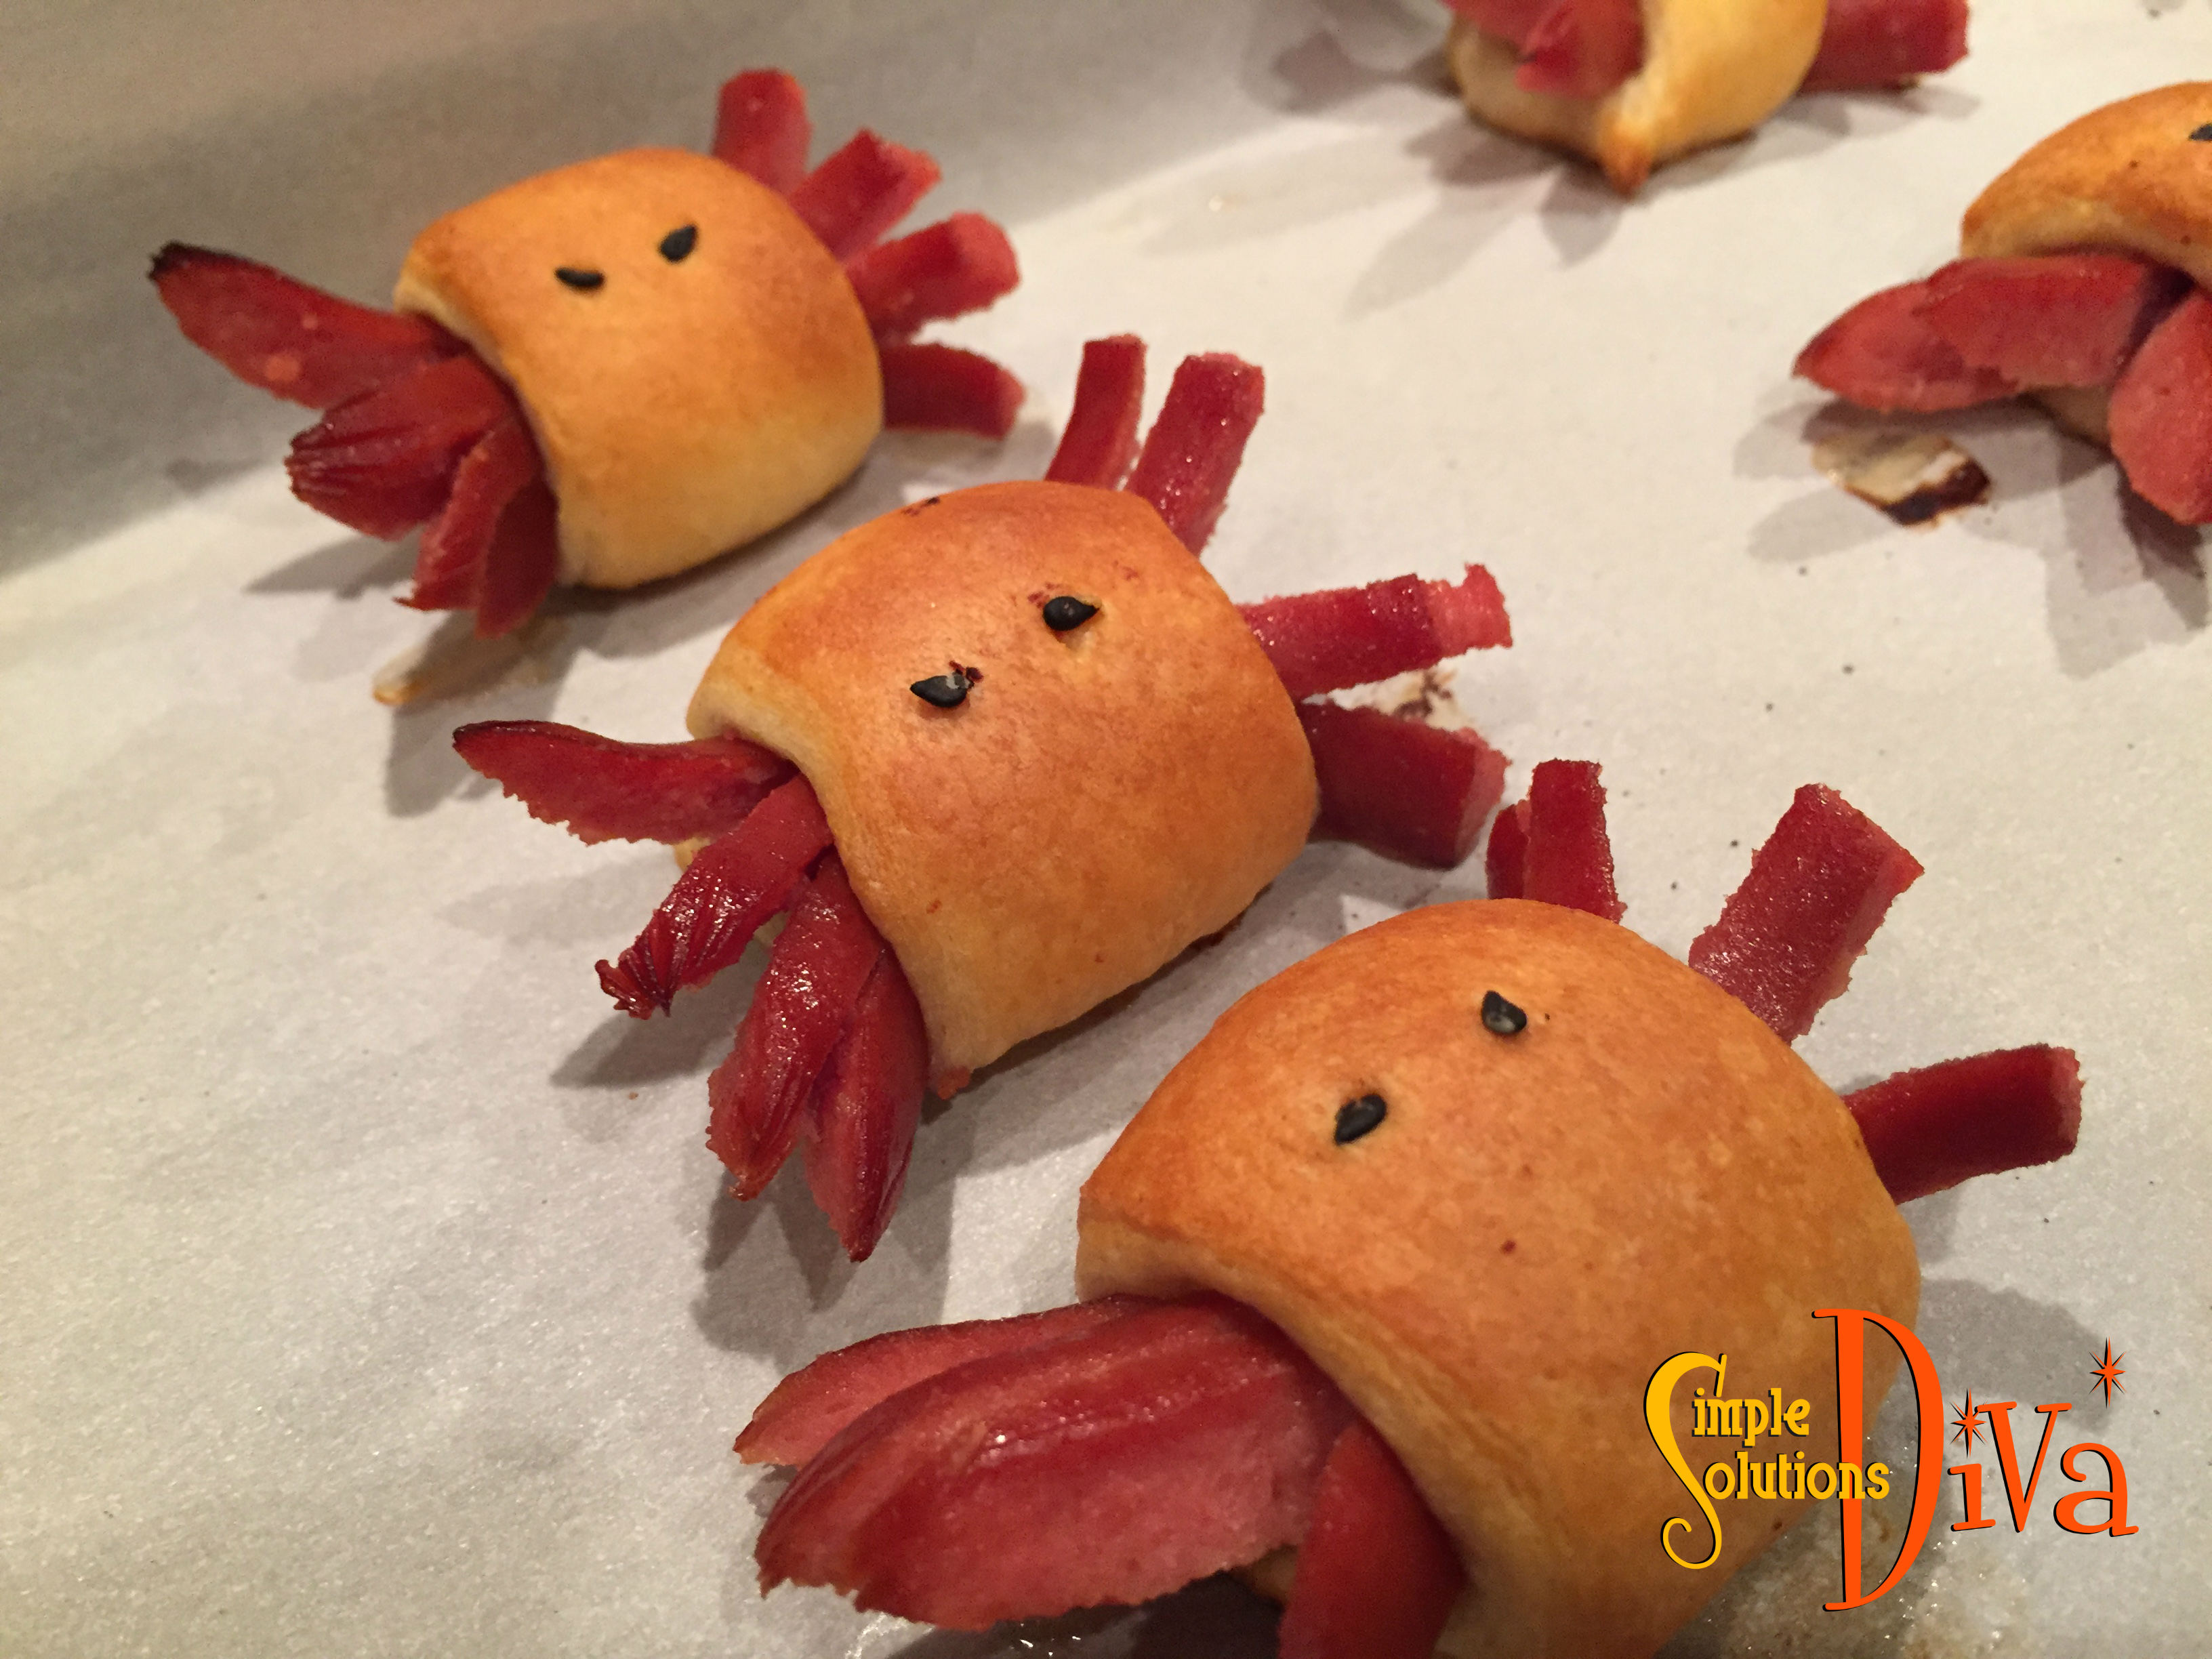
Pumpkin Pizza: Photo Courtesy of Papa Murphy's Restaurant.
Pumpkin Pizza: Photo Courtesy of Papa Murphy’s Restaurant.


Spider Dogs

These cute little guys are probably the most time consuming of the bunch here(it took me 10 minutes to whip up and assemble them), but they are just so cute! Preheat your oven to 400 degrees. Cover a cookie sheet with parchment paper. Start with one hot dog (one hotdog will make 4 spider dogs), slice it length-wise. Cut each length in half. See illustration below:

hot dog

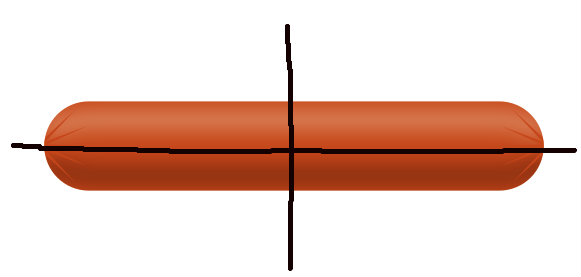
Lay each quarter dog flat. Slice 3 slits on each end of the quarters (leaving about 1/2 inch or so solid in the middle. These will make the eight legs for the spiders!

Using crescent roll dough, take slices of the dough and wrap around the middle of each spider and place on the parchment paper covered cook sheet. Black sesame seeds make the eyes. Place in the oven for 8-12 minutes, until the spiders are light brown (ovens will vary so be sure to watch them!).

SSD spider dogs


Thank you to WTLV-TV’s First Coast Living for inviting me on to share these simple Halloween recipes!

Make A Pumpkin Tower Three Ways For Fall!


This is a great project if you have found a good deal on artificial pumpkins! (Mid-October is when they tend to go on sale, so keep your eyes out for them!)

Pumpkin Tower 3

I like to have decor I don’t have to change up much to carry me from Fall to Thanksgiving, especially since I will go crazy with Christmas decorations! This was the perfect project for me – with just a few simple changes, I have three different looks!

Pumpkin Tower 2


What You Need:

  • Three artificial pumpkins, three different sizes and colors.
  • Hot Glue Gun
  • Knife to remove stem from 2 pumpkins (if needed)
  • Decorative items to change the look of the Pumpkin Tower. (I used two different bouquets of flowers from the grocery store, fall leaves, plus some Halloween decorations and some burlap fabric I had handy.)

Instructions on how to assemble the Pumpkin Tower are in the video at the top of this post!

Another use for the Pumpkin Tower, besides as a centerpiece: Have it on display in a planter on the front porch. Place some fall leaves and branches under it and it would be adorable!


Pumpkin Tower 1

DIY Chevron Pumpkin

Everyone loves the chevron pattern! Here is a simple craft perfect for Halloween through Thanksgiving! It takes your regular pumpkin from Drab to Fab!

Pumpkin Collage

Supplies Needed:

  • Artificial Pumpkin
  • White Spray Paint  or White Latex Paint (also need a brush if you are not using spray paint)
  • Frog Tape Multipurpose tape (green color is the multipurpose tape)
  • Old Newspapers to protect your work surface

Here are some tips to make taping off your pumpkin easier:

I like to use an exact knife to cut the points in the pattern, because i like clean lines. In the photo below, I’m FINALLY using my Creative Memories cutting pad! Once I’ve cut the points I apply them to the pumpkin, building up the design from the points.

IMG_8323

I start by taping off the top of the pumpkin, then repeating the pattern down the rest of the pumpkin (as seen below):

IMG_8324


Chevron Pumpkin

Pumpkin Peanut Butter Oatmeal Dog Biscuits

The month of October offers a HUGE variety of pumpkin treats for us humans, but don’t forget your dog likes pumpkin, too! These are the easiest dog biscuits to make and they are simple ingredients your dog will love! Plus, you can feel good feeding these to your pup! (My taste-tester, Maisie, LOVED them!)


Maisietreats


Pumpkin Peanut Butter Oatmeal Dog Biscuits
 
Prep time
Cook time
Total time
 
Dogs love pumpkin, so you can feel good about giving them this tasty treat!
Author:
Recipe type: dog biscuits
Cuisine: Dog food
Serves: 24 biscuits
Ingredients
  • 3 cups oats
  • ½ cup peanut butter
  • 1 cup pumpkin puree
  • 1 teaspoon cinnamon
  • 1 teaspoon baking powder
  • 2 eggs
Instructions
  1. Preheat oven to 375 degrees.
  2. Place the oatmeal into a food processor or blender and pulse it so it is not coarse (it does not need to be as fine as flour.)
  3. In a large bowl, add oatmeal, pumpkin, peanut butter, cinnamon, baking powder, and eggs. Using a hand mixer, blend on medium until it is thoroughly mixed.
  4. On a clean work surface, sprinkle a little flour and roll out the dough to ¼ - ½ inch thick. NOTE: Dough will be sticky, so have a little flour on hand to sprinkle on. Cut with cookie cutters.
  5. Place on a cookie sheet and bake for 15-20 minutes (ours took 18 minutes).
  6. Cool on rack until completely cooled.
  7. Place in airtight container to keep them fresh, or in the freezer.


FullSizeRender 2


This recipe is from CreatedBy-Diane.com – Definitely make it a point to visit her site – she has SO MANY recipes (Including ones for humans!) and they all look terrific!!


Maisie2


Too Many Candles – A Clear The Clutter Challenge

Chris Stone of Neatly Designed is BACK and we are talking clearing the clutter of candles! In this video, we show you how to approach decluttering those stashes of candles you have around the house (come on, I KNOW you have them!). All you need is an hour (maybe two, if you have as many as I do!).

So clear the clutter and feel good about doing it!


Screen Shot 2015-10-03 at 4.25.48 PM
You think I might have a candle problem?

SSD Too Many Candles

© 2015 SIMPLESOLUTIONSDIVA.COM Designed by The Web Design Chic | ADMIN LOGIN