During the summer, we all want a nice, frosty treat to cool us off — including our dogs! So here is a simple recipe for homemade Frosty Paws for your pup! They will love it!
Homemade Frosty “Faux” Paws Treats For Dogs
Ingredients:
16 oz. container of plain greek yogurt
1 banana, peeled
1 Tablespoon peanut butter
1-2 tablespoons of honey
Preparation:
Place all ingredients into a blend and blend until creamy and mixed thoroughly. Using cooking spray, spray the inside of a cupcake tin. FYI – I used mini-cupcake tins because my dog is small; feel free to use the larger cupcake tins if your dog is on the bigger size!
Pour the mixture into the cupcake tin and freeze until hardened (approximately 4 hours). Pop the “Frosty Faux Paws” out of the tin and place in a freezer bag; return to freezer until ready to use!
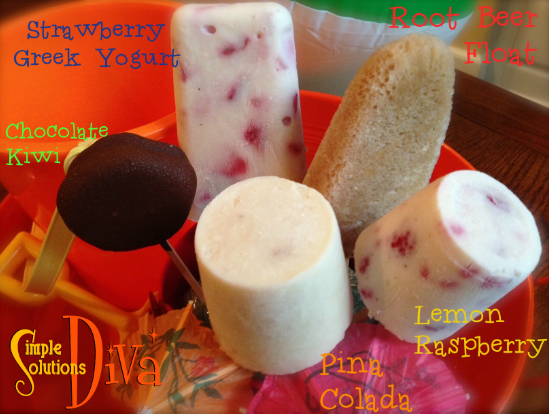
Popsicles are a perfect treat for summertime! Try making these yummy and healthy treats (at least most are healthy!) for your family – they may never want to visit the ice cream truck again!
A variety of homemade & healthy popsicles from SimpleSolutionsDiva.com!
Frozen Chocolate Covered Kiwi Pops
A perfect blend of chocolate and kiwi. These are so simple to make, you will want to make them for yourself and your kids all the time! And you don’t have to feel guilty eating them.
Ingredients:
Kiwi slices, peeled and sliced at least ¼ inch thick.
Baker’s Dipping Chocolate (Any flavor will do, but I used milk chocolate flavor)
Popsicle sticks (You can get these from any crafts store and at some dollar stores)
Preparation:
Insert one popsicle stick into each kiwi slice. Take parchment paper and cover a baking sheet. Place kiwi slices with stick onto parchment paper and freeze. (Approximately 2-4 hours)
Just before you take the kiwi out of freezer, heat the Baker’s Dipping Chocolate according to the package. Take kiwi out of freezer and dip each into the chocolate and place back onto parchment paper. When finished dipping all the kiwi slices, place back into freezer for an hour or feel free to eat it right away!
Strawberry Greek Yogurt Popsicles
Greek yogurt is packed full of protein and low in fat. These treats have awesome flavor AND are filling!
Ingredients:
One 16 oz. container of vanilla greek yogurt. (I used Chobani)
½ cup milk
1/3 cup chopped strawberries
½ teaspoon vanilla
popsicle sticks and molds
Preparation:
In a bowl, combine all the ingredients together, gently stirring in the strawberries. Pour into popsicle molds, insert popsicle sticks and freeze for approximately 4 hours. When removing pops from the mold, either leave out for 5 minutes prior to trying to remove OR run bottom of the molds under hot water for up to one minute.
Makes approximately 5 popsicles.
Pinã Colada Popsicles
These are like the frosty cocktail on a stick, but hold the rum! A creamy treat – and so simple to do!
Ingredients:
1 can light coconut milk
1 small can crushed pineapple, with juice
1 ripe banana
1 teaspoon vanilla
¼ cup shredded, sweetened coconut (optional)
popsicle sticks and molds
Preparation:
Combine all ingredients in a blender and blend until smooth! Pour into pop molds and insert popsicle sticks. Freeze for approximately 4 hours. Makes approximately 6 popsicles.
Lemon Yogurt & Raspberry Popsicles
Another simple recipe – I love the combo of lemon and raspberries! I use greek yogurt, but feel free to use regular yogurt in this recipe for a sweeter flavor.
Ingredients:
2 small (5 oz. each) containers of lemon-flavored greek yogurt (or use regular lemon-flavored yogurt)
½ cup vanilla-flavored almond milk (or use regular milk)
1 Tablespoon honey (optional)
½ cup ripe raspberries
popsicle sticks and molds
Preparation:
In a bowl combine all ingredients – feel free to lightly crush some of the raspberries! It just adds to the beauty and flavor of the popsicle! Pour into pop molds and insert popsicle sticks. Freeze for approximately 4 hours. Makes approximately 4 popsicles.
Root Beer Float Popsicles
The old-fashioned, summertime tradition, but frozen on a stick!
Ingredients:
One bottle of A&W Root Beer (or other favorite root beer!)
Small container of vanilla bean ice cream
popsicle sticks and molds
Preparation:
You want to open the root beer and allow it time to turn somewhat flat. (Approximately 20-30 minutes in the fridge.) If you don’t the molds will overflow when in the freezer!
Place popsicle mold onto a flat baking sheet. Pour the slightly flat root beer into the molds, until molds are ½ full. Place a small scoop of ice cream into the mold. Gently pour more root beer on top of the ice cream. It will foam up – scrape away excess foam as best you can. Insert popsicle sticks and freeze for approximately 4 hours. FYI – They may over flow due to bubbles! Makes approximately 4 popsicles.
Thank you to WTLV-TV’s First Coast Living for having me on!
NOTE: If you don’t have popsicle molds, you can use paper cups as molds. You will still need popsicle sticks.
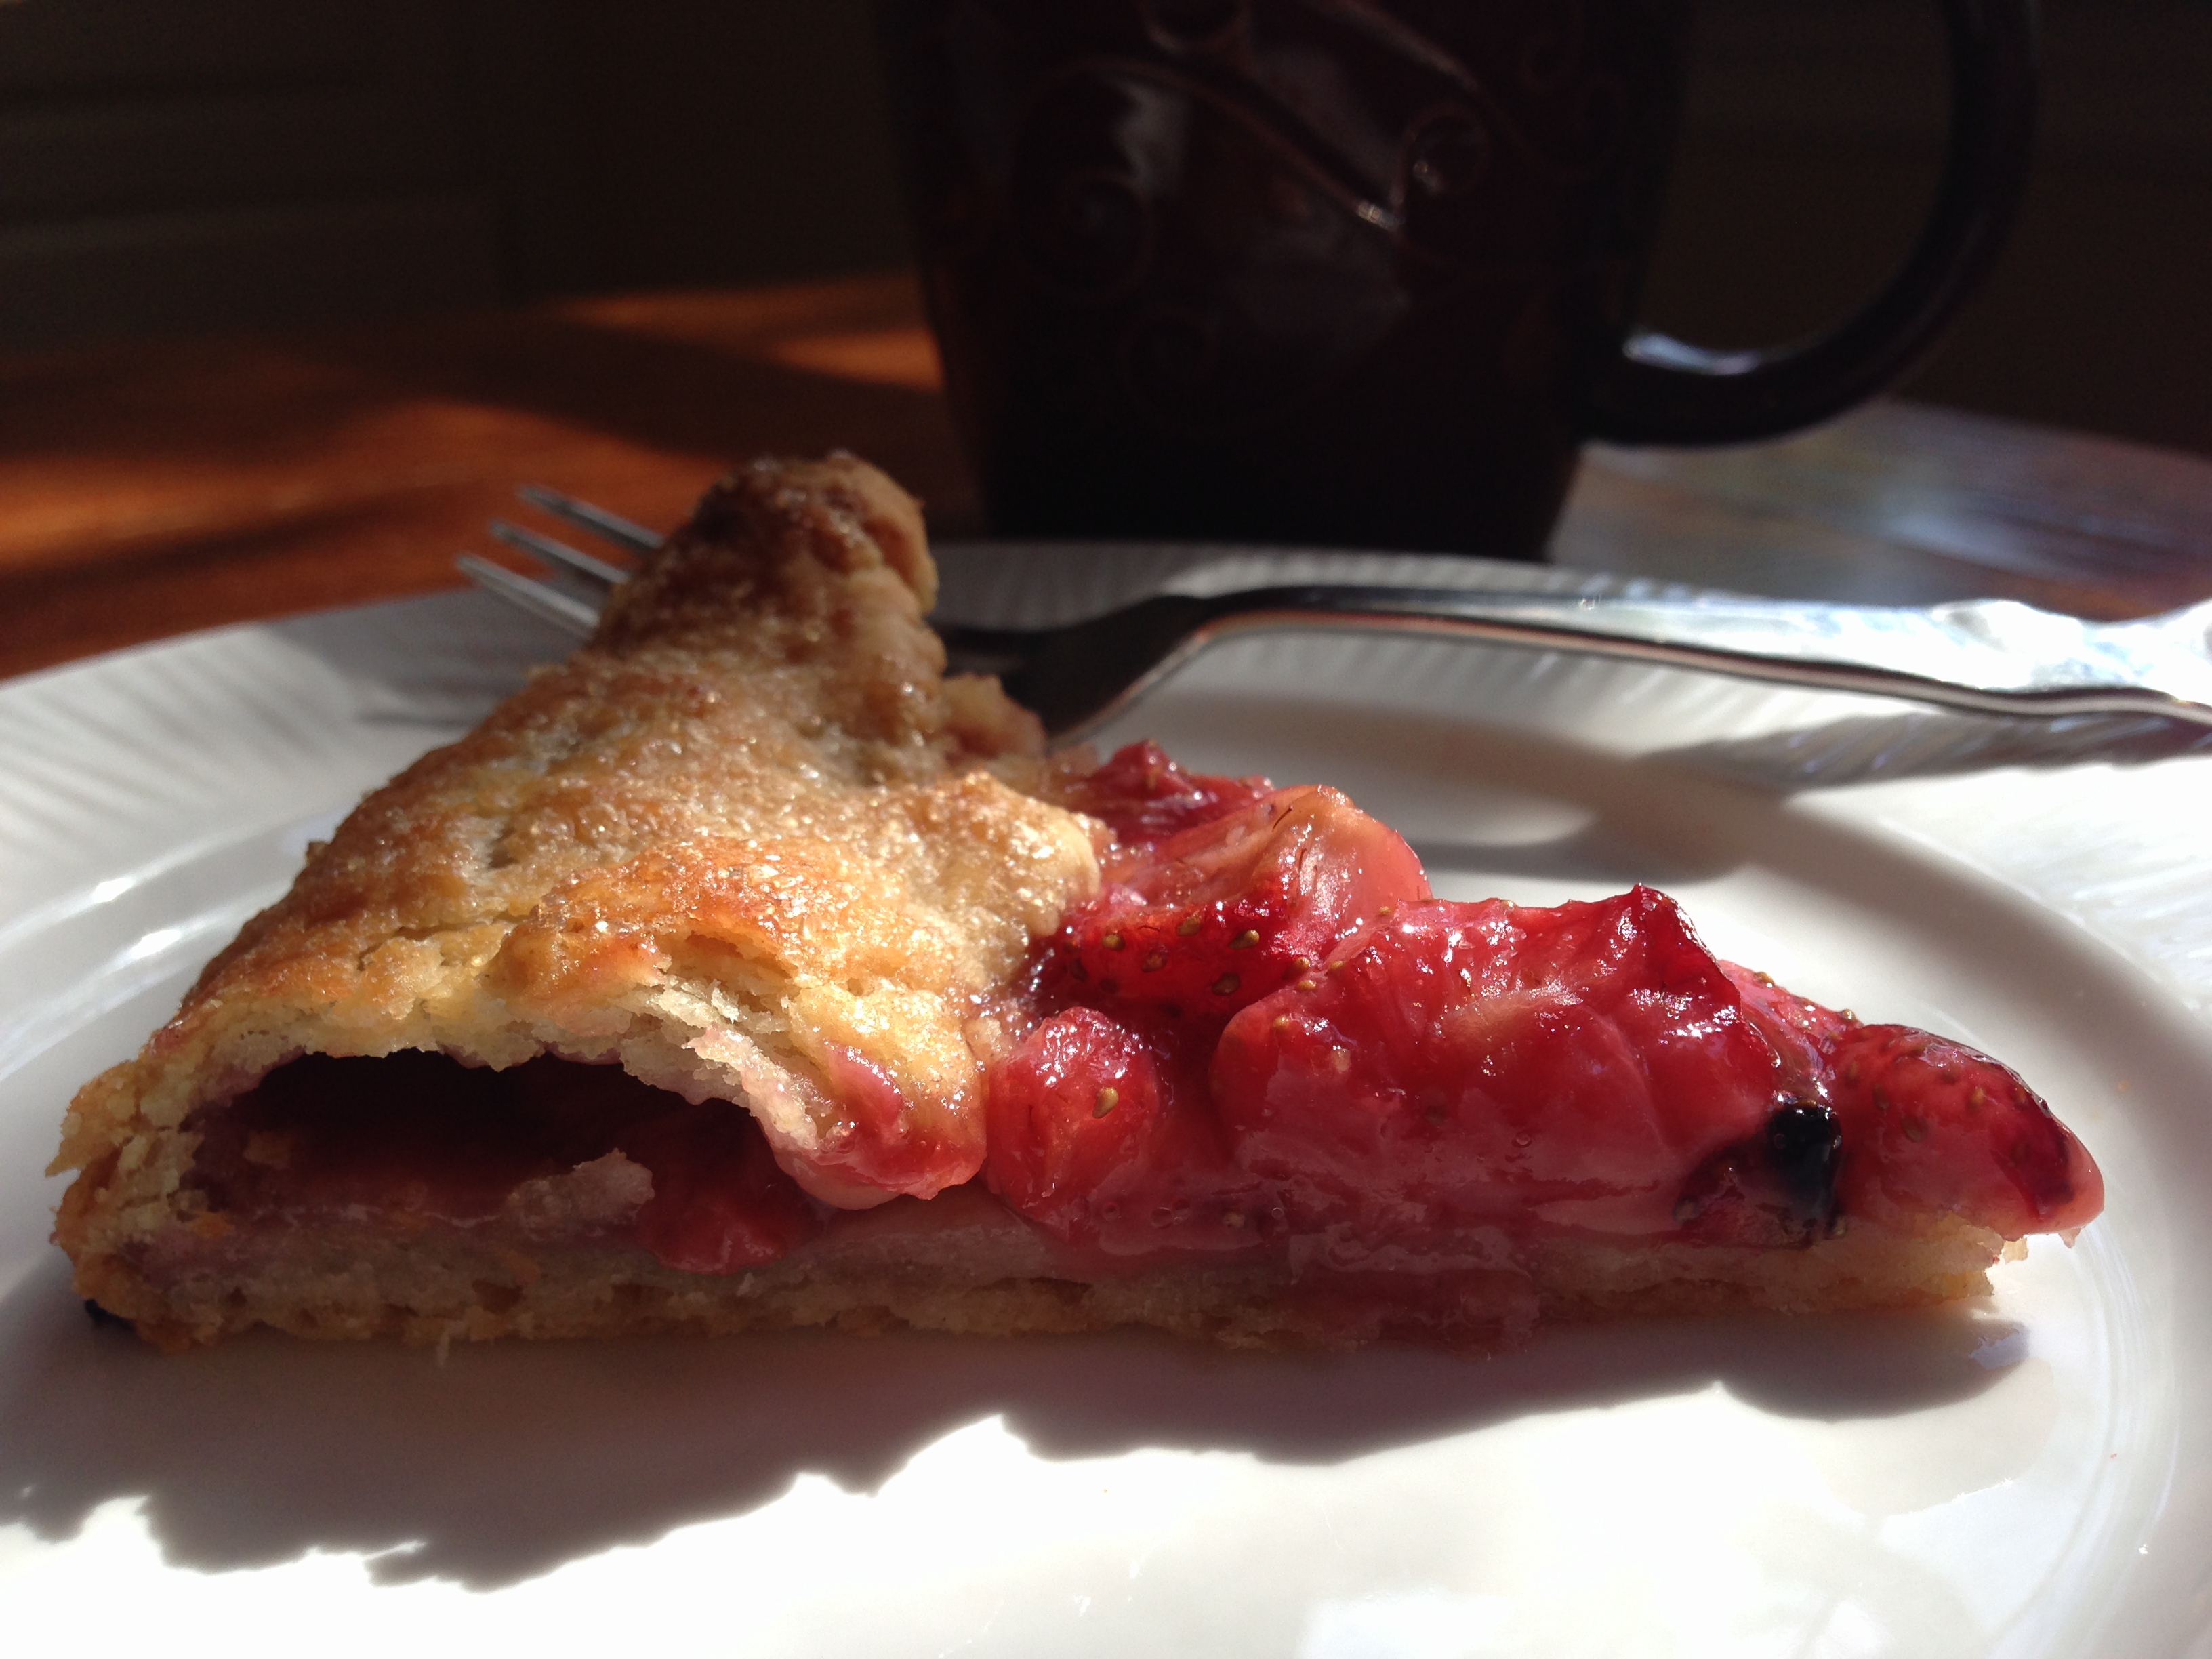
This is the perfect little tart for summer fresh fruit- not too sweet and flaky! Use fresh strawberries, raspberries, or any other favorites like peaches, apples, and more!
Rustic Fruit Tart
Rustic Fruit from SimpleSolutionsDiva.com.
Heat oven to 400 degrees, and if you have one, add a pizza or baking stone on center rack.
Dough:
2 cups flour
pinch of salt
1 tablespoon sugar
1 ½ sticks butter
ice water
Preparation:
Mix flour, salt and sugar. Cut butter into the dough until pieces are size of peas. Sprinkle ice water to moisten dough – does not need to be wet. Turn out onto plastic wrap and press into a disc. Wrap well with and place in fridge for 30 mins.
Fruit Filling:
One Pint Strawberries (hulled and cut into wedges) or other fresh fruit
1-2 tablespoons sugar
1 teaspoon cornstarch
Preparation:
While dough is setting in fridge, toss fruit with sugar and cornstarch. Allow to sit, to let berries get juicy!
Roll out dough on floured surface to approximately 12” diameter circle (remember – this is rustic, not perfect!!). You also don’t want to over-handle or over-roll the dough – butter will melt before you get it in the oven!
Transfer the dough onto sheet of parchment paper (if not using a baking stone, place on parchment lined baking sheet.)
Arrange the fruit filling in the center of dough, allowing about a 1 ½ inch clear space to the edge of the dough. Pull the edges of the dough up and over the filling, being sure not to leave any holes where the juices can leak out during cooking. The look will be rustic, uneven.
Brush the top of the crust with melted butter, cream, or egg white wash (egg white whipped with a little water). Sprinkle turbinado sugar over the crust.
Keeping the dough on parchment paper, place the dough on baking stone in oven and bake for approximately 45 minutes. You may want to rotate once in middle of baking process. Remove from oven when tart is golden. Enjoy!
I love scones, especially ones filled with flavor and fruit! But all the recipes I have found are filled with tons of butter (yummy, but fattening!) and are a lot of work! I found this great recipe from JoyTheBaker.com (actually, thank you to my friend Lisa who sent it to me with high recommendation!) and fell in love with this easy recipe! You can easily adapt this recipe by substituting raspberries or blueberries, or even chopped, dried cranberries and finish with an orange glaze! YUM!
Scrumptious Strawberry Cream Scones
Simple & Scrumptious Strawberry Scones
Ingredients:
3 cups all-purpose flour
1 tablespoon baking powder
1 teaspoon salt
1/3 cup granulated sugar
1 teaspoon pure vanilla extract
1 1/3 to 1 1/2 cups heavy cream plus more for brushing the top
3/4 cup coarsely chopped fresh strawberries
1/3 cup chopped white chocolate (optional- I did not use these in mine)
turbinado sugar for topping
Preparation:
Preheat oven to 425 degrees. Line a baking sheet with parchment paper.
In a medium sized bowl, whisk together the flour, baking powder, salt and sugar.
In a liquid measuring cup, combine the 1 1/3 cup cream and vanilla. Drizzle the cream mixture over the flour mixture, mixing as you go. Add strawberries (and chips if desired) and toss mixture to combine. Add up to 2 tablespoons of cream to the mixture to create a moist, but not sticky, dough.
Turn out the dough onto a clean, floured work surface and roll out to approximately 3/4″ thickness.
Using a small round cookie cutter or biscuit cutter (I improvised by using a small metal ramekin!), flour the cutter and cut small disks of dough. Place on the parchment-lined baking sheet. Brush the tops with cream and sprinkle with turbinado sugar.
Bake for 12-14 minutes, until golden brown and cooked through. Serve warm!
Be sure to check out JoyTheBaker.com – her photos are beautiful and her recipes are great!
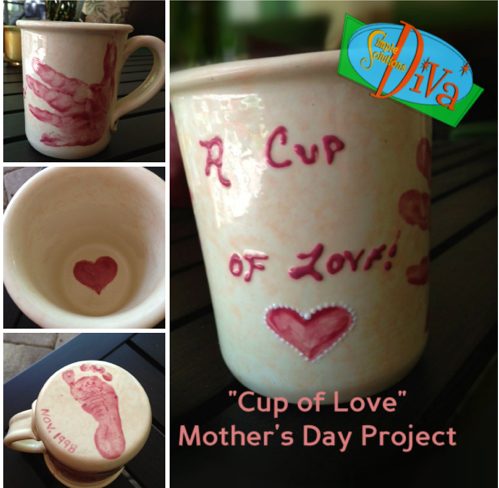
Mom loves gifts from the heart! Sometimes simple is better, and these simple crafts are perfect for mom and require very little time to do them!
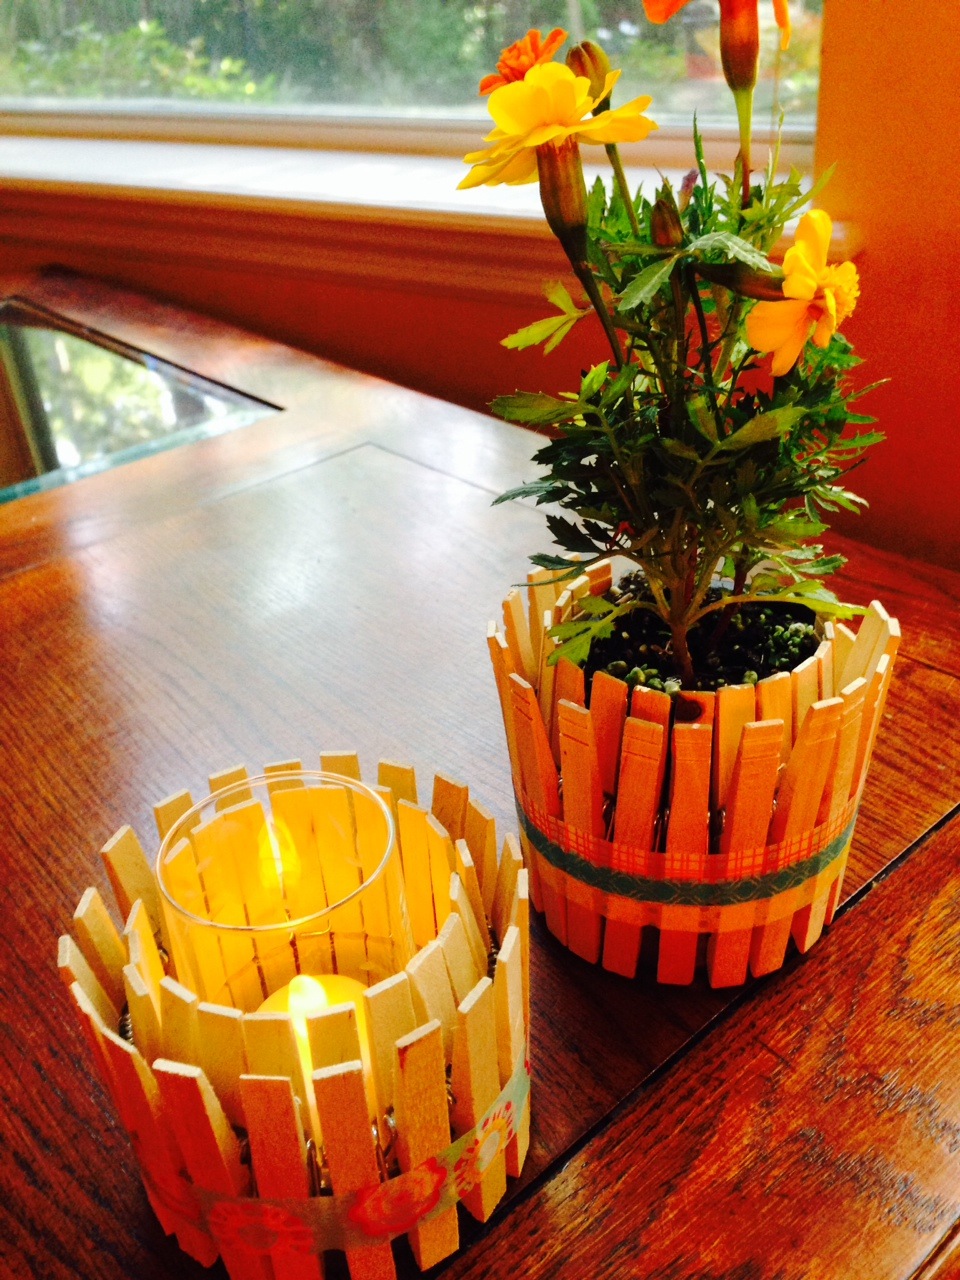
Clothes Pin Planter/Candle Holder
Clothes pin Planter/Candle Holder
This cute craft is just so easy, it is crazy! It reminds me of a picket fence!
What You Need:
Tuna fish can (or similar type of can), lid removed (and contents!) washed and dried thoroughly, label removed
Clothes Pins (I learned the hard way there are taller ones and shorter ones!)
Decorative washi tape or ribbons
Instructions:
Take clothes pins, and clip them onto the edge of the can, making sure they go all the way down to the bottom of can. Continue clipping until you have no more room.
Take a decorative ribbon or washi tape and tie/wrap it around the clothes pin-covered can. Use your imagination to make it special looking!
Place a small plant inside the center or glass votive candle holder. Voila!
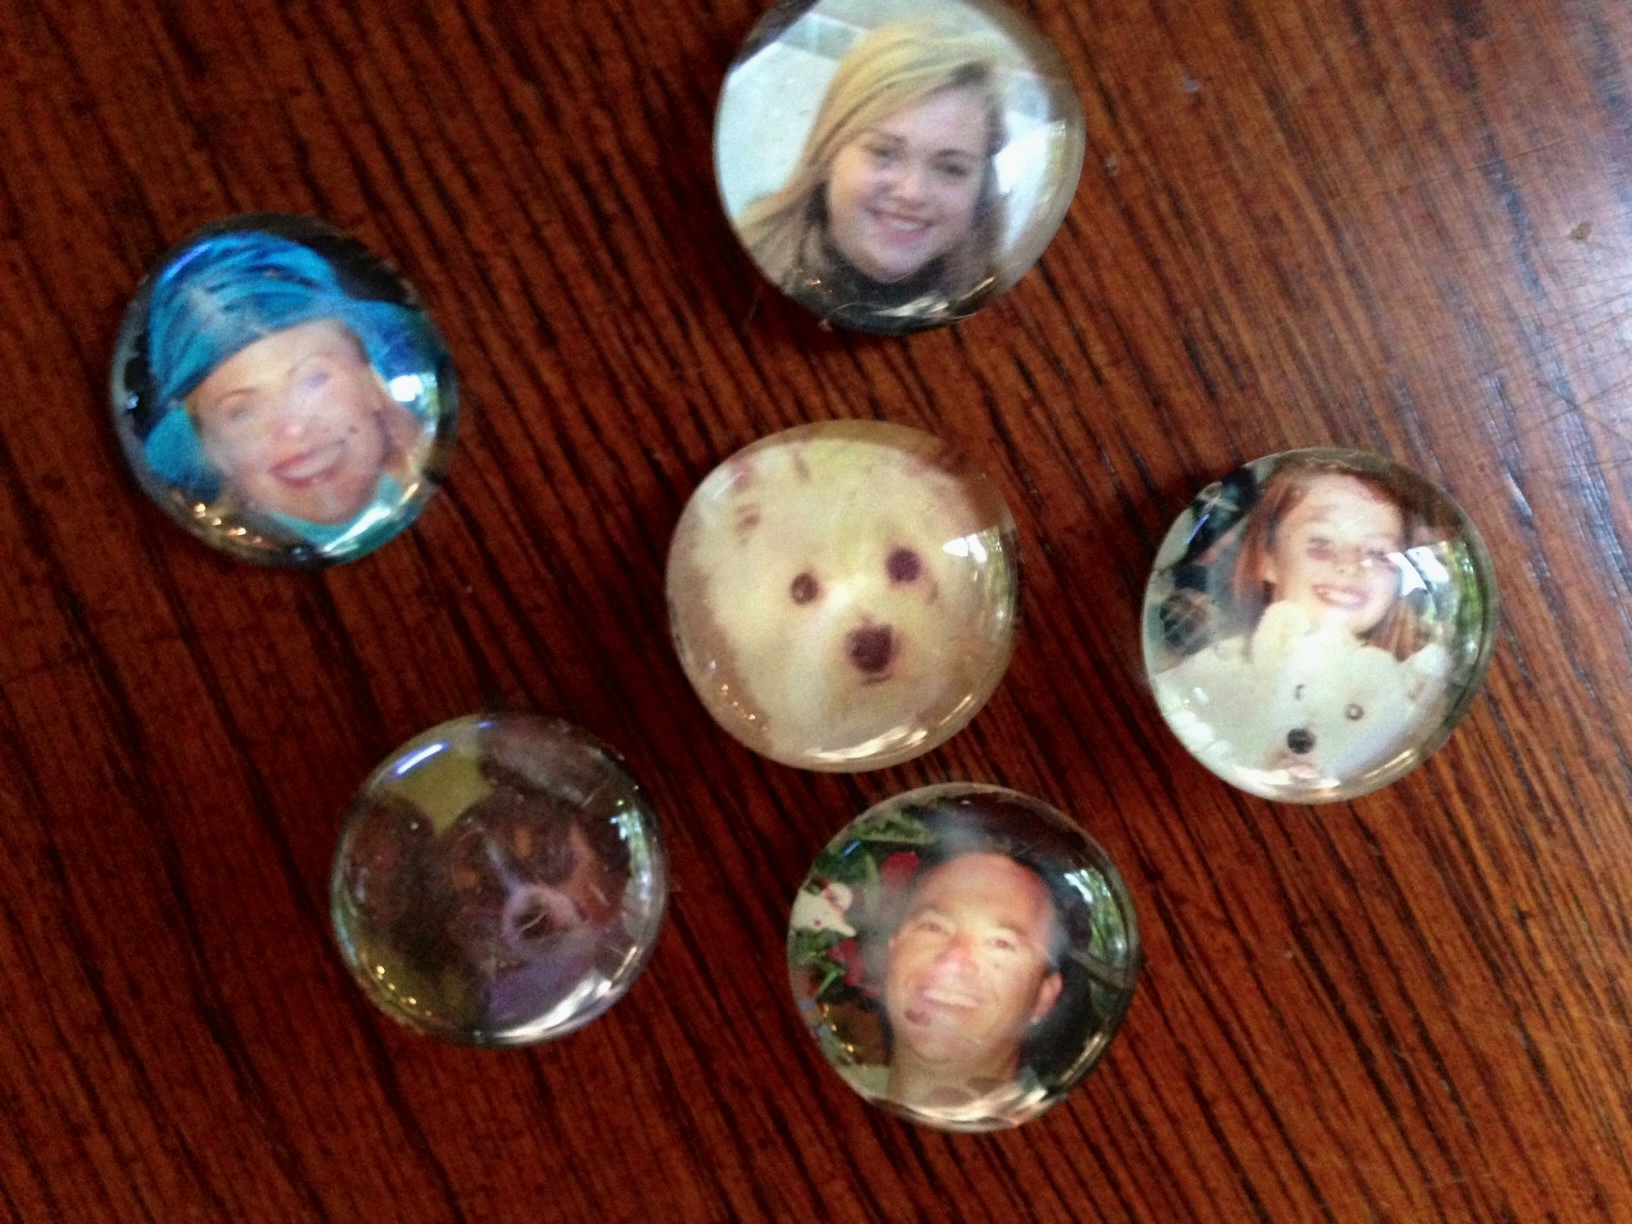
Glass Bead Photo Magnets
Glass Bead Photo Magnets, from SimpleSolutionsDiva.com.
Besides using photos, you can create small messages or words of love in colorful type on a computer and print them out to use in this project.
What You Need:
Glass Beads – I used large sized glass beads (with flat bottom) from the dollar store.
Mod Podge sealer and craft glue (available at all crafts stores)
Foam applicator
Small magnets (also available at craft stores)
Hot glue gun
Various small sized photos (or words or phrases) printed out on printer paper. I used both printer paper and actual photos – I find the printer paper works best on this project!
Instructions:
Working on a clean, flat and protected work surface, cut the photos or words into circles slightly smaller that the glass beads. You can use a glass bead to trace a circle around the photo you are using, then just trim it to fit the back of bead.
Using the sponge applicator, spread a thin amount of Mod Podge on the back of the bead. Place the photo circle, face down on the bead, pressing to eliminate any air bubbles. Turn bead over an make sure the photo is centered the way you want. Allow to dry.
Once dry, take the hot glue gun and put a small dot of glue on the magnet. Place magnet on the back of the bead/photo (glue side down). Press to adhere to back of bead. Allow to cool/harden.
“I Love You” Photo Frame
“I Love You” Photo Frame
Again, this one is so simple, but Mom will love it!! You can also create one for the “Pet Mom” in your life!
What You Need:
Photo Frame That has multiple openings – enough openings for each child, family member or pet
Photos of family, children or pets you plan to use (make sure they are the correct size for the frame) holding signs that send the message to Mom!
Instructions:
Not many instructions – Just insert the photos in the frame and give to Mom!
I chose to use black and white, but you can use color if you prefer!
Glass Bead Candle Holder
Glass Bead Votive Candle holder
All elements of this, besides the Mod Podge and the glue, I got from the Dollar Store! Plan to make this at least 24 hours prior to when you want to give it – it takes 24 hours to dry completely!
What You Need:
Large Glass Votive
Small Glass Beads – I used clear, but you can use colored beads as well.
Aleene’s Glass & Bead Glue – You can get this from any crafts store.
Optional:
Mod Podge
Colored Tissue Paper
Foam applicator
Instructions:
Place your votive on a clean, flat and protected work surface (& well ventilated!!). Using the glass glue, glue the beads onto the votive. Tip: I flip the votive upside down, so the lip is at the bottom, and started from the bottom up. This prevented beads from slipping down the votive!
Allow 24 hours to dry completely.
Optional: If you want to add color to your votive, affix colorful strips of tissue paper to the inside of the votive using the Mod Podge. Pick the colors that work for your room! Note:If you use the Mod Podge and tissue paper on the inside, please ONLY use a battery-powered tea light. A real candle may set it on fire.
I love using spices when I cook, and I especially love the convenience of pre-packaged spice blends! But when I began looking at the salt content and additives in the packets, I thought there has got to be a better way! So here are five, very flavorful spice blends that will save you on salt and additives. Simple, flavorful and awesome!
Note: All spice blends will stay fresh in air-tight containers for up to 6 months.
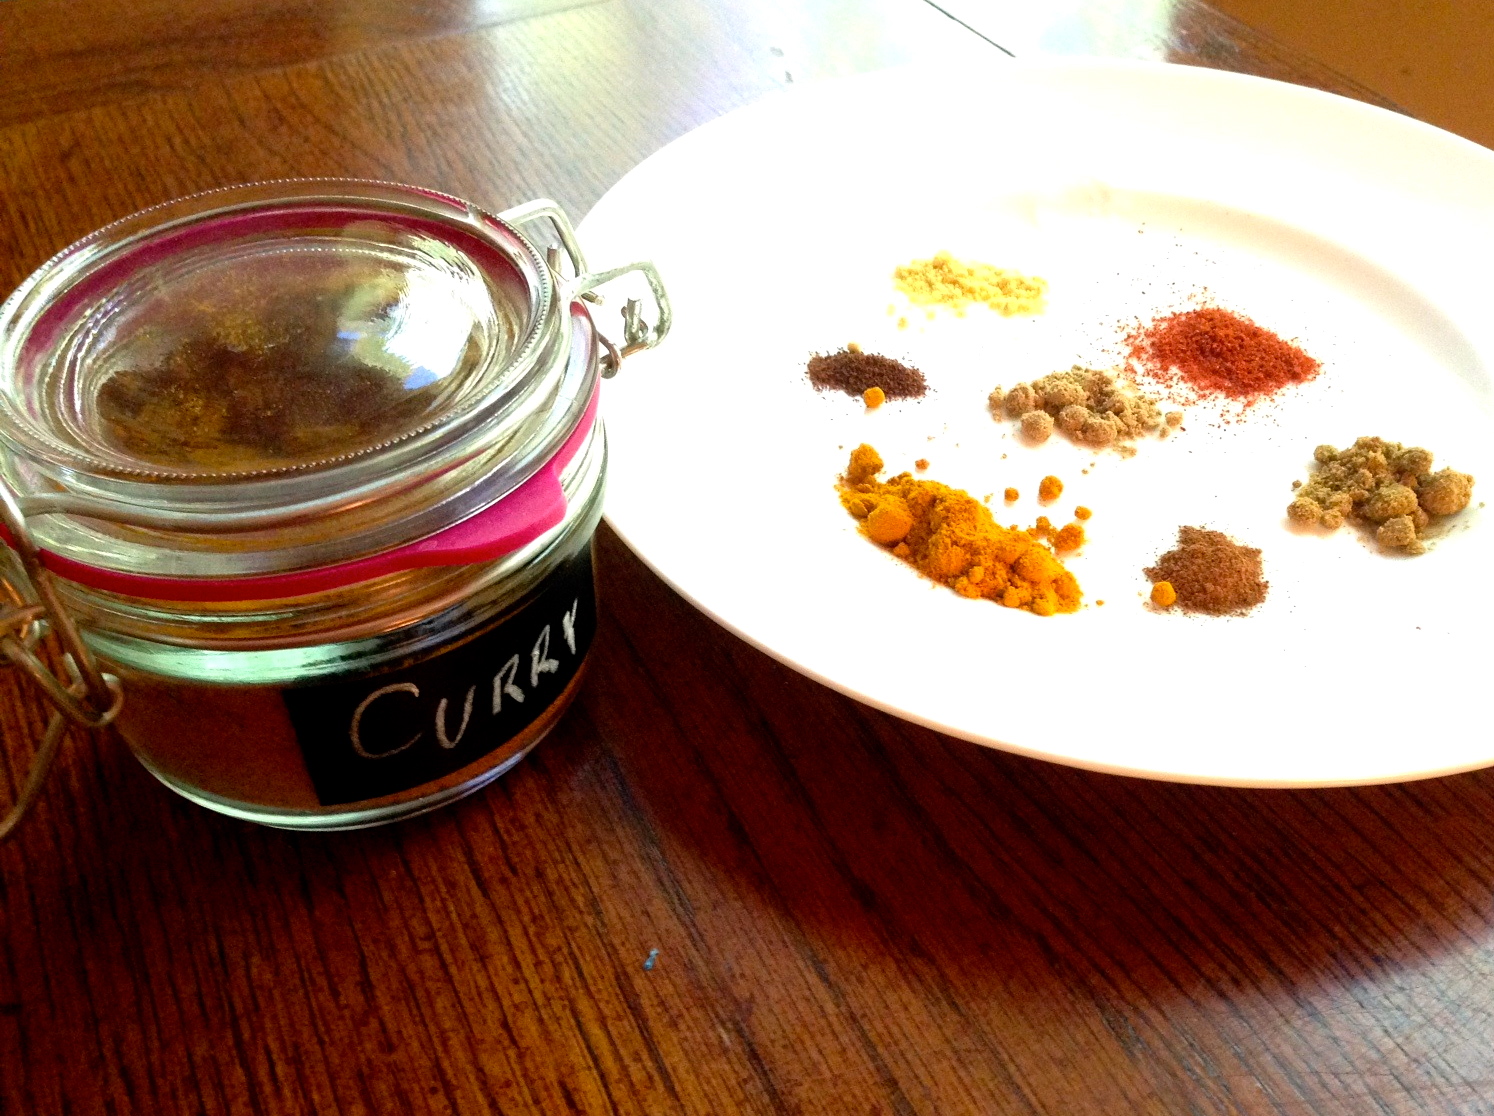
Homemade Curry Powder Recipe:
Homemade Curry Blend from SimpleSolutionsDiva.com.
Ingredients:
1/2 cup Paprika
1/4 cup Cumin
1 tablespoon Fennel Powder
2 tablespoons Ground Mustard Powder
1 tablespoon ground Red Pepper Flakes – more or less to taste adds spiciness
3 tablespoons ground Coriander
1/4 cup ground Turmeric root
1 teaspoon Cinnamon Powder
1/2 teaspoon Cloves Powder – Adds complex flavor
Preparation:
Combine all ingredients into an air-tight jar and shake!
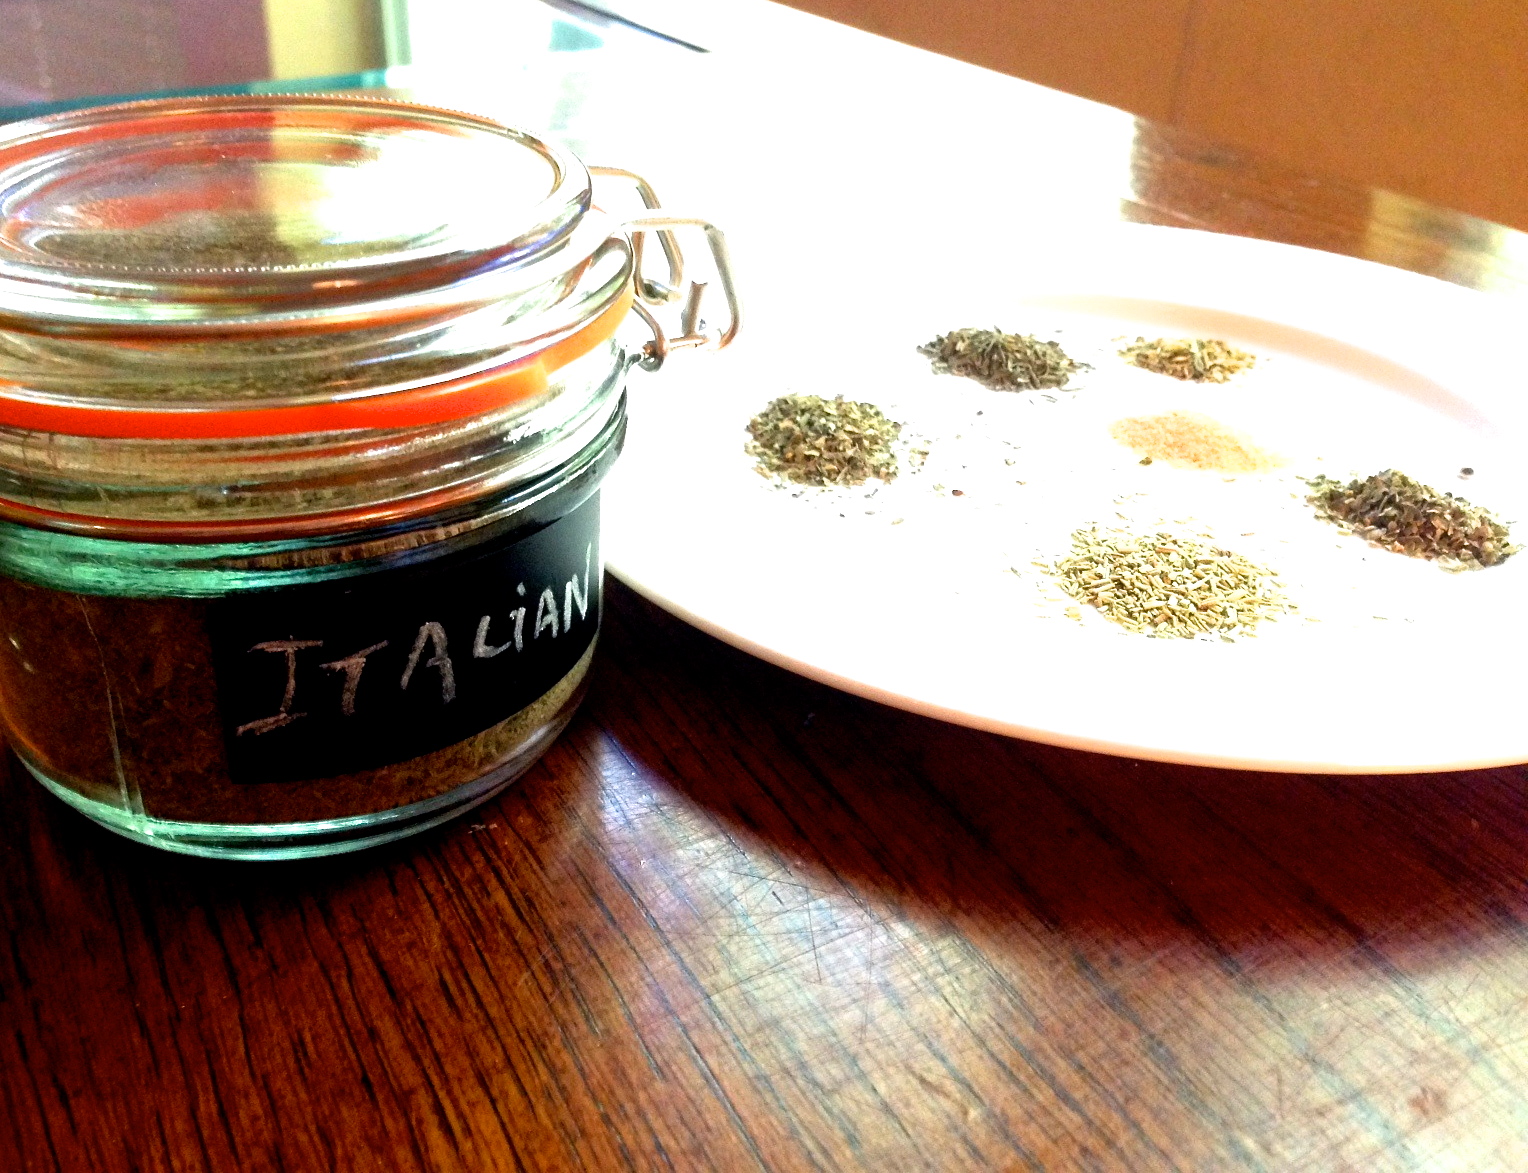
Homemade Italian Seasoning
Homemade Italian Seasoning, from SimpleSolutionsDiva.com.
Ingredients:
1/2 cup Basil leaf
1/2 cup Marjoram Leaf
1/2 cup Oregano leaf
1/4 cup cut and sifted Rosemary Leaf
1/4 cup Thyme Leaf
2 tablespoons Garlic Powder
Preparation:
Combine all ingredients into an air-tight jar and shake!
Homemade Ranch Mix
Homemade Ranch Seasoning Mix, from SimpleSolutionsDiva.com.
Mix one tablespoon of this mix with 1/3 cup mayonnaise and 1/4 cup milk or buttermilk. This is also great sprinkled by itself onto fish or chicken before cooking.
Ingredients:
1/4 cup dried Parsley leaf
1 Tablespoon Dill leaf
1 tablespoon Garlic Powder
1 tablespoon Onion Powder
1/2 teaspoon Basil leaf
1/2 teaspoon ground black pepper
Preparation:
Mix all ingredients together in jar or food processor (I used my single serve sized blender!).
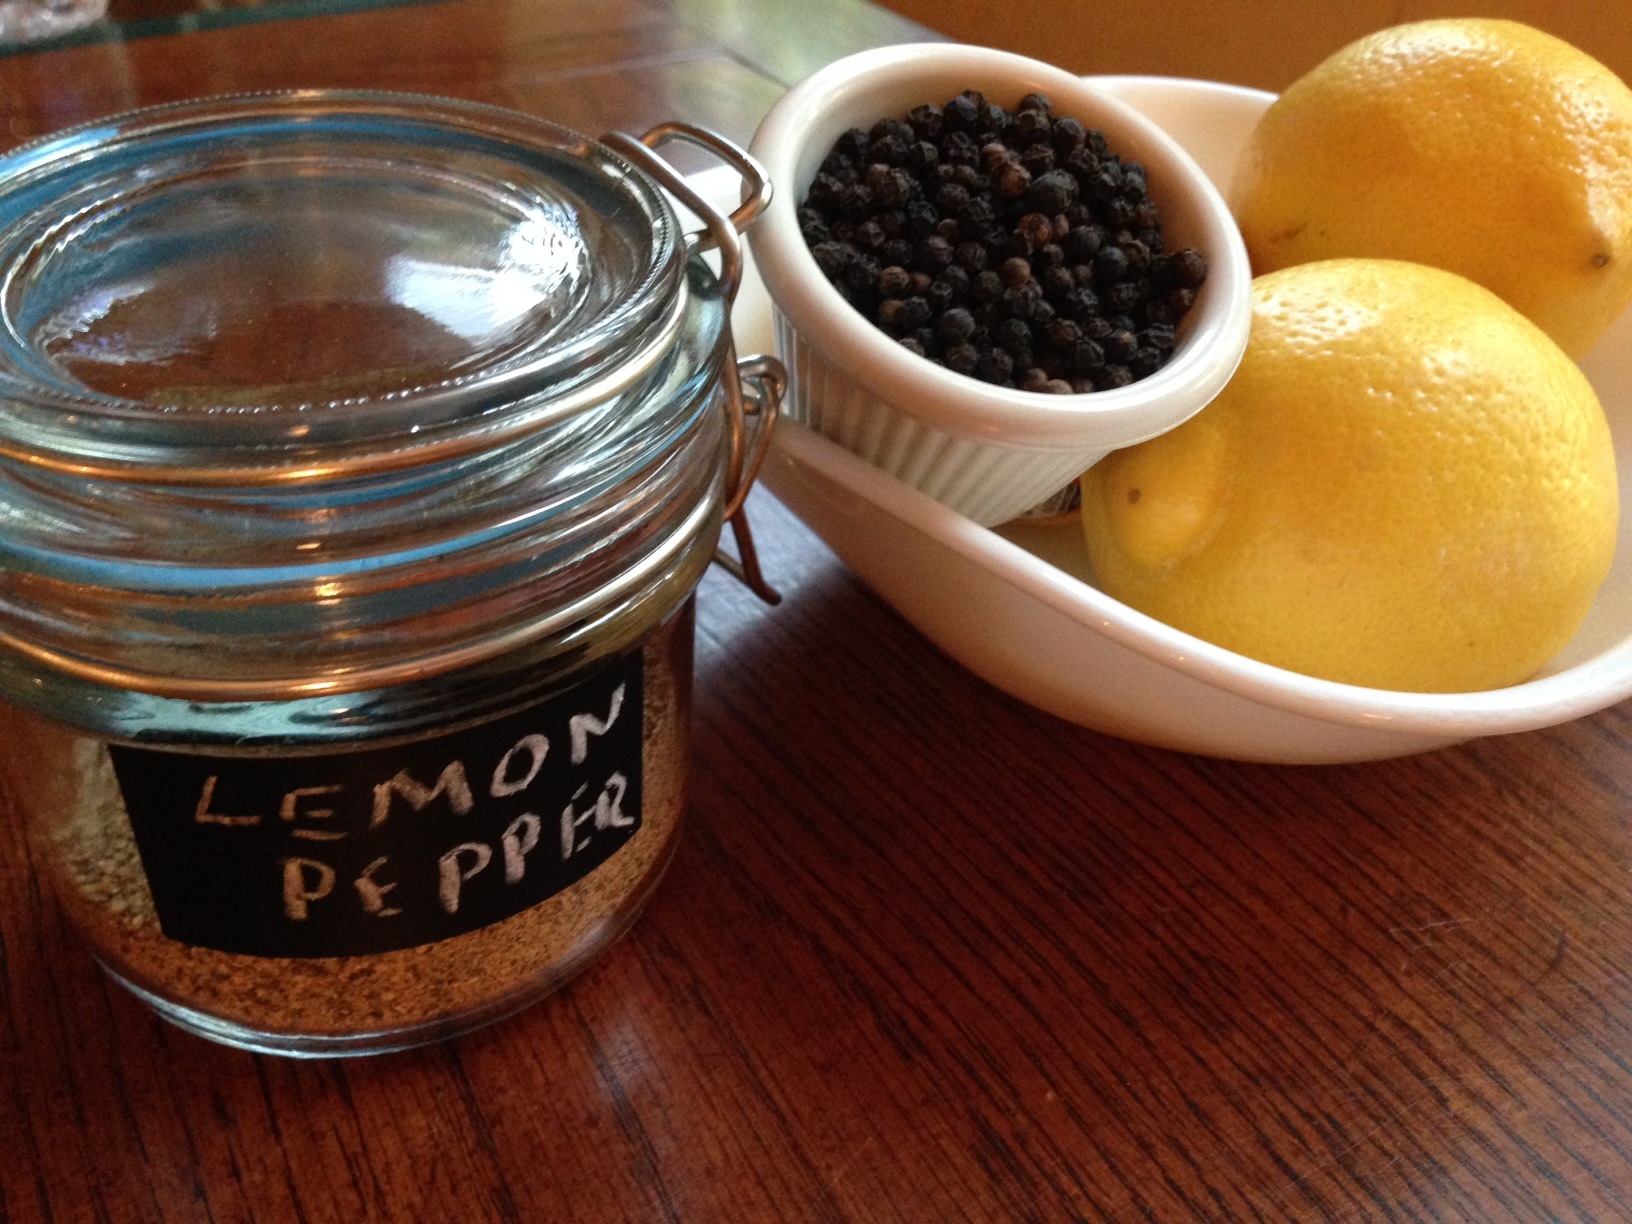
Lemon Pepper Seasoning
Homemade Lemon Pepper Seasoning, from SimpleSolutionsDiva.com.
Ingredients:
1 cup fresh lemon zest (zest approximately 10-12 lemons to get 1 cup)
1/3 cup peppercorns (black or mixed colors)
Preparation:
Place peppercorns in a food processor {or clean coffee grinder} and pulse just a few times until coarsely ground. Combine together in a bowl the fresh lemon zest and ground peppercorns and combine thoroughly. Pour out onto a parchment lined baking sheet and place in oven on lowest setting (mine was lowest at 170 degrees). Bake for about 1 hour or until zest is dried. Place mixture back into food processor and pulse until finely ground.
For ideas on what to do with all those lemons you used to get the zest, check out another Simple Solutions Diva post! (Click Here)
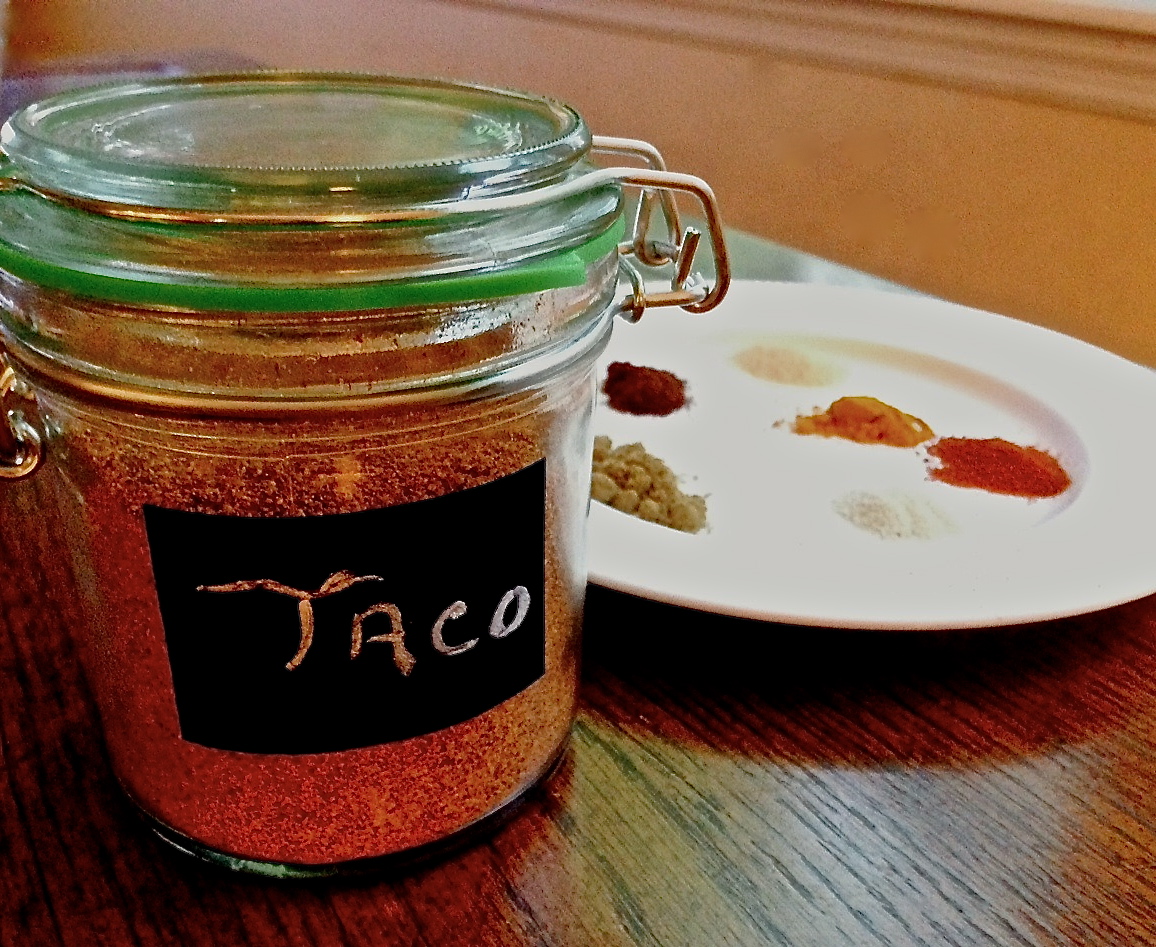
Homemade Taco Seasoning
Click Here to see my zesty, homemade Taco Seasoning recipe!
2 cans (12.4 oz each) Pillsbury flaky cinnamon rolls
1/2 cup butter, melted
1/4 cup sugar
2 eggs
1/2 cup half & half
3 tsp cinnamon
1/4 tsp nutmeg
2 tsp vanilla extract
1/2 cup finely chopped pecans (optional)
Icing from cinnamon rolls
Powdered sugar, if desired
Directions
Preheat oven to 350 degrees. Grease a 9×12 inch casserole dish.
Place butter in a large glass bowl and melt in microwave. Add sugar and mix well. Add in cream, eggs, cinnamon, nutmeg and vanilla.
Open canned cinnamon rolls, slice each cinnamon roll into eighths. Add cinnamon roll pieces into the bowl with the egg mixture and toss to thoroughly coat.
Pour the mixture, into the casserole dish and spread out evenly. Pour any remaining egg mixture over the top.
Sprinkle with pecans (if adding). Bake for 35-40 minutes.
When done, remove from oven. Warm icing from cinnamon roll packages in microwave for 15 seconds; pour evenly over bake. Sprinkle with powdered sugar, if desired.
Enjoy and Happy Mother’s Day!
This simple recipe is from GastRecipes.com – a great site to find some wonderful recipes! Check them out!