This is a simple and tasty way to get veggies into your diet, and maybe even get the kids to like zucchini!
Ingredients
2 zucchini squash, sliced in 1/4 inch slices
1 tablespoon olive oil
1/4 cup fresh grated parmesan cheese
1/4 italian-style bread crumbs (you can use less)
1/8 teaspoon salt
A couple of grinds of fresh ground pepper
1/8 teaspoon garlic powder, if desired
Cooking spray
Preparation
Preheat oven to 450 degrees. Lightly spray a cookie sheet with cooking spray. NOTE: If covering the sheet with tin foil for easy clean up, still use the cooking spray on the tin foil – keeps the chips from sticking!
Place sliced zucchini in a bowl and add olive oil. Mix until zucchini is well coated.
In a large plastic bag, combine the parmesan, bread crumbs, salt and pepper (and garlic, if using). Shake until well combined. Add the zucchini to the bag (in small batches), shaking to coat the zucchini well.
Lay the coated zucchini on the cookie sheet, in single layer. Sprinkle any leftover bread crumb mixture over the zucchini.Place in the oven for 25-30 minutes. Because all ovens are different, be sure to check the zucchini to make sure it does not burn to a crisp! It should be lightly browned and crispy.
Serve warm. You can serve this with ranch dip if you would like. Enjoy!
This recipe is adapted from Food Network. I always love looking at what they have to offer!
Meatless Mondays is a great concept – it’s a movement to get people to be conscious of their meat consumption and potentially reduce their risk for preventable health issues like high cholesterol.
I wanted to create some kid-friendly and simple recipes that will make Meatless Monday easy and stress-free! I hope you like them!
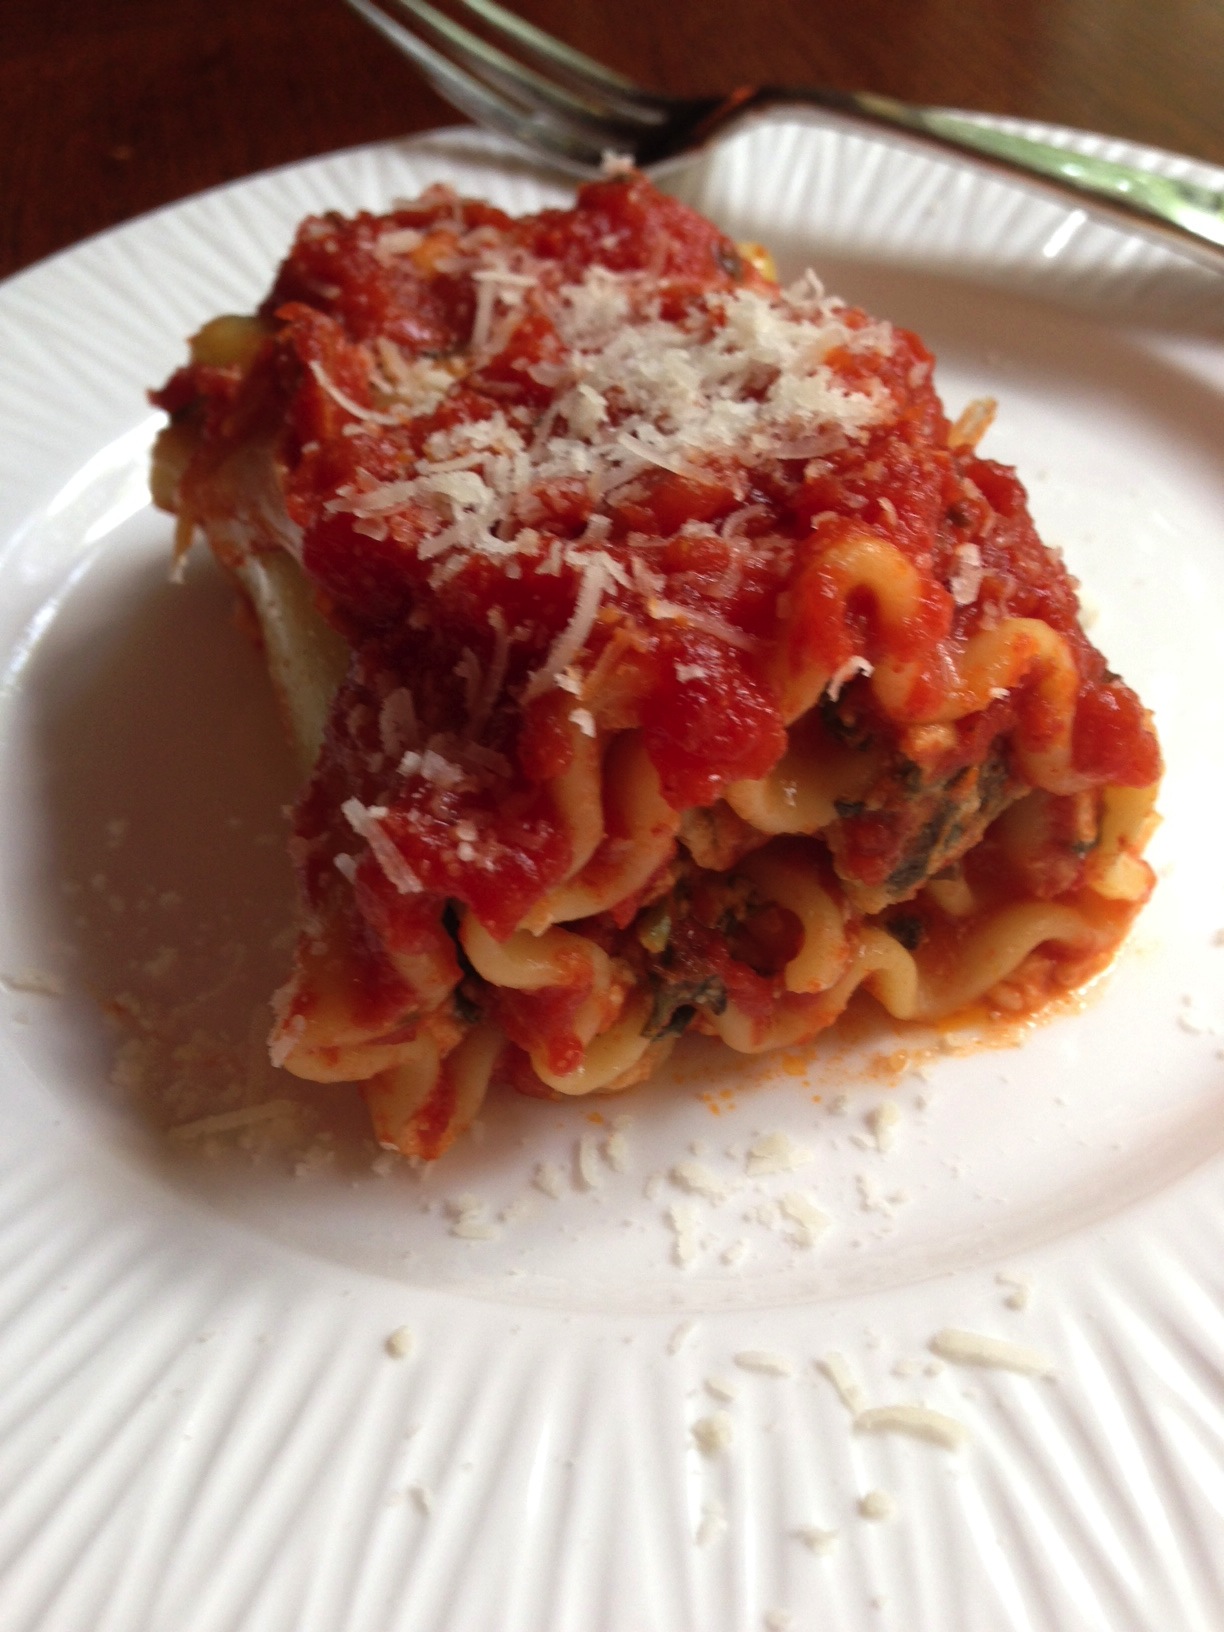
Spinach Lasagna Roll-Ups
Spinach Lasagna Roll-Ups from SimpleSolutionsDiva.com.
These are not only the perfect, single serving size, kids will enjoy making them with you! Besides, who doesn’t like to play with their food? You can assemble this on Sunday, put it in the fridge, and pull it out Monday to cook. Easy Peasy!
Ingredients
One 15 oz. container Ricotta Cheese, part skim (You can substitute cottage cheese)
One cup shredded mozzarella cheese, divided – ½ cup for cheese mixture; ½ cup to sprinkle on top of baked dish
One egg
Salt and pepper to taste
½ teaspoon garlic powder
¼ cup parmesan cheese (I used fresh grated, but you can use packaged to save time!)
1 container of frozen, chopped spinach – thawed and squeezed of liquid.
One box of lasagna noodles, cooked and drained (Note: to keep them from sticking after cooking, toss the cooked noodles with a light drizzle of olive oil).
2 cups marinara sauce – I used prepackaged sauce to make it easy.
Preparation
Preheat oven to 400 degrees. Cook noodles according to the package. Drain and toss with light drizzle of olive oil.
In a large bowl, combine the ricotta, ½ cup mozzarella, parmesan, egg, salt, pepper, and garlic powder. Add the drained, chopped spinach and mix well.
Pour about ½ cup of marinara into the bottom of a baking dish.
On a clean, flat work surface, lay out the noodles. Spread about ¼ cup of cheese mixture onto a noodle, spreading to the edges. You do not want it too thick. Starting at one end, roll the noodle up and place on it’s end in the baking dish. Repeat until you have used all the noodles.
Pour remaining marinara sauce over the top of the lasagna rolls. Cover with tin foil and bake for approximately 40 minutes. Just before it is done, sprinkle remaining mozzarella over top and cook until bubbly.
Stuffed Peppers
Meatless Monday Stuffed Peppers from SimpleSolutionsDiva.com.
My mom used to make these filled with rice and ground beef. I decided to replace the beef with Great Northern Beans – a great way to still get your protein and a very flavorful meal!
Ingredients
4 peppers (I used a combination of yellow, red and green peppers)
1 15 oz. can Bush’s Great Northern Beans, Reduced Sodium
1 15 oz. can diced tomatoes (I like to use the basil oregano flavored)
2 tablespoons olive oil
1 cup onions, chopped
1 clove garlic, minced
½ teaspoon cumin (feel free to add more to taste)
Salt and pepper to taste
2 cups brown or white rice (I used Uncle Ben’s Ready Rice to make it easier)
1 can tomato sauce
Shredded cheddar cheese – as much or as little as you like.
Preparation
Wash and then cut the tops off the peppers. Deseed the peppers. Take the tops of the peppers and chop them up (without the stem).
Pour the can of tomato sauce into the bottom of the baking dish.
In a large pan, sauté the onions, chopped pepper tops and garlic. Add the cumin, tomatoes, salt and pepper, beans, and rice – mix thoroughly. Feel free to add more or as little spices as you want!
Stuff the peppers with the rice mixture. Place the stuffed peppers upright in the baking dish. Place in oven for approximately 40 minutes. Sprinkle the cheese on top of the peppers in the last 5 minutes of cooking.
Serve warm!
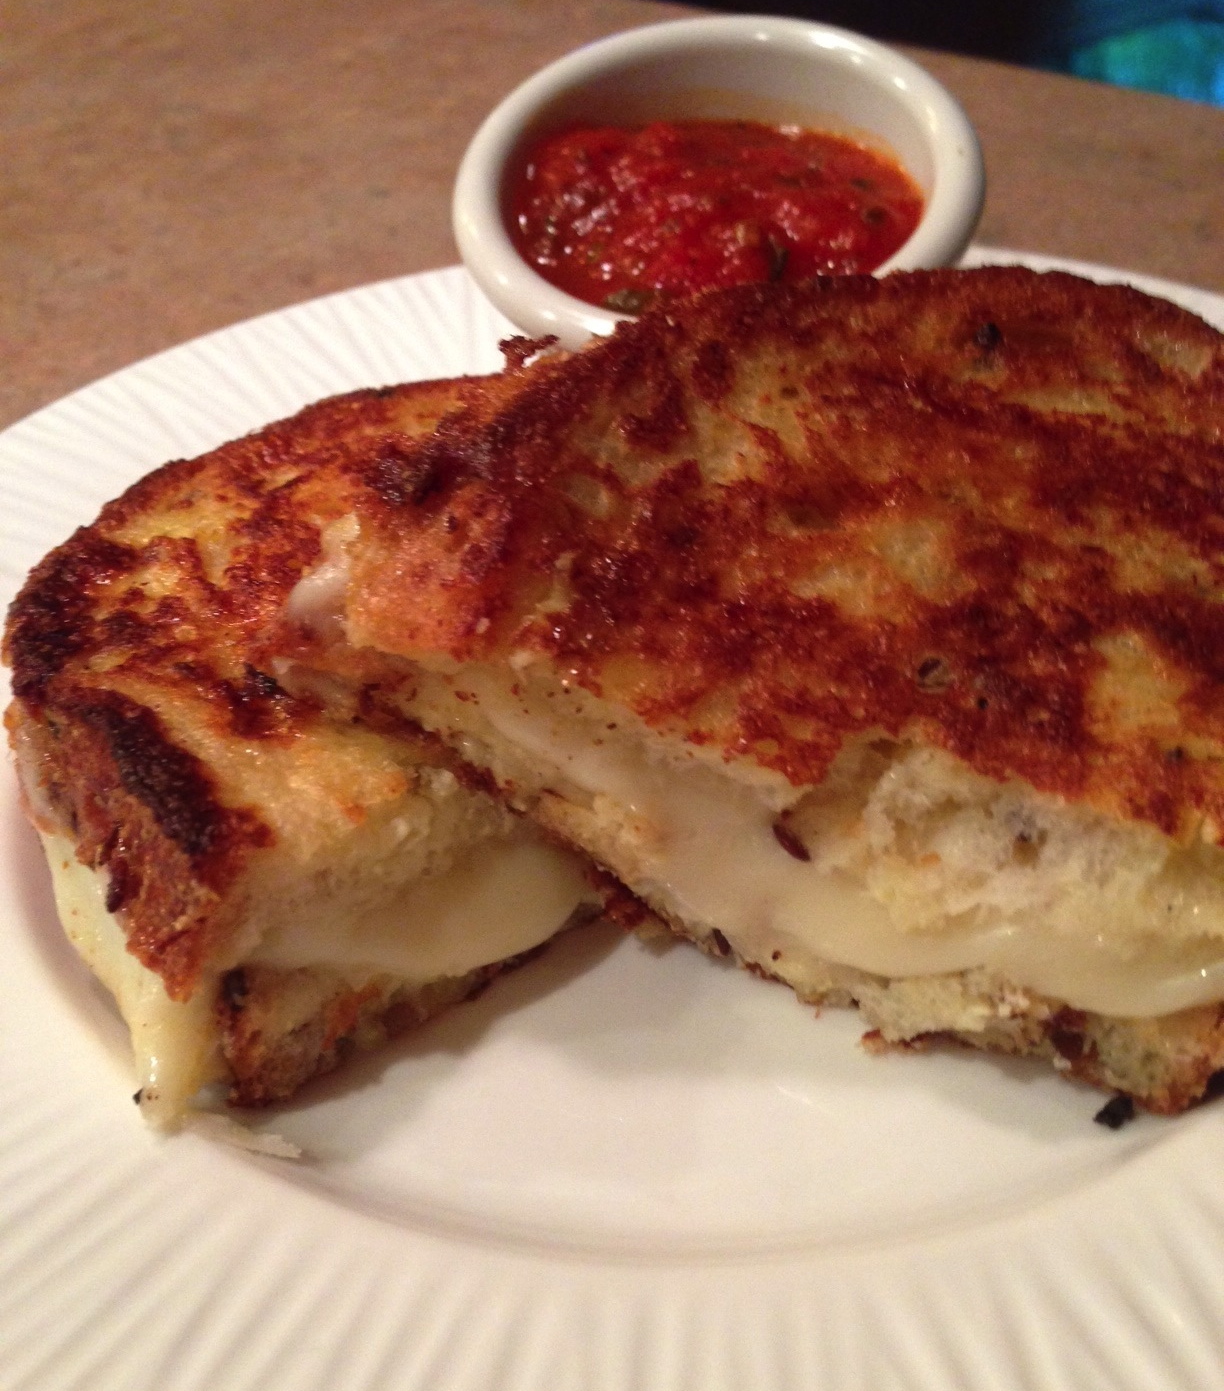
Upgraded Grilled Cheese
UpGraded Grilled Cheese from SimpleSolutionsDiva.com.
This is like having mozzarella sticks in sandwich form!
Ingredients
4 slices crusty bread
4 thick slices mozzarella
1 egg
¼ cup half & half or milk
salt to taste
1 teaspoon olive oil
butter
½ teaspoon minced garlic
Marinara sauce for dipping
Preparation
Make a sandwich with two slices of bread with two large slices of mozzarella; Repeat with second sandwich.
In a bowl, beat the egg, milk/cream, & salt.
In a fry pan, heat olive oil and garlic over medium high heat. Add butter.
Dip the sandwiches in the egg mixture and then place in fry pan. Cook until golden brown on one side (approx. 2 mins.), then flip.
Serve with warm marinara as dipping sauce.
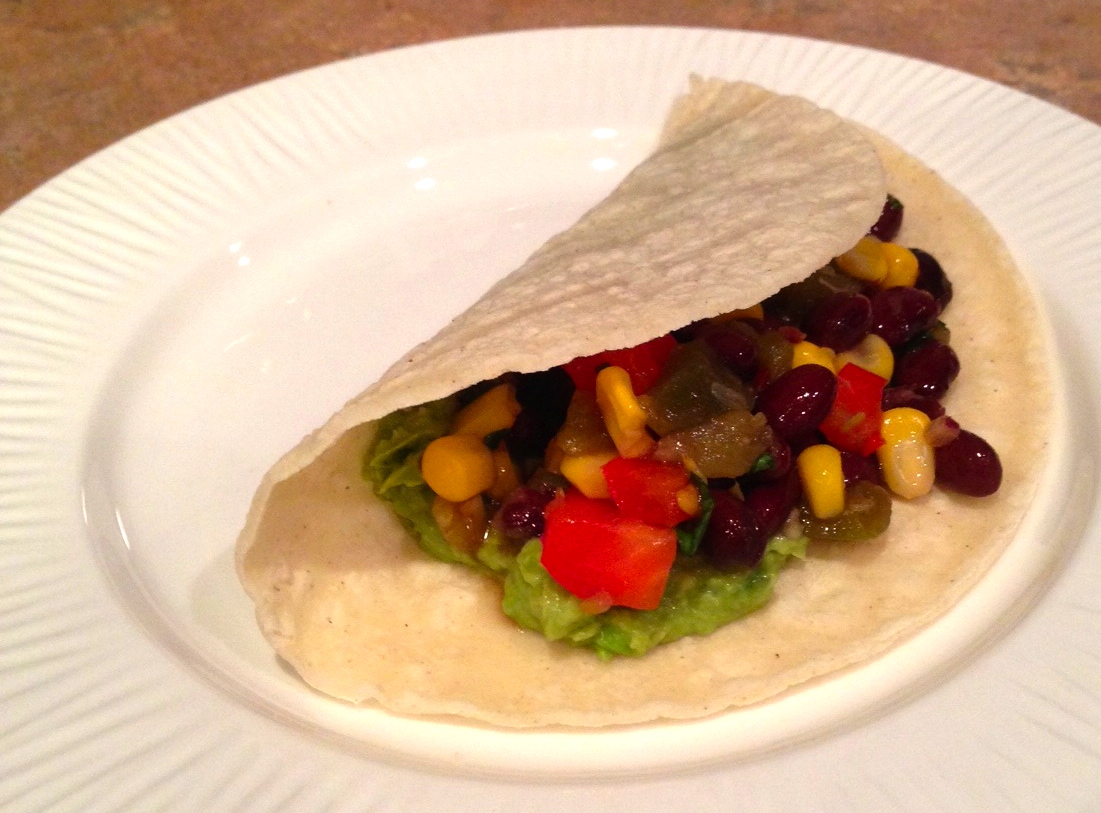
Avocado Tacos
Avocado Tacos from SimpleSolutionsDiva.com.
This is so easy and very tasty! Top these tacos with your favorite taco toppings: sour cream, lettuce, etc.
Ingredients
Corn tortillas
2 Avocados, mashed
Bean, Corn and Red Pepper Salsa (Click here for recipe)
Favorite taco toppings
Preparation
Heat corn tortillas in a fry pan. Add a couple of teaspoons of the mashed avocado, the bean salsa. Add favorite toppings! Enjoy – Yum!
If you would like to see more Meatless Monday recipes, visit my Pinterest Board or visit MeatlessMonday.com. Thank you to WTLV-TV’s First Coast Living for inviting me on to share these recipes!
We LOVE tacos at our house, and this recipe is so easy, you’ll never want to buy those prepackaged versions (full of salt and additives) again!
Zesty No Salt Taco Seasoning
(Adapted from Rachel Ray recipe)
1 Part Chili Powder
1 Part Ground Cumin
1 Part Garlic Powder
1 Part Onion Powder
1/3 Part Tumeric
1/4 – 1/2 Part Crushed Red Pepper (I used ground red pepper)
Combine all the parts into a good container with a secure, air-tight lid and shake until combined. Enjoy! Feel free to play with the amounts – maybe you like more red pepper, or you want more cumin!
Consider using fresh spices in this mixture for a more potent flavor. One of my favorites is to order through The St. Augustine Spice and Tea Exchange. You can check out their website and wonderful spices by clicking here. (Though nothing beats going into one of their stores and just inhaling the aroma!)
Thank you to WTLV-TV’s First Coast Living for inviting me on to talk tacos and taco seasoning!
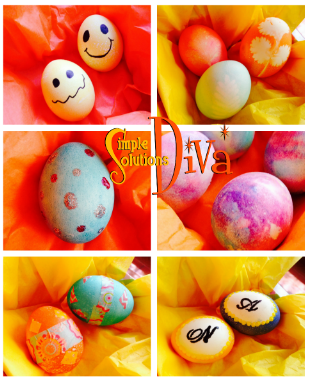
I was so excited when First Coast Living gave me a challenge – find some unique ways to decorate Easter Eggs! Well, after searching high and low, I found some favorites and tested them just for you!
Volcano Eggs
Volcano Eggs
This is a cool technique and great fun to do with the kids! And it yields a beautiful egg coloring. The best part about this technique? It looks like a volcano bubbling a rainbow! I found this technique on the website ToddlerApproved.com. Check out the website for great ideas!
What You Need:
Hard boiled eggs
Food coloring
Baking soda
Vinegar
Wide-lipped plate or bowl
Paint Brushes
Color-safe cups for mixing “paint”
Technique:
Make the “Paint” – Combine in a color- safe cup, one tablespoon baking soda, a teaspoon or two of water and food coloring of choice. Mix until it is a consistency of mustard – kind of grainy but with some heft to it.
Repeat that process with the other colors you choose to use.
Take a paintbrush and start to paint your eggs with the different “paint” colors – there is no perfect way to do this, just have fun and be creative. Make sure to leave a “blob” or two of the paint on the egg.
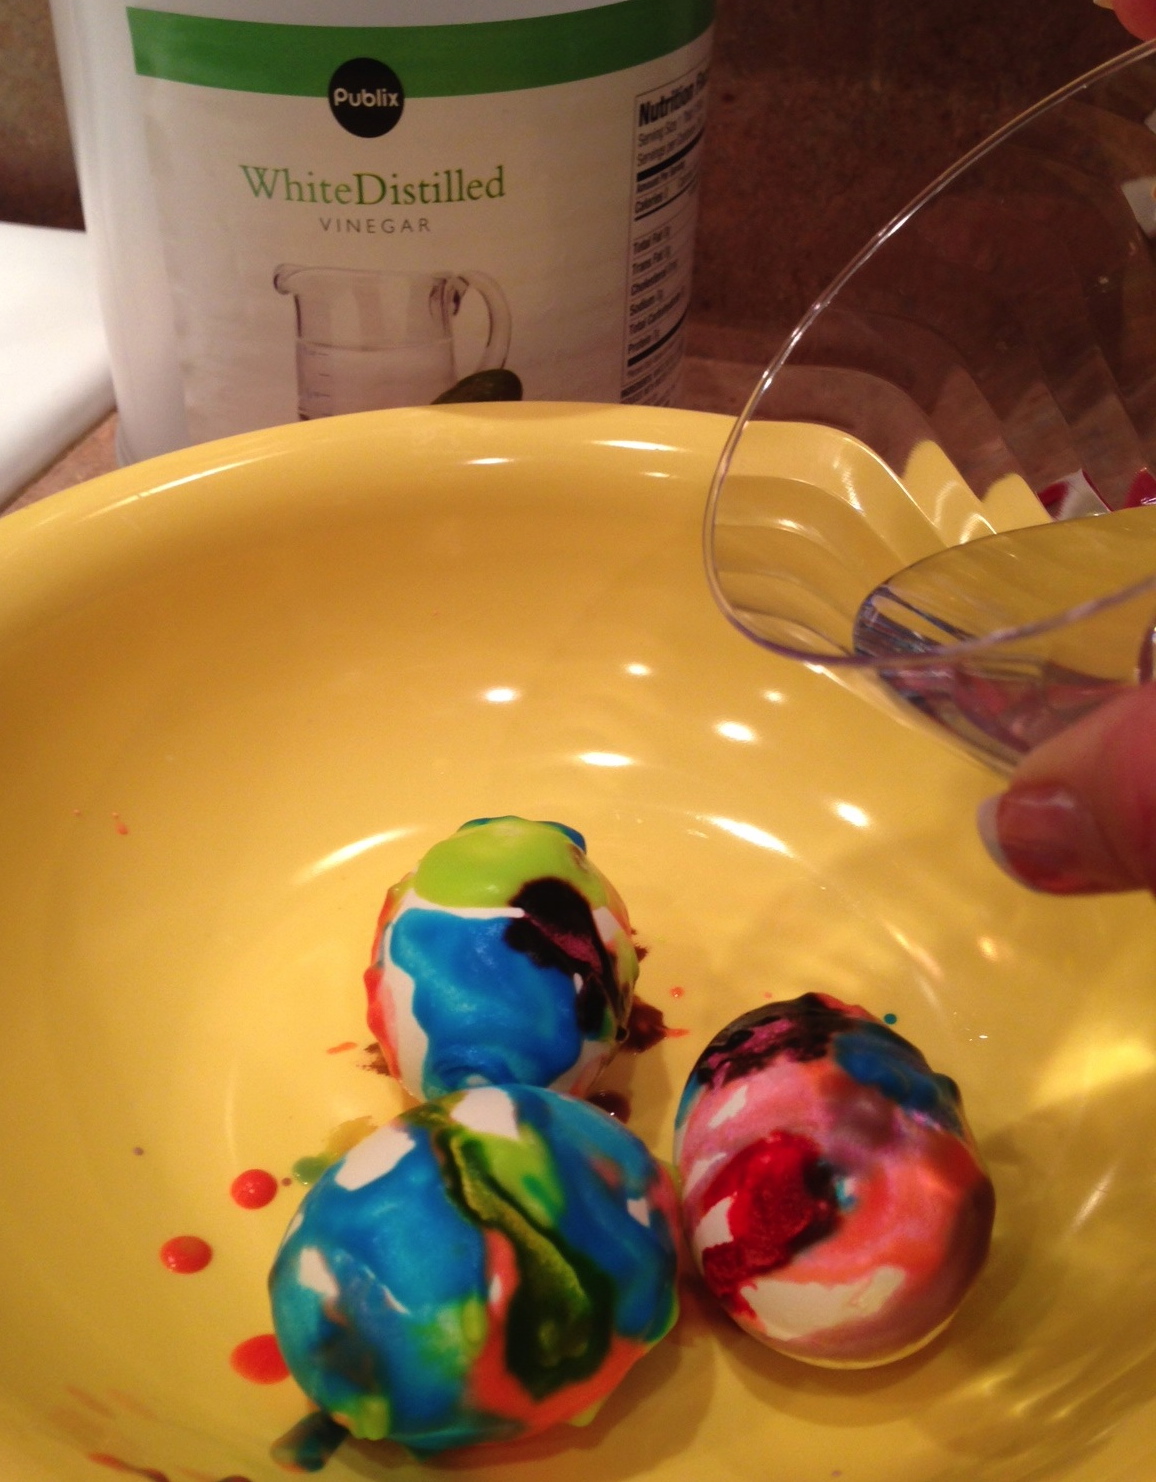
Pouring Vinegar on Volcano Eggs.
Place the painted eggs into the wide-lipped plate or bowl. Take your food coloring and drip a drop or two on your eggs.
Now comes the volcano part: Drizzle vinegar over your eggs and watch the colors start to bubble! Let the mixture sit on the eggs for awhile, then wipe off with paper towel!
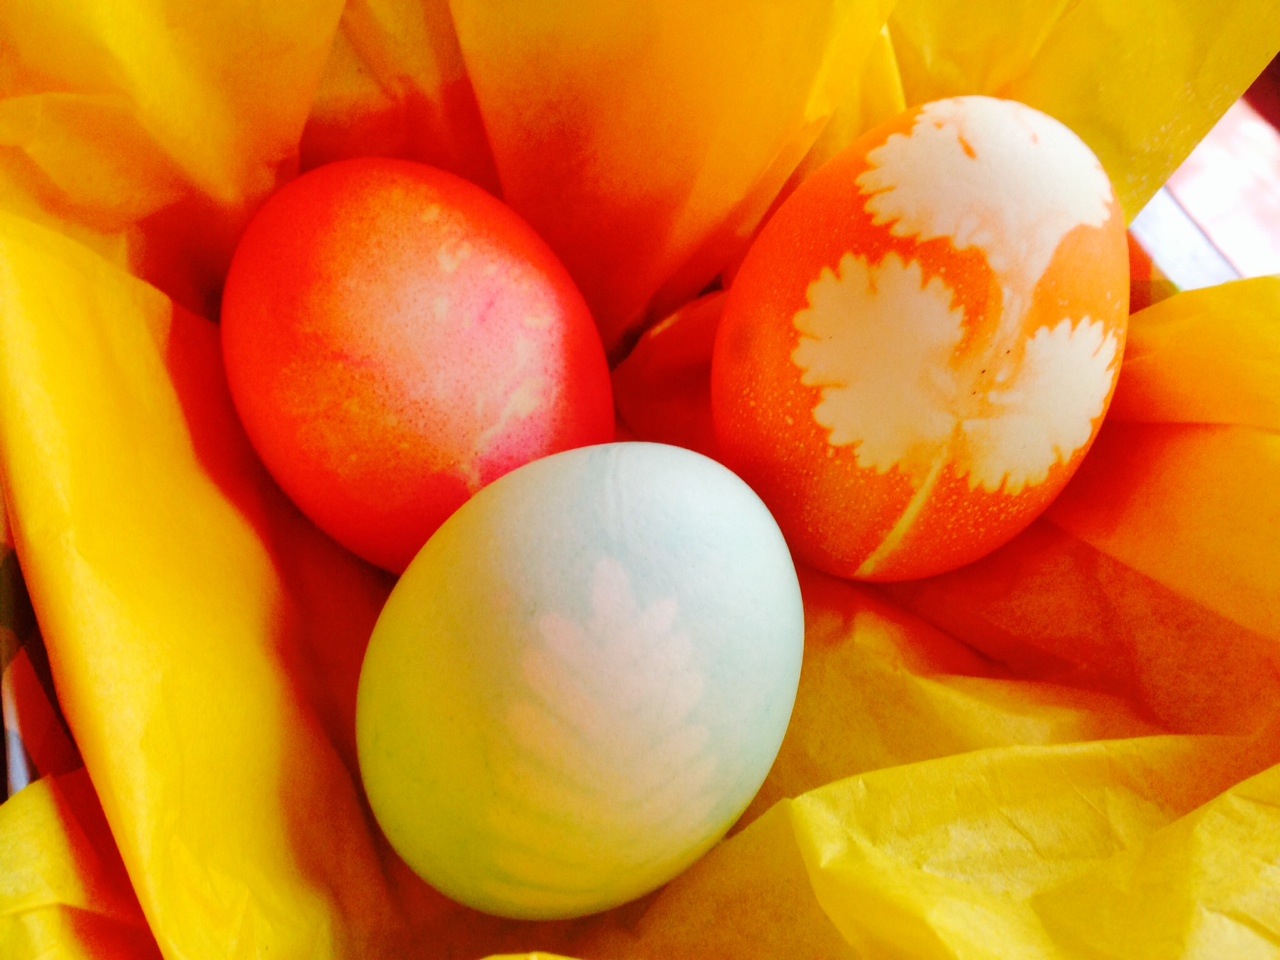
Leaf Print Eggs
Leaf Print Easter Eggs
I love incorporating natural elements into projects if I can. I found this beautiful idea, Leaf Print Eggs, on Spoonful.com and thought I’d give it a try! Since I AM the Simple Solutions Diva, I wanted to simplify the process, so I just used the PAAS Egg Decorating Kit to dye the eggs, rather than mix up my own dyes as listed on Spoonful (click on the link above to see their full instructions!).
What You Need:
Hard Boiled Eggs
PAAS Egg Decorating Kit
Various leaves with interesting shapes – I used Cilantro, a fern and a small squash leaf. (Don’t recommend “woody” types like rosemary)
Cups to mix up the dyes
Rubber bands
Sheer knee high hosiery (nylons), cut into 3 inch strips
Color-safe place to dry the eggs
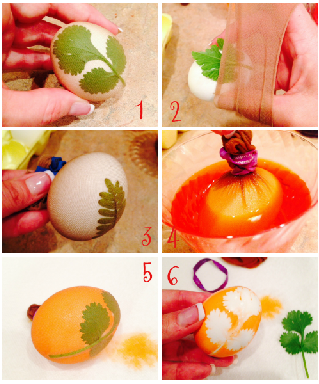
Instructions:
Mix up your dyes according to the PAAS package, using the instructions for more vivid colors (using vinegar).
1.) Take the egg and position your leaf on your egg. 2.) Using the piece of knee high, wrap your egg so the leaf is secure and tight against the egg. 3.) Pull the excess nylon tight on the opposite side of the egg, securing with a rubber band.
4.) Place the egg in the dye and allow to sit until the egg has reached the color intensity you want.
5.) Remove the egg from the dye and place on color safe surface. 6.) Remove rubber band and nylon and gently remove the leaf from the egg. Allow to dry.
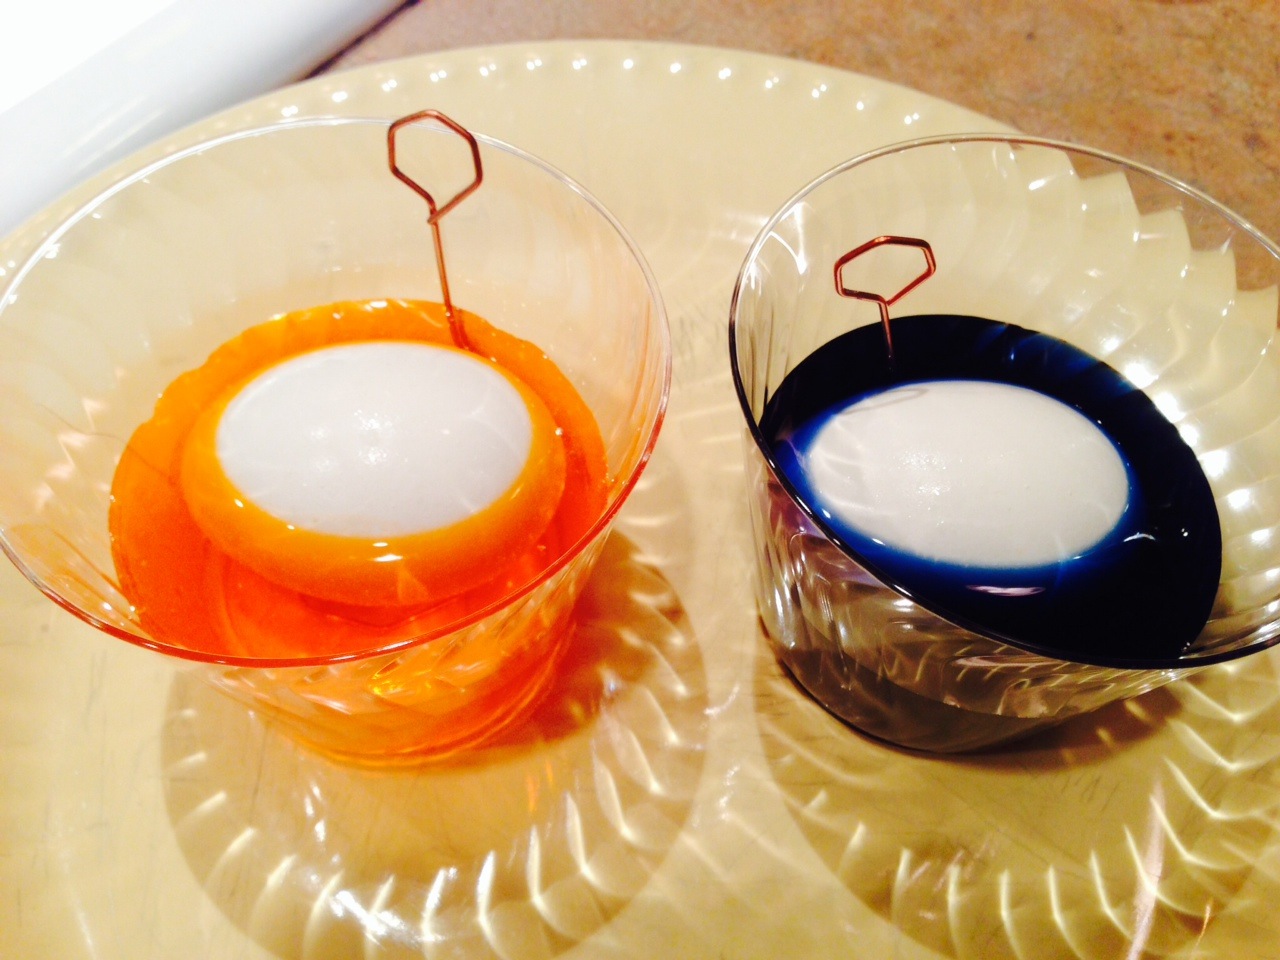
Initial Eggs
Initial Easter Eggs
These make for cute placeholders for the Easter table, or for limiting how many each child gets during the Easter Egg Hunt (They look for their name or initial!). This cute idea is from Reader’s Digest!
What You Need:
Hard Boiled Eggs
PAAS Egg Decorating Kit with dyes
Cups for mixing dyes
Acrylic Paint
Small Paintbrush
Black Sharpie
Instructions:
Mix up your egg dyes according to package, using the vivid instructions (includes using vinegar).
Place an egg sideways in a cup and gently pour the dye of choice until you have an oval of white showing (don’t cover the entire egg with dye-See photo below). Let egg sit, without disturbing, in dye until it reaches the desired color. Remove egg from dye and allow to dry.
Once dry, take acrylic paint and, using paintbrush, draw dots around the edge of the oval. Allow to dry.
Once dry, draw an initial or a name in center of oval, using the black sharpie. Allow to completely dry.
Washi Tape Eggs
Washi Tape Eggs
Washi tape is like a very pretty, decorative masking tape. And projects using it are all over Pinterest! It comes in a variety of colors and sizes. It works perfectly on dyed, hard boiled eggs or just plain, white hard boiled eggs! This is a simple way to get little kids involved with the egg decorating.
What You Need:
Hard Boiled Eggs (they can be dyed or not)
Washi Tape (available at any craft stores), choose a variety of patterns and sizes.
Instructions:
Just “go to town” and start decorating!
For small children – Cut small pieces of washi tape and put them out for little hands to decorate with!
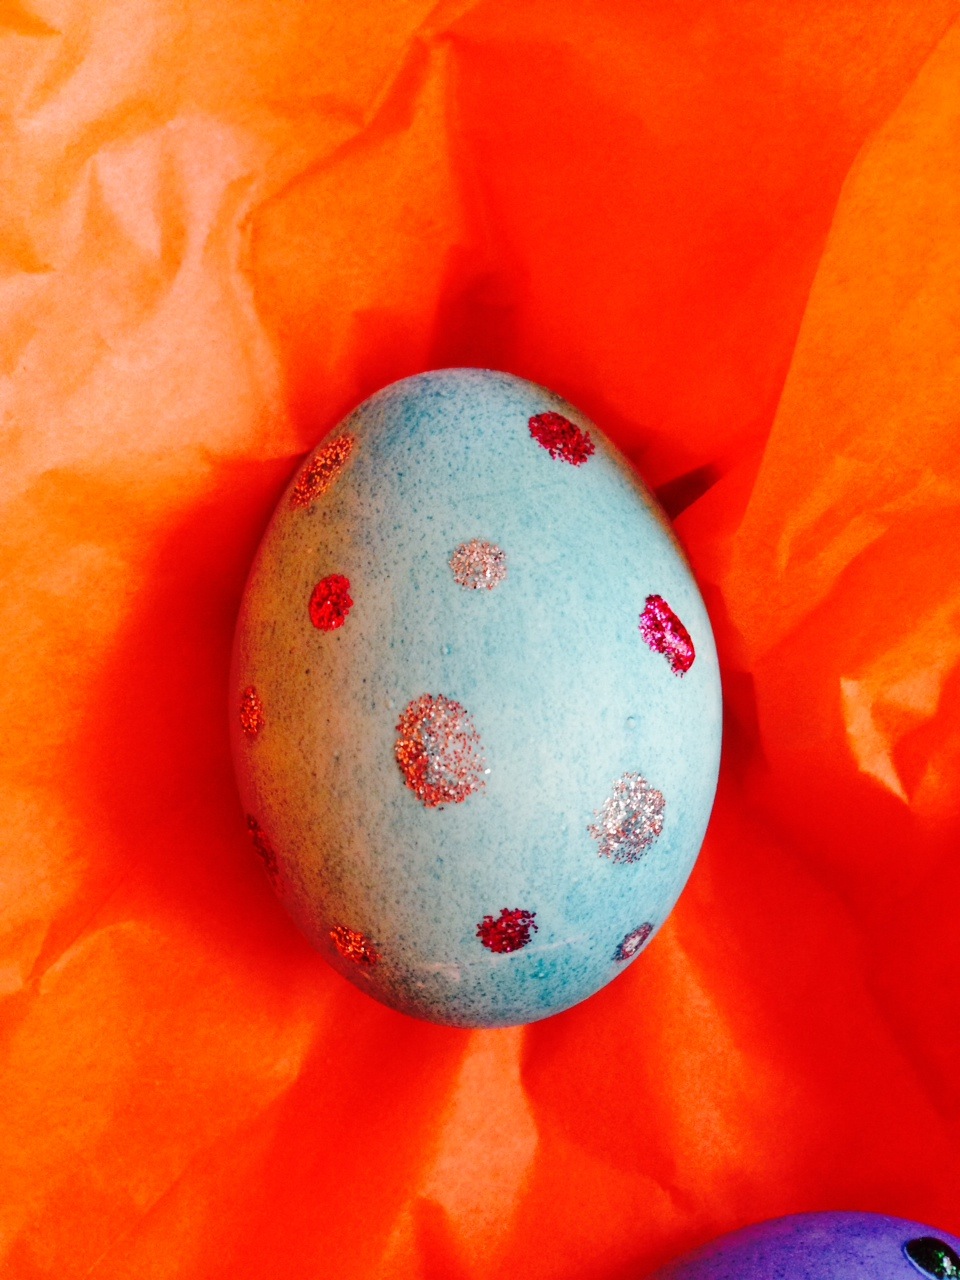
“Bling” Eggs
Bling Eggs
Another simple way to decorate the eggs with little kids!
What You Need:
Hard Boiled Eggs (colored or plain white)
Crayola Washable Glitter Pens, variety of colors
Instructions:
Using the glitter pens, make dots of glitter all over the eggs. I did one side first, allowed to dry, then did the other side!
Happy Face Eggs
Happy Face Eggs
This is my personal favorite because my mom and I love smiley faces, PLUS it is super simple to do!
What You Need:
Hard Boiled Eggs dyed yellow
Black Sharpie
Instructions:
Use the black sharpie to create whatever type of face YOU want! Tip –When drawing the eyes, make sure the eyes are on the narrow end of the egg, mouth near the lower half of egg.
Thanks WTLV-TV’s First Coast Living for this fun challenge!
Easter is almost here, and my mother-in-law challenged me to find a way to make hard boiled eggs easier to peel! (I think she wants to have nice looking deviled eggs!)
After some extensive research, I found this solution – Hope it works for you! Remember, use older eggs when hard boiling – fresh eggs will not peel as well.
With Easter and Passover fast approaching, we will have lots of family time – what can you do that’s fun with the kids and adults to keep everyone busy? Try some springtime crafts!
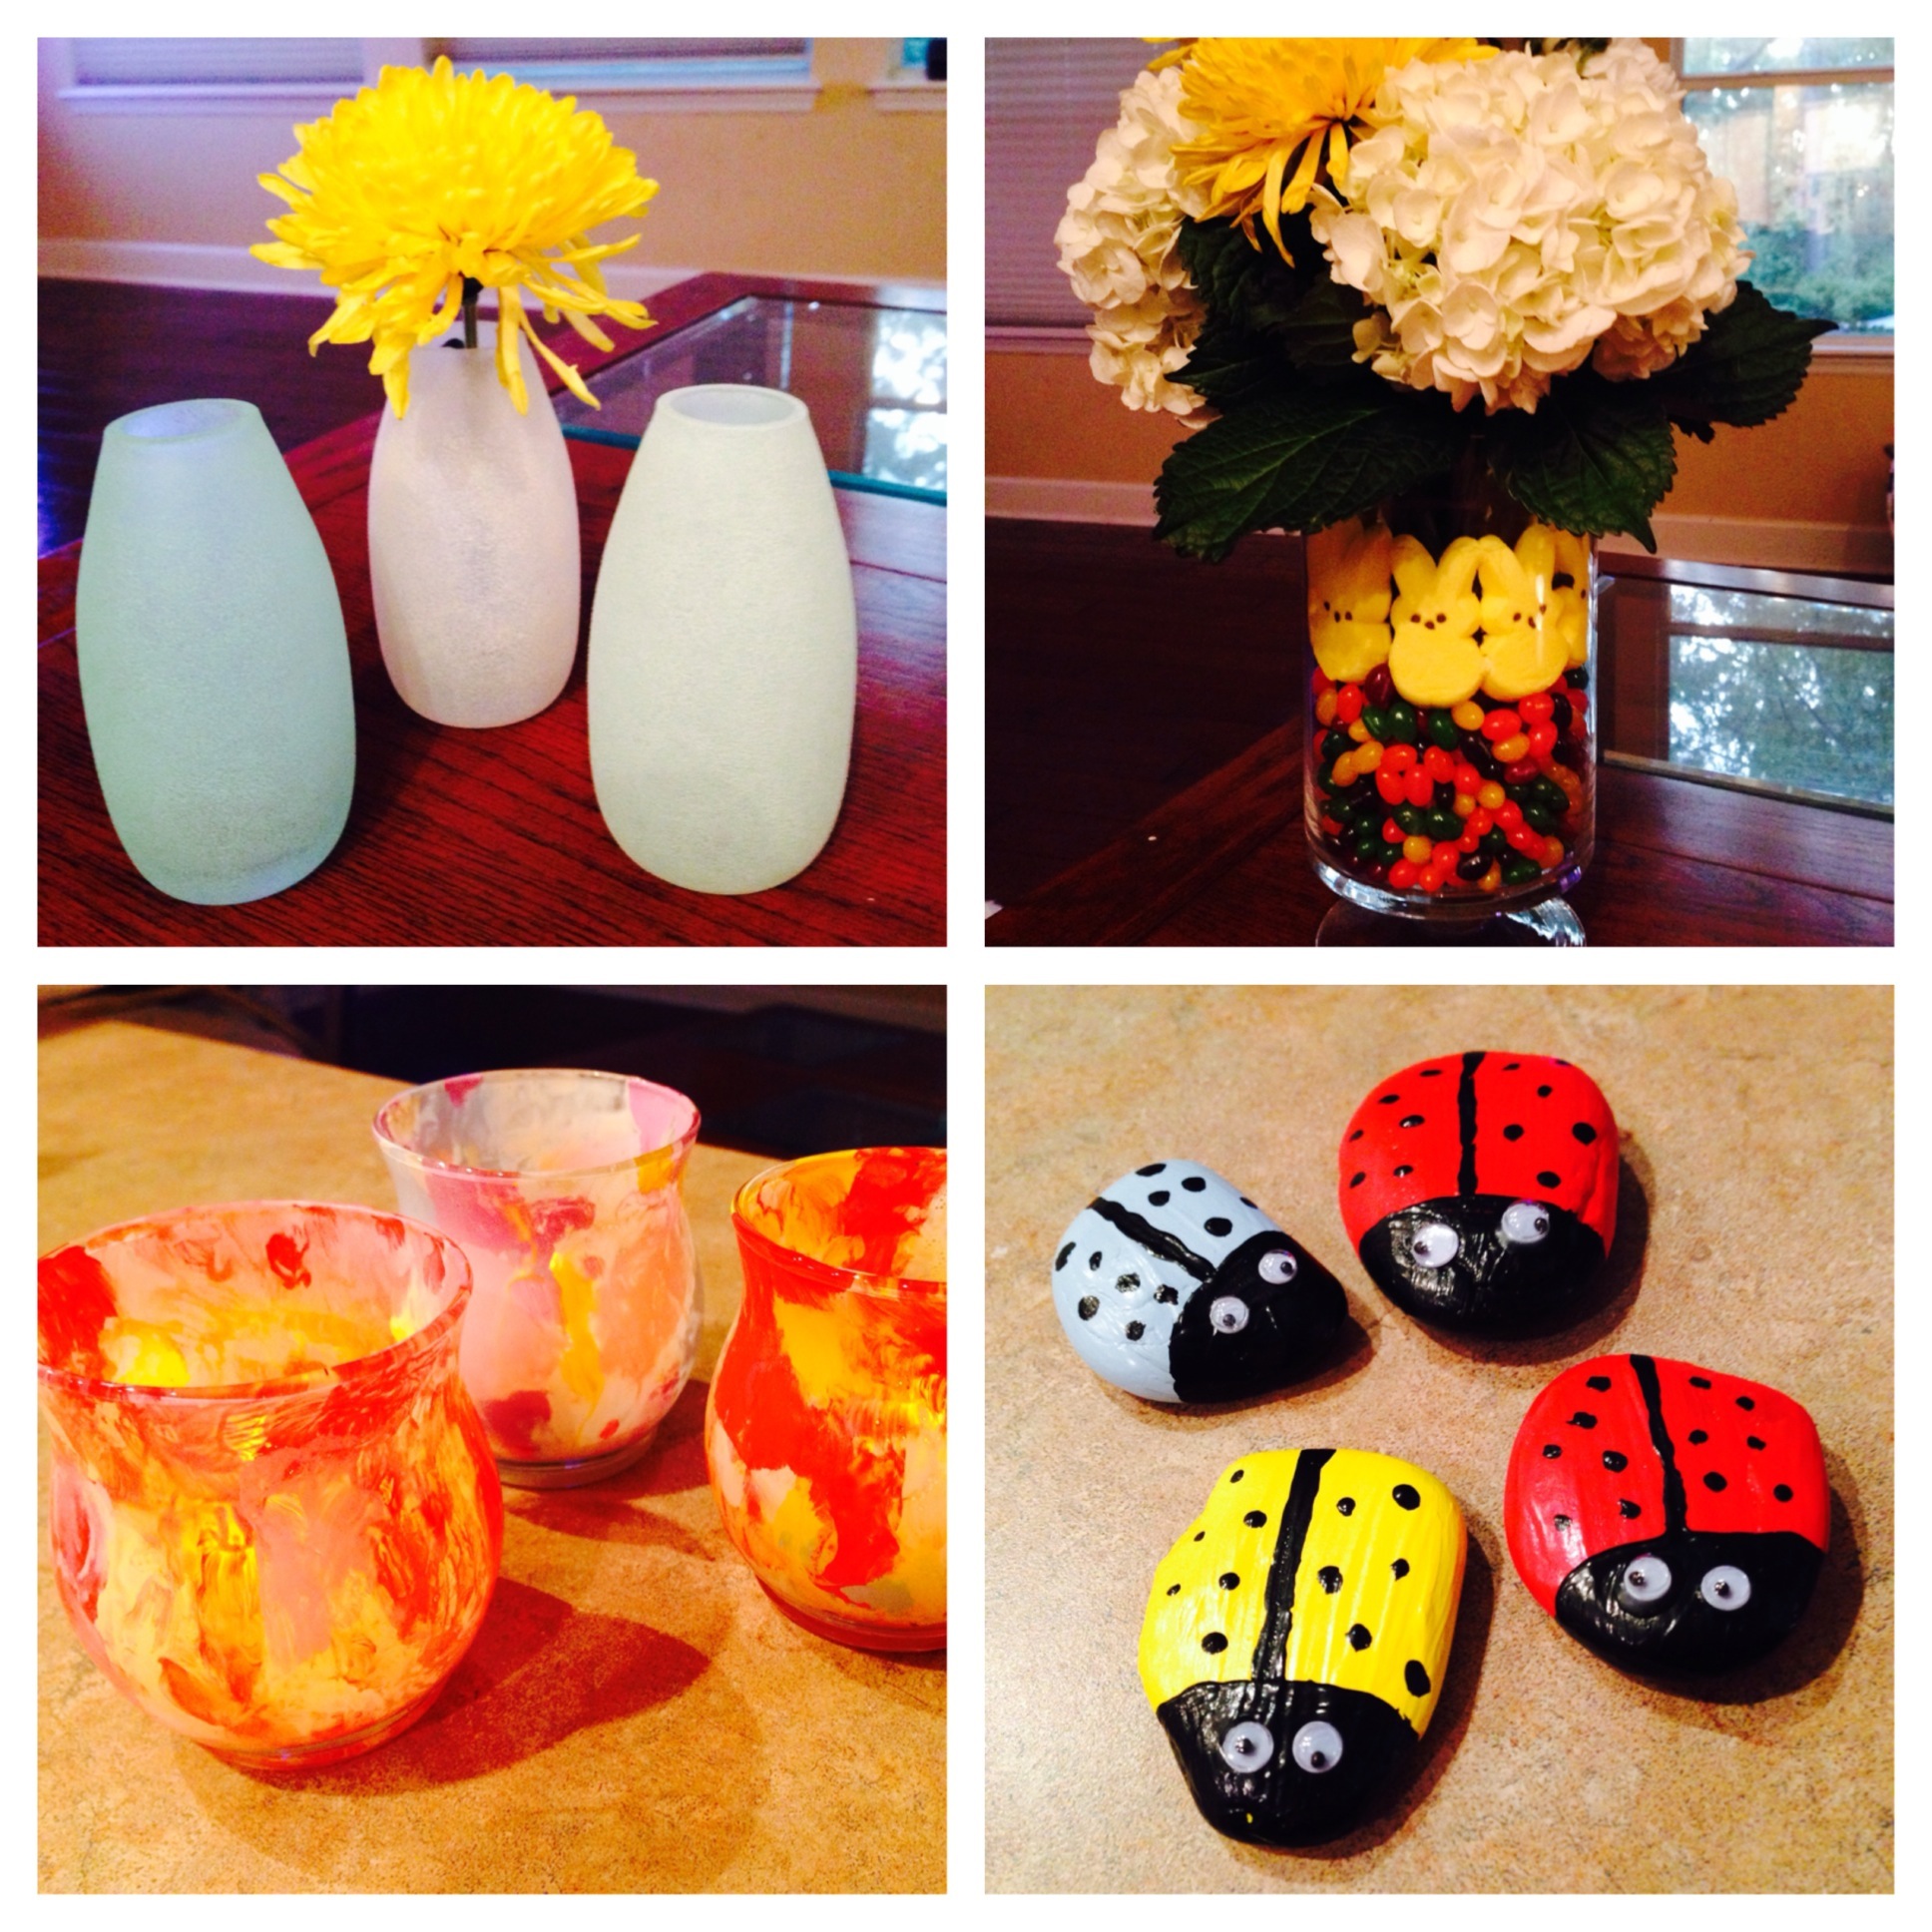
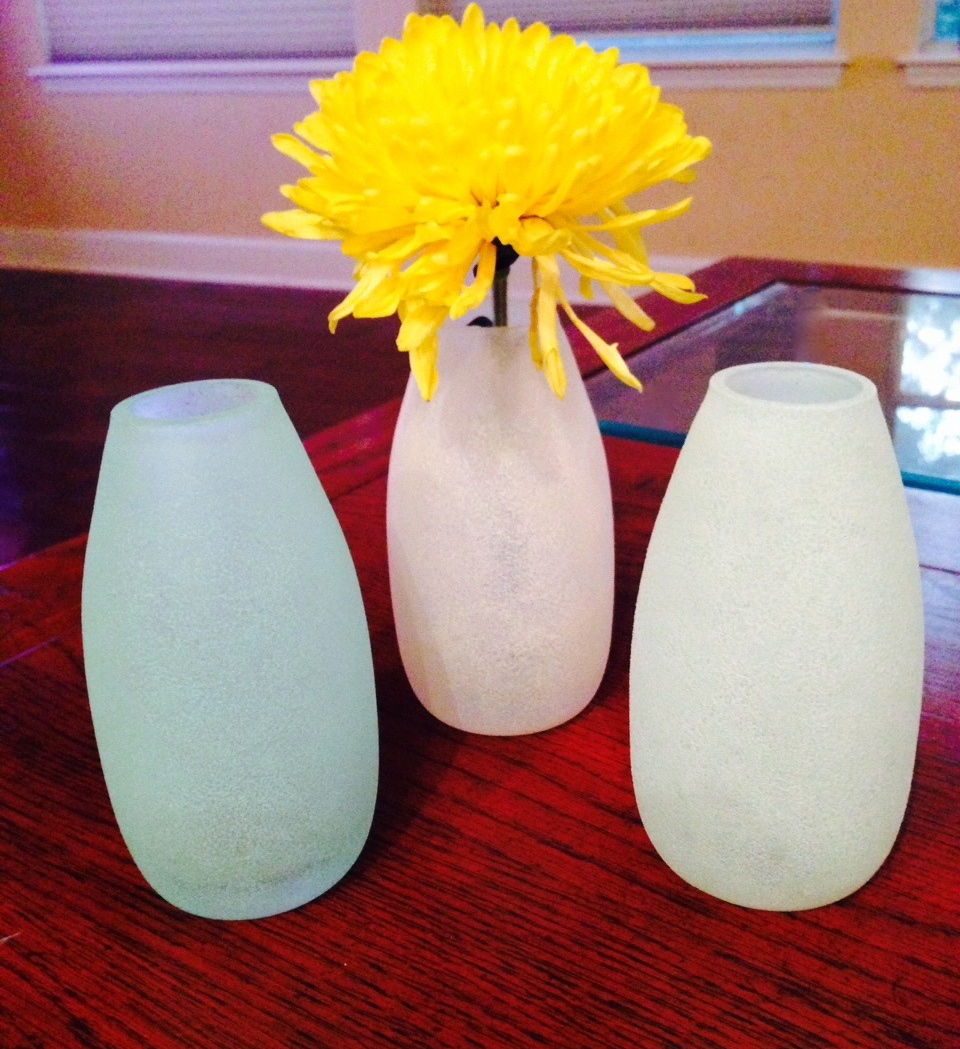
“Beach Glass” Vases
“Beach Glass” Vases from SimpleSolutionsDiva.com.
I love the look of beach glass. Muted hues of blues, greens and whites. You can make any glass item look like a piece of beach glass by just using special glass paint. I used Martha Stewart Crafts Frost Translucent Glass Paint — The effect is translucent, frost-like with a slight pebbly texture that resembles sea glass. Beautiful and easy!
What You Need:
Martha Stewart Crafts Frost Translucent Glass Paint (Available at most craft stores) I used colors of beach glass green, sea lavender and white. (Click Here To See Product And Color Selection Available)
Sponge applicators – I like to use sponge applicators because they leave a nice, pebbly texture behind in the paint.
Glass vase or other glass items – Check out the selection at dollar stores (love these stores!). You can find some great pieces that can be painted!
Rubbing Alcohol/cotton balls
Small paper plates or other item to squeeze paint on to
Directions:
Find a clean, flat work surface and cover with old newspapers. Wipe down the glass vase surface to be painted with rubbing alcohol and allow it to dry.
Squeeze out a dab of glass paint onto paper plate. Using the sponge applicator, dip the applicator in the glass paint and dab the paint onto the glass surface. Cover the entire surface. Allow to dry for one hour.
The paint is permanent after it has dried for 21 days. You can speed the process along by curing the paint by baking it. Here are the instructions from Martha Stewart Crafts: Let project air dry 1 hour, place in cool oven. Set temperature to 350 degrees. Once oven reaches 350 degrees, bake for 30 minutes (glass must heat gradually). After 30 minutes, turn oven off. Let glass cool completely in oven. Wait 72 hours before using. **
**NOTE: If you use the white frosted paint, baking the project might slightly darken the paint. Mine turned from a pretty white to a creamy, slightly toasted color.
Spring “Impressionist” Glass Painted Votives
Spring “Impressionist” Votives from SimpleSolutionsDiva.com.
Spring brings beautiful colors and softness to our landscape. I always think of Monet paintings when I think of Spring. I love the slightly unfocused visual and blended soft colors. THis little project makes me think of Impressionist paintings. And best of all, with this project, you don’t have to be perfect! Just keep it simple!
What You Need:
Glass votives – Again, the dollar stores are a great source for these types of items!
Glass Paint – I used Folk Art Brand Multi Surface Acrylic Paints, because I can use the paints for many other projects in the future. I would use no more than 3 complimentary colors. (I chose 2 colors, plus white.) Click Here to see product and color selection.
Paper plate to squeeze paint on
Cup of Water
Paintbrush
Rubbing Alcohol/cotton balls
Directions:
Clean the inside of glass votive with rubbing alcohol and cotton balls. Alow them to dry.
There is no one method for this – just listen your inner artist!! The first one I did I was not thrilled with, but once I limited my colors to 2 colors plus white, I found the ideal combination for me!
My technique for 3 colors: Take your paintbrush and dip in the cup of water. Swirl brush into your 1st paint of choice and apply dabs to inside of the votive. Clean the brush and repeat the “swirl and dab” process above with second color. Using the same process, finish with the white, using it to blend and swirl the other colors inside the votive. You will be really surprised when you are done how nice it looks! Just don’t use too many colors or it will start to get “muddied”.
Allow to dry 21 days or cure the glass using the same instructions under the Beach Glass Vases above.
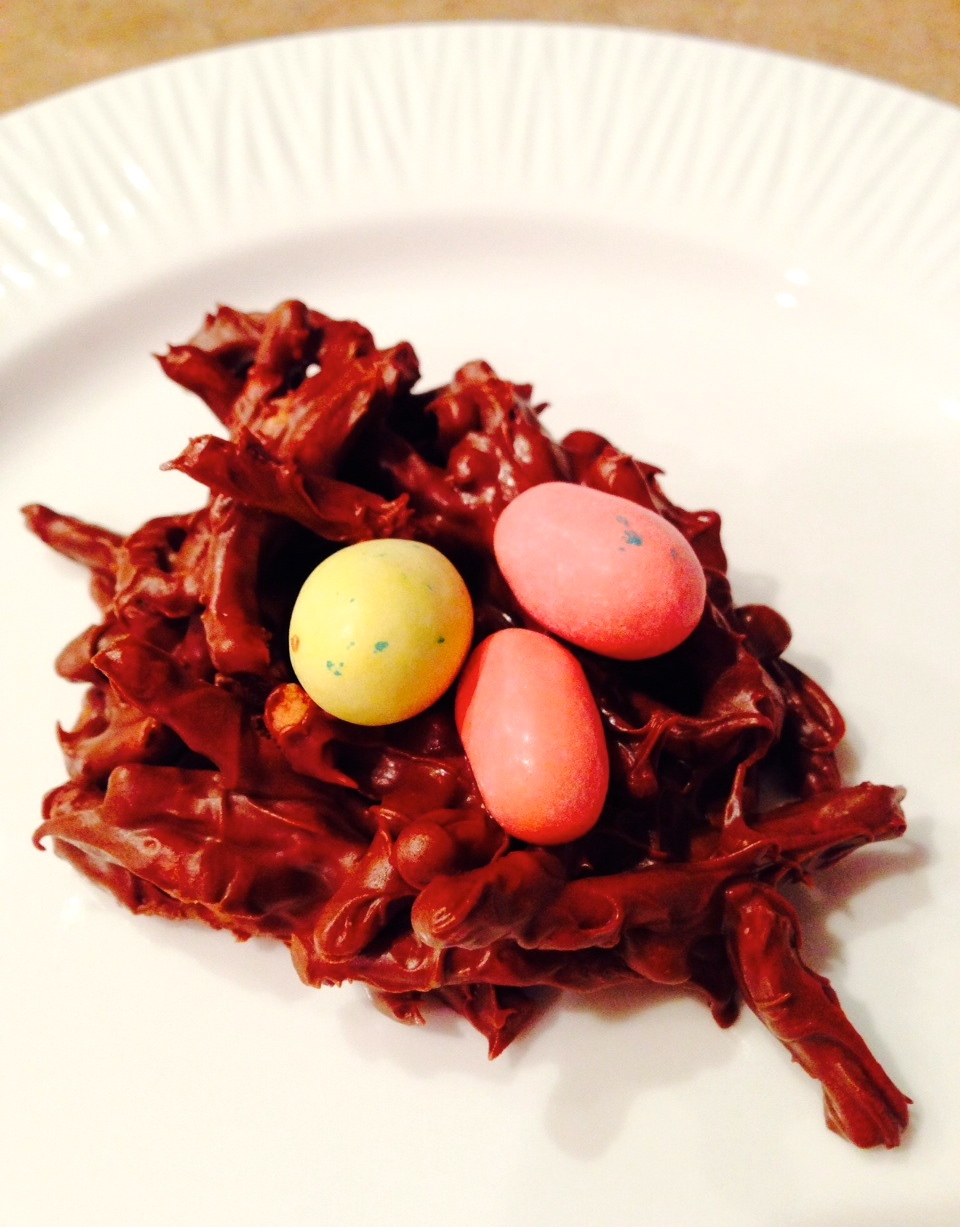
Edible Robin’s Egg Nest
Edible Bird Nests from SimpleSolutionsDiva.com.
I love making food related crafts with the kids! They love getting messy and they enjoy “cleaning” (read licking) their fingers when done. These little bird nests are adorable and pretty yummy. They are a twist on an old favorite I remember eating as a kid.
Ingredients:
1 bag semi-sweet chocolate chips (12 oz.)
1 bag butterscotch chips (11 oz)
10 oz. Crunchy Chow Mein Noodles
1 bag of bird egg shaped candies of your choice (I used Whoppers malted milk balls in the shape of bird eggs, but M&M’s or jelly beans would work, too.)
Parchment paper or wax paper
Directions:
Combine and melt both bags of chips in a microwave safe bowl, on 50% power for 60 seconds. Stir. Repeat the process until all chips are melted. Gently stir in the chow mein noodles until well coated.
On a flat work surface, spread out parchment paper/wax paper. Using clean hands, take a small handful of the chocolate/chow mein mixture and put it in a shape of a small nest on the parchment paper. Repeat the process until you have used all the mixture. Take 3 “eggs” (egg-shaped candies) and arrange on each nest. Let harden or place in fridge to speed up the hardening process.
Ladybug Garden Décor
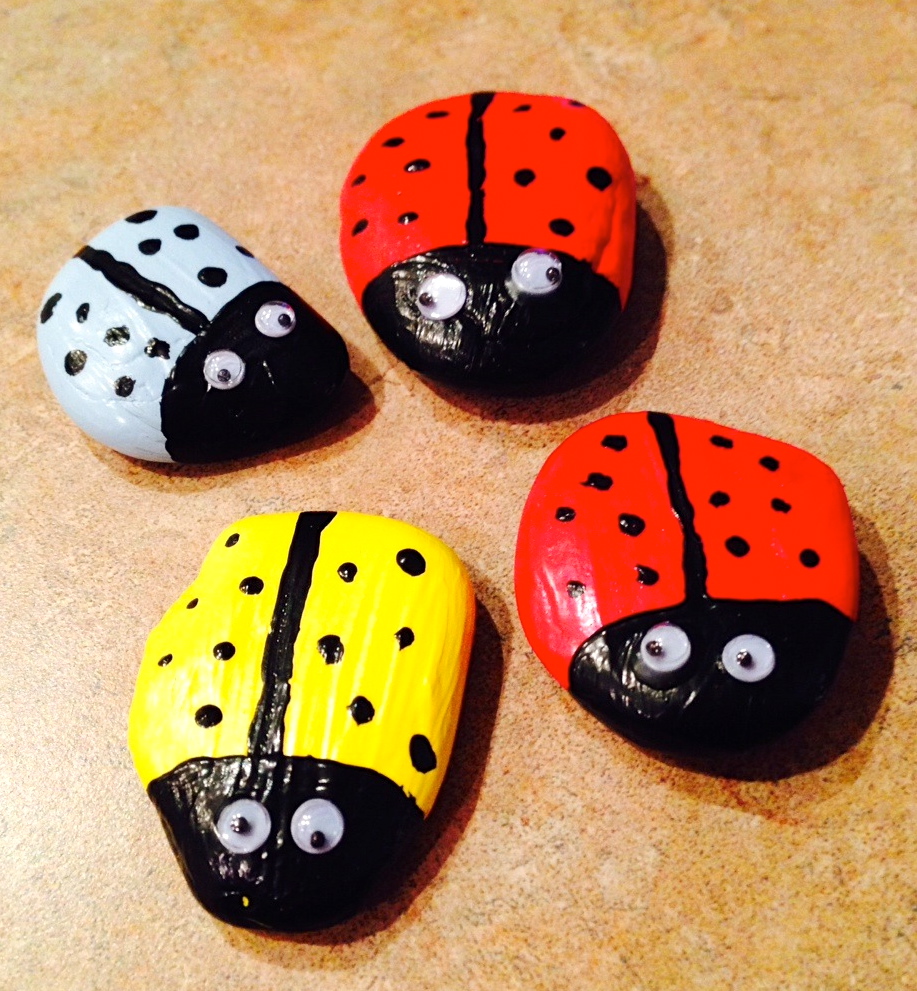
Lady Bug Garden Decor from SimpleSolutionsDiva.com.
This is a cute little project kids of all ages will enjoy and it is very simple & inexpensive to do!!
What You Need:
Flat rocks of various sizes (I used river rocks I bought at the dollar store)
Assortment of acrylic paints, including black paint. I used Folk Art Multi Surface Acrylic paints.
“Wiggly” eyes for the ladybugs.
Glue
Clear Acrylic Sealing paint to seal the rocks once painted.
Paintbrush – I used a large one for the overall colors and a fine tipped one for the ladybug dots and wing line.
Directions:
Wash and dry the rocks to be used.
On a flat, protected work surface, lay your rocks out and paint them the overall colors you want. Allow to dry for about ½ hour.
Now for the details! Taking the black color paint, paint the head of the ladybug. Draw a lie down the back of the lady bug using the black paint and the thin, small tipped brush. Add dots to the ladybug’s back. Allow to dry. Apply Clear Acrylic Sealing paint to the ladybugs and allow to dry.
Add 2 small dots of glue to the ladybug head. Place a wiggly eye on each dot and allow to dry.
Place in the garden, indoor planters, display on desk or table. They also make adorable paperweights!
Easter Centerpiece
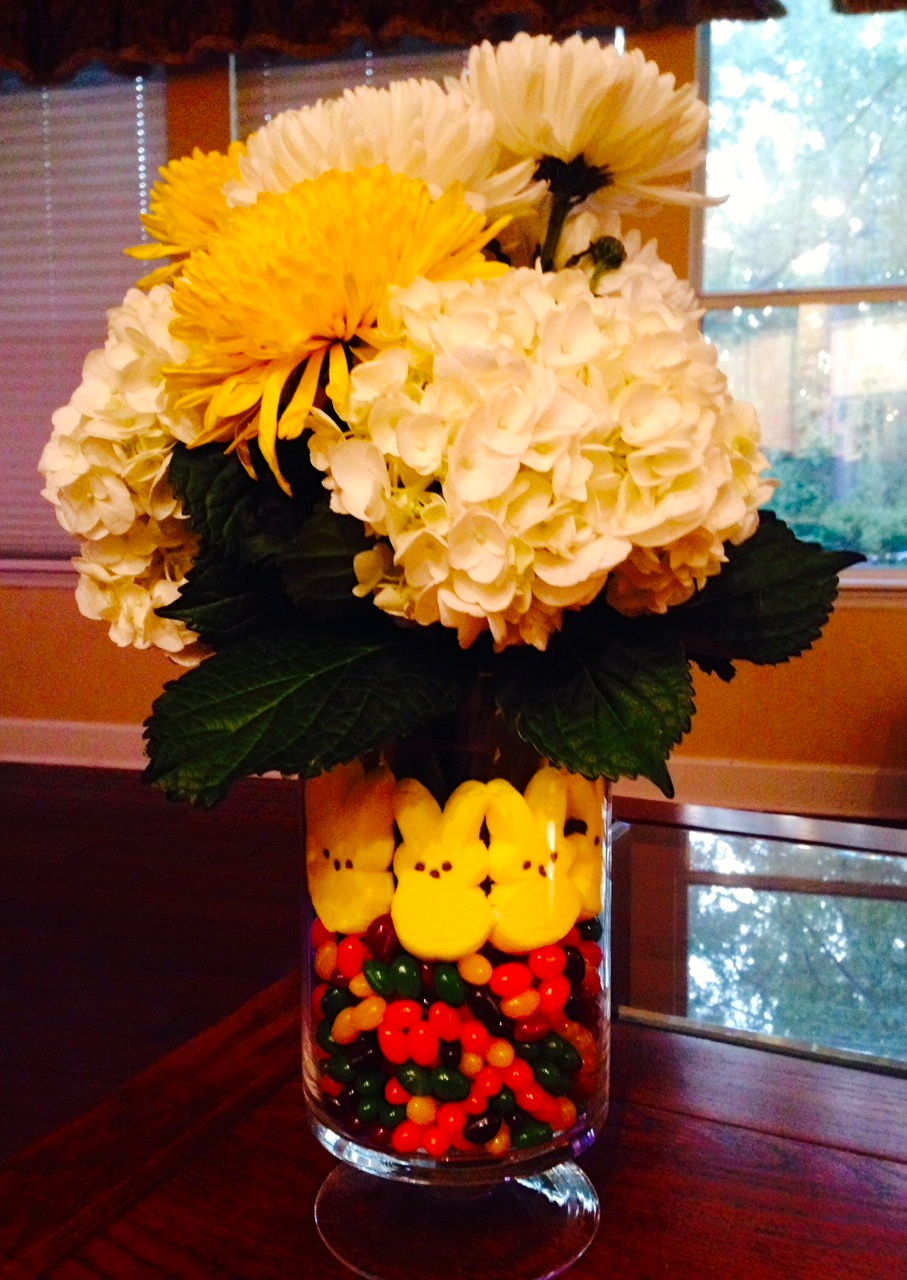
Easter Centerpiece from SimpleSolutionsDiva.com.
This is a fun way to bring Easter to the table and let the kids get involved! I have seen it all over Pinterest and thought I needed to try making it – SUPER simple!
What You Need:
Two vases, one smaller that can fit into the larger vase, allowing for at least a ½ inch space between the two.
1 bag of jellybeans
1-2 packages of Peeps bunnies
Flowers of choice
Instructions:
Place smaller vase inside larger vase, making sure it is centered. Pour jelly beans into space between the two vases, making sure you make it as level as possible around the vase. Take Peep bunnies out of package and slide a row of them into the space between the two vases, letting them rest on the jellybeans. Repeat the process until the bunnies go all the way around the vase.
Trim your flowers to fit the inside vase. Pour water into the inside vase and arrange flowers. Voila! You have a beautiful centerpiece the kids helped with!
Thank you to WTLV-TV’s First Coast Living for inviting me on to talk about these fun craft projects!
There is nothing I love better that to see beautiful urns flanking a front door, filled with gorgeous and healthy flowers and plants. But how do people create these stunning containers and KEEP them looking beautiful? Here are a few tips to remember when planning your garden container:
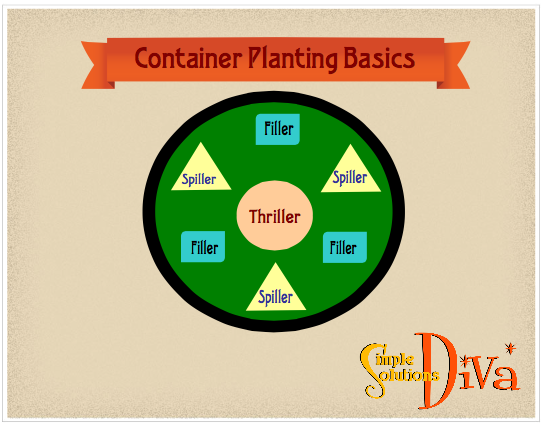
Think Thriller, Filler and Spiller!
These are code words for the types of plants you use in designing a planter/container. Think of the planter as a movie and the plants in it the cast of characters!
Thriller: Thriller is the star! It is the centerpiece of your planter. It should be the tallest of the plants – Think Big, Bold, Beautiful.
Filler: The Filler is the supporting cast – a usually a flowering plant that compliments the Thriller. It is usually shorter than the Thriller and will stay shorter as it grows.
Spiller: This plant is the comedic relief – provides a bit of mischief for the container, spilling over the sides of the container, softening its edges. It is usually a low-lying plant.
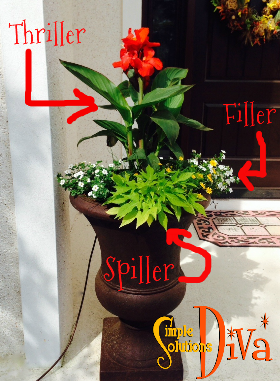
Here is an example of the Thriller, Filler & Spiller Strategy from my front porch:
The Thriller, Filler & Spiller Strategy for Planting Containers, from SimpleSolutionsDiva.com.
If you follow this strategy, you are well on your way to creating a beautiful planter! Here are some other tips to consider when creating a garden container:
Choose plants that have similar watering and sunlight needs.
Choose plants that will not crowd and outgrow their pot – Choose plants of similar size expectations (height and width). If you can’t match the sizes, be prepared to have to transfer plants from the pots when they get too big.
Potting soil choice is important – use one with moisture control, or you will be watering it non-stop in the summer.
If you live in a hot climate, consider adding to the container a small sprinkler device that connects to your sprinkler system. You can find these at places like Lowe’s and Home Depot. (In photo above, you can see the tubing on left side of urn leading up to the mini sprinkler- this is how I keep my plants alive in the Florida heat!)
For Large, Heavy Containers – Keep your container light weight by using empty water bottles to take up space in the bottom of the pot, so you don’t have to fill it all with heavy potting soil. This will also allow for better drainage.
Thank you to WTLV-TV’s First Coast Livingfor inviting me on to talk about this topic!