We all know labels are sometimes tricky to get off of new dishes, glassware and more! You may get the paper part off, but the sticky stuff stays behind! UGH! This tip really helps remove those pesky labels without a lot of effort. Easy Peasy!


We all know labels are sometimes tricky to get off of new dishes, glassware and more! You may get the paper part off, but the sticky stuff stays behind! UGH! This tip really helps remove those pesky labels without a lot of effort. Easy Peasy!
The Simple Solutions Diva has an answer to an age old question:
How do you get your plate back from a holiday party?
The simple answer? Don’t ask for it back — Create a Season of Giving Plate!
The concept is: you share the plate, along with the food you bring to a party. Then the host is free to use it when THEY go to a holiday party, and the plate moves from home to home throughout the holidays!
The instructions are easy: It is as simple as buying a pretty plate from the Dollar Tree Store, writing a nice verse (for suggestion, see below) on the plate in permanent marker, baking it at 350 degrees for approximately 30 mins. This baking process will set the permanent marker so it won’t wash off.
You can write whatever you would like, but if you are in need of something, try this:
In this Season Of Giving, we share so much joy,
& plates full of cookies for all to enjoy!
This plate is for giving, not keeping for one.
So pass this plate on to others, and share all the fun!
It is a beautiful way to share the love this holiday season!

What do you do when your turkey gravy is too thin, too thick or just plain pale? Some simple tips from the Diva! These tips also work with other gravies, too!)

 Holiday Time means festive décor – including setting the perfect table for the holiday! But don’t spend upwards of $75-$100 per place setting! Check out your local Dollar Tree, THE holiday headquarters for affordable decorations, and get some holiday inspiration! And since everything at Dollar Tree is just $1.00, you can create some beautiful tablescapes without ruining your holiday budget!
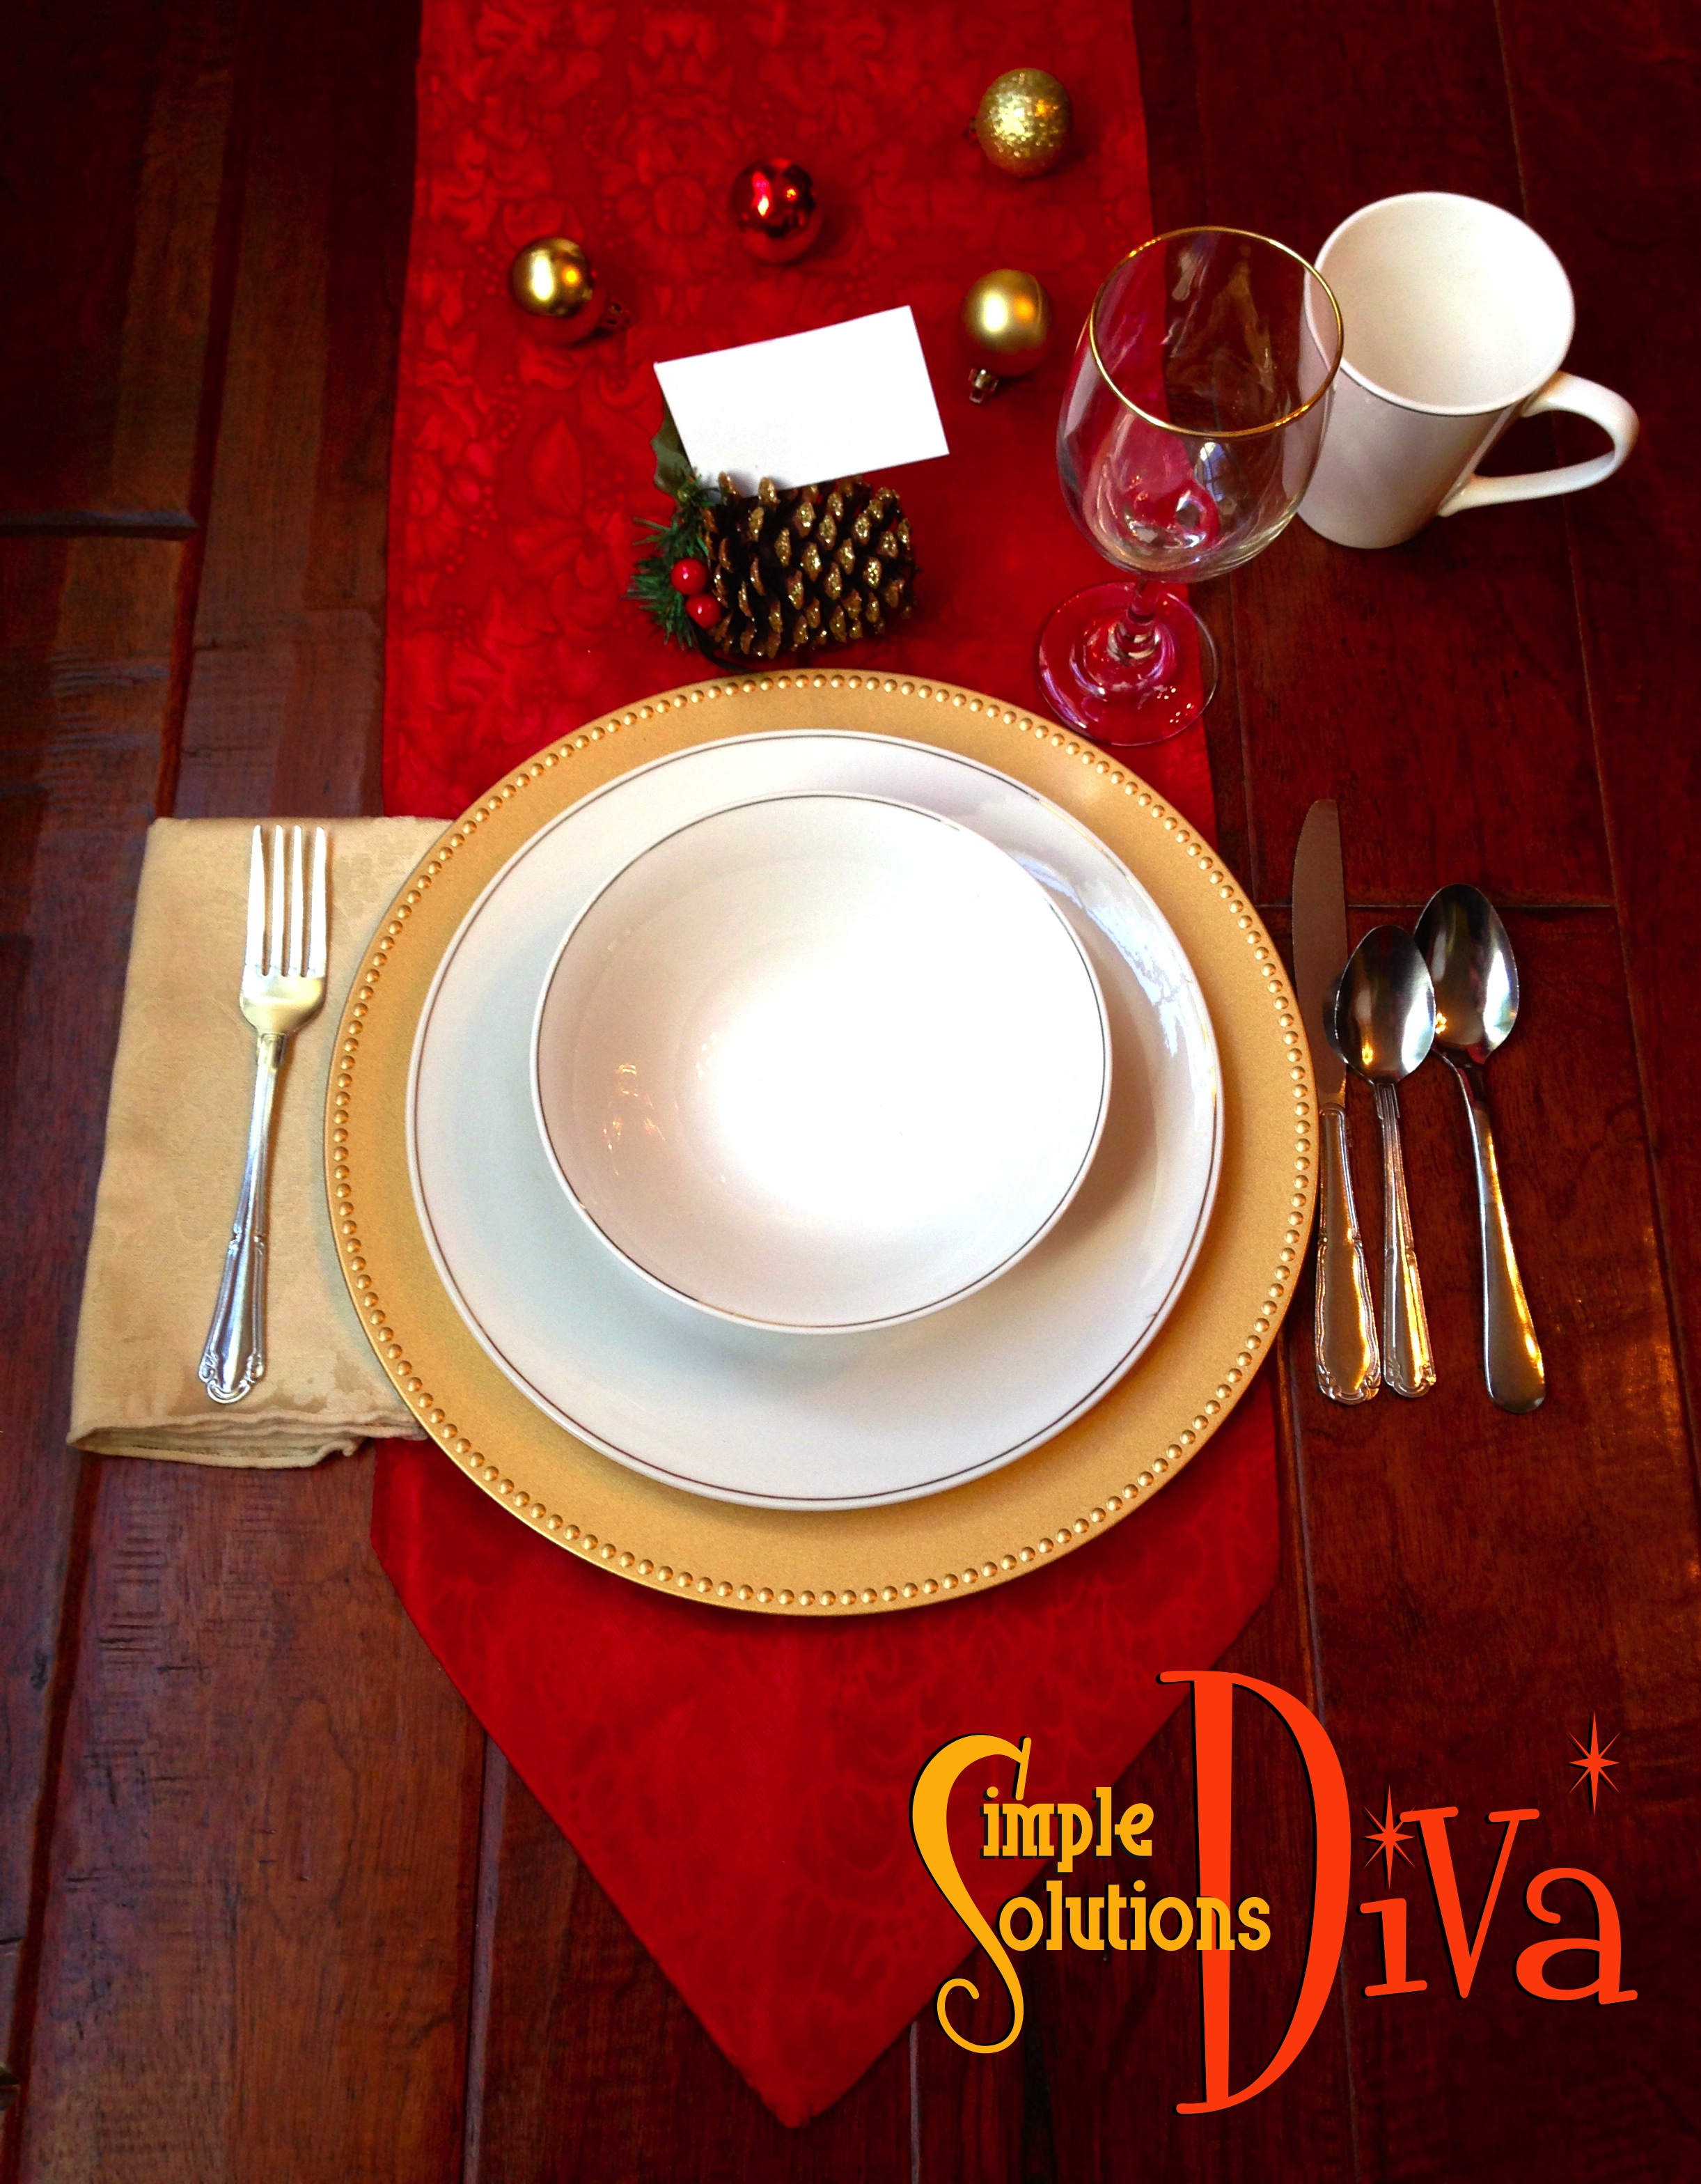
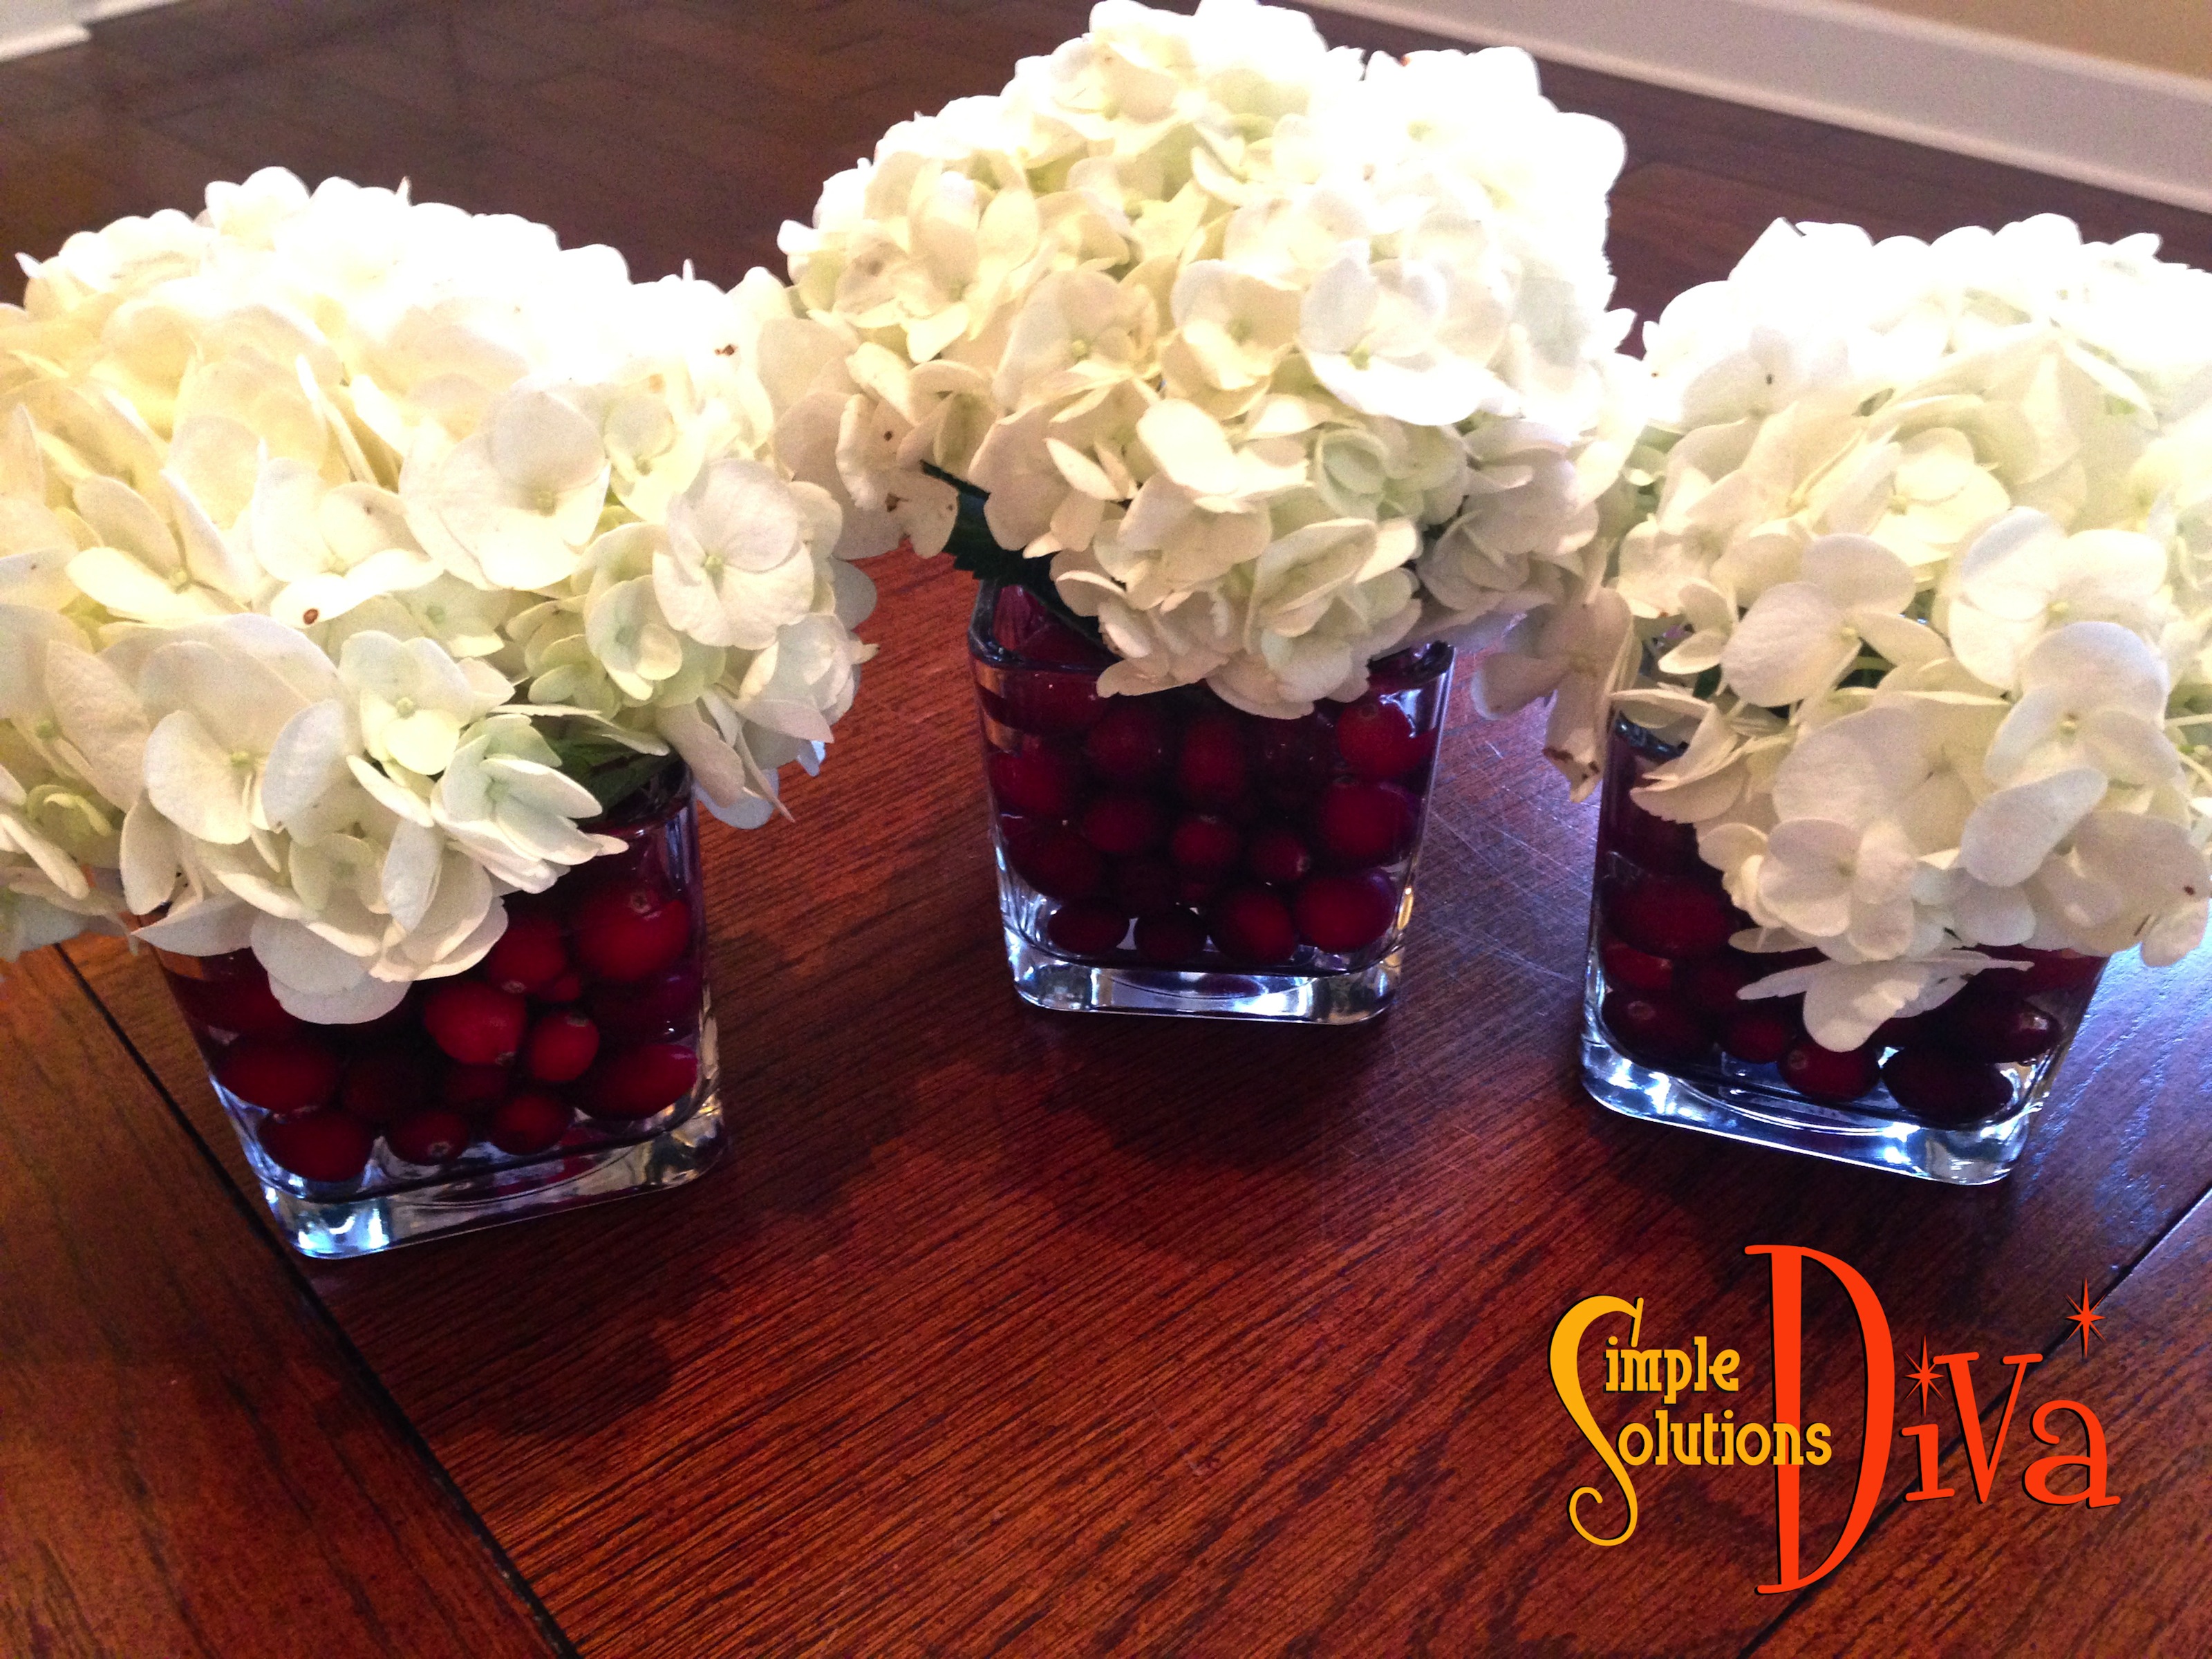
Here is a traditional look using Dollar Tree items, including a gold charger plate, gold-rimmed plate, bowl, coffee cup, and wine glass. Traditional stainless steel flatware and a red table runner finish off the look. Plus I’ve created a simple centerpiece (see below) using three glass candle holders, fresh cranberries and hydrangeas. I’ve used a pinecone ornament as a place card holder. This cost only $15.00 for everything (not including the flowers and cranberries!) from Dollar Tree!
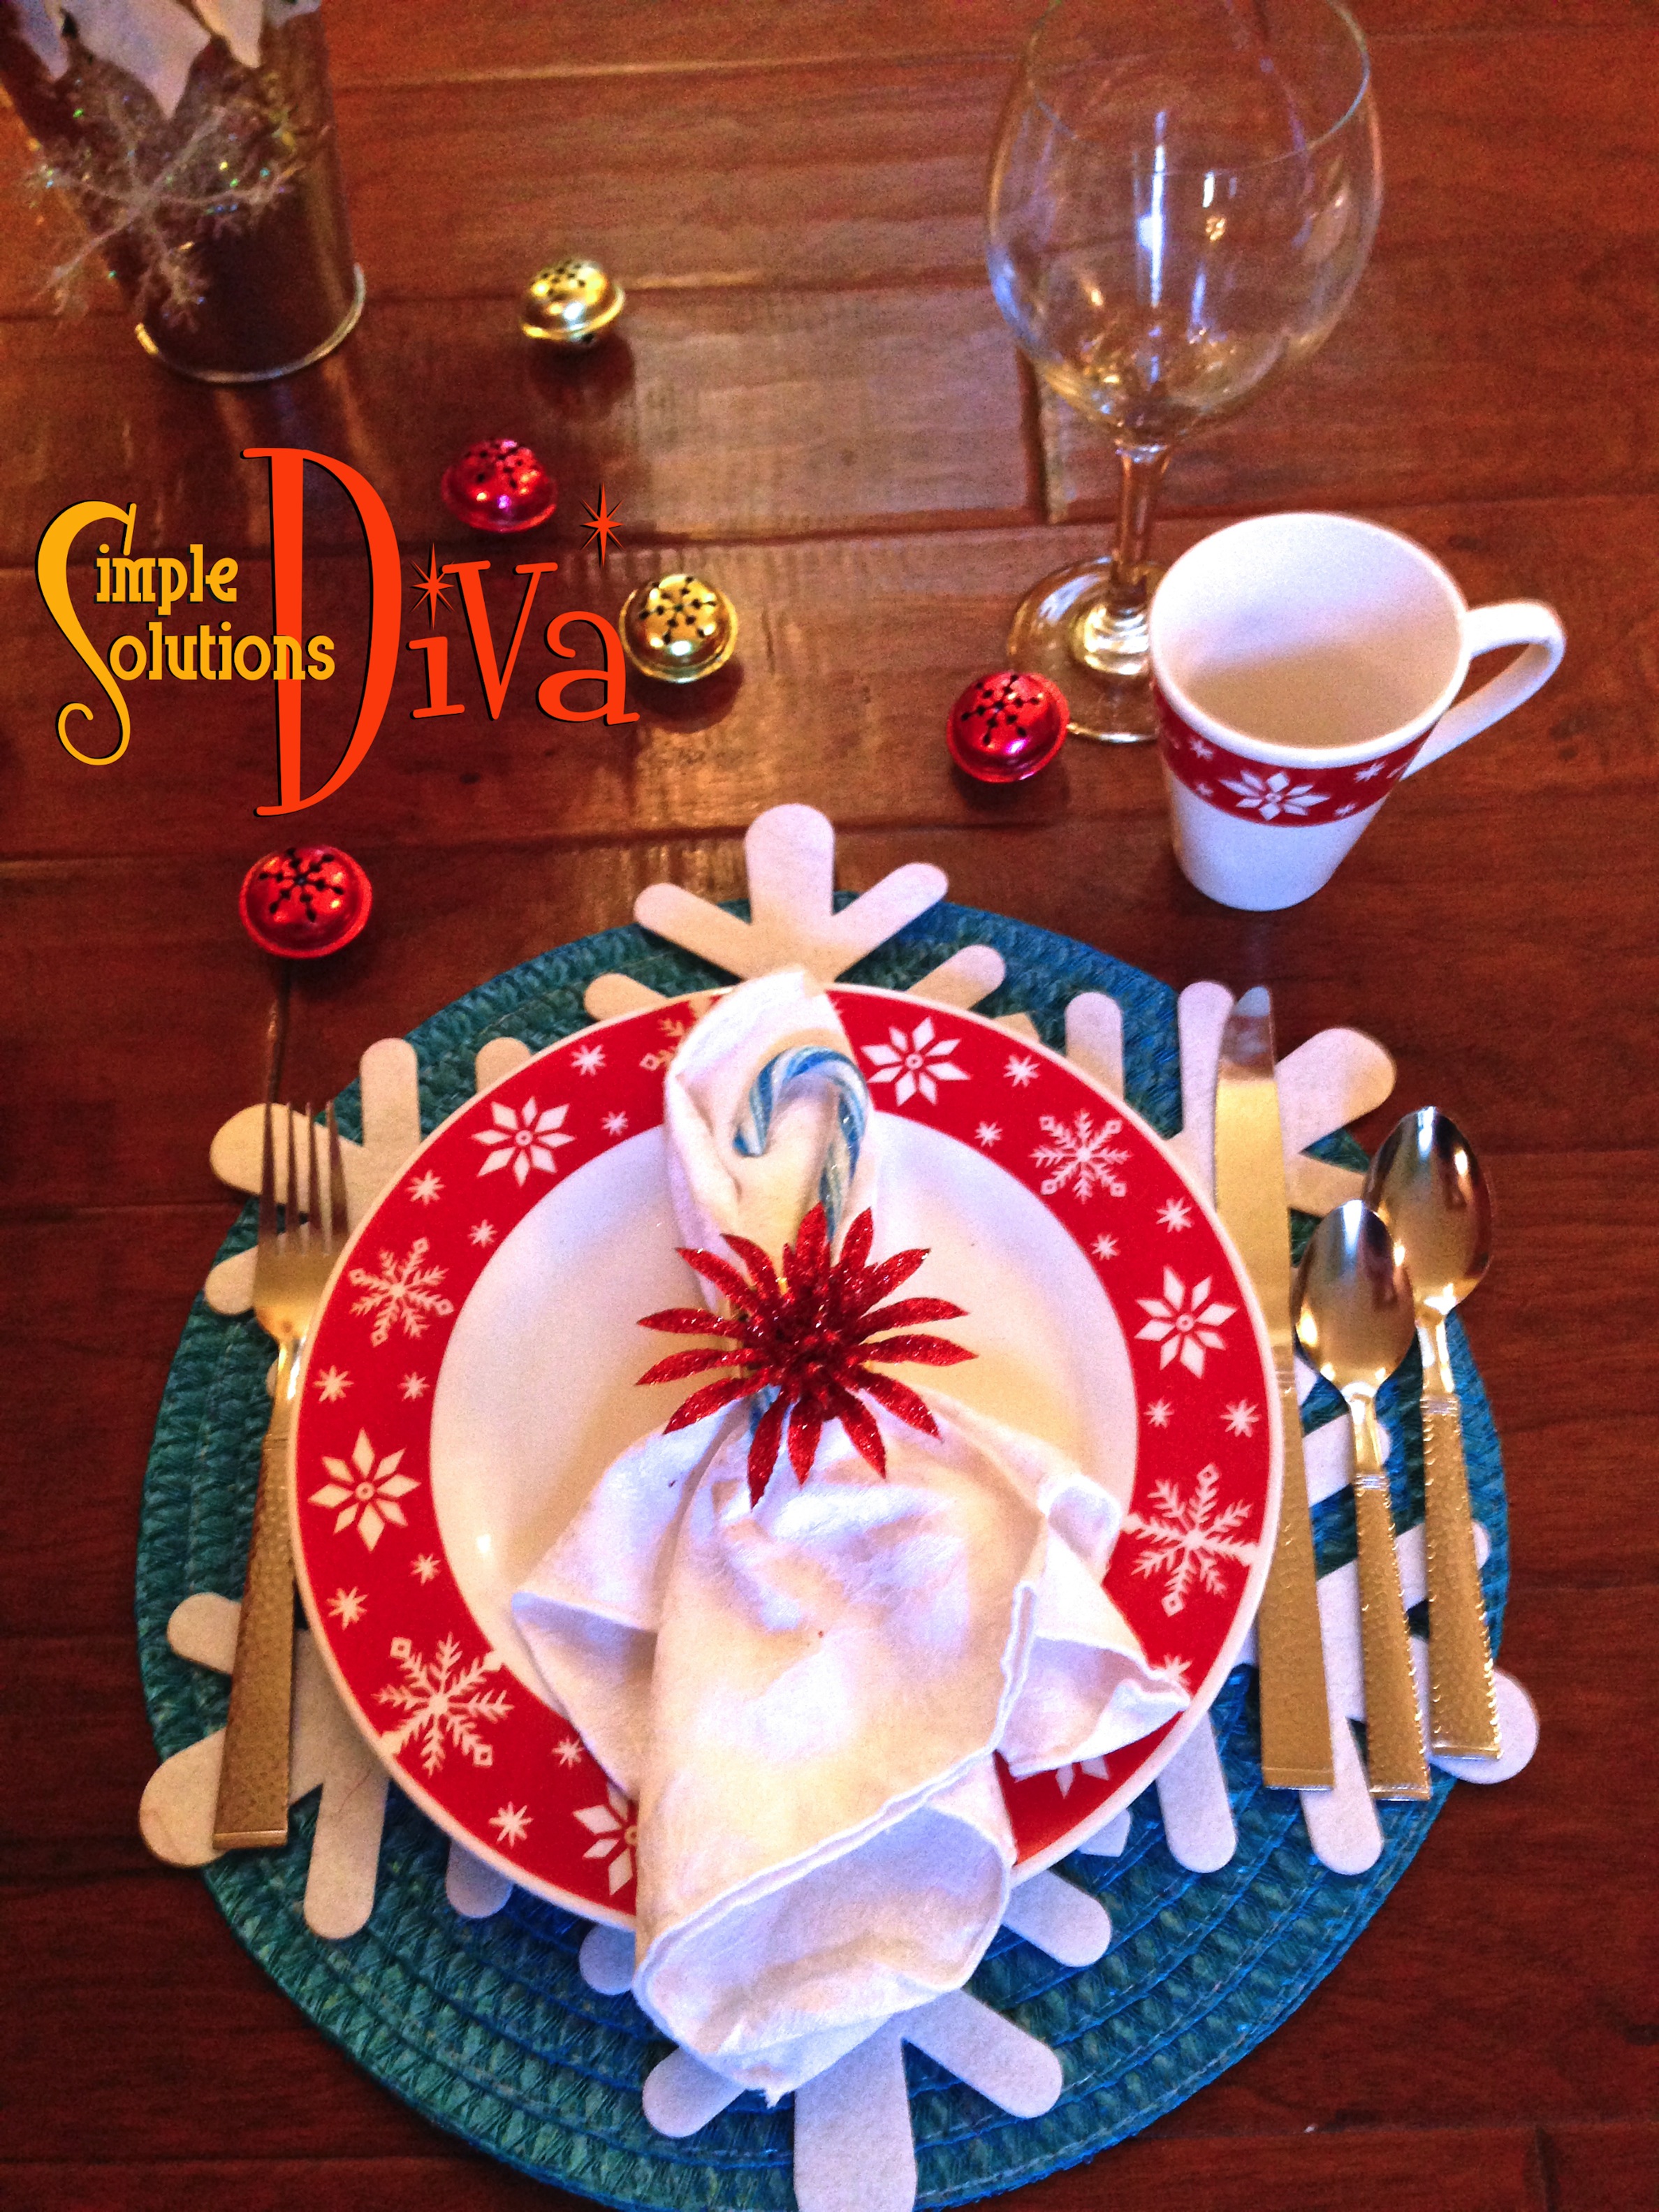
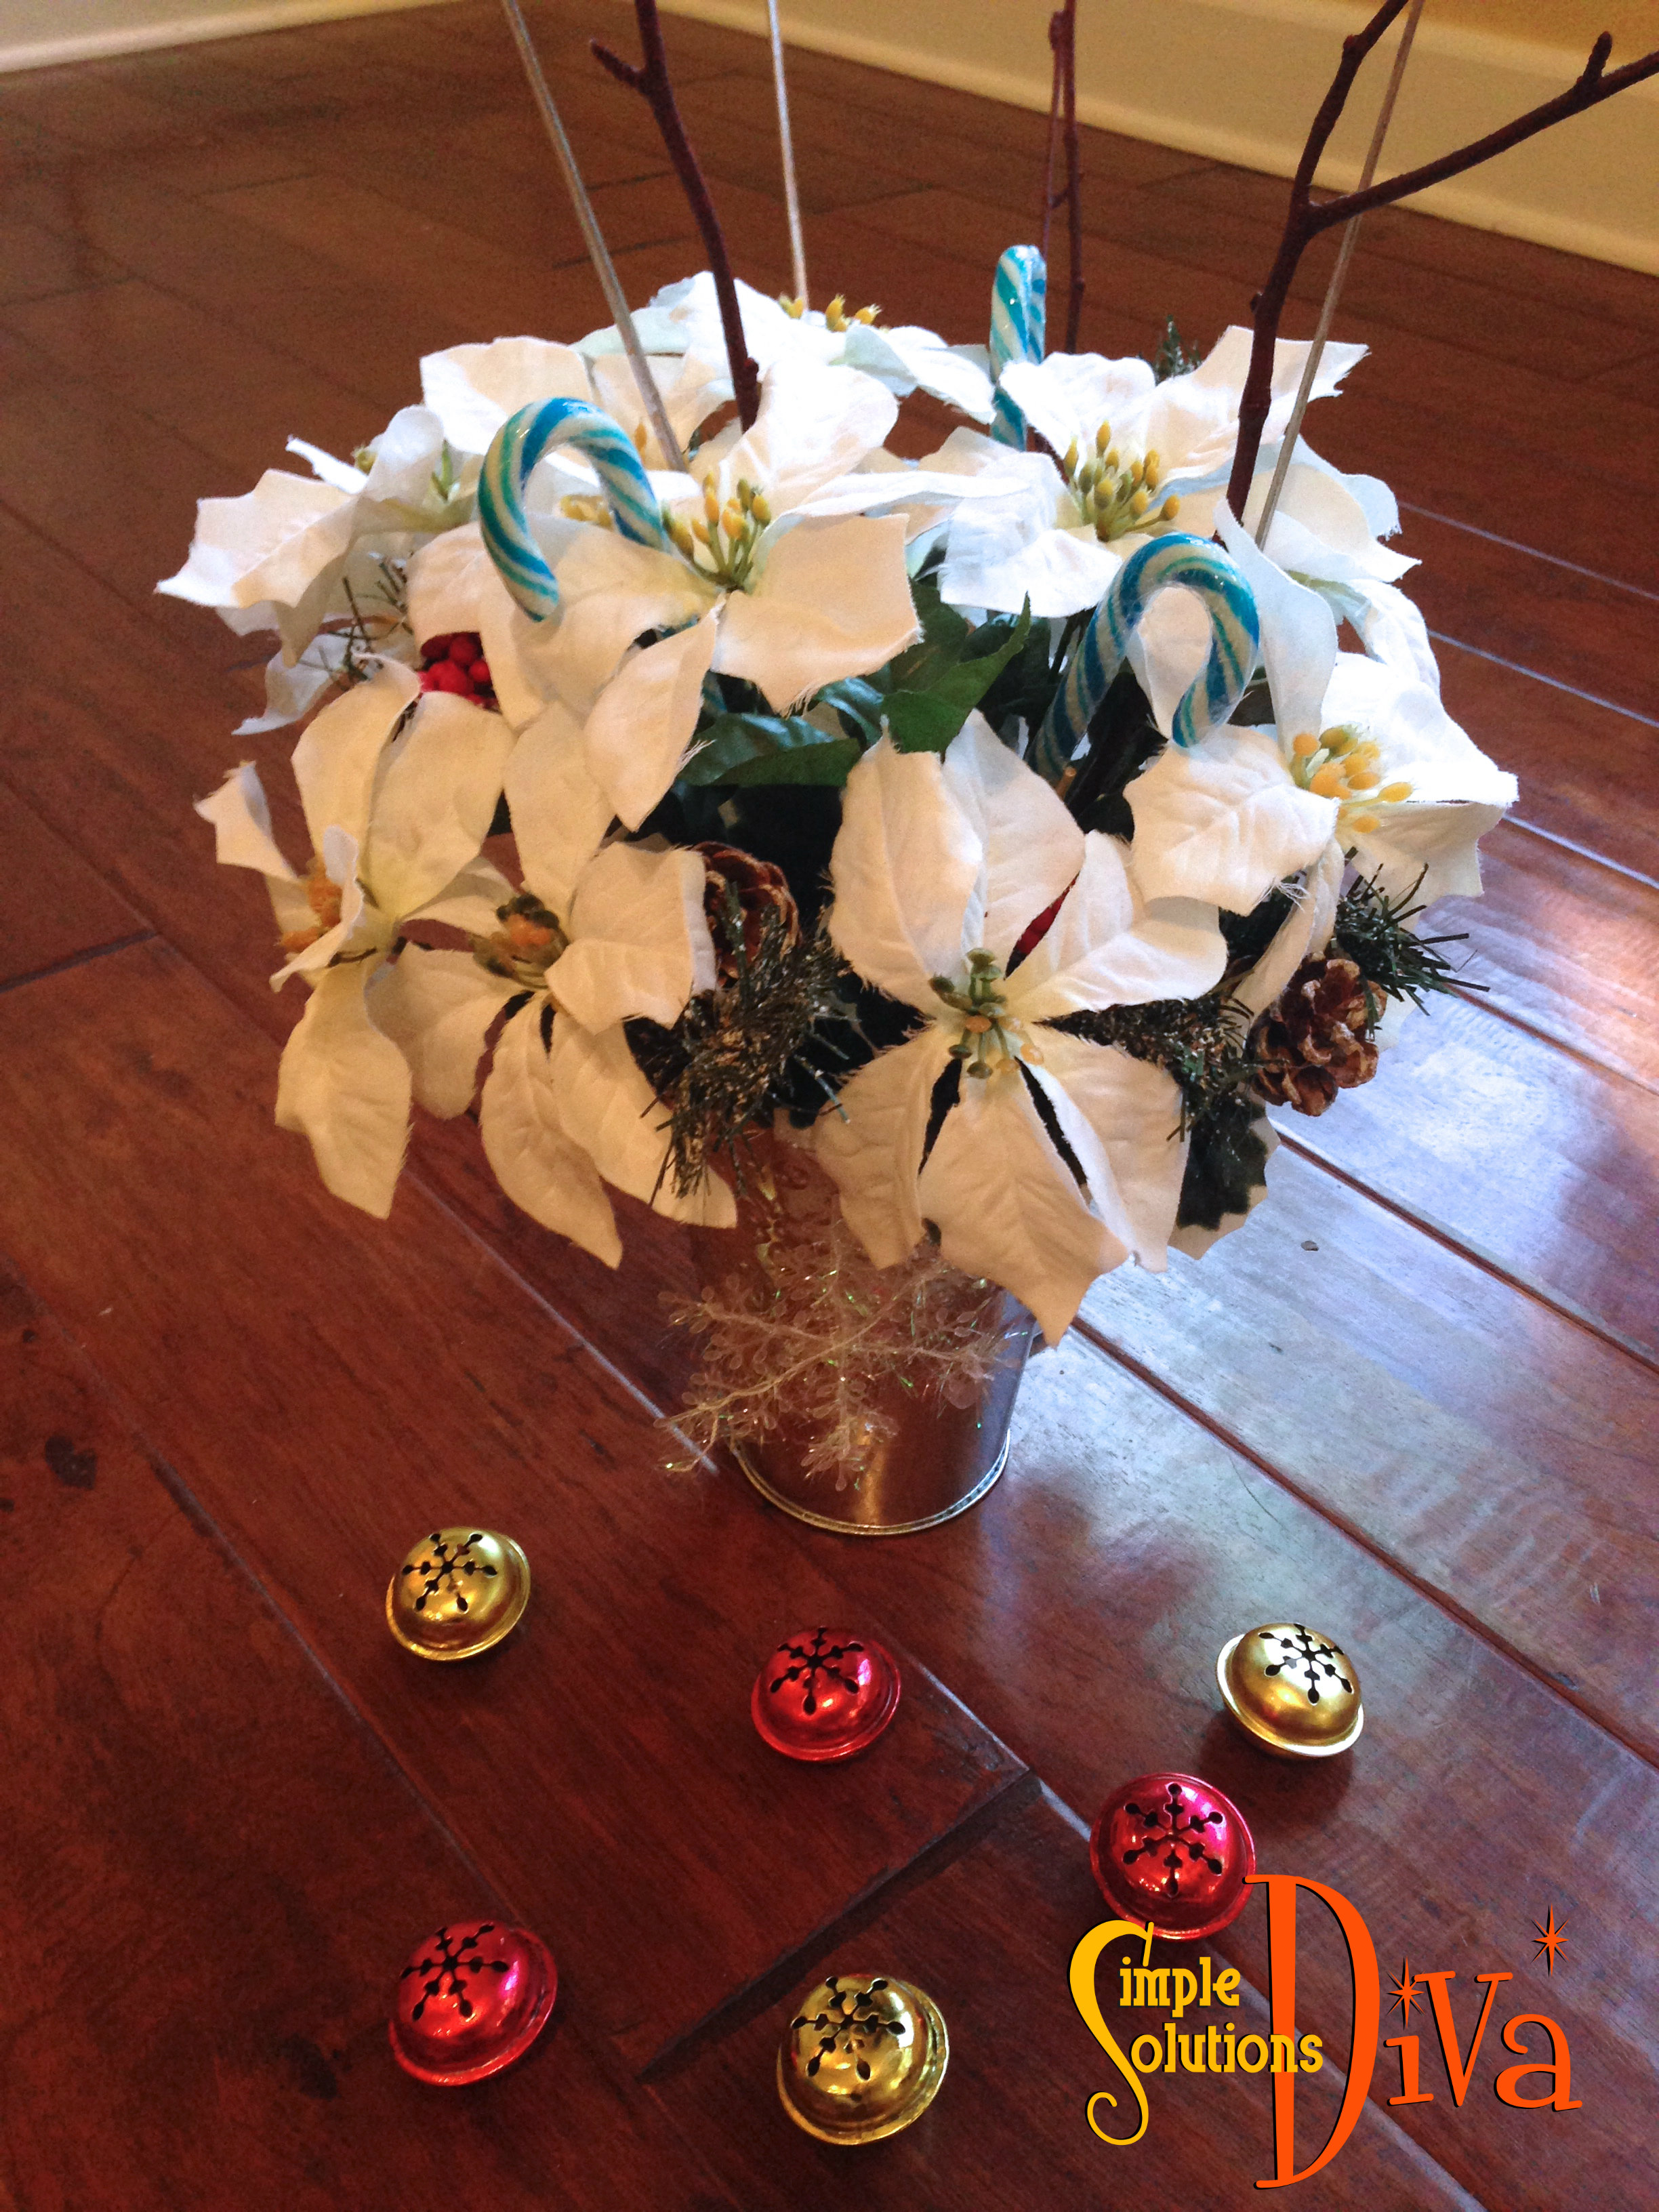
This snowflake setting is so cute! A blue placemat layered with snowflake placemat sets the theme. Add a snowflake plate and matching coffee mug, a simple red wine glass. A funky red floral Christmas clip/decoration creates a napkin ring. Stainless steel flatware with a hammered look completes the festive place setting. In addition, I created the centerpiece (see below) from floral stems, containers, candy canes and holiday ornaments. Including the centerpiece, this cost a total of $24.00.
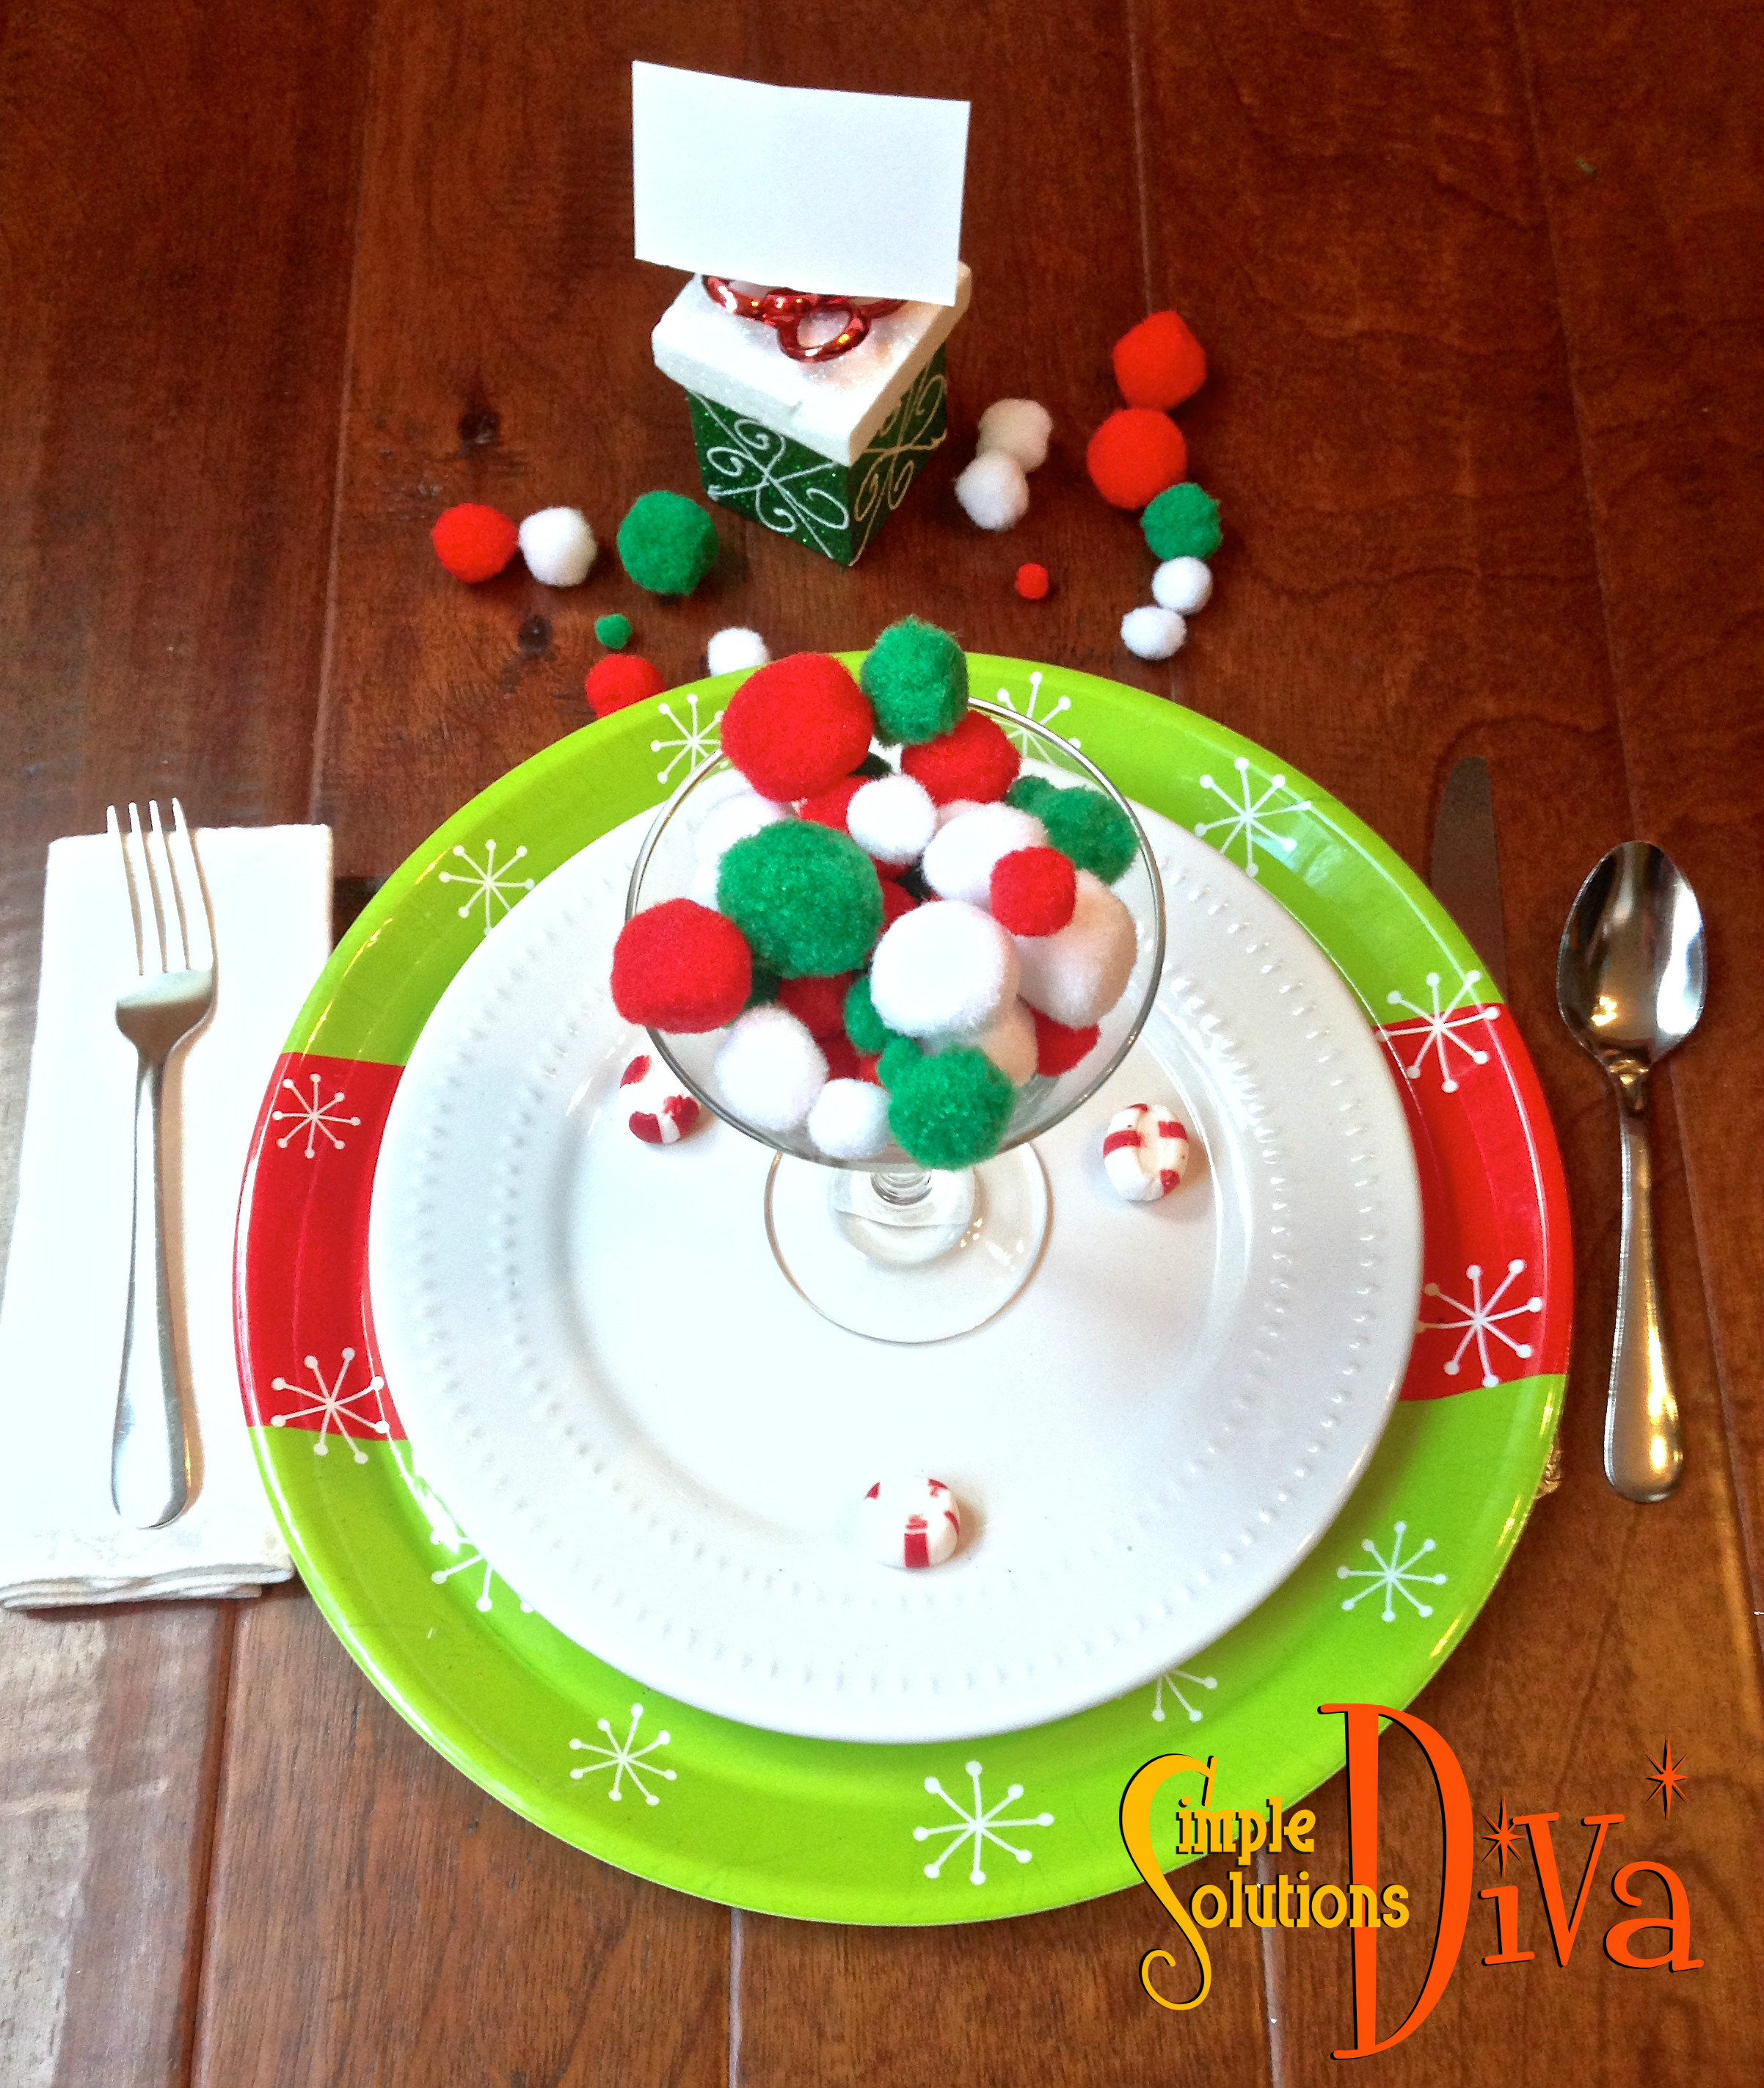
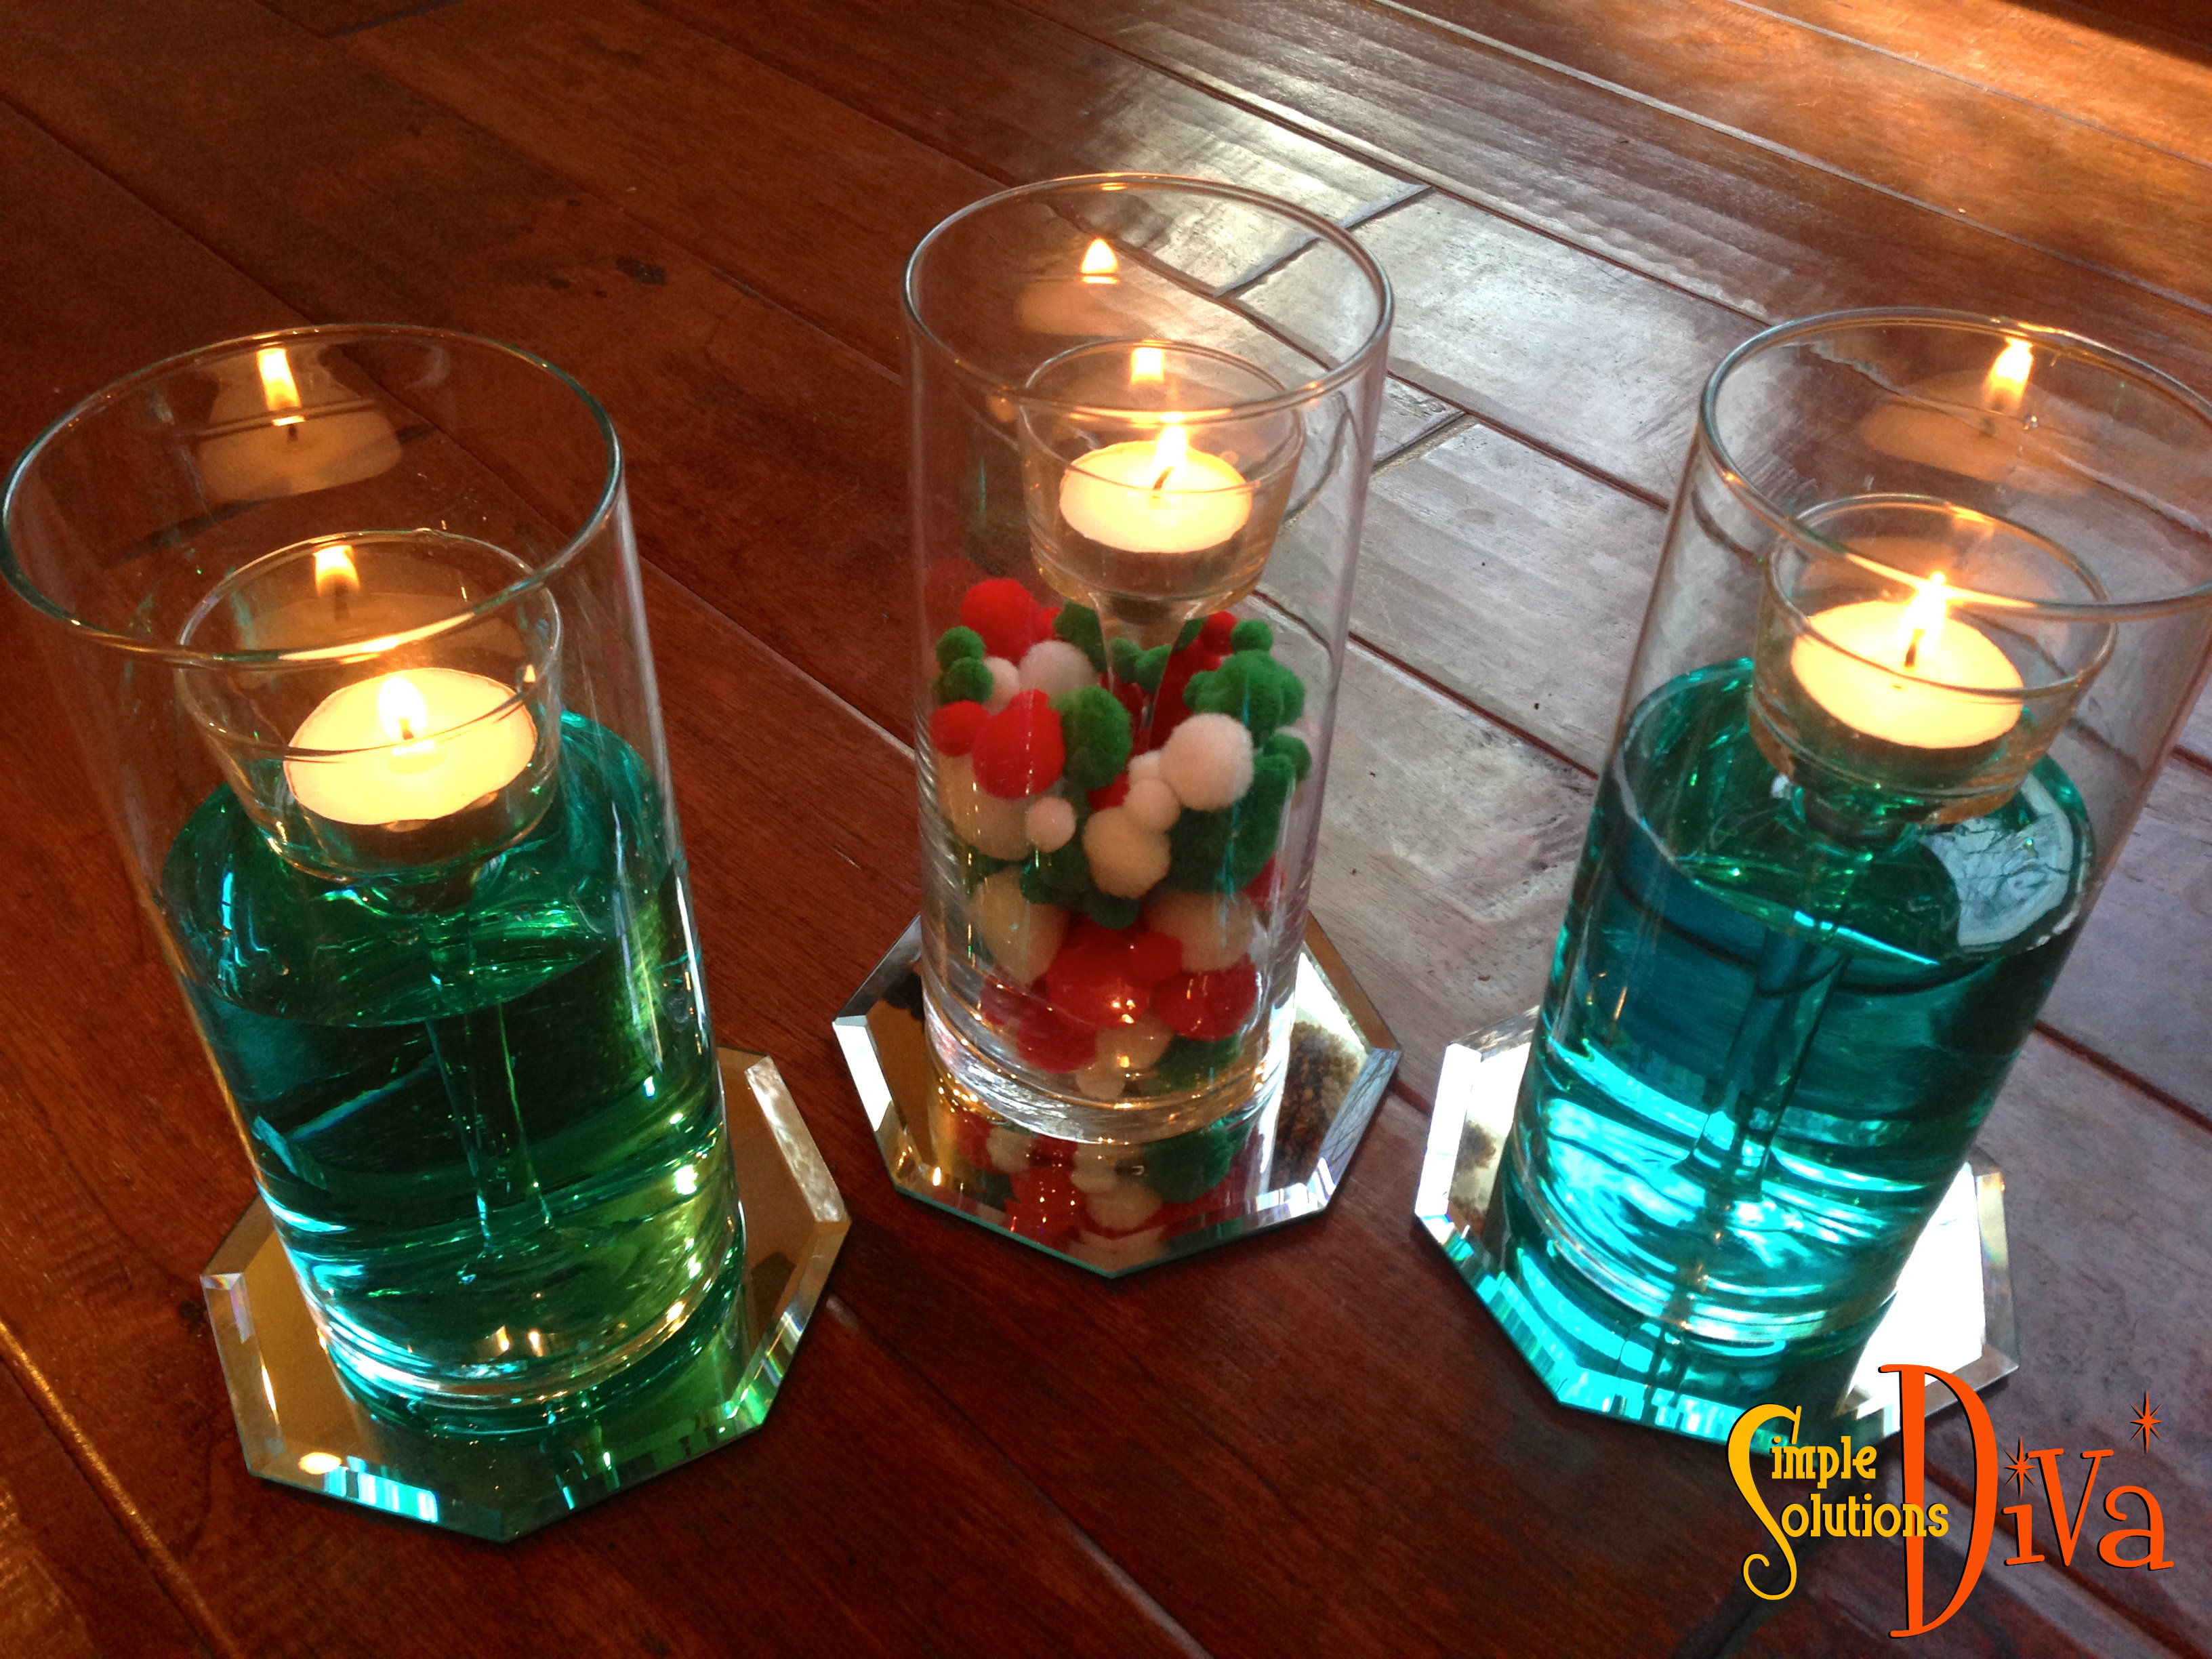
I LOVE this simple contemporary look! I’ve used a cool plastic tray as a charger to create the contemporary look, plus a crisp white plate and sleek stainless steel flatware. I’ve taken the martini glass and filled it with pompoms, plus topped it all off with the cute present place card holder (which is just a Christmas ornament). In addition, I have created a contemporary centerpiece (see below) using glass vases, votive candle holders, more pompoms, and mirrored candle holders. Total cost, including the centerpiece: $21.00.
While I was shopping at Dollar Tree, I overheard one woman say, “Dollar Tree really has stepped up their Christmas selection!” — and they have! They have stockings, plus everything you could want to stuff in those stockings, like candies, toys and more, gift wrap, boxes and bags. Serving pieces and holiday decorations for the home!
With everything in the store just $1.00, Dollar Tree will help keep a little jingle in your wallet this holiday season! Visit ileavehappy.com for more holiday inspiration!
Thank you to Dollar Tree for sponsoring this project, and to WTLV-TV’s First Coast Living for inviting me on to share these Holiday ideas!
Try this easy technique to get ready for holiday baking! With just a little planning ahead, you can make it easy on yourself this holiday season!
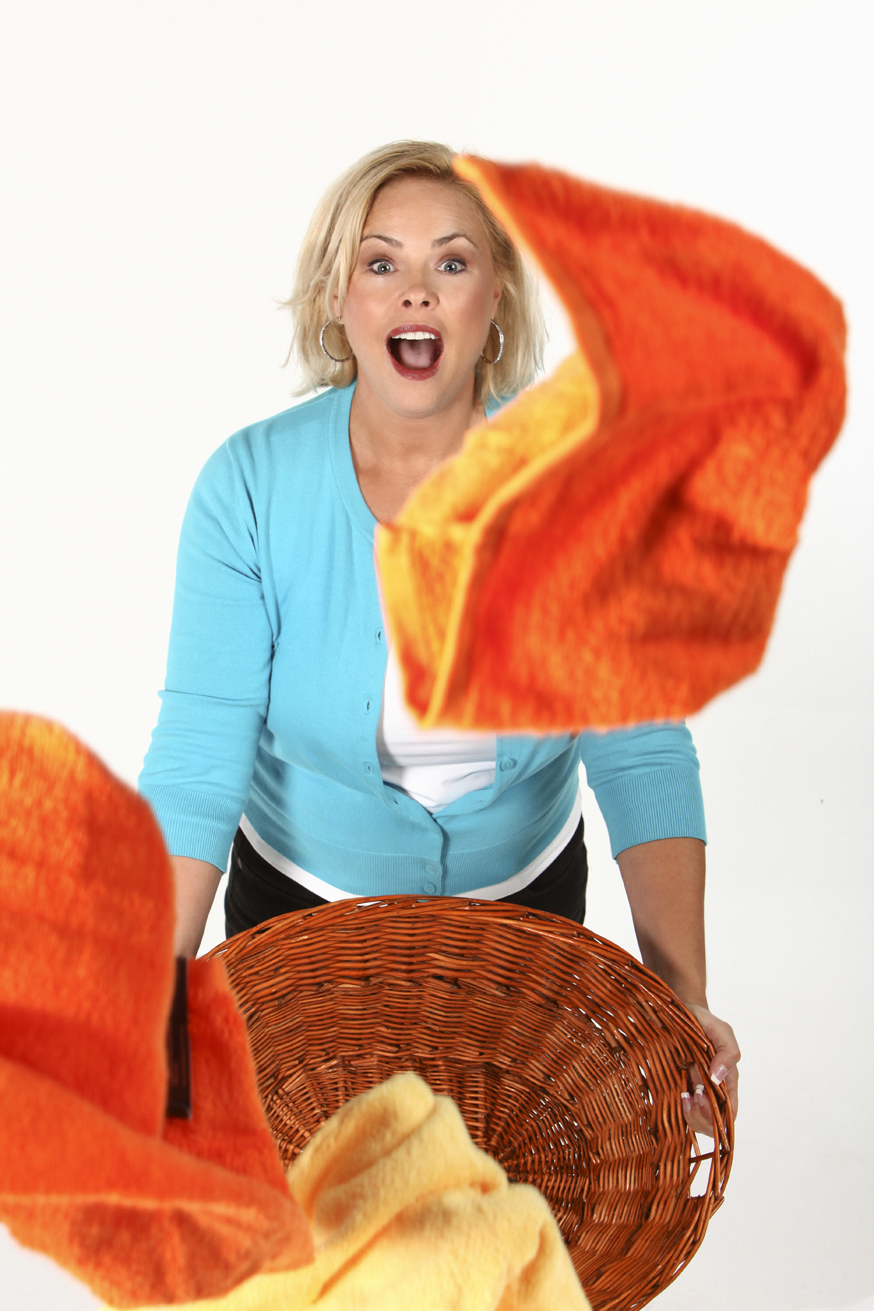
This is one of my favorite tips to speed up the drying process, because I really dislike doing laundry!
Check out how easy it can be to clean those dusty lampshades!
Imagine Trick or Treating on Halloween and not being able to eat anything you have in your bag! That is Halloween for the child with food allergies. But you can make Halloween fun again for those kids with food allergies – and it is as simple as a Teal pumpkin!
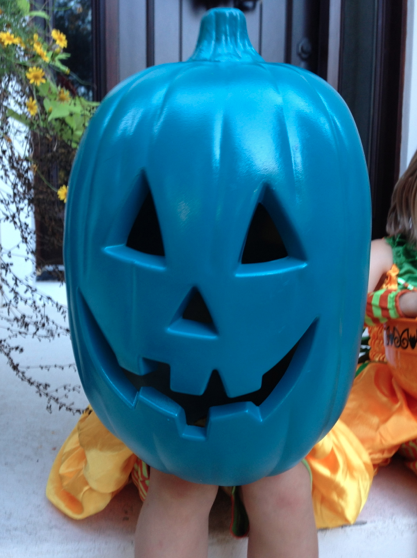
The Teal Pumpkin Project, created by the Food Allergy Research & Education Organization (FARE), was developed to encourage communities to promote food allergy awareness. The Teal Pumpkin Project encourages families to make non-food treats — like pencils, glowsticks, bracelets, or other items from the Dollar Tree — available to Trick or Treaters, in addition to their candy offerings.
By simply painting a pumpkin teal (the color of food allergy awareness), and/or using the free printable flyer that FARE offers, they can let others know about the food allergy awareness program and that they are participating.
Such a simple way to make Halloween fun (and inclusive) for everyone! See below for links to the flyers:
To Download the “We have both candy and non-food treats” flyer, click here.
To Download the “We have non-food treats” flyer, click here.
For more information on the Teal Pumpkin Project, visit http://www.FoodAllergy.org.
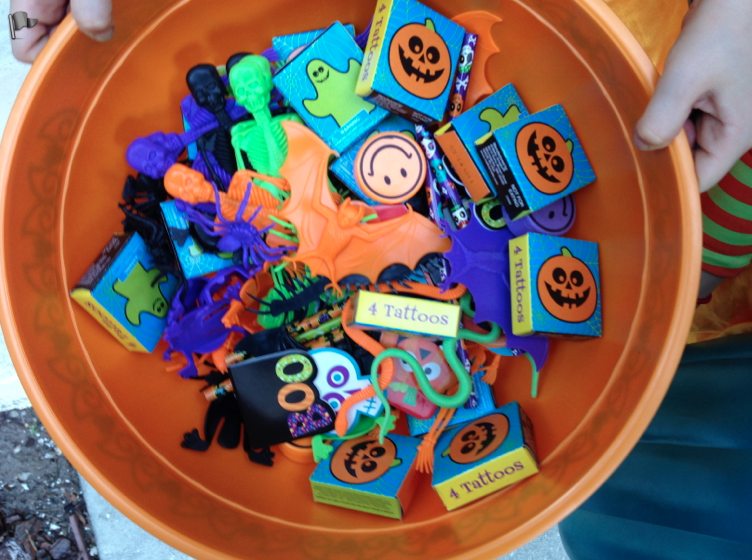
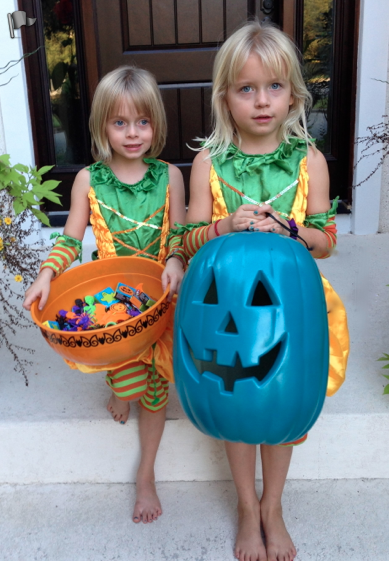
My neighbors, Sadie and Josie, came down to show me examples of the items they have to offer trick or treaters with food allergies. The basket contains items like temporary tattoos, rubber snakes and bats, pencils and stickers! Good job girls!
Simple Halloween Craft ideas for kids are the best! I especially enjoy making things that are not expensive – utilizing items from around the home! Thanks to WTLV-TV’s First Coast Living for inviting me on to share these Halloween ideas!
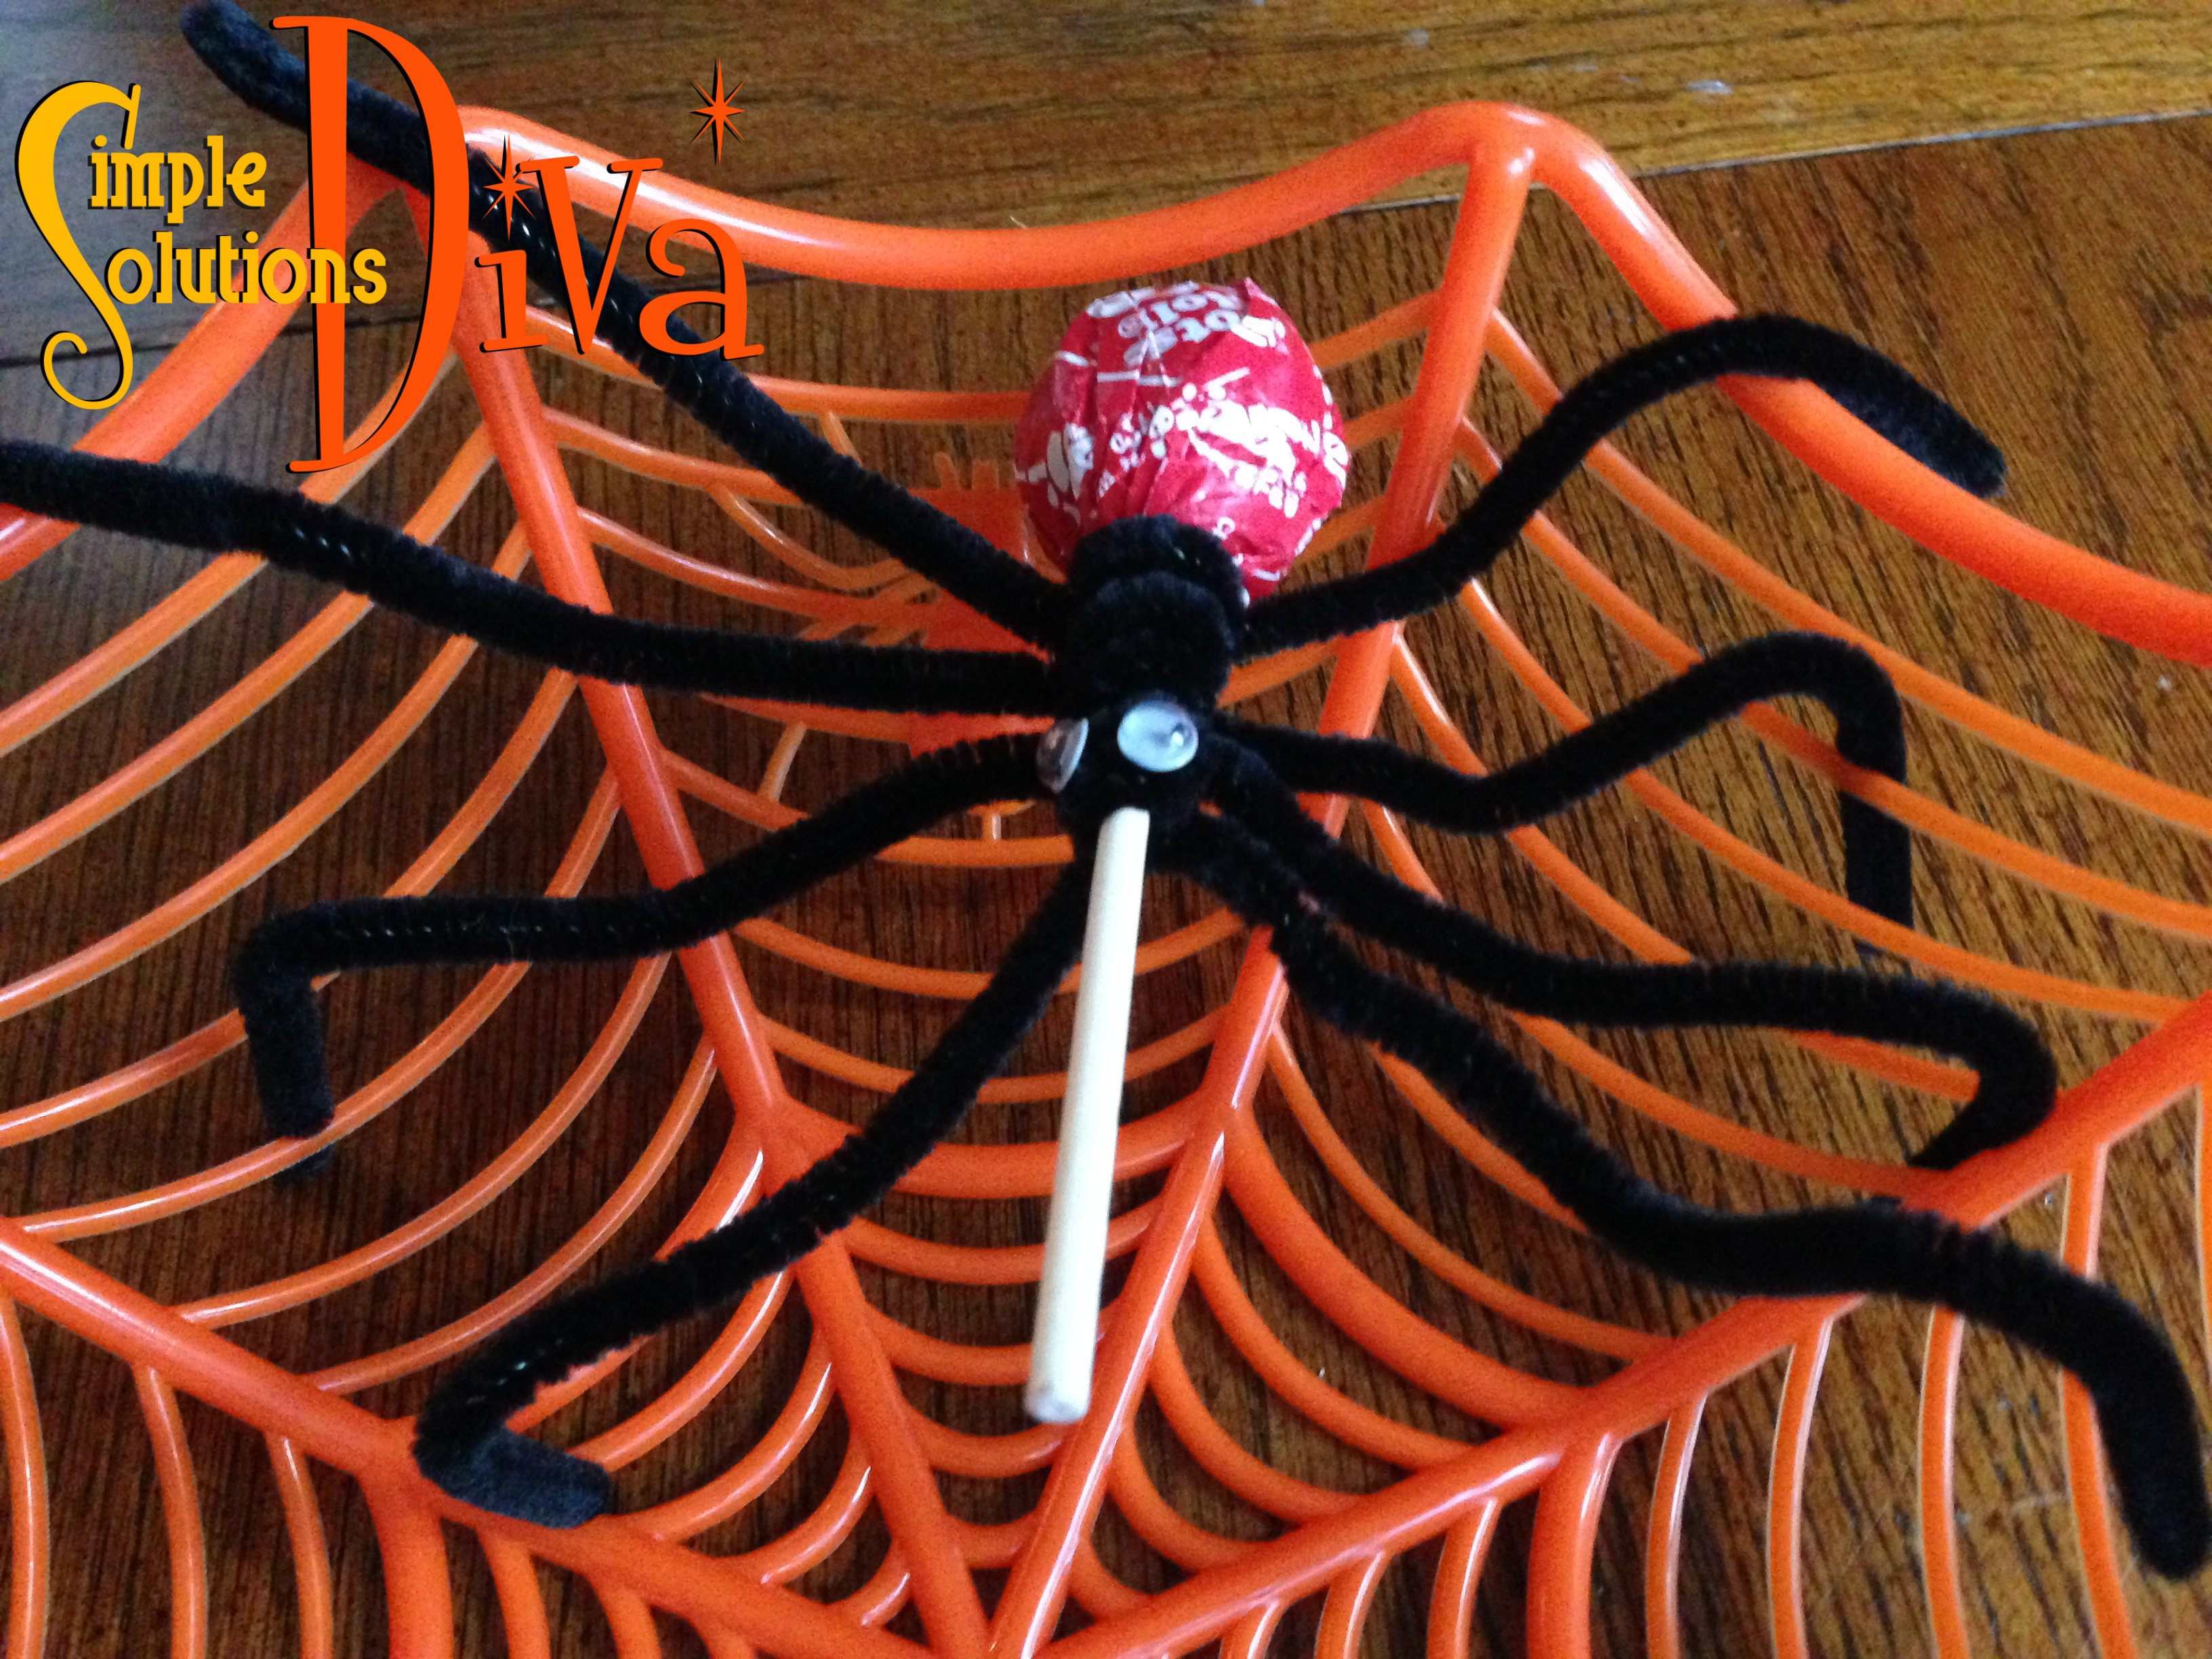
Got Black pipe cleaners, Tootsie Roll lollipops, little wiggly eyes, and glue? Then you have the makings of spider pops! These are super simple and the kids don’t need much help. Take your Tootsie Pop, and wrap 4 black pipe cleaners around the stick near the base of the lollipop. It will now look like the spider has 8 legs – bend each leg to look realistic. Glue on a pair of wiggly eyes and there you have it – Spider Pop!
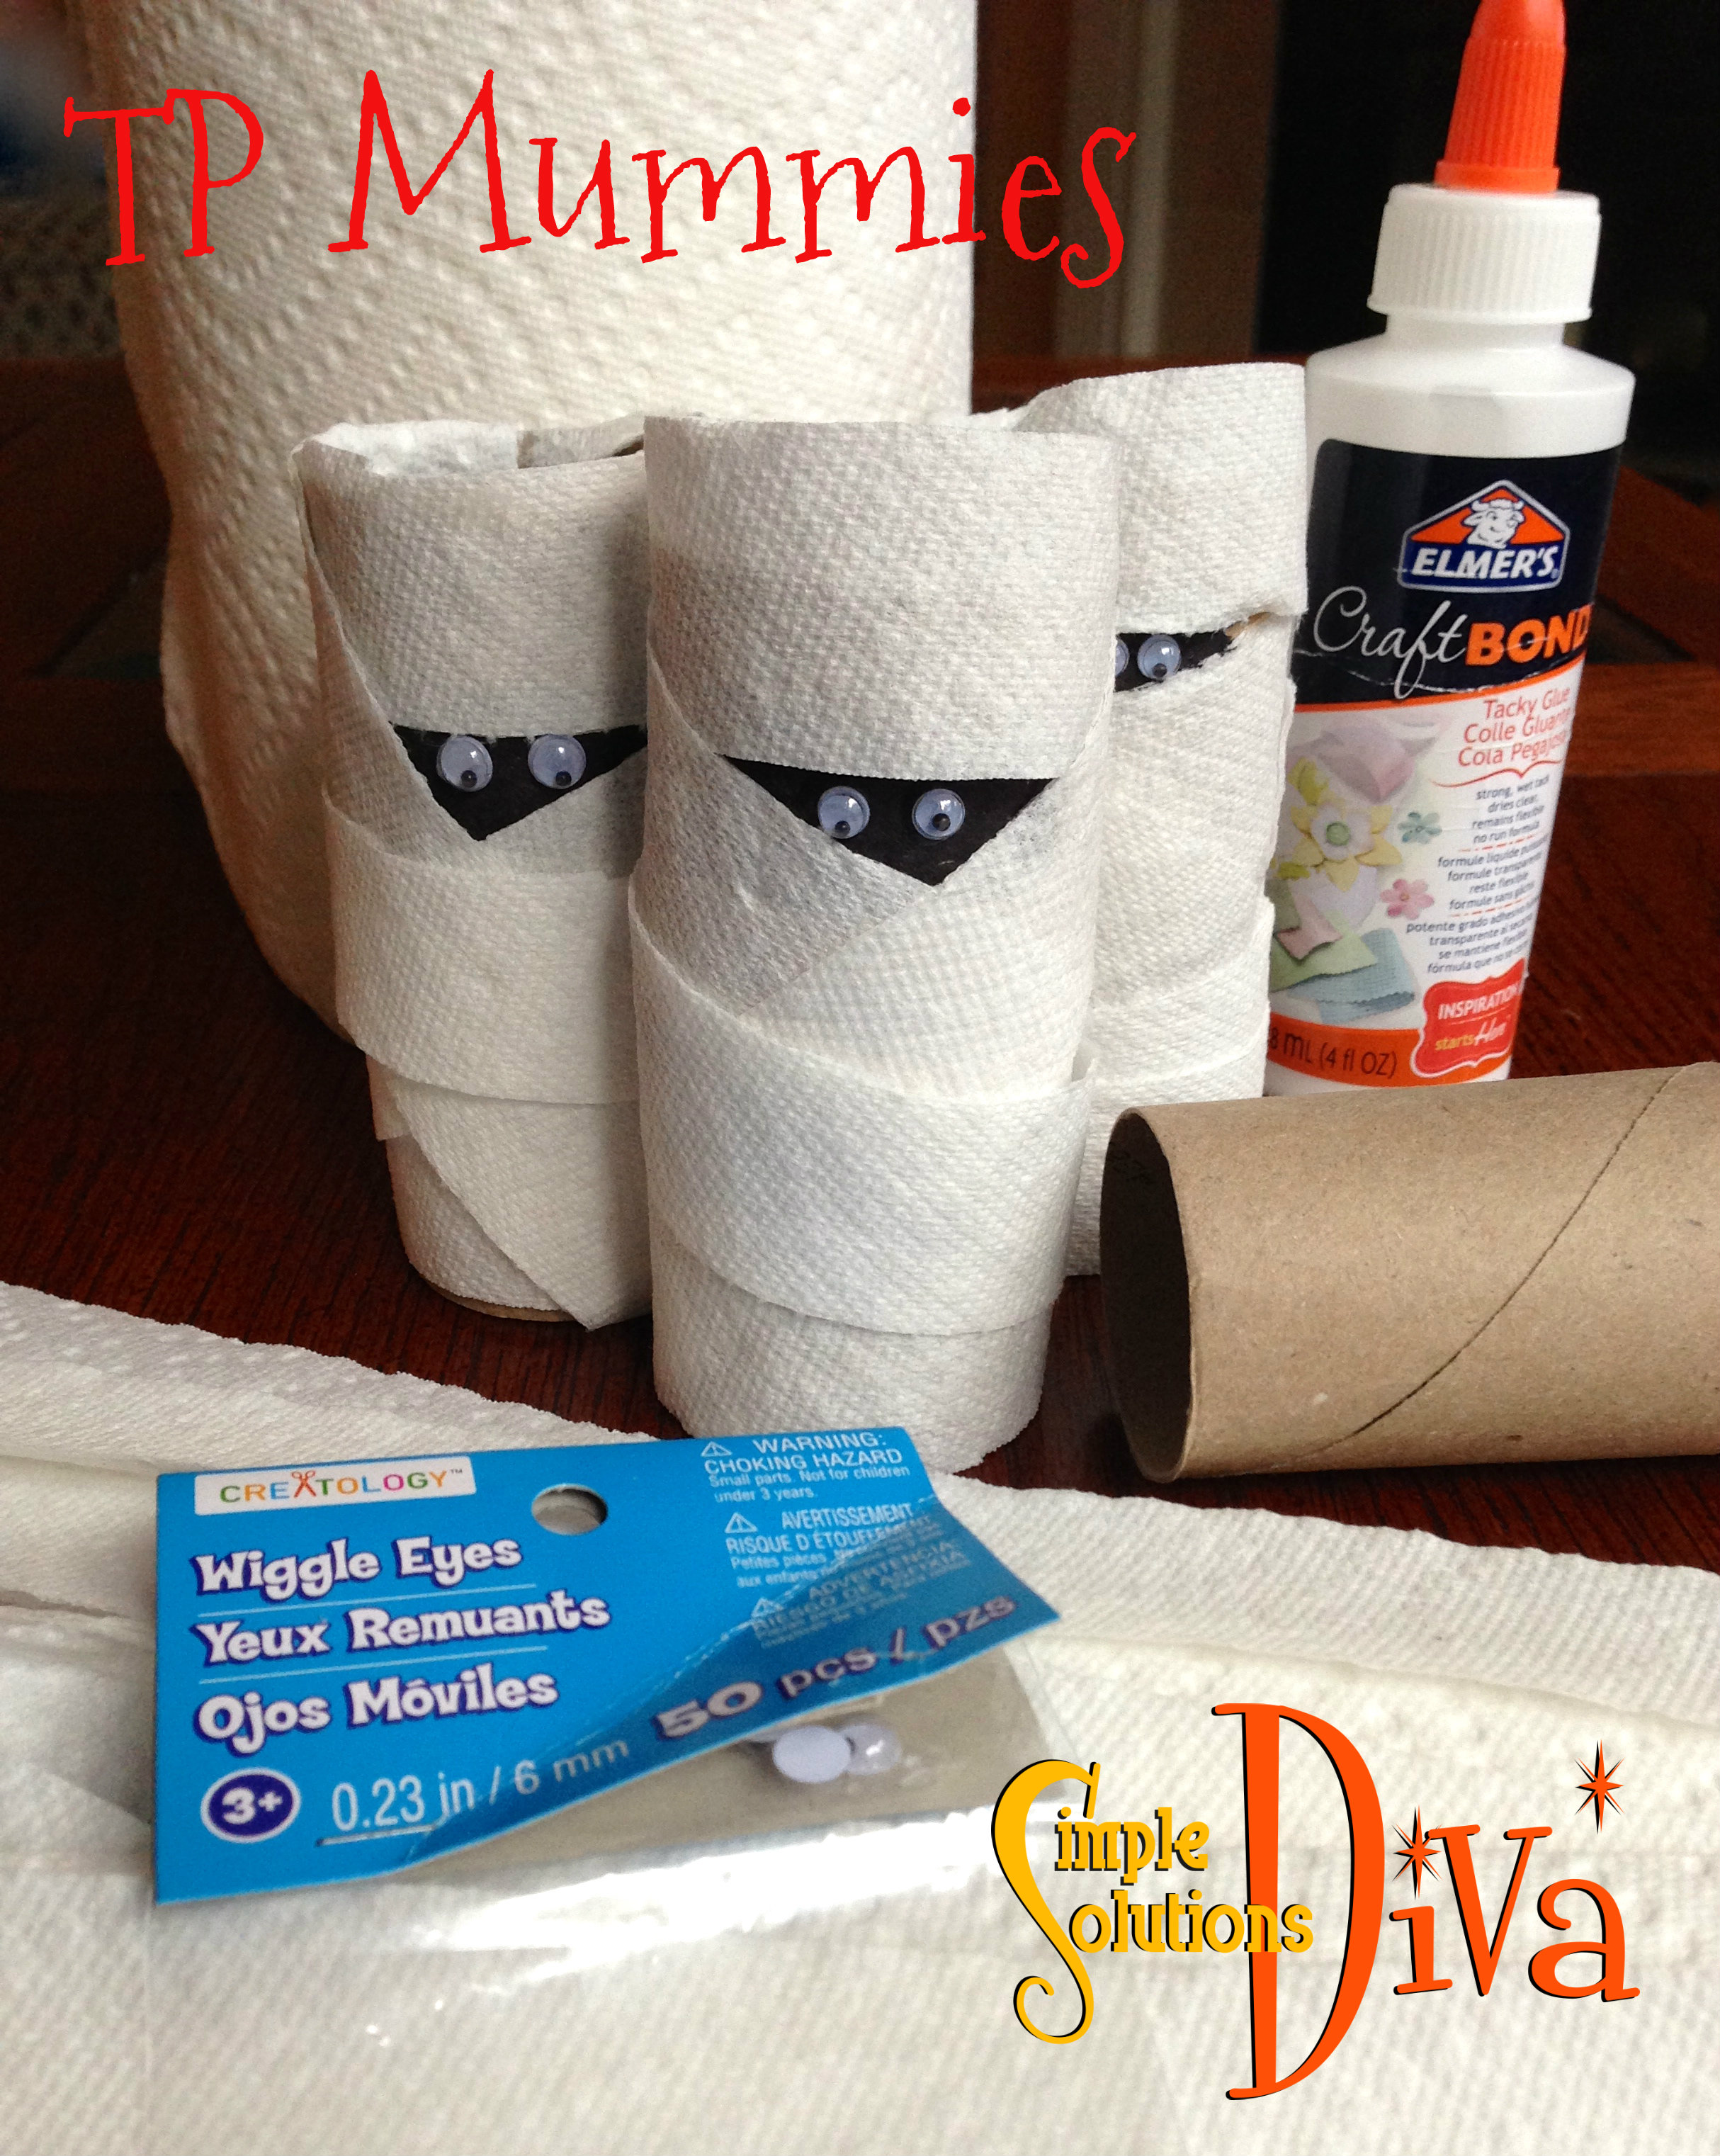
Something about these little guys makes me grin – maybe it is their wiggly eyes! Simply take an empty toilet paper tube, draw a black rectangle near one end. Using strips of paper towels (1/2 inch wide strips work well), wrap the tube up like a mummy, gluing as you go and leaving an opening so the black is exposed. Next, taker a pair of wiggly eyes and glue them in place.

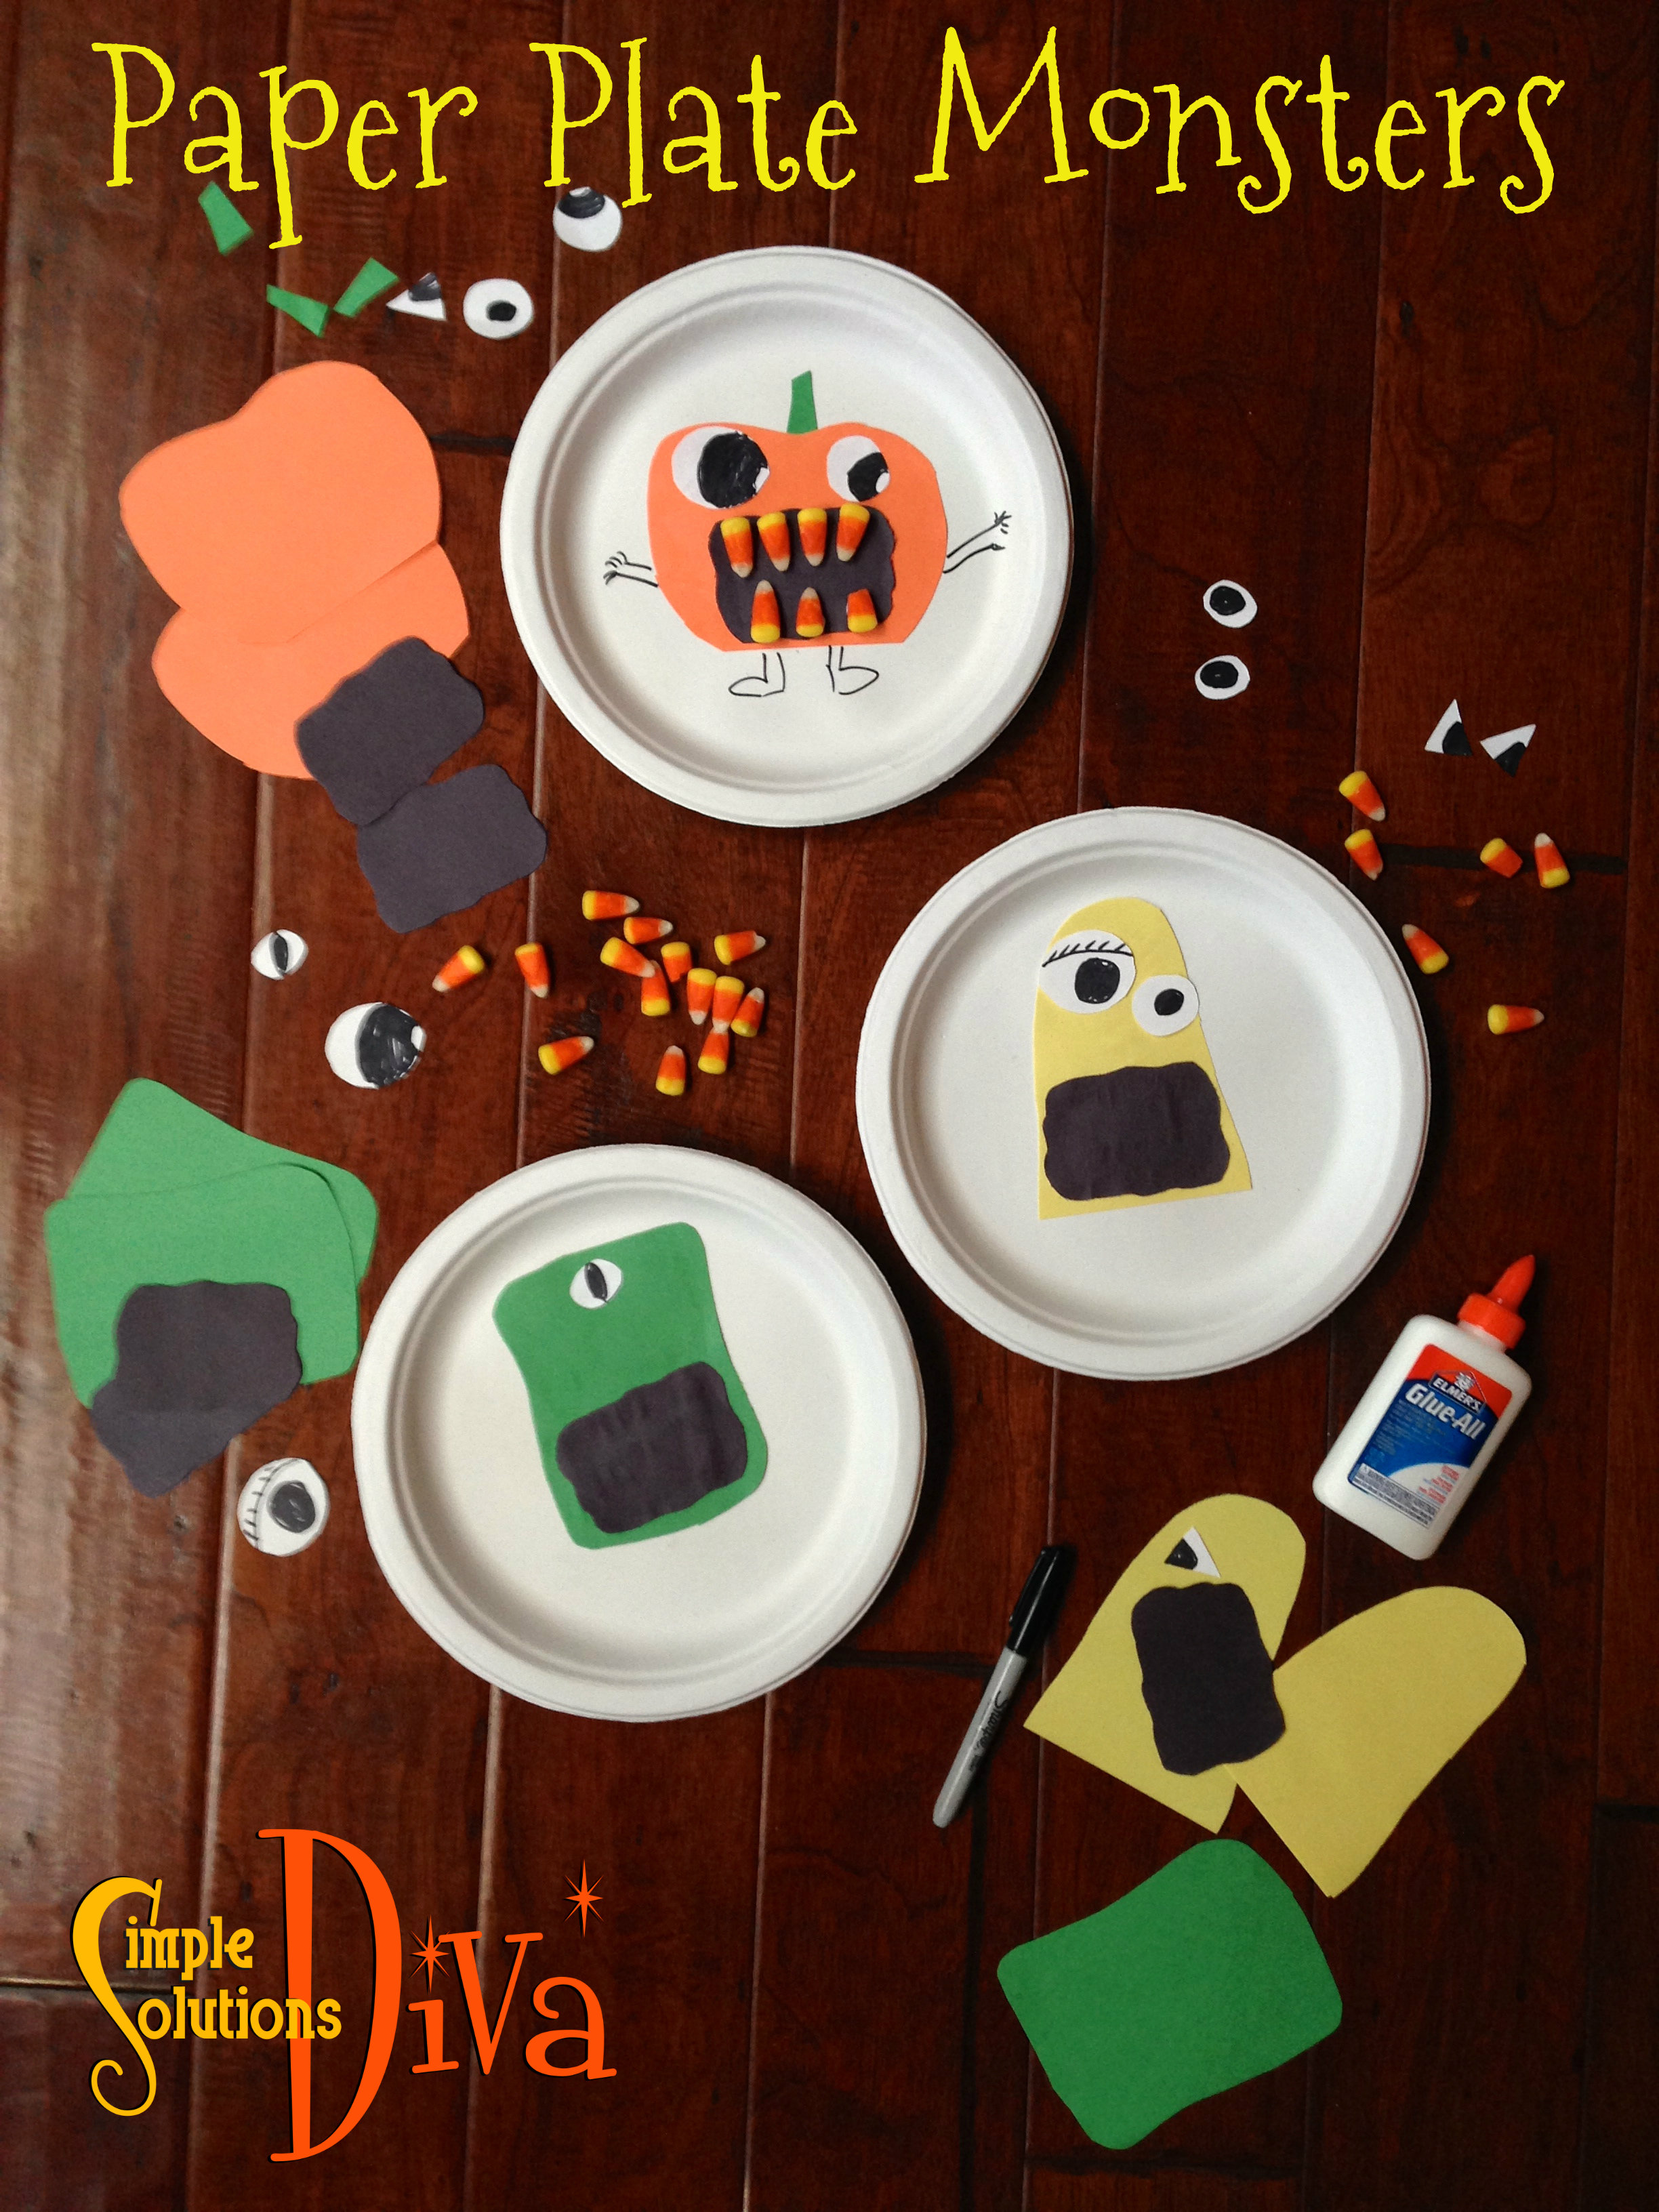
A white paper plate, glue and construction paper shapes, plus candy corn, will make this craft go “Boo”! I cut out several different body styles for monsters – each in a different color construction paper. I cut out black mouths, white eye balls in different shapes. I glued the bodies on different plates, glued the black mouths on, then I had the kids pick their favorite eyeballs (I drew different irises on each eyeball!) and design their monsters. I offered candy corn as teeth, which were glued in place! The kids drew the arms and legs of their creature! Kind of creepy/cute aren’t they?!
I love finding ways to add a spooky fun Halloween motif without spending too much money! These little tips are cost effective and fun to make! Thank you to WTLV-TV’s First Coast Living for inviting me on to share these ideas!
 Ghoulish Bleeding Candles
These are simple and you can use items you already have at home! Click here for the video and instructions.

For something a little less ghoulish and a little more sparkly, try this simple craft idea! I used an artificial pumpkin, Halloween ribbon, and sparkly purple sequins to create a Blinged-Out Pumpkin! I used a marker to write out my word of choice (you can choose any frightening word you want.), used a hot glue gun to attach the sequins, then topped it with the bow! (you can use craft glue, instead)
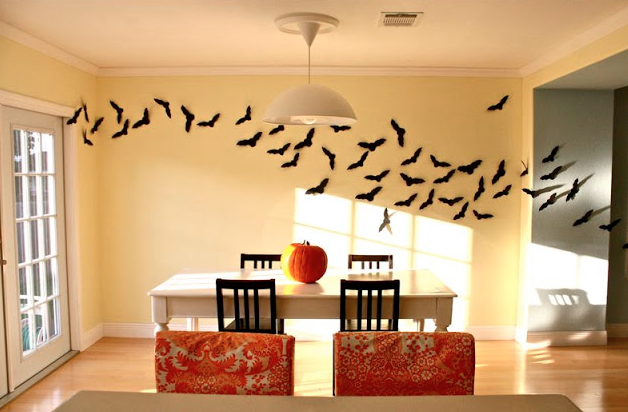
Something about the sight of a colony of bats just gives me chills! This idea from DanaMadeIt.com does the trick! It is as simple as cutting out of black card stock a lot of different sized bats and sticking them to the wall with double-sided tape! Easy Peasy! You can also set them up outside, just use duct tape – it will hold better outside!
Happy Halloween!