This recipe is the best of both worlds – pumpkinbread AND cheesecake! Feel free to use your own favorite pumpkinbread recipe, then use the directions below to create the cheesecake layer and to assemble the layers!
Ingredients:
PumpkinBread Layer
2 Cups canned pumpkin (one can of canned pumpkin)
4 Eggs
1 1/2 Cups flour (You can make this 1/2 white flour and 1/2 wheat flour, for a healthier and more dense bread)
3/4 Cup light brown sugar, packed
1 teaspoon baking soda
1 1/2 teaspoons ground cinnamon
1/4 teaspoons nutmeg
1/4 teaspoon ground cloves
1/4 teaspoon ginger
Cheesecake Layer
8 oz. cream cheese, softened
4 Tablespoons sugar
2 teaspoons flour
1 egg
Directions:
Preheat oven to 350 degrees. Grease and flour a bread loaf pan.
For the pumpkin layer– In a large bowl, combine the pumpkin and eggs until mixture is smooth. In a separate, medium bowl, combine the flours, sugar, baking soda, and spices, making sure they are well mixed.
Slowly add in the dry ingredients into the wet ingredients. Mix well and set aside.
For the cheesecake layer – In a small bowl, combine cream cheese, sugar, flour, and egg until smooth.
To assemble the layers – Spoon or pour the pumpkin mixture into the bread loaf pan, filling 1/2 way. Spoon or pour the entire cheesecake mixture over the pumpkin mixture, covering well. Add remaining pumpkin mixture to fill bread loaf pan 3/4 of the way.
Place in 350 degree oven for approximately 50-60 minutes. Test with a knife or toothpick in center for doneness – toothpick should come out clean. If not, place it back in oven and test again in five minutes!
This wonderful recipe was adapted from the website, BroughtToYouByMom.com. If you would like to check out the original recipe, click Here.
The kids are heading off to school early in the morning, and coming home STARVING! How do we give them treats that are filling, are good for them, and will not ruin their dinner? Simple Solutions Diva has gathered a few recipes from friends and her social media circles that are sure to be easy, fun, and great snacks!
Peanut Butter Banana Chocolate Chip Cookies!
Warm muffins fresh out of the oven just melt my heart every time! Make them in mini muffin tins (or in heart shaped muffin tins, as illustrated in the photo!) for a perfect child-sized treat.
Ingredients:
3-4 ripe bananas, mushed
1/2 cup peanut butter
1/2 cup sugar
1/2 cup milk
2 cup all-purpose flour
2 teaspoons baking powder
1 teaspoons baking soda
1 cup mini chocolate chips
Preparation:
Preheat oven to 350°. Mix together bananas, peanut butter, sugar, and milk. Add in flour, powder, and soda. Stir in chips. Prepare pans with cooking spray or oil. Pour into prepared pan(s).
Bake mini muffins or heart-shaped muffins for approximately 15 minutes. Bake loaf for 45-50 minutes and regular muffins for 15-18 minutes.
This yummy recipe (and photo) is courtesy of Annette at ThisSimpleHome.com. She always has wonderful recipes, homemaking tips, craft ideas, and so much more on her website. If you have a chance, please visit her!
Simple, Small-Sized Pizza
What kid does not like pizza? And decorating your own mini pizza to bake can be a healthy treat for the kids, because YOU control the ingredients!
Provide the kids with sauce, your favorite mozzarella or other cheese, fresh cut veggies, turkey pepperoni (Hormel has a mini-sized turkey pepperoni that is terrific-70% less fat than regular pepperoni!), and they have their own pizza pie shop!
Now, because I’m the SIMPLE Solutions Diva, I love to use pre-baked breads for the base of my small pizza – you can use 1/2 an english muffin (PERFECT small size!), small pitas, or one of my favorites, StoneFire Naan Flatbreads (See photo above).
Once assembled, these little pizzas cook up quickly in the oven or toaster oven – Cook at 400 degrees, for 5-10 minutes. Not much of a recipe, but you get the idea! And in my book, the simpler, the better!
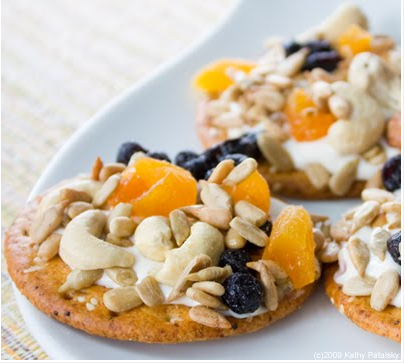
Trail Mix Sprinkle Cracker Snack
Trail Mix Sprinkle Cracker Snack from LunchBoxBunch.com.
Another great recipe where the kids can take a break from studying to make a tasty snack. And it is Vegan, so you can feel good about giving it to your kids!
Ingredients:
8 extra large ‘entertaining’ size crackers, multi or whole grain
4 Tbsp vegan cream cheese or nut butter (you can use regular cream cheese instead of vegan if you prefer)
1 Tbsp maple syrup
1 1/2 cups of “trail mix” sprinkle – Basically a mixture of your favorite combo of dried fruits/nuts/seeds. A few ideas: dried apricots, dried blueberries, salted sunflower seeds, almonds, cashews, poppy seeds, pumpkin seeds, dried cherries, dried figs, sesame seeds, goji berries, shredded coconut, dried cranberries, walnuts, pecans, Brazil nuts, pistachios and hazelnuts. For large items like dried apricots and large nuts-be sure to chop them into pea sized bits.
Preparation:
1. Assemble your trail mix sprinkle of choice in a bowl, making sure you chop extra large pieces into smaller pieces.
2. “Whip” your maple syrup into your cream cheese or nut butter into a smooth “frosting”.
3. Line a cookie sheet or other flat surface with wax paper (this will catch any wayward sprinkles so they can be used again!.)
4. Assemble the crackers (pack them tightly together) on the covered flat surface. Spread one teaspoon of “frosting” onto each cracker.
5. Sprinkle the trail mix mixture over the crackers and frosting. Press mixture lightly and then remove crackers to individual plates and enjoy!!
This recipe (and the photo!) is from LunchBoxBunch.com; it is a site full of tasty and terrific Vegan recipes.
Choco-Banana-Almond Chiller
Choco-Banana-Almond Chiller from SimpleSolutionsDiva.com.
My nephew loves chocolate (What can I say? He takes after his favorite Auntie!), and since he discovered Chocolate Almond Milk, he’s hooked! I haven’t introduced this smoothie recipe to him yet, but I know he will LOVE it!
Ingredients:
8 oz. Silk Pure Almond Milk, Dark Chocolate Flavor
1 small, frozen banana
1 heaping teaspoon almond butter (I love the crunchy kind)
A handful of ice
(Optional: For an extra kick of calcium, you can get creative and add flavored yogurt, like coconut flavored for an “Almond Joy” type of flavor, or just plain vanilla yogurt.)
Preparation:
Blend all ingredients in a blend until the drink is smooth. Serve icy cold!
For more great ideas for snacks and Back-To-School snack ideas, visit Simple Solutions Diva’s Simple Snacks For Back To School Pinterest Board, where I’ve collected way too many ideas to feature here in this post! May your kids enjoy their new school year (and may YOU enjoy a little quiet time!).