Everyone loves a good game or activity to do with their kids – even better when it is a Halloween party! Here are a few favorites from our family! One of our children has an October birthday, so we often had a Halloween-themed party when she was little. Thanks to WTLV-TV’s First Coast Living for inviting me on to share these activities!
Toilet Paper Mummy Race
TP Mummy Race
Break into teams of three (or four) people. One person in each group is the mummy. Using toilet paper rolls, wrap up the person head to toe to look like a mummy. The first team done wins!
Eye Of Newt Relay Race
Who’s Looking At You? Eye Of Newt Relay Race!
Purchase chocolate eyeballs (or use white grapes!), enough plastic spoons for each participant. Divide the participants into teams of three people or more. Each team splits in half and separate with about 10 feet between the two groups. They face each other. Put two “eyeballs” into the starter’s plastic spoon and begin the relay race – first person runs the 10 feet to their partner, passes the eyeballs from their spoon to their partner’s (without using their hands), and then that partner runs back across the 10 feet to do the same with the next team member. If they drop an eyeball, they need to pick it up with the spoon, not their hands. First team to pass their eyeballs through all their team members wins!
Pass The Pumpkin
Pumpkin Relay Race
Divide kids into equal teams. Each team lines up so you have each team member behind the next. Give the person in front of the line a pumpkin (you want it somewhat big, but not too big for the age group!). At the count of three, first person in line passes pumpkin backwards over their head to next in line. That person then passes it through their legs to the next person – they alternate like this until the end! First line to finish wins!
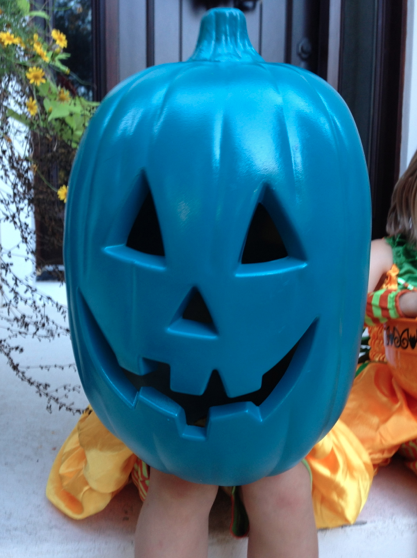
Imagine Trick or Treating on Halloween and not being able to eat anything you have in your bag! That is Halloween for the child with food allergies. But you can make Halloween fun again for those kids with food allergies – and it is as simple as a Teal pumpkin!
The Teal Pumpkin Project
The Teal Pumpkin Project, created by the Food Allergy Research & Education Organization (FARE), was developed to encourage communities to promote food allergy awareness. The Teal Pumpkin Project encourages families to make non-food treats — like pencils, glowsticks, bracelets, or other items from the Dollar Tree — available to Trick or Treaters, in addition to their candy offerings.
By simply painting a pumpkin teal (the color of food allergy awareness), and/or using the free printable flyer that FARE offers, they can let others know about the food allergy awareness program and that they are participating.
Such a simple way to make Halloween fun (and inclusive) for everyone! See below for links to the flyers:
To Download the “We have both candy and non-food treats” flyer, click here.
To Download the “We have non-food treats” flyer, click here.
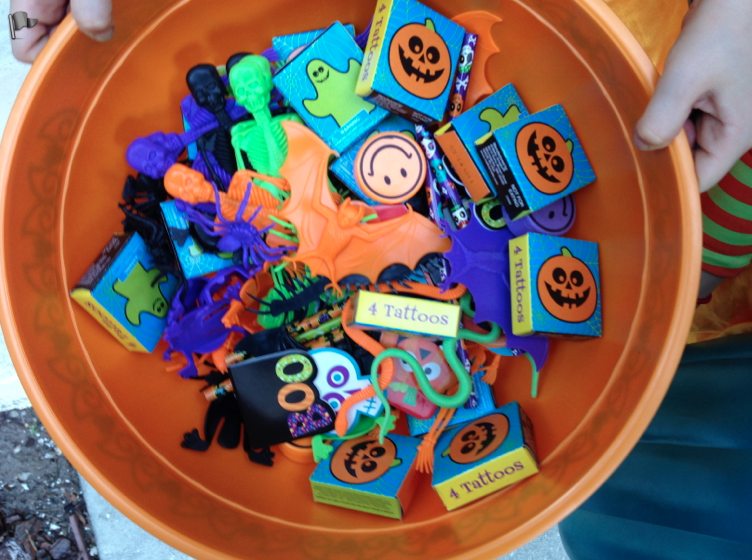
A great selection of non-food items for Halloween Trick or Treaters w/Food Allergies!
My neighbors, Sadie and Josie, came down to show me examples of the items they have to offer trick or treaters with food allergies. The basket contains items like temporary tattoos, rubber snakes and bats, pencils and stickers! Good job girls!
Simple Halloween Craft ideas for kids are the best! I especially enjoy making things that are not expensive – utilizing items from around the home! Thanks to WTLV-TV’s First Coast Living for inviting me on to share these Halloween ideas!
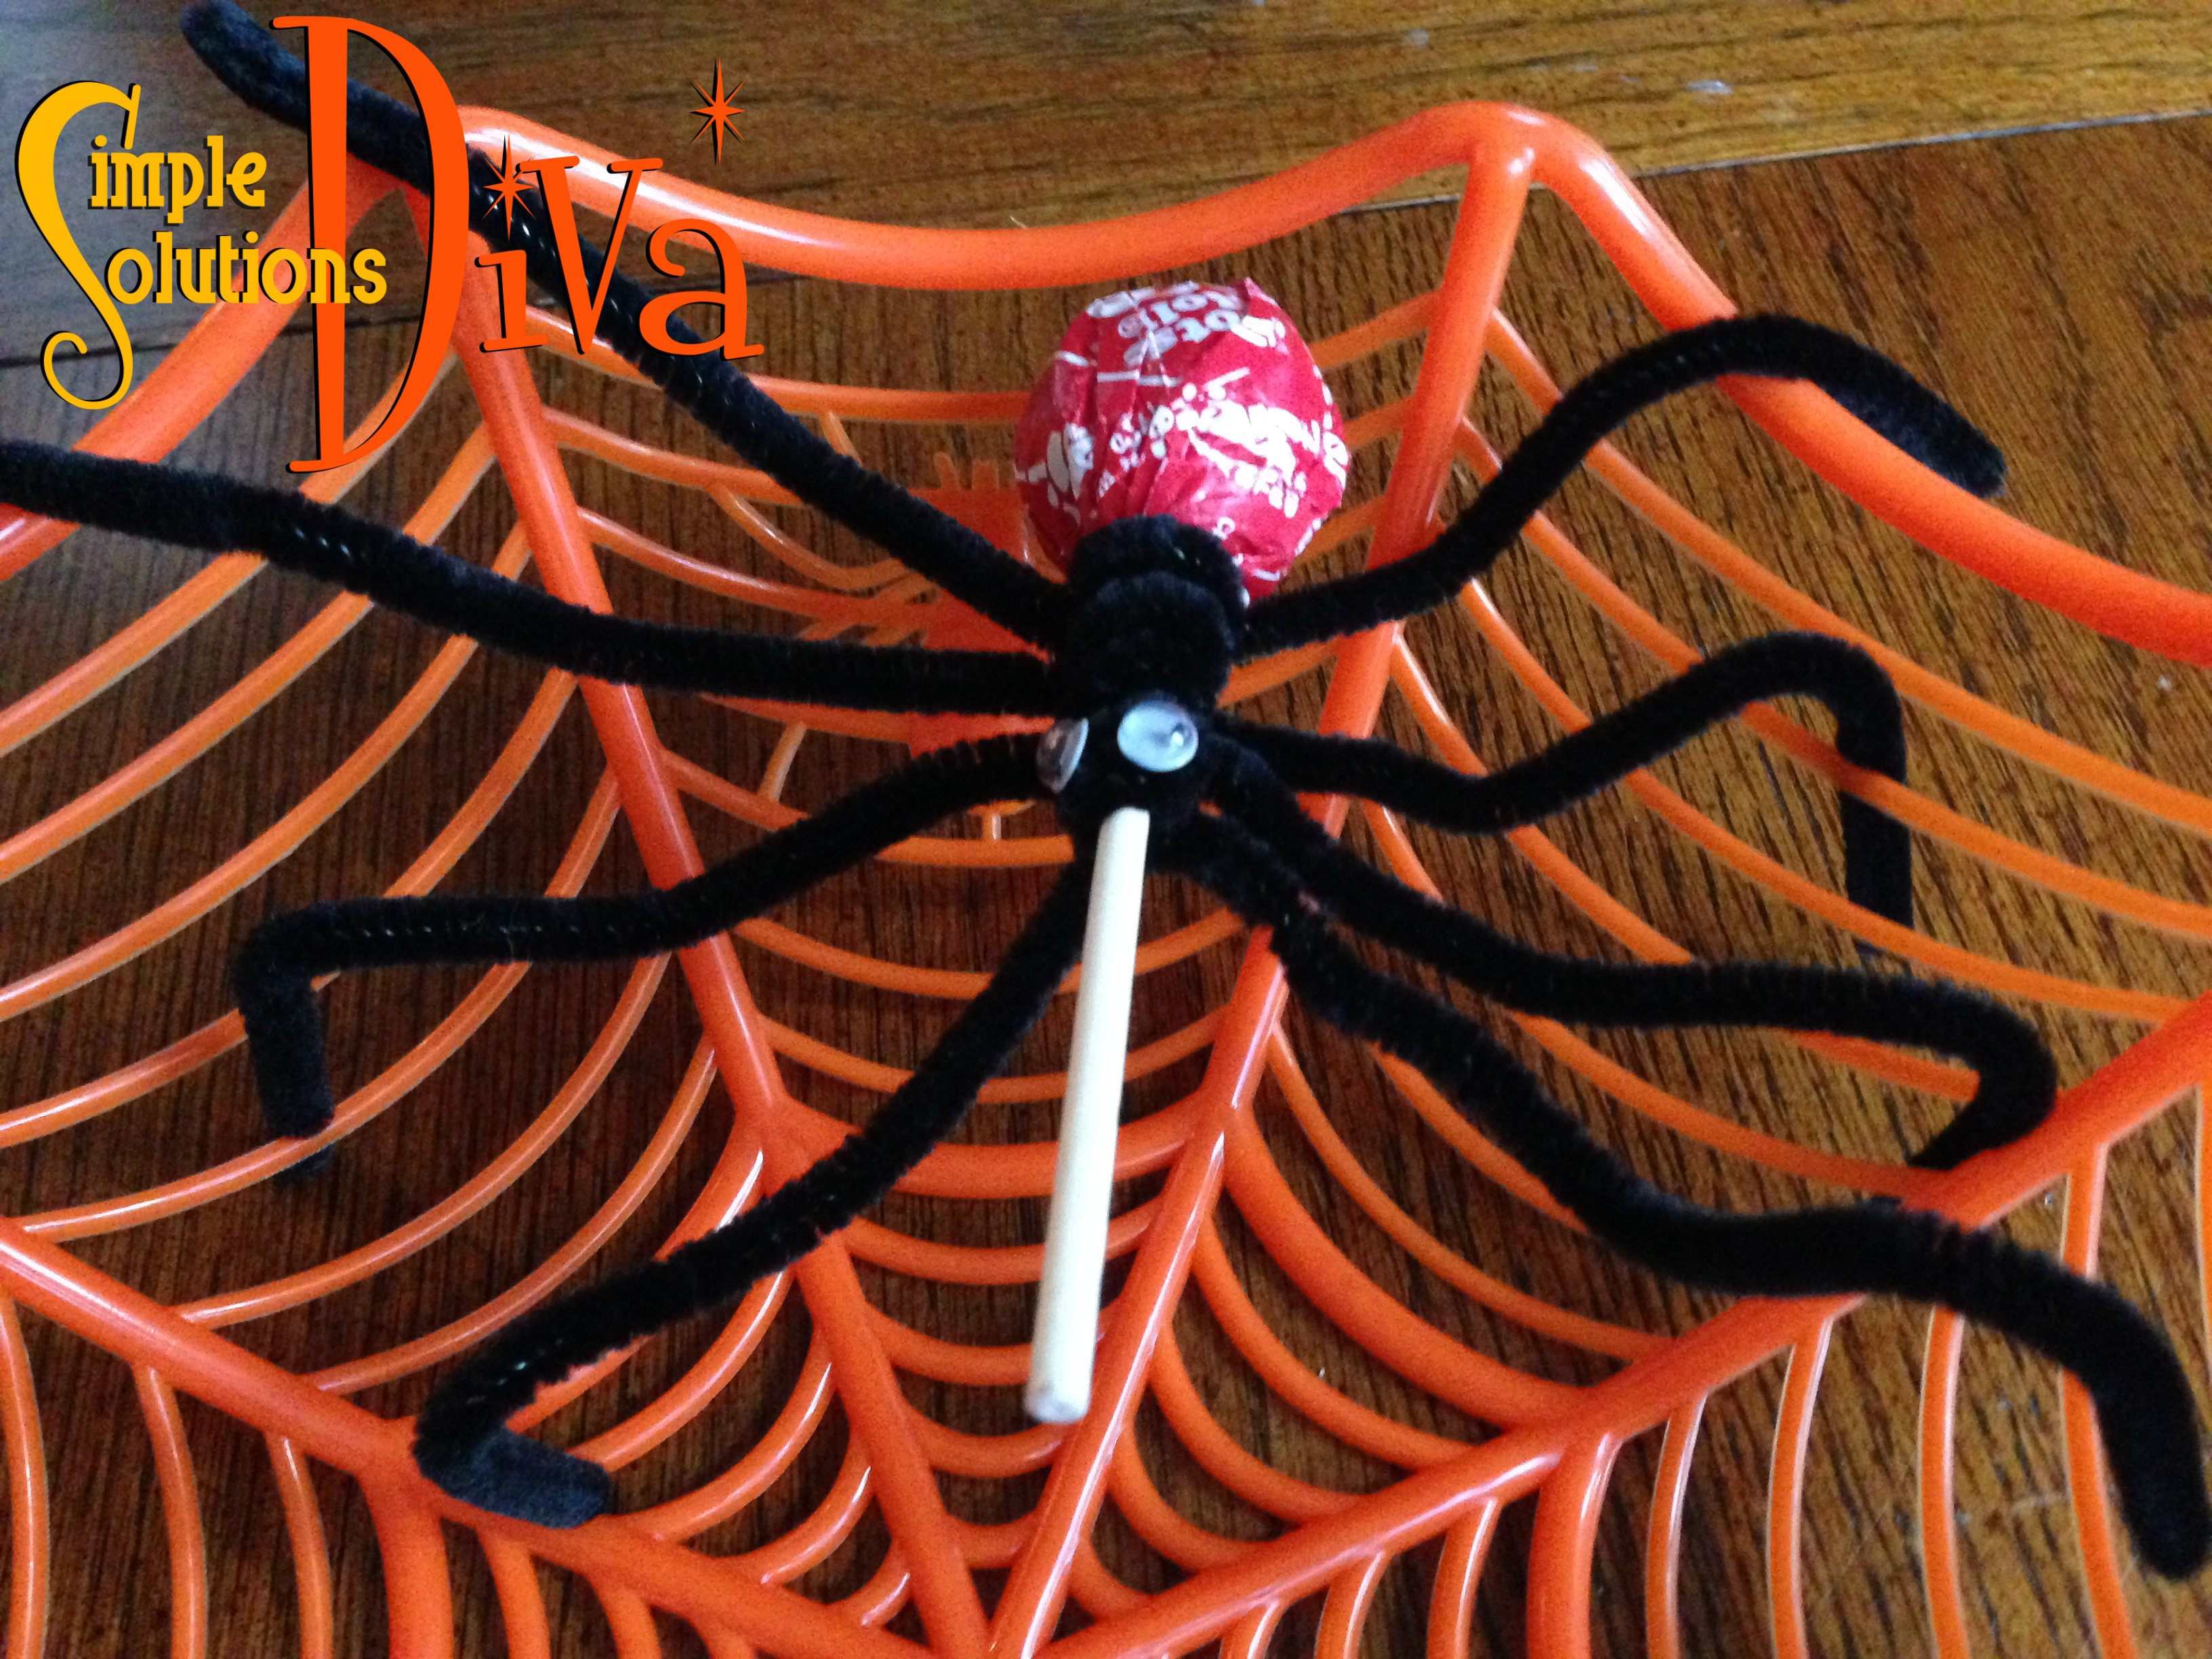
Spider Pops
Got Black pipe cleaners, Tootsie Roll lollipops, little wiggly eyes, and glue? Then you have the makings of spider pops! These are super simple and the kids don’t need much help. Take your Tootsie Pop, and wrap 4 black pipe cleaners around the stick near the base of the lollipop. It will now look like the spider has 8 legs – bend each leg to look realistic. Glue on a pair of wiggly eyes and there you have it – Spider Pop!
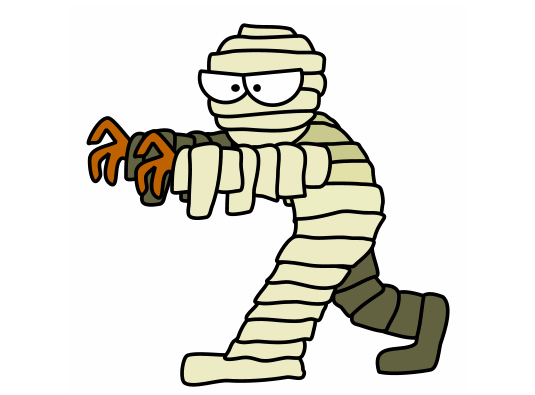
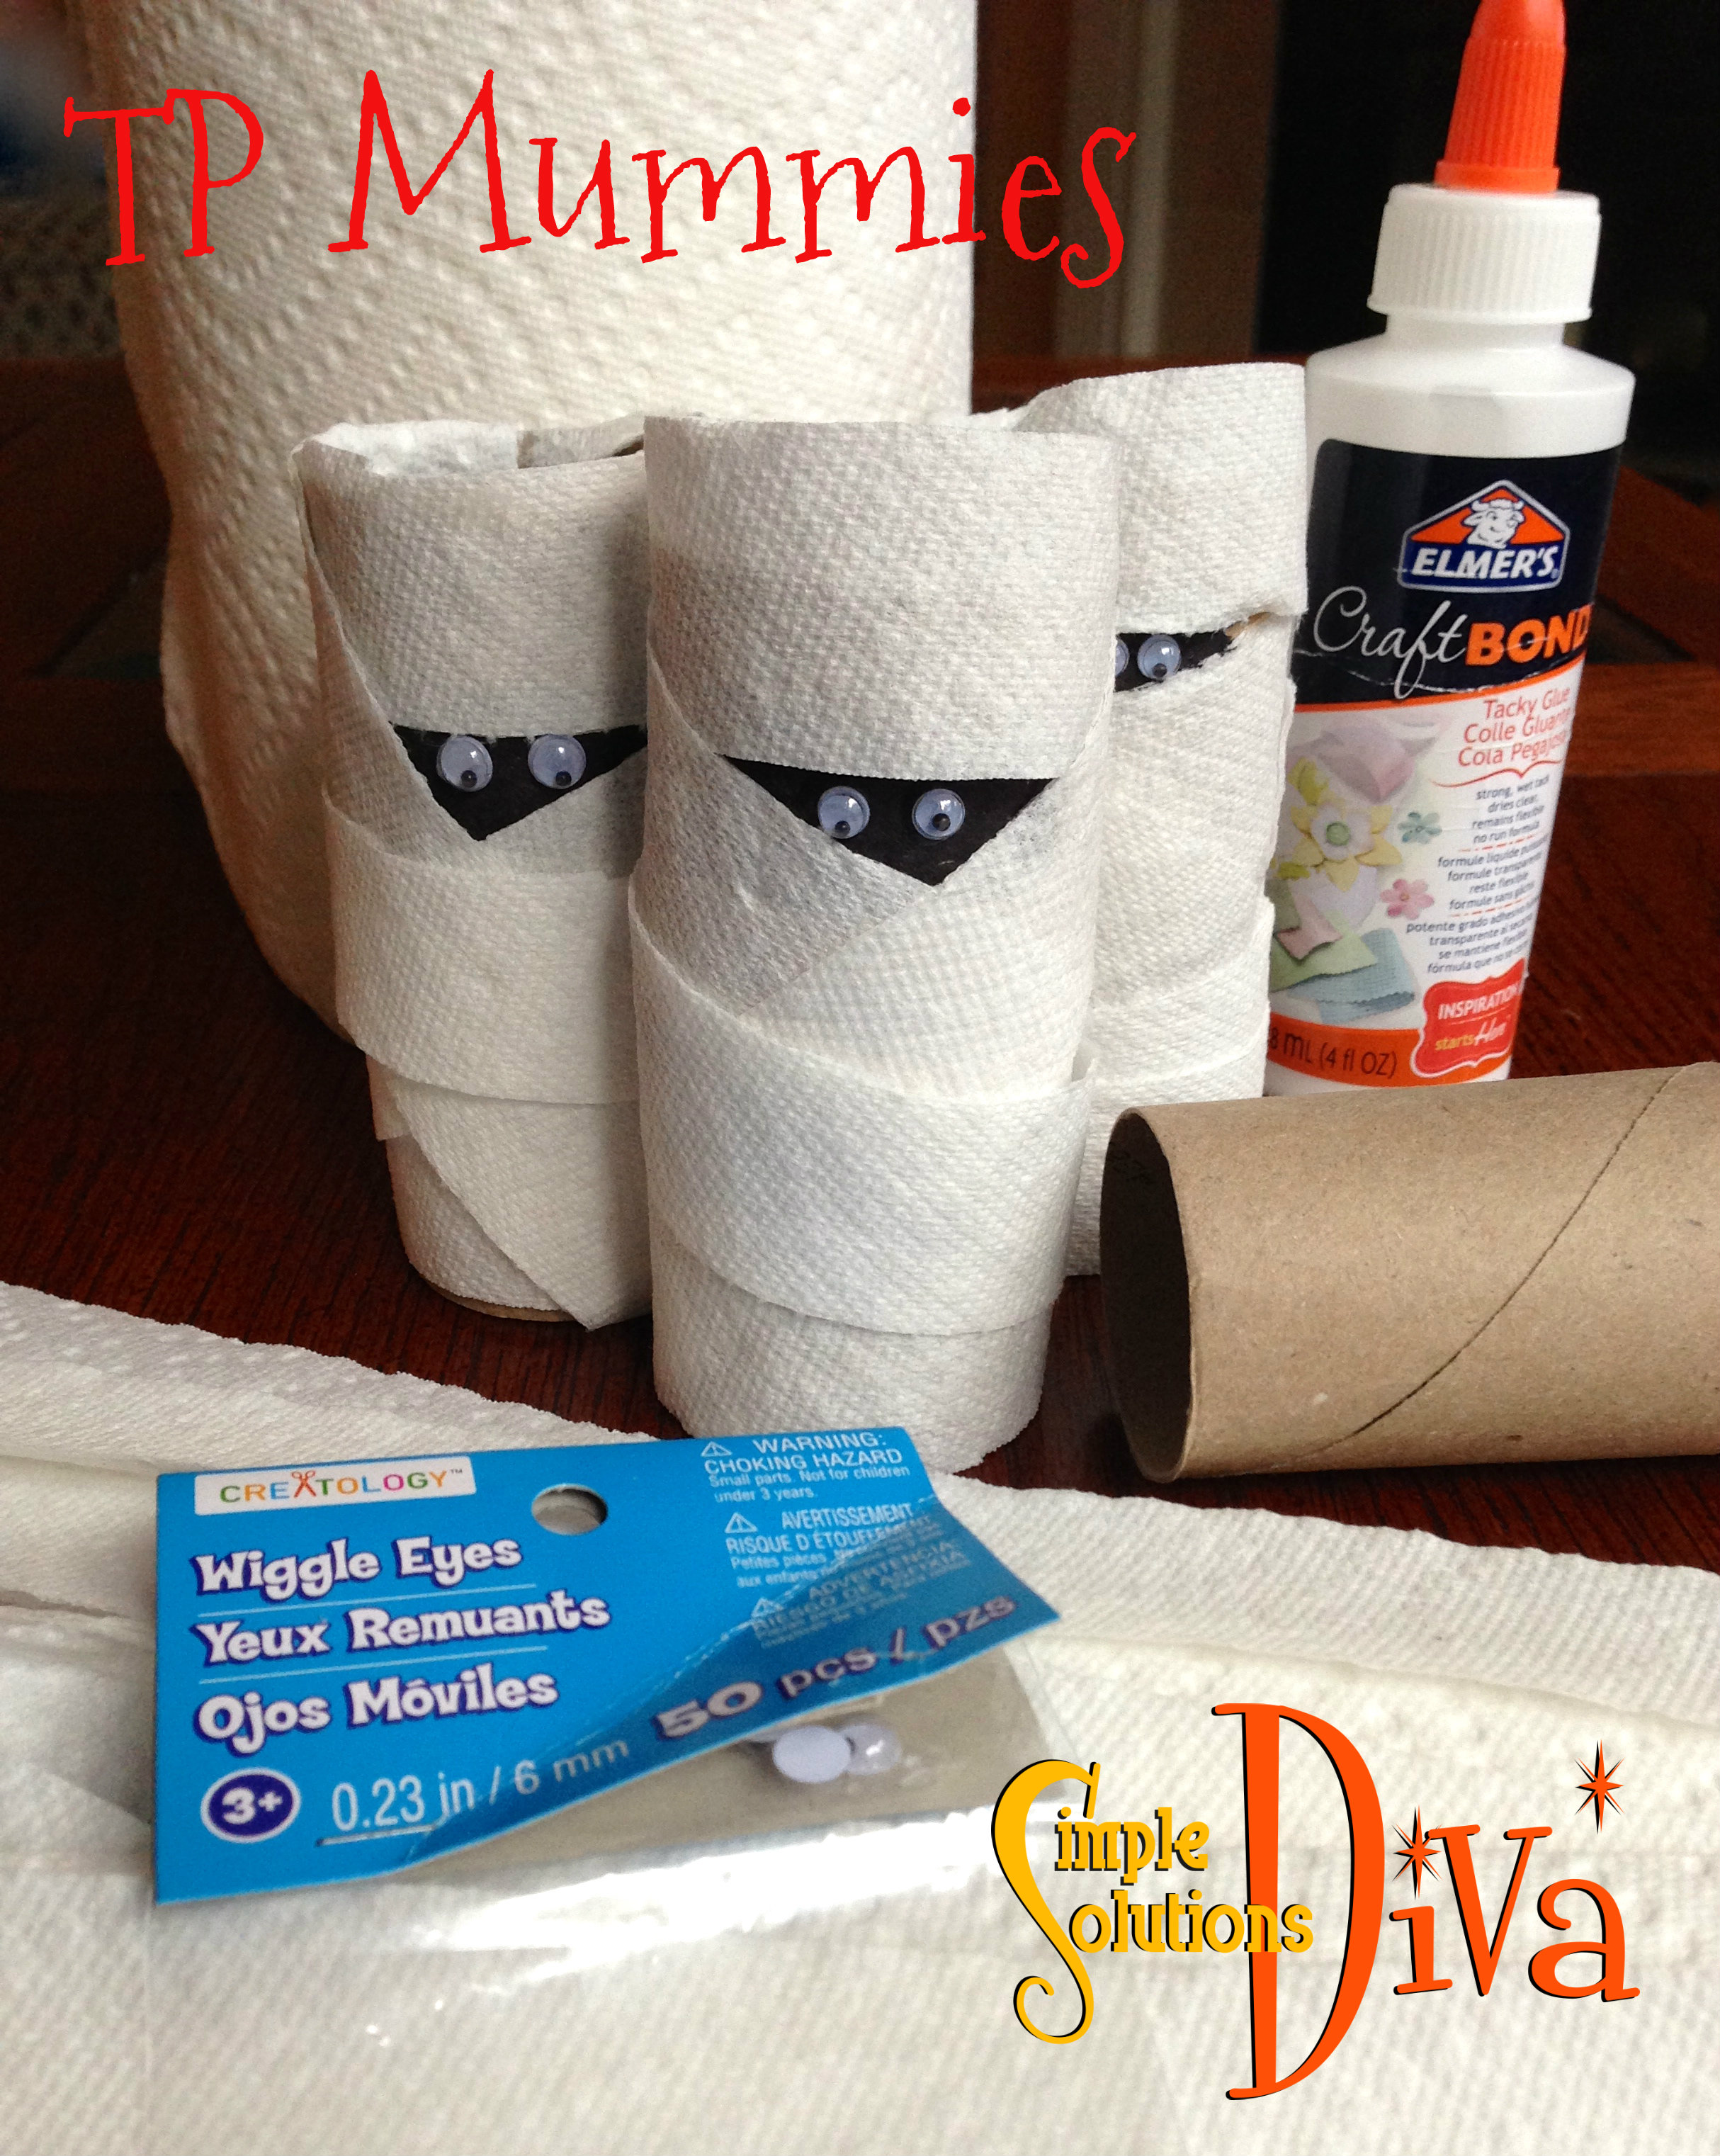
TP Mummy Roll
Something about these little guys makes me grin – maybe it is their wiggly eyes! Simply take an empty toilet paper tube, draw a black rectangle near one end. Using strips of paper towels (1/2 inch wide strips work well), wrap the tube up like a mummy, gluing as you go and leaving an opening so the black is exposed. Next, taker a pair of wiggly eyes and glue them in place.
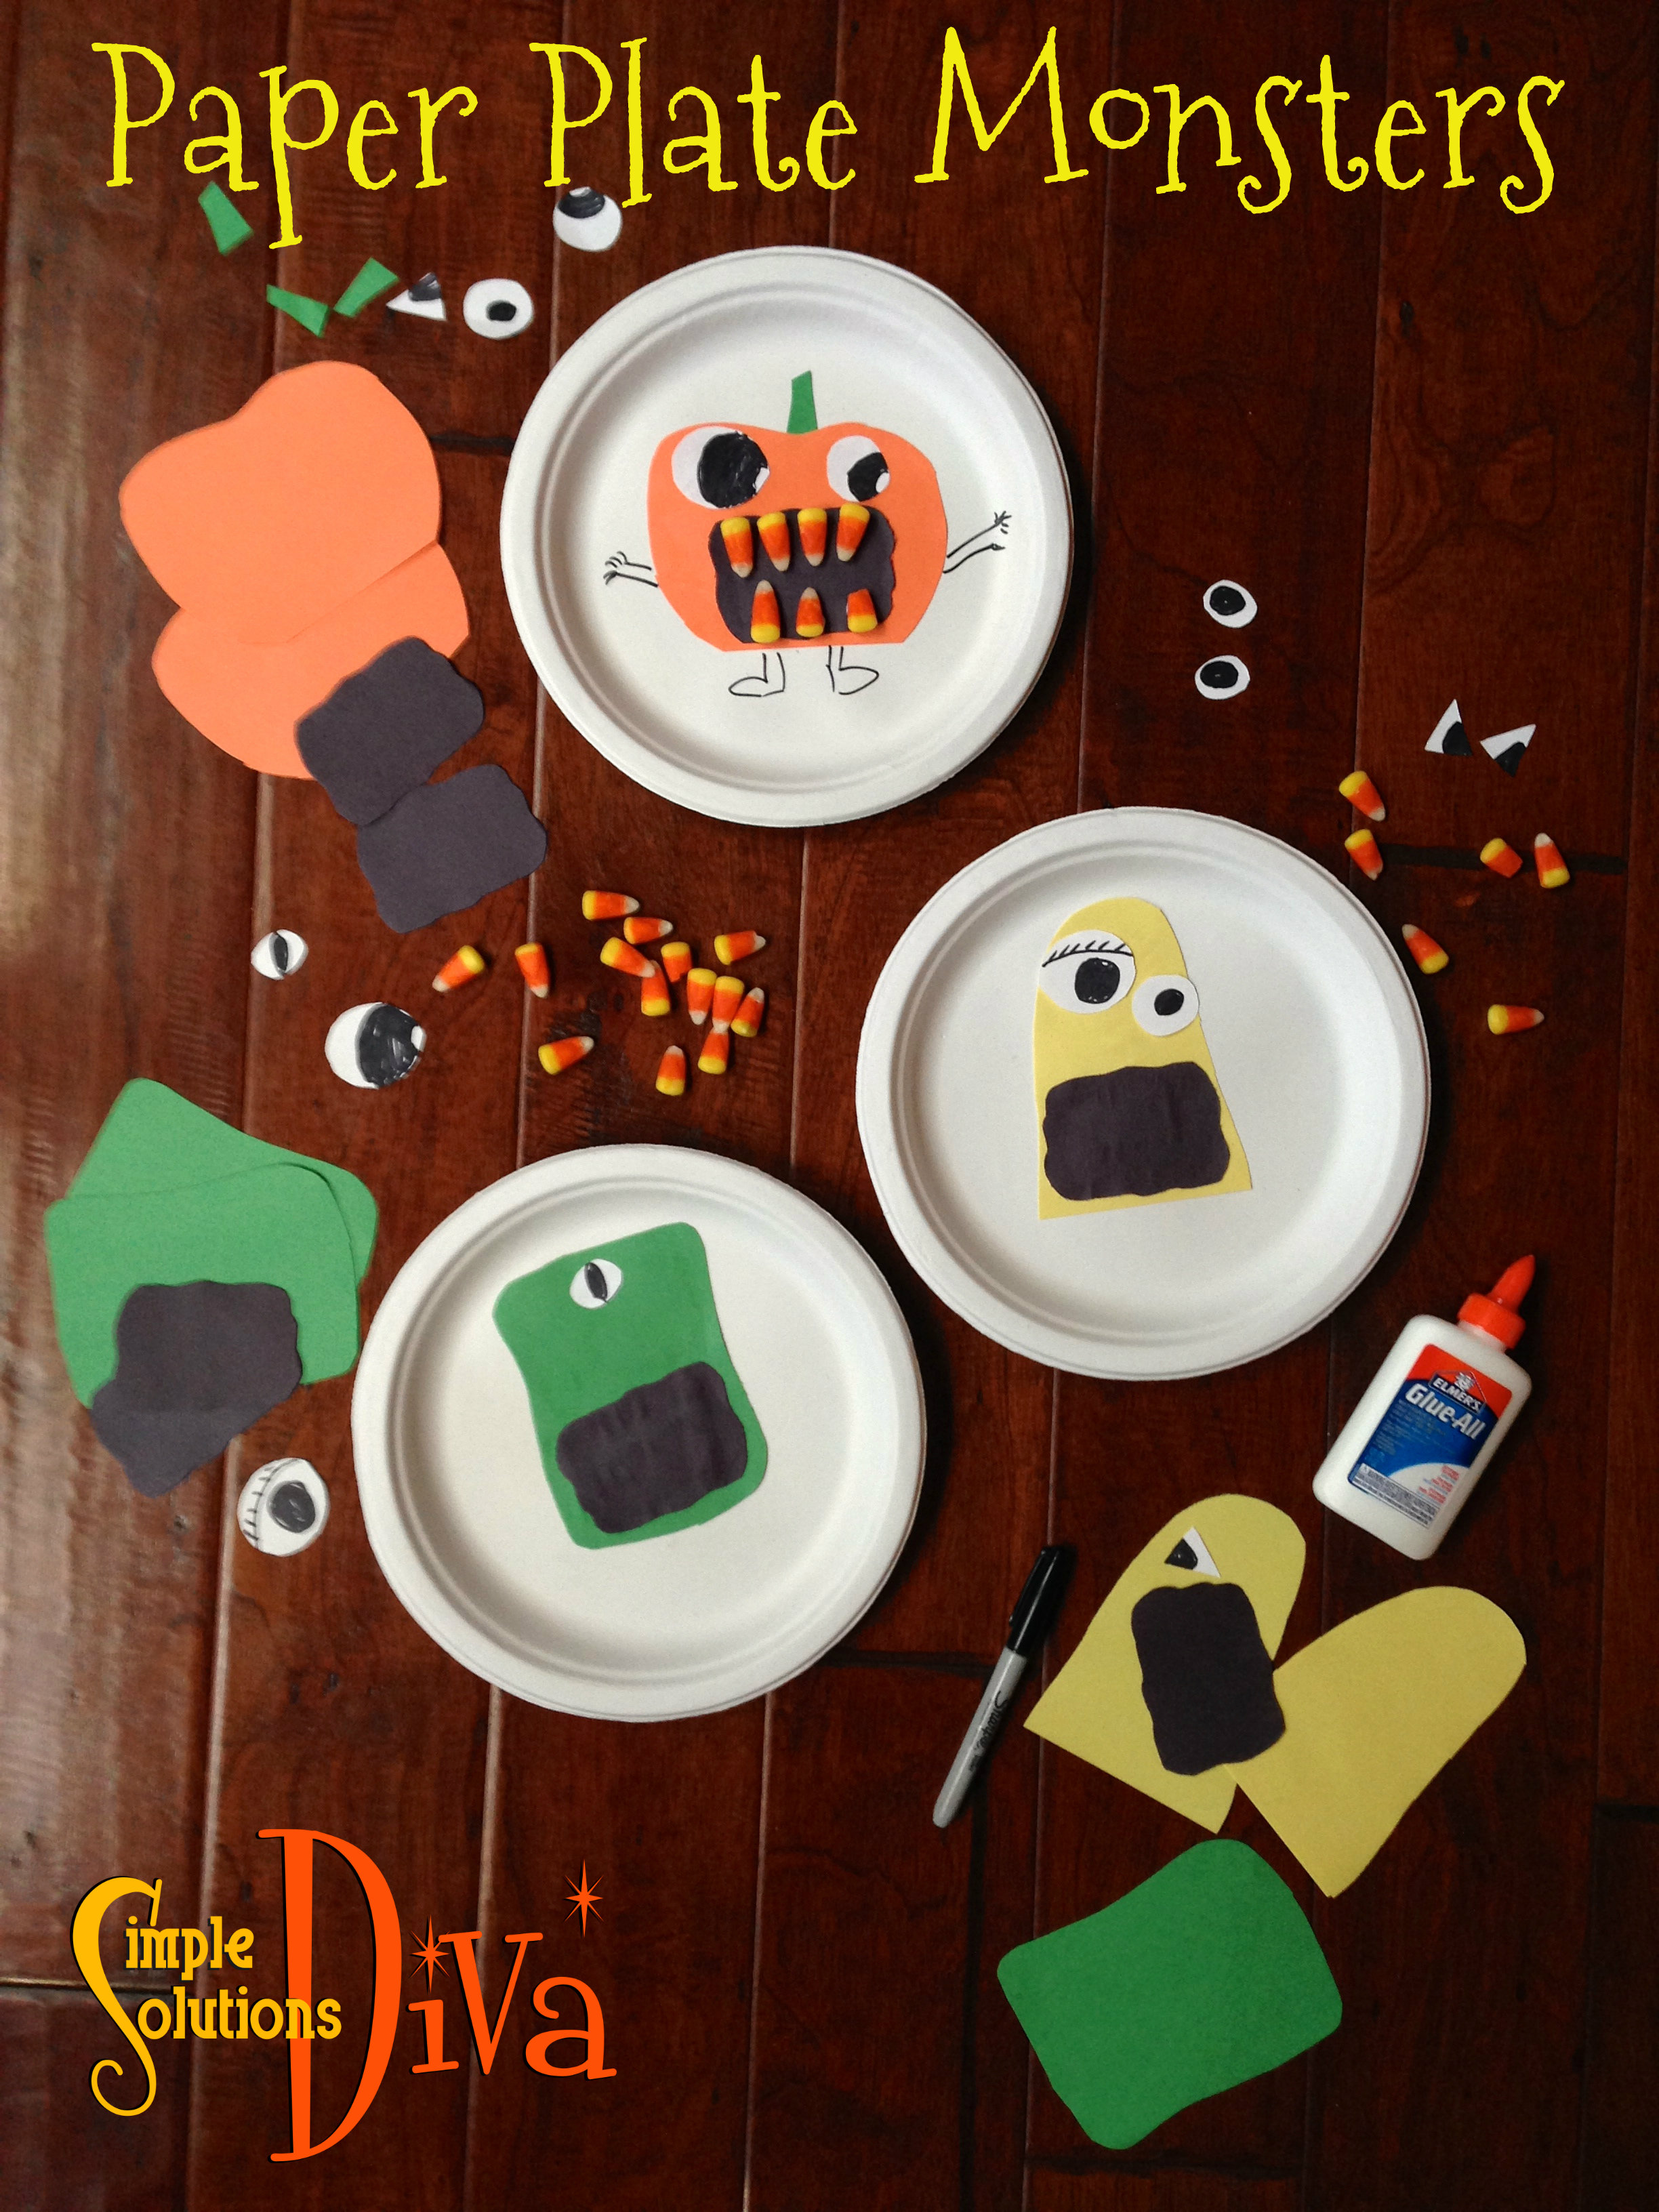
Paper Plate Monsters
A white paper plate, glue and construction paper shapes, plus candy corn, will make this craft go “Boo”! I cut out several different body styles for monsters – each in a different color construction paper. I cut out black mouths, white eye balls in different shapes. I glued the bodies on different plates, glued the black mouths on, then I had the kids pick their favorite eyeballs (I drew different irises on each eyeball!) and design their monsters. I offered candy corn as teeth, which were glued in place! The kids drew the arms and legs of their creature! Kind of creepy/cute aren’t they?!
I love finding ways to add a spooky fun Halloween motif without spending too much money! These little tips are cost effective and fun to make! Thank you to WTLV-TV’s First Coast Living for inviting me on to share these ideas!
Ghoulish Bleeding Candles
These are simple and you can use items you already have at home! Click here for the video and instructions.
Crafty Halloween Pumpkin
For something a little less ghoulish and a little more sparkly, try this simple craft idea! I used an artificial pumpkin, Halloween ribbon, and sparkly purple sequins to create a Blinged-Out Pumpkin! I used a marker to write out my word of choice (you can choose any frightening word you want.), used a hot glue gun to attach the sequins, then topped it with the bow! (you can use craft glue, instead)
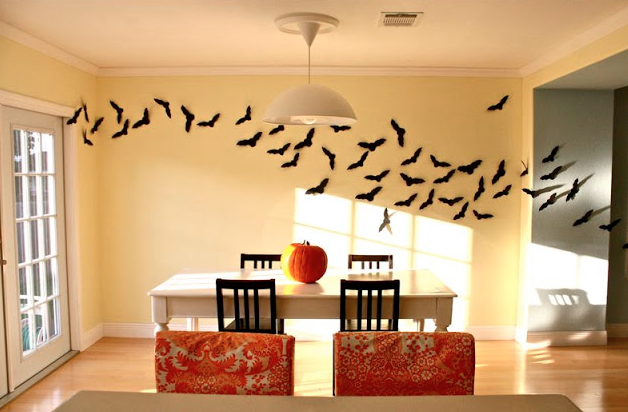
Flying Bats photo and idea from DanaMadeIt.com.
Flying Bats!
Something about the sight of a colony of bats just gives me chills! This idea from DanaMadeIt.com does the trick! It is as simple as cutting out of black card stock a lot of different sized bats and sticking them to the wall with double-sided tape! Easy Peasy! You can also set them up outside, just use duct tape – it will hold better outside!
Halloween is coming and the kids all want costumes, right? But who has the money to buy expensive ones that will be worn once? Well, I found the solution! My friends at Dollar Treeasked me to create some fun and inexpensive Halloween costumes using items from their stores! Best thing about it? Everything is a $1 at Dollar Tree, so you and I leave happy because we didn’t have to break the bank this year!
How To Get Creative Ideas
Before you head to Dollar Tree, I recommend you browse Pinterest for Halloween costume ideas for kids (here is a link to some great costumes). This really helps you get your creative juices flowing. When you get to Dollar Tree, you can see what is available in your store and then apply it to some of the Pinterest Ideas.
My Costume Ideas
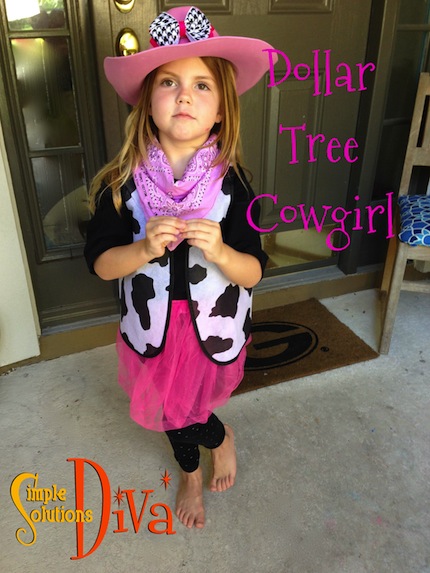
Dollar Tree Cowgirl by SimpleSolutionsDiva.com. Total Cost: $5
Cowgirl: Cowgirls have style, too! I’ve used a shirt, leggings and pink bandana our adorable model already had. I added items from Dollar Tree – Pink Cowboy hat, cowboy vest (black and white), Pink Tutu (I’m using two so it is fluffy!), black and white houndstooth bow w/pink trim (for cowboy hat). Total Cost: $5
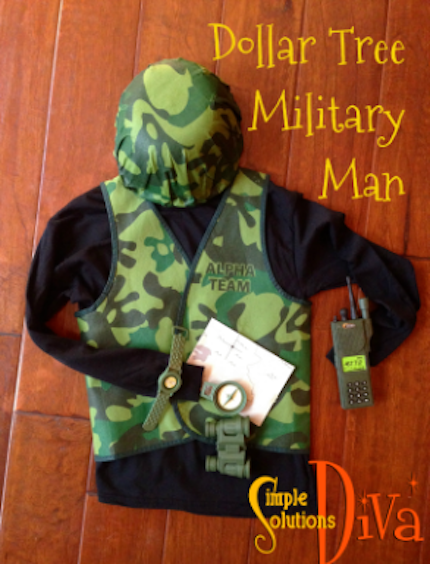
Dollar Tree Military Man by SimpleSolutionsDiva.com. Total Cost: $4
Military Man: For our Mighty Military Man, I paired a long sleeve black T-Shirt with these items from Dollar Tree – Camo helmet, camo vest, military action play set, walkie talkie. Total Cost: $4
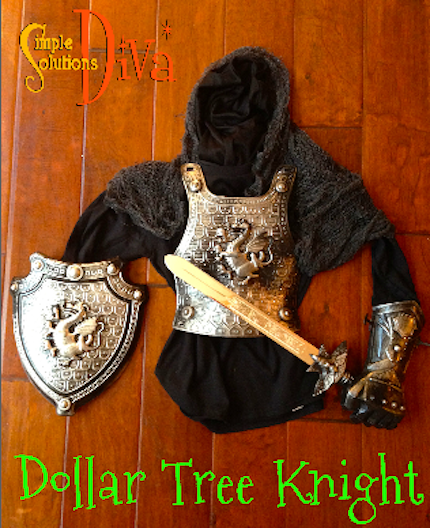
Dollar Tree Knight by SimpleSolutionsDiva.com. Total Cost: $5
Knight: I had so much fun creating this costume! I used a long sleeve, black T-Shirt, then added from Dollar Tree – Knight Chest Plate, knight shield, knight gloves, sword, black ninja hood with red trim removed, Creepy Cloth. Total Cost: $6
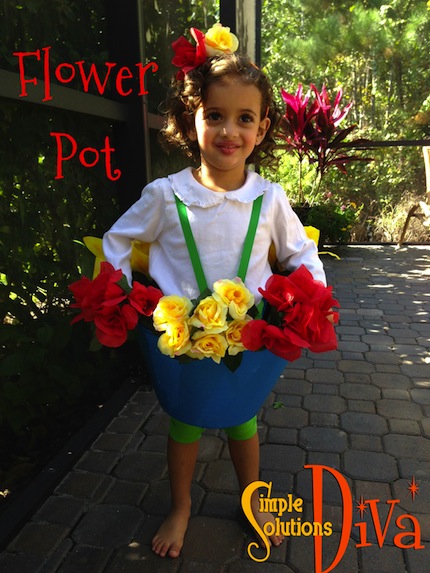
Dollar Tree Flower Pot Costume by SimpleSolutionsDiva.com. Total Cost: $9
Flower Pot: This sweet little costume blossomed when put on our adorable model! She brought the white shirt and green leggings from home, and I added from Dollar Tree – Blue beverage tub with handles (bottom cut out), red and yellow silk flower stems (6 total duct-taped to the inside of the tub), green grosgrain ribbon for suspenders(also duct-taped to inside of tub), orange sparkle headband with 2 of the flowers hot-glued on it. Total Cost: $9
Don’t Forget Halloween Accessories, Too!
Dollar Tree has a very wide assortment of glow sticks, bracelets, wands and other glowing accessories that are not only fun and fashionable but will keep your family safe this Halloween season. Plus, they have some great looking candy pails, including my favorite – the Glow in The Dark Pumpkin Pail! All for a Dollar!
Additional Costume Ideas
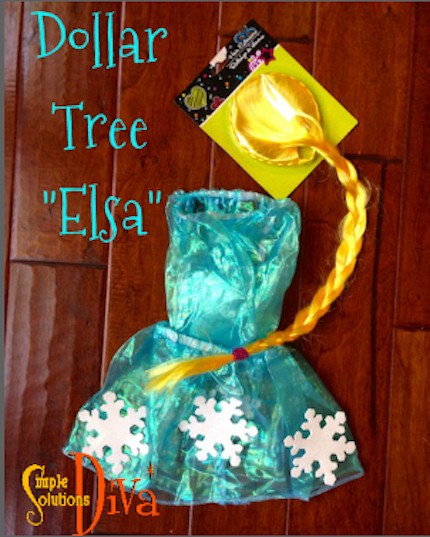
Dollar Tree “Elsa” Costume by SimpleSolutionsDiva.com. Total Cost: $4
Improvised Elsa Costume: The hottest little girls costume this year is Elsa, from Disney’s Frozen. While I was at Dollar Tree, I found the perfect pieces to create the must-have costume of the year! Pair this little costume with a white, long-sleeved leotard and tights (or long-sleeved white T-shirt, shorts and tights)! Dollar Tree Items used – 2 blue tutus, one package snowflake forms (glued on with hot glue gun), one blonde “hair extensions” headband (braided). Total Cost: $4
For More Information
Check out a Dollar Tree store near you and you will be even more amazed at what one dollar can buy. Dollar Tree is my Halloween headquarters – a one-stop shop for affordable spook-tacular decorations and costume accessories. Happy Haunting, I mean, Hunting!
To shop for more products for Halloween or the upcoming Holidays, visit your local Dollar Tree store or visit DollarTree.com. For terrific project ideas (with details on the products used to make them!), visit their project website at ILeaveHappy.com!
Thank you to Dollar Tree for sponsoring this project, and to WTLV-TV’s First Coast Living for bringing us on to model the costumes! And a BIG thank you to our wonderful child models!
What I loved about this project is I used items I had hanging around the house, so there was no expense involved in the project!
There’s just something about the romance of “bleeding” candles really screams Halloween!
Ghoulish Halloween Candles from SimpleSolutionsDiva.com
What You Need:
White candle of choice – I used used pillar candles that I was about to get rid of, but you can use brand new candles as well.
Red candle – Make sure the candle you use is NOT a dripless candle! I used red tea lights I had hanging around (I had a bunch left over from Christmas).
Directions:
Place white candle in or on candle holder of choice. Light the red candle, and very gently drip the hot wax down the sides of the white candle until it looks ghoulish enough to your liking! That is it!
So simple, yet so creepy!
Bleeding, Ghoulish Halloween Candles from SImpleSolutionsDiva.com.
Note/Disclaimer:
As with any project that involves a flame, keep lit candles in a safe place, away from potential fire hazards.
Do not leave home with candles lit – you don’t want to come back from trick or treating and find your house in flames!
Supervise children if they are doing this project. Hot wax and flames can be harmful to children, their clothes, their hair and eyebrows! (Take it from someone who lost an eyebrow as a kid!)
This is such a simple little project! You can make this using the following supplies:
Chalkboard Paint (purchase at any craft supply stores or many hardware stores)
Small paint brush (I recommend using one with bristles, not a sponge applicator, just to have a smooth finish)
A dish or plate (I used one from the dollar store!)
Depending on how large the plate is, you can use it to serve and identify appetizers (like a cheese plate), use it to list the dinner menu, use it as an ever-changing welcome sign, a humorous sign for family, and so much more!
Rain putting a damper on your kids’ summertime fun? Simple Solutions Diva has some fun and active ways to keep kids entertained! Try one of these themes to keep them busy!
Anyone who says sunshine brings happiness has never danced in the rain. ~Author Unknown
Game Day Fun:
Indoor Scavenger Hunt – A little preparation ahead of time will make this something easy to pull together when you need it! This is a great way for the kids to have fun and maybe even work together to solve some clues! Think of “Eye Spy” in your own home. Being as creative as you can (maybe even do a poem), describe an item in the house the kids have to find. Once they find the item, the next clue will be there. Make them run up and down stairs, climb under beds, etc. Each clue answer brings them to the next clue. The kids can work together as a team or as individuals to solve the clues. Make the prizes at the end enjoyable for both you and the kids – homemade cookies, trips to the bowling alley, or other appealing activities!
Can of Sardines – This game of hide and seek has you finding the person who is “It”, but instead of announcing you found them, you cram into the same space with them and wait. The last person to find them is the next “sardine”!
Broom-Hilda, Created by Russell Myers.
Broomhilda The Witch – Broomhilda The Witch is a game I used to play with friends MANY years ago (I will not divulge exactly how many!). The play area should be a circle of some sort, maybe around a table or big space cleared in a family room. The person who is “It” (the Broomhilda) is blindfolded and given a broom to hold upside down. The others quietly hide in spaces within the circle/play area. The lights are dimmed and “Broomhilda” begins her slow and careful march, banging the broom handle on the ground with each step, letting the others know she is coming. “Broomhilda” can say anything to make the others giggle, giving up their hiding place. If she finds you, you are out. If you are the first one to be found, you are the next “Broomhilda”.
Mini Marshmallow Popping Contest – Plastic cups, mini marshmallows, scissors and balloons are the simple items you need for this project/game. Cut off the bottom of the plastic cup with the scissors. Take a balloon and tie off the balloon. Using scissors, cut off the top of the balloon and attach the part of the balloon with the knot onto the open bottom of the cup. Make sure it fits tightly onto the cup, bringing the knot almost flush with the bottom of cup. Repeat the process for as many players as you have.
Take a mini marshmallow and place in the bottom of the cup, fitting it into the knotted part of balloon. Pull the balloon down and “pop” the marshmallow out of the cup. The person who can shoot the marshmallow the farthest is the winner.
The way I see it, if you want the rainbow, you gotta put up with the rain. — Dolly Parton
Camp Out in The Family Room:
This theme is always my go to favorite!
Make Microwave S’mores – So simple and easy! Assemble your s’mores fixings (graham cracker, chocolate piece, marshmallow, and another graham cracker on top!) on a microwave-safe plate and microwave until the marshmallow gets big. Keep a close watch on them — 15-30 seconds, depending on your microwave.
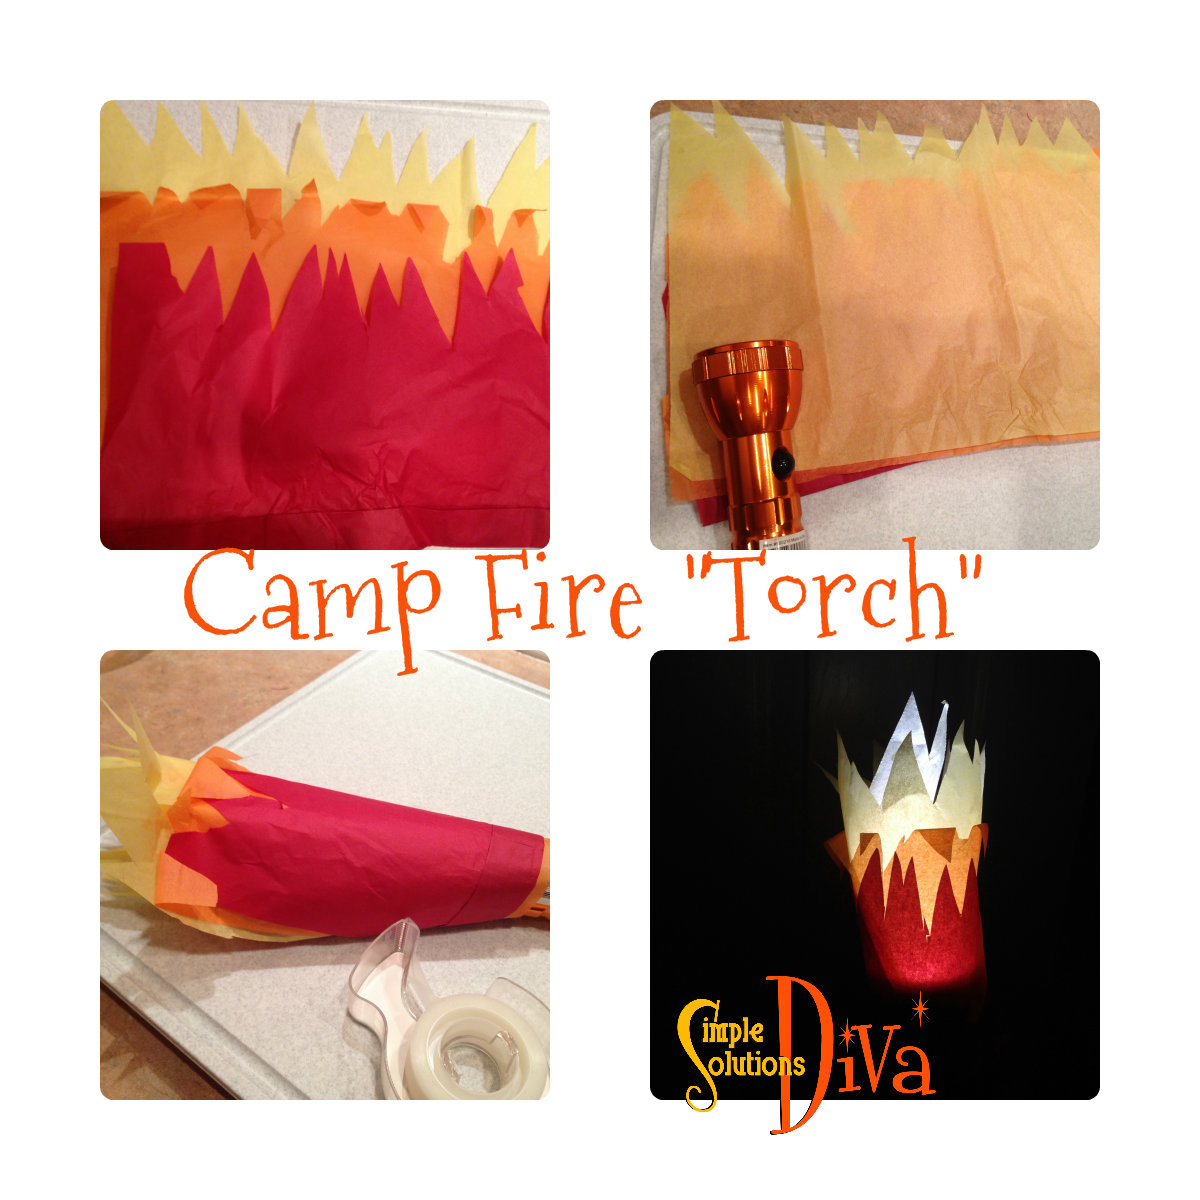
Make An indoor “Camp Fire” -Use yellow, orange and red tissue paper to create a “torch” using a flashlight. Perfect to use in those tents you make with blankets and chairs!
Communications Fun – Make 2 tents and have the kids make a communications system using the old idea of two cans (or cups) with a string between them!
Tea Party:
The Table – Set a beautiful Tea Party Table on a table or maybe even on a blanket. Consider using the china – great time to teach the kids to be gentle with things!
The Guests – Have kids create a character they will be. This is a great way for kids house their imagination. Have them create that character’s silly back ground. Have the kids:
Speak in funny accents.
Dress up in mom and dad clothes.
The Food – Serve tea sandwiches (any sandwich that has the crust cut off and is cut into four small, triangular pieces can be a tea sandwich) and tea (or favorite beverage).
Baking Day:
My personal feeling:Anytime you can make real, homemade baked goods (from scratch) with the kids helping will be a special time. With so many boxed dessert products out there, it is nice to show your kids what real homemade cookies taste like!
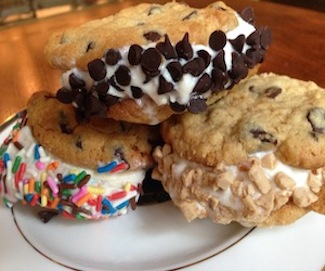
– Bake Homemade Chocolate Chip Cookies or brownies
– Use some of the cookies (or brownies) to make Ice Cream Sandwiches, then roll the edges in different toppings.
Ice Cream Sandwiches from SimpleSolutionsDiva.com.
Want A Few More Ideas?
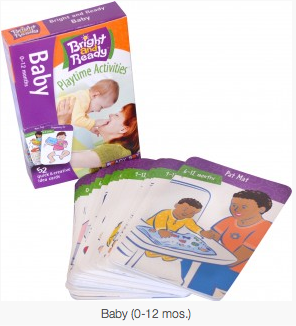
Bright And Ready: If you need some simple ideas on what to do with the kids (without having to spend a lot of money), check out the Activity and Learning Decks from Bright and Ready. They have terrific and creative ideas to encourage your child to learn and grow! They have a variety of activity decks for babies, on up to 9 years old.
Thank you to WTLV-TV’s First Coast Living for inviting me on to speak about these fun activities!
Looking to keep the kids busy and entertained this summer? Have them make their own sidewalk chalk! This project only uses 3 ingredients and will provide hours of fun once the chalk has set! Turn those artists loose on the driveway or sidewalk and they will have a ball!
What You Need:
Water
1/4 cup Tempura Paint PER COLOR (multiple colors)
1 Cup Plaster of Paris PER COLOR (find this in any craft store)
Disposable cups – One per color you plan to use
Plastic spoons or wooden popsicle sticks, something to stir that you can throw away
Molds – It is best if you can find shaped, silicone ice cube molds or use just plain ice trays.
Instructions:
Place 3/4 cup water in the disposable cup. Add 1/4 cup tempura paint. Mix well using the plastic spoon or popsicle stick. Add 1 cup Plaster Of Paris. Mix thoroughly until most of the lumps are dissolved. SHould look like the consistency of really thick pancake batter.
Repeat the process with each color of paint you plan to use.
Pour the colored mixture into the molds. You can use one color per mold section OR you can add multiple colors to each section (just don’t stir the colors – you will get a muddy-looking chalk piece.
Allow to dry in molds for 24 hours; gently pop chalk out of molds and allow to dry another 24 hours.
Now go have a ball drawing on your driveway with your kids!
I found this recipe on PrincessPinkyGirl.com – check them out because they have some great ideas PLUS they featured some GREAT sidewalk chalk art!