Flatbread is a great way to create a variety of easy appetizers! I used Stonefire Naan flatbreads from my supermarket to create these four appetizers; feel free to go crazy and make your own flatbread! I try to assemble all my ingredients prior to starting, then just go down the “assembly line” to make the variety of flatbreads!
Note: All amounts noted below in each recipe are variable, depending on your taste and the amount you plan to make! Each flatbread recipe makes approximately 16 appetizer-sized pieces.
General Preparation:
Place a pizza stone inside the oven and preheat the oven to 500 degrees. If using a regular cookie sheet instead of a pizza stone, set the temperature to 450 degrees.
Lay the flatbreads on a clean, flat work surface. Distribute the cheese slices evenly on the flatbreads; assemble the remaining ingredients on the flatbreads (except for the finishing drizzles as noted!).
Place flatbreads on pizza stone and bake for approximately 5 minutes. Remove when cheese is melted. Remove from oven, drizzle with appropriate finishing drizzles (if called for), and slice into appetizer-sized pieces. Serve immediately.
Apple, Brie and Cranberry Flatbread Appetizer from SimpleSolutionsDiva.com.
Brie, Apple and Cranberry Flatbread Appetizer
Ingredients:
2 Stonefire Naan Flatbreads (They come packaged in twos)
Wedge of Brie, sliced into thin slices. (I try to remove most of the white rind on the cheese)
One apple – skin removed, cored and sliced into thin slices.
1/2 cup (Approx.) Dried, Sweetened Cranberries (I used Ocean Spray Dried Cranberries)
Apple, Bacon Cheddar Flatbread with Maple Syrup Drizzle from SimpleSolutionsDiva.com.
Apple, Bacon and Cheddar Flatbread Appetizer With Maple Syrup
Ingredients:
2 Stonefire Naan Flatbreads
One apple, peeled, cored and sliced thin.
1/2 cup crumbled bacon (I used Boar’s Head Precooked Bacon – I like keeping things easy!)
Cheddar Cheese, sliced thin.
Real Maple Syrup (This is for a finishing drizzle on top of this flatbread)
Fig, Prosciutto, Mozzarella with Honey Drizzle Flatbread Appetizer from SImpleSolutionsDiva.com.
Fig, Prosciutto, Mozzarella Flatbread Appetizer With Honey
Ingredients:
2 Stonefire Naan Flatbreads
4 dried figs, chopped
4 slices of Prosciutto, thin sliced
8 oz. fresh Mozzarella, sliced
Honey (This is for a finishing drizzle on top of this flatbread)
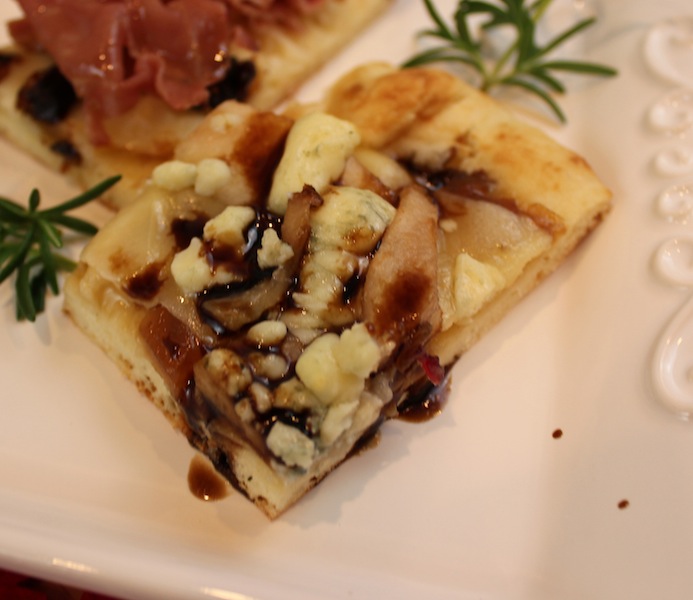
Pear, Gorgonzola, Provolone, Caramelized Onion Jam With Balsamic Vinegar Drizzle Flatbread Appetizer from SimpleSolutionsDiva.com.
Pear, Gorgonzola, Provolone, Caramelized Onion Jam Flatbread Appetizer With Balsamic Vinegar
Ingredients:
2 Stonefire Naan Flatbreads
One pear, peeled, cored and sliced thin
1/2 cup Gorgonzola Cheese Crumbles
8 slices Provolone Cheese
Caramelized Onion Jam (you can find this in specialty food aisles of your supermarket, or specialty food stores)
Balsamic Vinegar (This is for a finishing drizzle on this flatbread)
A Big Thank you to Stonefire Naan for providing me with a wonderful selection of Naan Flatbreads for this post!
This wonderful recipe is the perfect blend of sweet and tart (I happen to LOVE cranberries)! Here is the recipe:
Ingredients:
3 eggs
2 cups sugar
3/4 cup butter, softened
1 teaspoon vanilla
2 cups flour
12 oz. fresh cranberries, rinsed
Preparation:
Preheat the oven to 350 degrees. Butter the bottom and sides of a 9 x 13 pan.
Mix together the eggs and sugar in a large bowl, using a mixer on high speed, for 5-7 minutes. The mixture should double in size and lighten to a soft yellow color. Do not skip or shorten this step – it is what provides the cake’s light texture.
Add the vanilla and softened butter, beating until the butter is thoroughly mixed in – approximately 2 minutes. Add the flour, mixing until it is completely moistened. Stir in the cranberries using a spoon, then pour the batter into the buttered pan.
Bake 40-50 minutes, until the top of the cake is light brown and a toothpick inserted in the center comes out clean. Let the cake cool completely before cutting.
Enjoy!
I found this recipe on BarefeetInTheKitchen.com, a site chockfull of wonderful recipes! Check them out when you have a chance!
On Tuesday, November 26, Simple Solutions Diva got to share her simple craft ideas for Thanksgiving. If you missed the show, you can check it out here!
Thanksgiving is a time for family and friends to gather and be thankful for all they have. Simple Solutions Diva has a few simple ideas to add to the Thanksgiving festivities, keeping family and friends connected, and keeping the conversations going! Thanks to WTLV-TV/Channel 12’s First Coast Living for inviting me to share these ideas on air!
May you all have a wonderful Thanksgiving!
Father, we thank Thee for this food, for health and strength and all things good. May others all these blessings share, and hearts be grateful everywhere. —Traditional American Blessing, circa 1800’s
Thankful Tree
The Thankful Tree
This project is very simple to make. You need the following items:
Heavy vase or clean, outdoor pot
Branches from trees in your own back yard, stripped of foliage and cut to the appropriate size for pot. You can paint the branches white or black, or you can leave them natural. I used white spray paint.
Styrofoam block or floral dry foam block.
Filler (I used nuts, but you could use fabric, autumn leaves, etc.)
Blank tags with ties. I made my own with construction paper, and hole punch and natural cord/string.
Pens
Place your pot on a flat surface. Place styrofoam or floral dry foam block inside pot; secure with tape if needed.
Insert branches into the foam block. Add filler material around the base of the branches to cover the foam block.
Place the Thankful Tree, tags and pens in a prominent place in your home and ask guests to write what they are thankful for and to tie it to the tree.
I found this thoughtful idea from Yesterfood.com – to see their beautiful post, click HERE.
Thanksgiving Conversation Starter Centerpiece
Thanksgiving Conversation Starter Centerpiece
Keep the fun conversation going at the Thanksgiving table! For this project you can use many items from around your home. You will need:
Large glass vase or decorative glass bowl
Thanksgiving themed filler – you can use nuts, ornaments, ribbon, leaves, felt pumpkins. Basically whatever calls to you!
Small blank cards or squares of construction paper
Pens
Stickers or other decorative elements – optional
Assemble your filler of choice in the vase or bowl. Write conversation prompts on the small cards and fold them (or roll & tie them). Place the cards into the bowl. Place bowl on or near the Thanksgiving table. Reach for the the bowl whenever the mood or need arises! Make sure you have at least one prompt per person.
Stumped for prompt ideas? Try some of these:
What life advice would you give a younger person?
What is your favorite holiday memory?
What is your favorite Thanksgiving food?
What is your favorite part of Thanksgiving?
How is Thanksgiving different today from when you were a child?
When you were a child, what were the popular toys everyone wanted for Christmas?
I found this great idea on CraftyChica.com. Here is the original post!
Turkey Day Table Runner
Let your guests get creative during the Thanksgiving meal! Let them discover their inner artist! And most importantly, keep them at the table by giving them something to do between courses!
You will need:
Brown or white plain wrapping paper or white butcher paper. I used postal wrapping paper because it is a little heavier than wrapping paper and there is no gloss to it. It is also significantly cheaper – $4.99 for 75 sq. ft of paper, versus $4.99 for 45 sq. ft. of wrapping paper.
Pens, crayons, markers (no bleed).
Thanksgiving themed stickers or other decorations
Run the wrapping paper down the center of your table. Add your major table elements, like your candles, centerpiece, salt & pepper – whatever you plan to place on the table for dinner.
Add a few decorative elements to your table runner, to let people know they can write on it. Add stickers or other decorations. Or even use it to write out place cards for your guests!
Place markers and or crayons in small cups along the table within easy reach of guests. Be sure to let them know they are free to doodle!
Cornucopia Place Card Holders
Cornucopia Place Card Holders
This is a perfect project to get your kids involved in, but be sure to have plenty of the candy filler around!
You will need:
Waffle cones
A bowl of water
A fat pen
Candy filler – you can use the Harvest mix candies (they are like candy corn, but veggie shapes), or you could use Reese’s Pieces (they are perfect harvest colors!), or even use a nut based trail mix.
Take your waffle cone and soak the pointy end in the bowl of water for about 30 seconds (not too soaked – you don’t want it to get too mushy). Place cone in microwave for approximately 30 seconds, until the ends is just softened and pliable.
Remove cone from microwave and using the fat pen, flatten and curl the cone’s end up around the pen to create a cornucopia effect.
Fill cornucopia with candy or nut filler and lay at the place setting. Filler can spill out for effect, or you can wrap the open end in plastic wrap and secure with ribbon.
Lay the place card on the back end of the cornucopia.
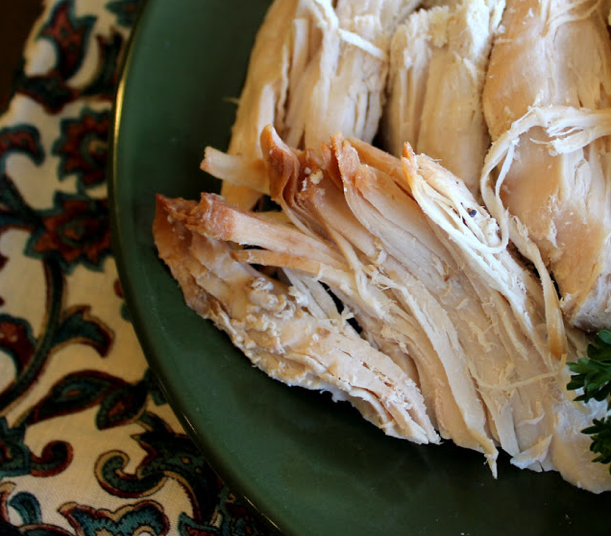
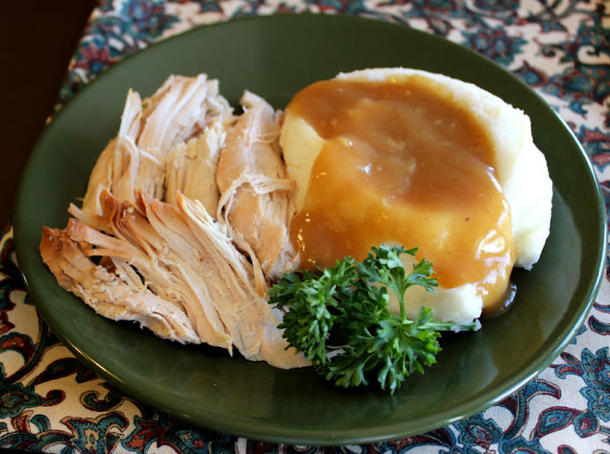
I did not make up the title of this recipe, but I have to be in full agreement with the title! I discovered this recipe online on the site JaimeCooksItUp.com, a great site with lots of family friendly recipes. My first reaction was, “Yuck, turkey in a crockpot?”, but then I thought about how simple it sounded. And how great this would be for, perhaps, someone with very little room in their kitchen or oven (like apartment dwellers). A perfect way to save space in the mad dash to cook up a Thanksgiving Day meal!
I made the recipe a week ago, with the intention of taking photos of the final product. Well, the final product was so good, there was nothing left to take pictures of! (Photos are taken directly from JaimeCooksItUp.com!)
Though the skin was not golden brown like when you roast the turkey, this dish was seriously good, easy to make, and the turkey was very moist and fell off the bone! And the drippings left in the crockpot make a TASTY gravy!
Ingredients:
One 5-6 pound turkey breast (bone in)
1/2 Cup Orange Juice (or chicken broth)
One packet Lipton Onion Soup Mix
One can whole cranberry sauce (14 oz.)
Salt & Pepper to taste (I did not use salt, because soup mix had enough for me!)
Place turkey breast in crockpot (be sure crockpot is large enough- you need to make sure the lid will fit over the turkey!).
In a bowl or measuring cup, mix together the OJ, onion soup mix and cranberry sauce. Pour mixture over the turkey breast, cover with lid, and let cook on low for 8-9 hours.
That is it!! Enjoy!! For my 30SecondMom.com video version of this recipe, Click Here!
Be sure to check out the original post from JaimeCooksItUp.com! I think she’s a cooking genius!
Turkey Breast of Wonder (and photo credit) from JaimeCooksItUp.com.
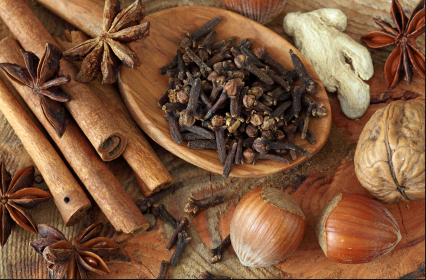
Did you know spices have a shelf life? Humidity, heat, sunlight, and exposure to air can pull the flavor and aroma right out of spices and dried herbs. With the holidays here, now is the perfect time to replace those holiday spices you bought last year! Colleen Messner of The Spice & Tea Exchange in St. Augustine, Florida, has a list of the top spices you should have in your cabinet for the holidays. (And most of them can be used year round!)
Top Spices For The Holidays
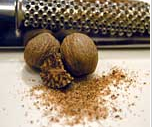
Nutmeg Photo from Food.com.
Nutmeg – This brown seed, when grated, provides a warm, spicy/sweet flavor to dishes. A whole seed can be stored indefinitely in an airtight container. Best when freshly grated.
Allspice – This spice tastes/smells like a combination of cinnamon, cloves, and nutmeg. I love it on pork tenderloin!
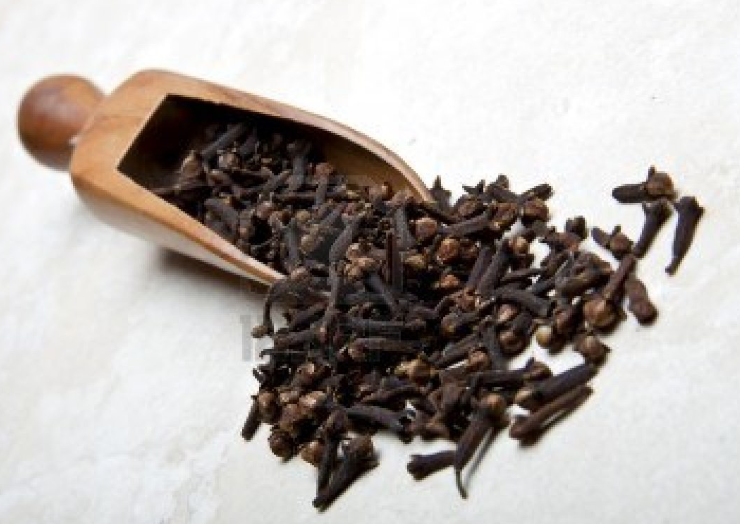
Cloves Photo from Food.com.
Cloves – This fragrant, nail-head shaped spice is perfect for decorating a ham or whole orange. Imparts a warm and sweet flavor.
Green Pod Cardamom Photo from Food.com
Green Pod Cardamom – Cardamom has a strong, unique spicy-sweet taste. Best when purchased in pods, which are removed and discarded before grinding the seeds. Adds great flavor to danish and other pastries.
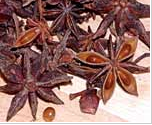
Star Anise Photo from Food.com
Star Anise – Sweet/warm spice with a licorice flavor. Great to use in pastries, stews or even asian cooking (It is one element in Chinese 5 Spice Blend).
Candied Ginger Photo from Food.com
Candied Ginger – Perfect to use in gingerbread or even chopped as decorative (and tasty!) topping for cupcakes!
Cinnamon – The favorite in the Simple Solutions Diva household! Warm and sweet, cinnamon works well in so many recipes during the holidays!
Storage Tips
Keep all spices in a dark, cool and dry place, away from heat. (So I guess that means I need to move my spice shelves away from the stove!)
Leafy items, such as oregano, basil, bay leaves do best when stored in the fridge.
Order Fresh Spices and Dried Herbs
If you would like to order any or all of these spices FRESH from the Spice & Tea Exchange, follow this link HERE to be taken directly to the products page of their website!
Holidays are a wonderful time to bring family to the table to share meals and enjoy time together, but what do you do when extended family or friends are gluten intolerant? Make Gluten Free side dishes that everyone will love! It doesn’t take much to do gluten free, and your family won’t be able to taste the difference! Tammy Barr, personal chef and owner of Change Your Crave, gives some simple tips and recipes to help you provide gluten free options for your guests.
Food ingredient lists don’t include the actual word for gluten, so it can be difficult to know if something is gluten free. You can look for a few Warning Words:Caramel Coloring, Malt, Barley, Rye, and Monosodium Glutamate. These ingredients are usually derived from wheat products or contain gluten.
The easiest way to make sure the items you buy are gluten free is to look for the GF symbol on the shelf tags at your grocery store. You can usually find these in the organic aisle, and these are products specifically marketed/approved as gluten free.
Try one or both of these simple and TASTY recipes, both provided by Chef Tammy. No one will know they are gluten free!
Gluten Free Classic Thanksgiving Stuffing
From Tammy Barr, Personal Chef, Change Your Crave
Ingredients:
1 loaf white sliced Gluten Free bread (Tammy likes to use Udi White Sandwich Bread), toast each piece
1 large onion, finely chopped
3 tablespoons chopped fresh garlic (or to taste)
1/2 cup butter (no substitutes!)
4 large celery ribs, chopped
1 tablespoon poultry seasoning
1 tablespoon Kosher salt
1 -2 teaspoon fresh ground black pepper
1 (10 ounce) can water chestnuts, drained and coarsely chopped
1 C Sliced Almonds
3 C Turkey Broth or Turkey drippings if you have them
Directions:
Toast all the bread slices and cut into cubes.
Melt butter in a large skillet over medium heat until HOT and sizzling.
Add in onions, garlic and celery, stir immediately with wooden spoon; add in the poultry seasoning, Kosher salt and black pepper; sauté for about 5-6 minutes, or until onions are translucent.
Stir in the chopped water chestnuts, sliced almonds and cubed GF toast cubes; toss well to combine.
Add the turkey broth 1 cup at a time. Carefully combine so bread does not completely fall apart. Continue adding broth until everything is well combined.
Transfer into a baking dish and drizzle Olive Oil over the top.
Bake for 20 minutes at 360 degrees.
Enjoy!!
Gluten Free Classic Thanksgiving Gravy
From Tammy Barr, Personal Chef, Change Your Crave
Ingredients:
1 stick butter
4 cups pan drippings from turkey (or see **Options below the recipe)
1 can evaporated milk
1/2 cup brown rice flour
1/2 teaspoon black pepper (I use freshly ground pepper)
Directions:
Drain the pan drippings for the roasted turkey through a fine strainer.
Let sit and then remove any fat from the top of the drippings.
Add in chicken broth or water to make 4 cups if necessary.
In a medium saucepan, melt butter.
Add in black pepper.
Add in 1/2 cup brown rice flour; constantly whisk for about 3 minutes over low heat.
Slowly add in the evaporated milk and then 4 cups turkey broth/drippings; whisk constantly over medium-low heat until bubbly and thickened (about 3 minutes).
Use right away or keep warm over lowest heat setting, whisk again before serving.
**Options: You can use more evaporated milk or drippings to thin out if it’s too thick.
Newly diagnosed as gluten sensitive? Chef Tammy teaches families how to cook terrific gluten free recipes. To schedule an appointment with her, visit ChangeYourCrave.com.
To find the book, Gluten Is My Bitch by April Peveteaux, a humorous and informative book on how to be gluten free, you can find it on Amazon.com by clicking on the link below:
With the craziness of the season, time is a Luxury during the holidays! Simple Solutions Diva’s Laura Morey shares simple tips to make time for what is important for YOU, in a guest blog post on LikeLoveWantNeed.com. Check out her simple tips by clicking on the photo below!