I love finding shortcuts to recipes, and this one is wonderful because the short cut is to use rotisserie chicken from the grocery store (rather than cook the chicken separately!). This yummy dish is easy and delish!
Chicken Enchilada Casserole
Ingredients:
2 cups shredded or chopped deli rotisserie chicken
2 tablespoons chopped fresh cilantro
(1) 15 oz can low-sodium black beans, drained & rinsed
1/2 – 1 teaspoon ground cumin (to taste)
(1) 4.5 oz can chopped green chiles, undrained
(1) 10 oz can enchilada sauce
8 corn tortillas (5 or 6 inch)
1 1/2 cups shredded mexican cheese blend
(1) 8 oz container sour cream
Preparation:
Preheat oven to 375 degrees. Spray a casserole dish (I used 13×9 sized pan) with non-stick cooking spray. Pour a few tablespoons of enchilada sauce in bottom of dish, spreading to cover bottom of dish. Layer four of the tortillas on the bottom of the dish, overlapping if needed.
In a large bowl, mix together the chicken, cilantro, black beans, cumin, and green chilies until well combined.
Pour half of the chicken mixture into the dish. Sprinkle half the cheese over the chicken, half the remaining enchilada sauce, then add the corn tortillas. Do another layer of chicken and cheese, plus add a layer of 1/2 cup sour cream, and finish it off with the remaining enchilada sauce.
Cover with tin foil and bake for 30 minutes. After 30 minutes, remove tin foil and add a sprinkle of cheese and add remaining sour cream. Bake, uncovered, for another 5 minutes.
Remove from oven and allow to set for 10 minutes before devouring!
This recipe I found on One Good Thing By Jillee, a great site with many recipes, projects and more – it is definitely worth a visit!
During the summer, we all want a nice, frosty treat to cool us off — including our dogs! So here is a simple recipe for homemade Frosty Paws for your pup! They will love it!
Homemade Frosty “Faux” Paws Treats For Dogs
Ingredients:
16 oz. container of plain greek yogurt
1 banana, peeled
1 Tablespoon peanut butter
1-2 tablespoons of honey
Preparation:
Place all ingredients into a blend and blend until creamy and mixed thoroughly. Using cooking spray, spray the inside of a cupcake tin. FYI – I used mini-cupcake tins because my dog is small; feel free to use the larger cupcake tins if your dog is on the bigger size!
Pour the mixture into the cupcake tin and freeze until hardened (approximately 4 hours). Pop the “Frosty Faux Paws” out of the tin and place in a freezer bag; return to freezer until ready to use!
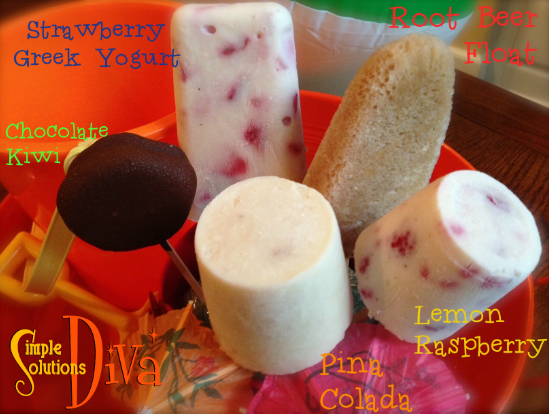
Popsicles are a perfect treat for summertime! Try making these yummy and healthy treats (at least most are healthy!) for your family – they may never want to visit the ice cream truck again!
A variety of homemade & healthy popsicles from SimpleSolutionsDiva.com!
Frozen Chocolate Covered Kiwi Pops
A perfect blend of chocolate and kiwi. These are so simple to make, you will want to make them for yourself and your kids all the time! And you don’t have to feel guilty eating them.
Ingredients:
Kiwi slices, peeled and sliced at least ¼ inch thick.
Baker’s Dipping Chocolate (Any flavor will do, but I used milk chocolate flavor)
Popsicle sticks (You can get these from any crafts store and at some dollar stores)
Preparation:
Insert one popsicle stick into each kiwi slice. Take parchment paper and cover a baking sheet. Place kiwi slices with stick onto parchment paper and freeze. (Approximately 2-4 hours)
Just before you take the kiwi out of freezer, heat the Baker’s Dipping Chocolate according to the package. Take kiwi out of freezer and dip each into the chocolate and place back onto parchment paper. When finished dipping all the kiwi slices, place back into freezer for an hour or feel free to eat it right away!
Strawberry Greek Yogurt Popsicles
Greek yogurt is packed full of protein and low in fat. These treats have awesome flavor AND are filling!
Ingredients:
One 16 oz. container of vanilla greek yogurt. (I used Chobani)
½ cup milk
1/3 cup chopped strawberries
½ teaspoon vanilla
popsicle sticks and molds
Preparation:
In a bowl, combine all the ingredients together, gently stirring in the strawberries. Pour into popsicle molds, insert popsicle sticks and freeze for approximately 4 hours. When removing pops from the mold, either leave out for 5 minutes prior to trying to remove OR run bottom of the molds under hot water for up to one minute.
Makes approximately 5 popsicles.
Pinã Colada Popsicles
These are like the frosty cocktail on a stick, but hold the rum! A creamy treat – and so simple to do!
Ingredients:
1 can light coconut milk
1 small can crushed pineapple, with juice
1 ripe banana
1 teaspoon vanilla
¼ cup shredded, sweetened coconut (optional)
popsicle sticks and molds
Preparation:
Combine all ingredients in a blender and blend until smooth! Pour into pop molds and insert popsicle sticks. Freeze for approximately 4 hours. Makes approximately 6 popsicles.
Lemon Yogurt & Raspberry Popsicles
Another simple recipe – I love the combo of lemon and raspberries! I use greek yogurt, but feel free to use regular yogurt in this recipe for a sweeter flavor.
Ingredients:
2 small (5 oz. each) containers of lemon-flavored greek yogurt (or use regular lemon-flavored yogurt)
½ cup vanilla-flavored almond milk (or use regular milk)
1 Tablespoon honey (optional)
½ cup ripe raspberries
popsicle sticks and molds
Preparation:
In a bowl combine all ingredients – feel free to lightly crush some of the raspberries! It just adds to the beauty and flavor of the popsicle! Pour into pop molds and insert popsicle sticks. Freeze for approximately 4 hours. Makes approximately 4 popsicles.
Root Beer Float Popsicles
The old-fashioned, summertime tradition, but frozen on a stick!
Ingredients:
One bottle of A&W Root Beer (or other favorite root beer!)
Small container of vanilla bean ice cream
popsicle sticks and molds
Preparation:
You want to open the root beer and allow it time to turn somewhat flat. (Approximately 20-30 minutes in the fridge.) If you don’t the molds will overflow when in the freezer!
Place popsicle mold onto a flat baking sheet. Pour the slightly flat root beer into the molds, until molds are ½ full. Place a small scoop of ice cream into the mold. Gently pour more root beer on top of the ice cream. It will foam up – scrape away excess foam as best you can. Insert popsicle sticks and freeze for approximately 4 hours. FYI – They may over flow due to bubbles! Makes approximately 4 popsicles.
Thank you to WTLV-TV’s First Coast Living for having me on!
NOTE: If you don’t have popsicle molds, you can use paper cups as molds. You will still need popsicle sticks.
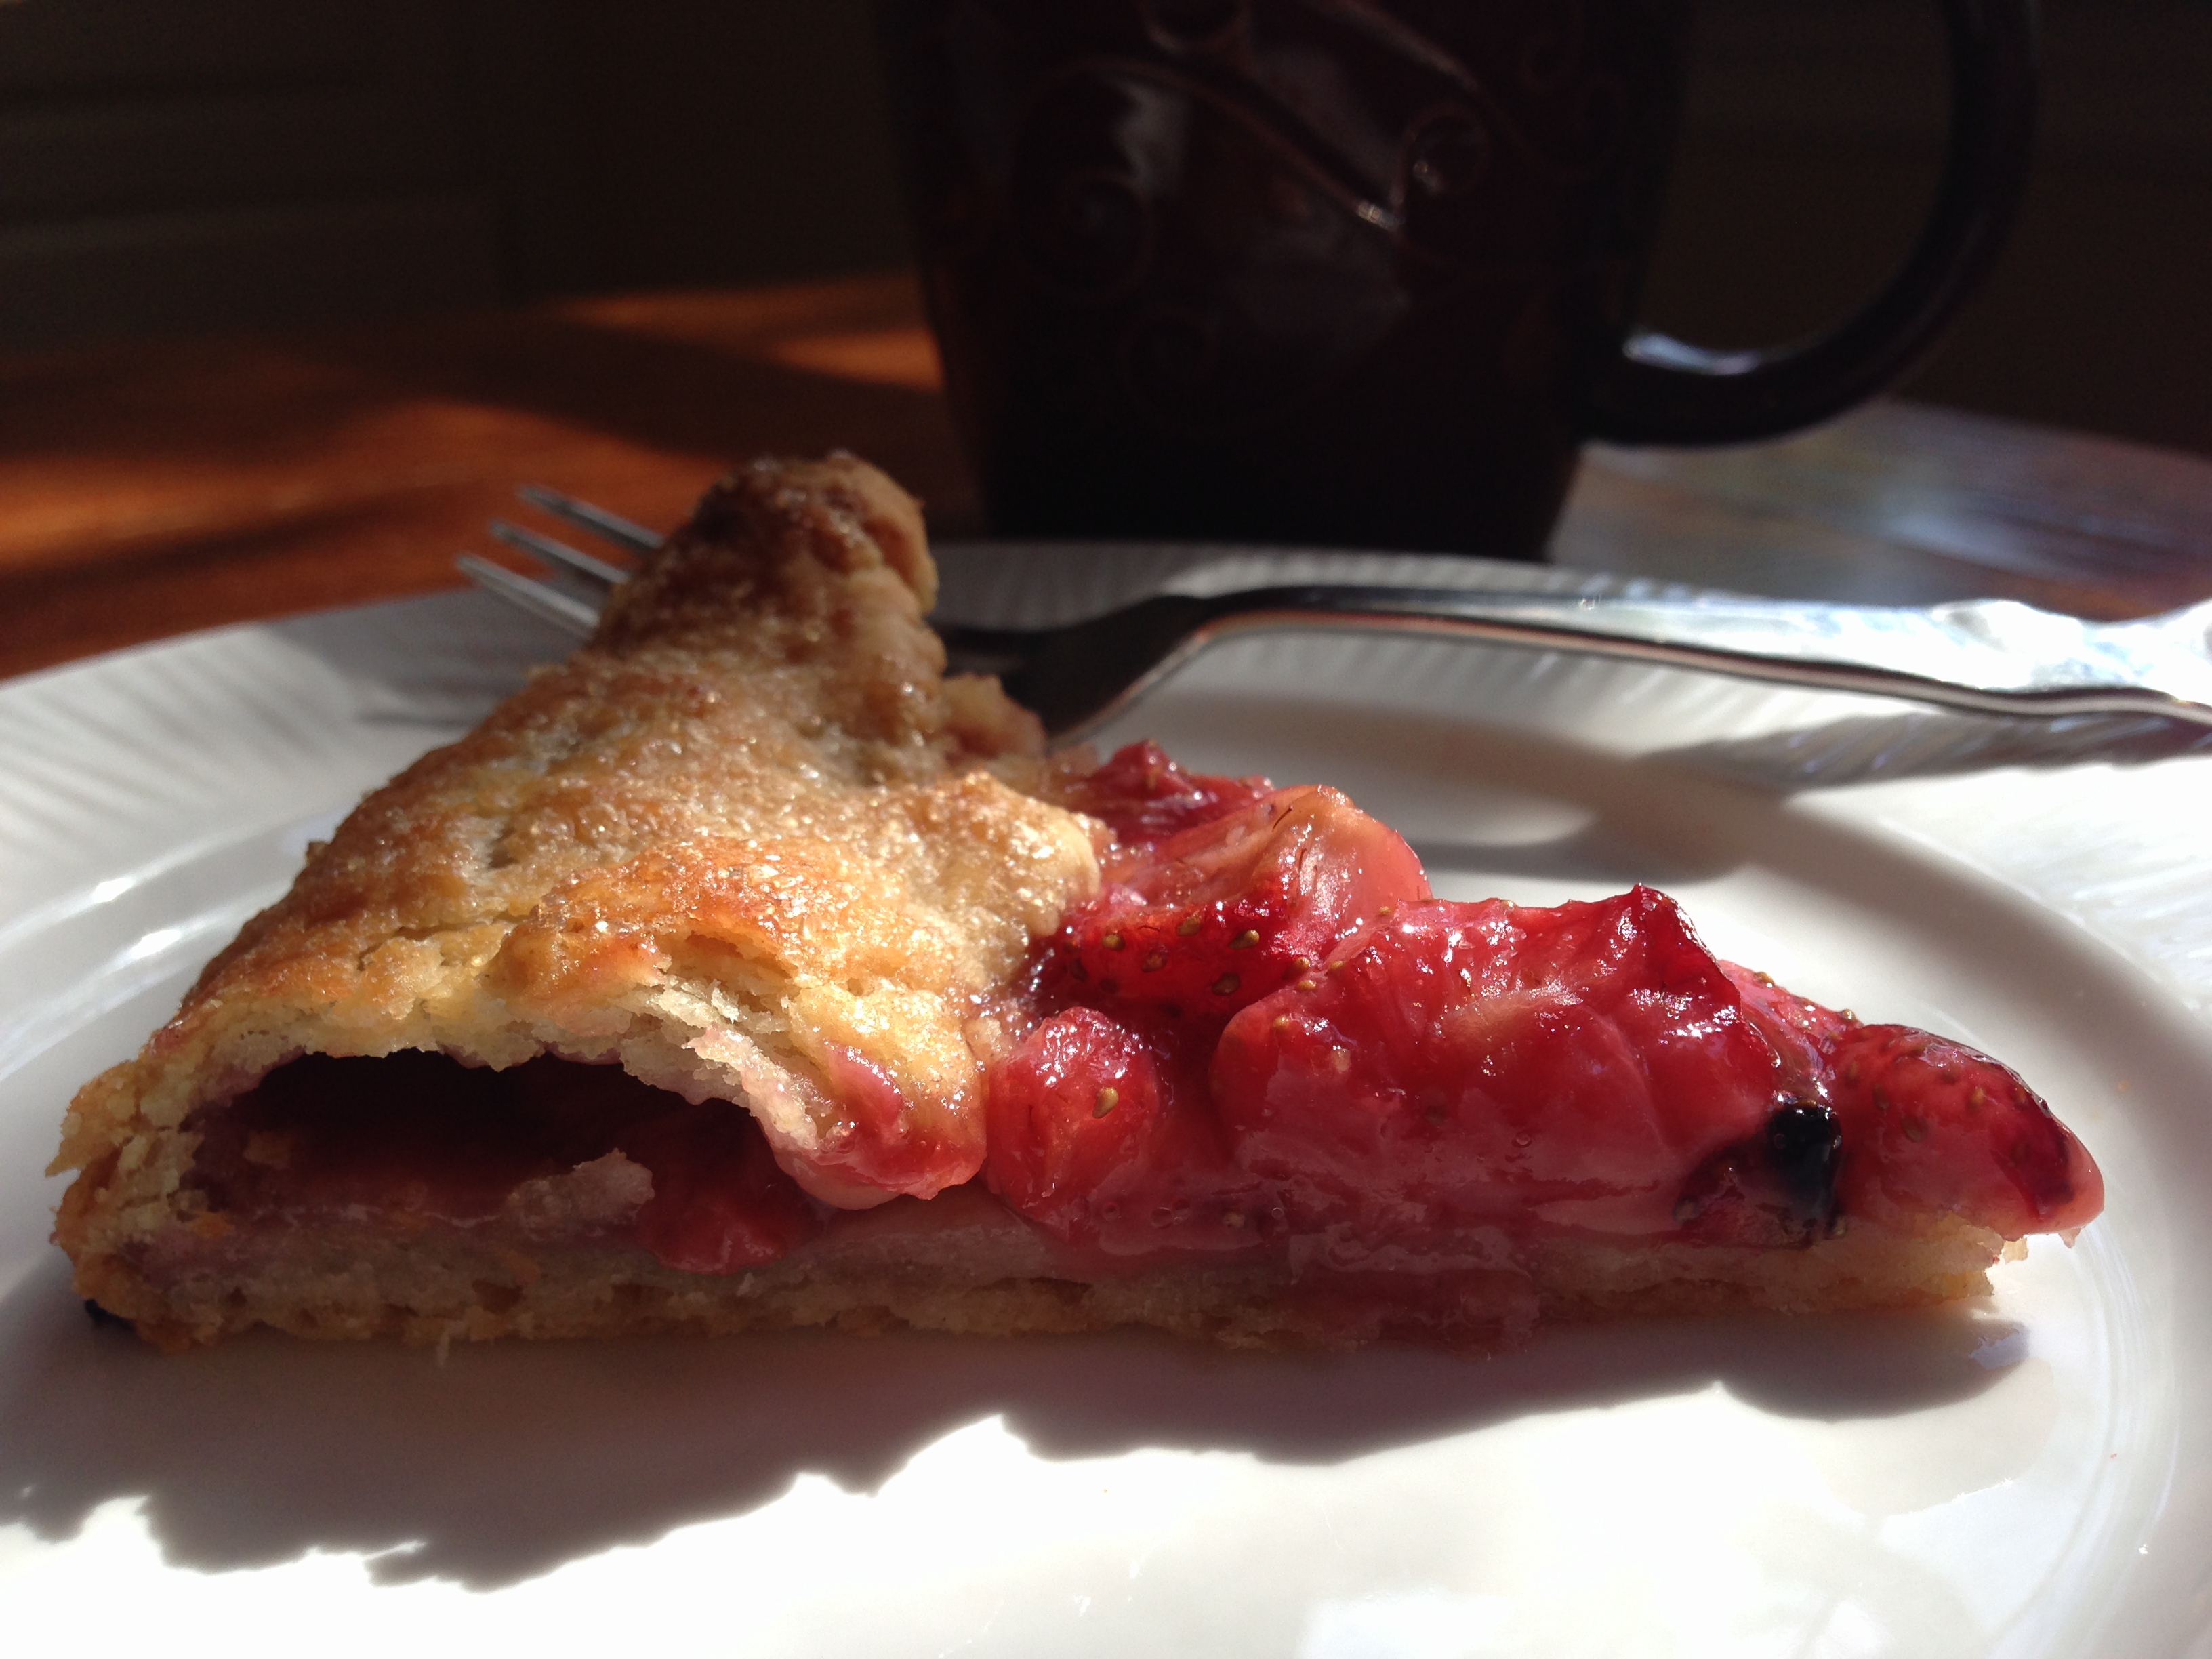
This is the perfect little tart for summer fresh fruit- not too sweet and flaky! Use fresh strawberries, raspberries, or any other favorites like peaches, apples, and more!
Rustic Fruit Tart
Rustic Fruit from SimpleSolutionsDiva.com.
Heat oven to 400 degrees, and if you have one, add a pizza or baking stone on center rack.
Dough:
2 cups flour
pinch of salt
1 tablespoon sugar
1 ½ sticks butter
ice water
Preparation:
Mix flour, salt and sugar. Cut butter into the dough until pieces are size of peas. Sprinkle ice water to moisten dough – does not need to be wet. Turn out onto plastic wrap and press into a disc. Wrap well with and place in fridge for 30 mins.
Fruit Filling:
One Pint Strawberries (hulled and cut into wedges) or other fresh fruit
1-2 tablespoons sugar
1 teaspoon cornstarch
Preparation:
While dough is setting in fridge, toss fruit with sugar and cornstarch. Allow to sit, to let berries get juicy!
Roll out dough on floured surface to approximately 12” diameter circle (remember – this is rustic, not perfect!!). You also don’t want to over-handle or over-roll the dough – butter will melt before you get it in the oven!
Transfer the dough onto sheet of parchment paper (if not using a baking stone, place on parchment lined baking sheet.)
Arrange the fruit filling in the center of dough, allowing about a 1 ½ inch clear space to the edge of the dough. Pull the edges of the dough up and over the filling, being sure not to leave any holes where the juices can leak out during cooking. The look will be rustic, uneven.
Brush the top of the crust with melted butter, cream, or egg white wash (egg white whipped with a little water). Sprinkle turbinado sugar over the crust.
Keeping the dough on parchment paper, place the dough on baking stone in oven and bake for approximately 45 minutes. You may want to rotate once in middle of baking process. Remove from oven when tart is golden. Enjoy!
I love scones, especially ones filled with flavor and fruit! But all the recipes I have found are filled with tons of butter (yummy, but fattening!) and are a lot of work! I found this great recipe from JoyTheBaker.com (actually, thank you to my friend Lisa who sent it to me with high recommendation!) and fell in love with this easy recipe! You can easily adapt this recipe by substituting raspberries or blueberries, or even chopped, dried cranberries and finish with an orange glaze! YUM!
Scrumptious Strawberry Cream Scones
Simple & Scrumptious Strawberry Scones
Ingredients:
3 cups all-purpose flour
1 tablespoon baking powder
1 teaspoon salt
1/3 cup granulated sugar
1 teaspoon pure vanilla extract
1 1/3 to 1 1/2 cups heavy cream plus more for brushing the top
3/4 cup coarsely chopped fresh strawberries
1/3 cup chopped white chocolate (optional- I did not use these in mine)
turbinado sugar for topping
Preparation:
Preheat oven to 425 degrees. Line a baking sheet with parchment paper.
In a medium sized bowl, whisk together the flour, baking powder, salt and sugar.
In a liquid measuring cup, combine the 1 1/3 cup cream and vanilla. Drizzle the cream mixture over the flour mixture, mixing as you go. Add strawberries (and chips if desired) and toss mixture to combine. Add up to 2 tablespoons of cream to the mixture to create a moist, but not sticky, dough.
Turn out the dough onto a clean, floured work surface and roll out to approximately 3/4″ thickness.
Using a small round cookie cutter or biscuit cutter (I improvised by using a small metal ramekin!), flour the cutter and cut small disks of dough. Place on the parchment-lined baking sheet. Brush the tops with cream and sprinkle with turbinado sugar.
Bake for 12-14 minutes, until golden brown and cooked through. Serve warm!
Be sure to check out JoyTheBaker.com – her photos are beautiful and her recipes are great!
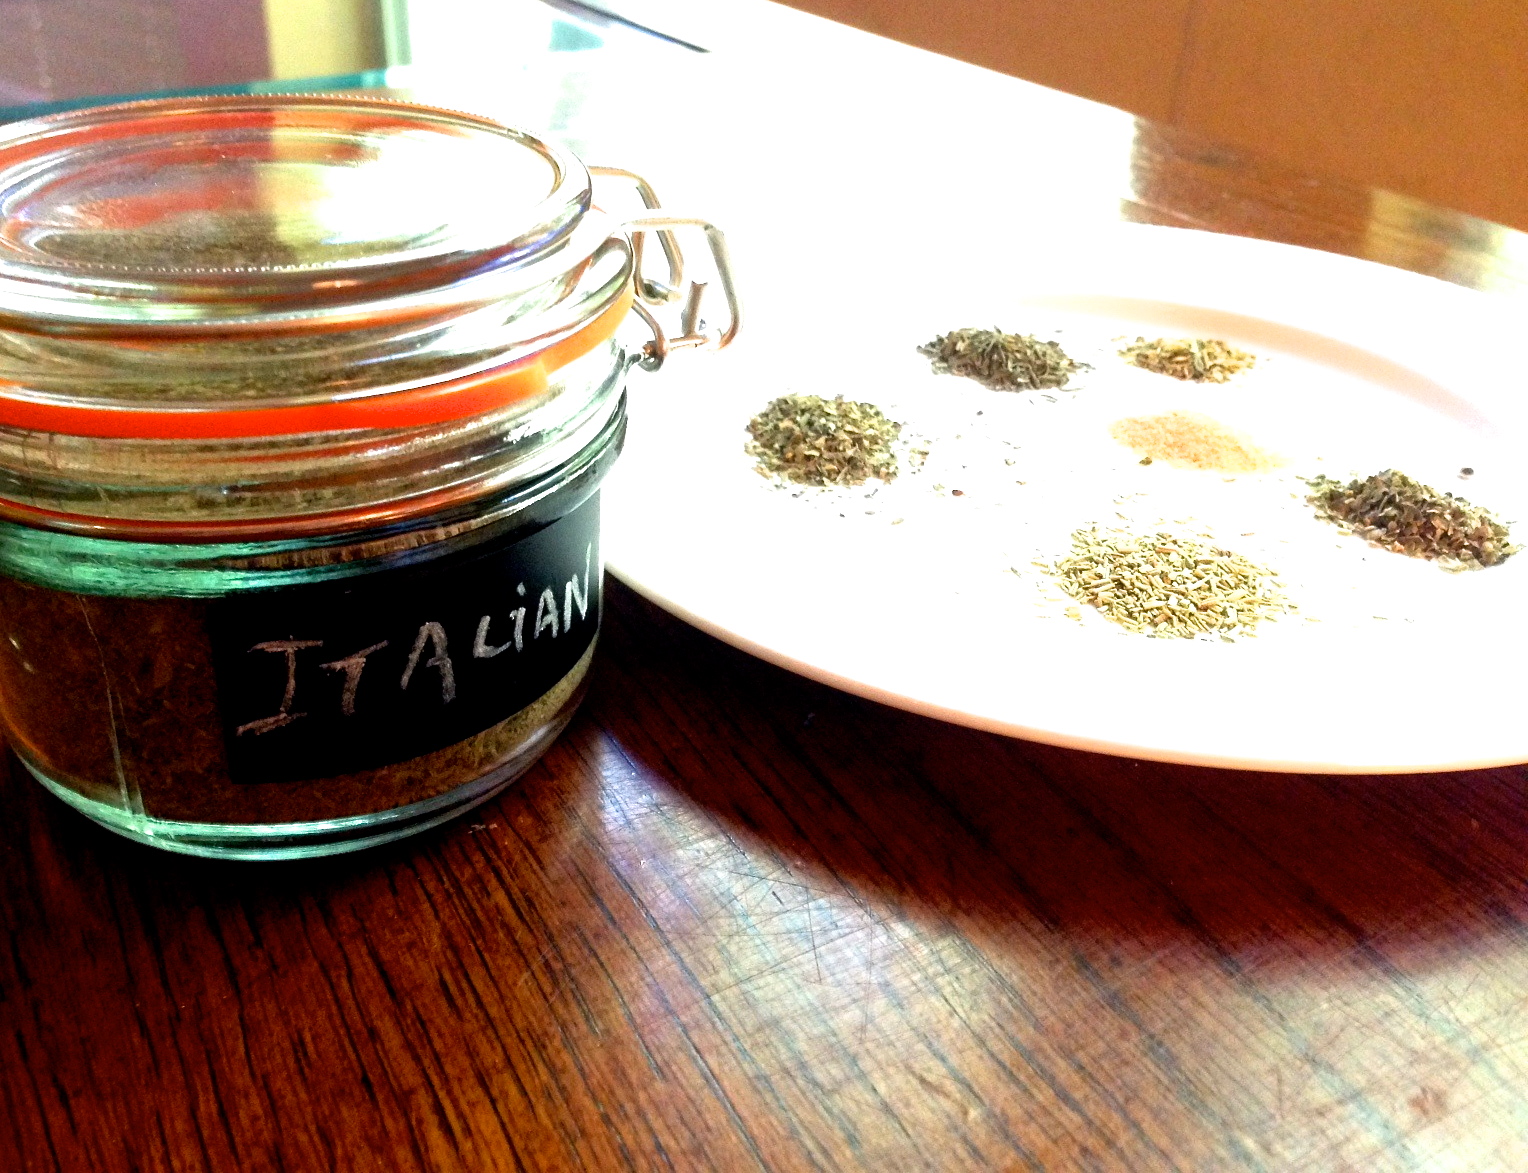
I love using spices when I cook, and I especially love the convenience of pre-packaged spice blends! But when I began looking at the salt content and additives in the packets, I thought there has got to be a better way! So here are five, very flavorful spice blends that will save you on salt and additives. Simple, flavorful and awesome!
Note: All spice blends will stay fresh in air-tight containers for up to 6 months.
Homemade Curry Powder Recipe:
Homemade Curry Blend from SimpleSolutionsDiva.com.
Ingredients:
1/2 cup Paprika
1/4 cup Cumin
1 tablespoon Fennel Powder
2 tablespoons Ground Mustard Powder
1 tablespoon ground Red Pepper Flakes – more or less to taste adds spiciness
3 tablespoons ground Coriander
1/4 cup ground Turmeric root
1 teaspoon Cinnamon Powder
1/2 teaspoon Cloves Powder – Adds complex flavor
Preparation:
Combine all ingredients into an air-tight jar and shake!
Homemade Italian Seasoning
Homemade Italian Seasoning, from SimpleSolutionsDiva.com.
Ingredients:
1/2 cup Basil leaf
1/2 cup Marjoram Leaf
1/2 cup Oregano leaf
1/4 cup cut and sifted Rosemary Leaf
1/4 cup Thyme Leaf
2 tablespoons Garlic Powder
Preparation:
Combine all ingredients into an air-tight jar and shake!
Homemade Ranch Mix
Homemade Ranch Seasoning Mix, from SimpleSolutionsDiva.com.
Mix one tablespoon of this mix with 1/3 cup mayonnaise and 1/4 cup milk or buttermilk. This is also great sprinkled by itself onto fish or chicken before cooking.
Ingredients:
1/4 cup dried Parsley leaf
1 Tablespoon Dill leaf
1 tablespoon Garlic Powder
1 tablespoon Onion Powder
1/2 teaspoon Basil leaf
1/2 teaspoon ground black pepper
Preparation:
Mix all ingredients together in jar or food processor (I used my single serve sized blender!).
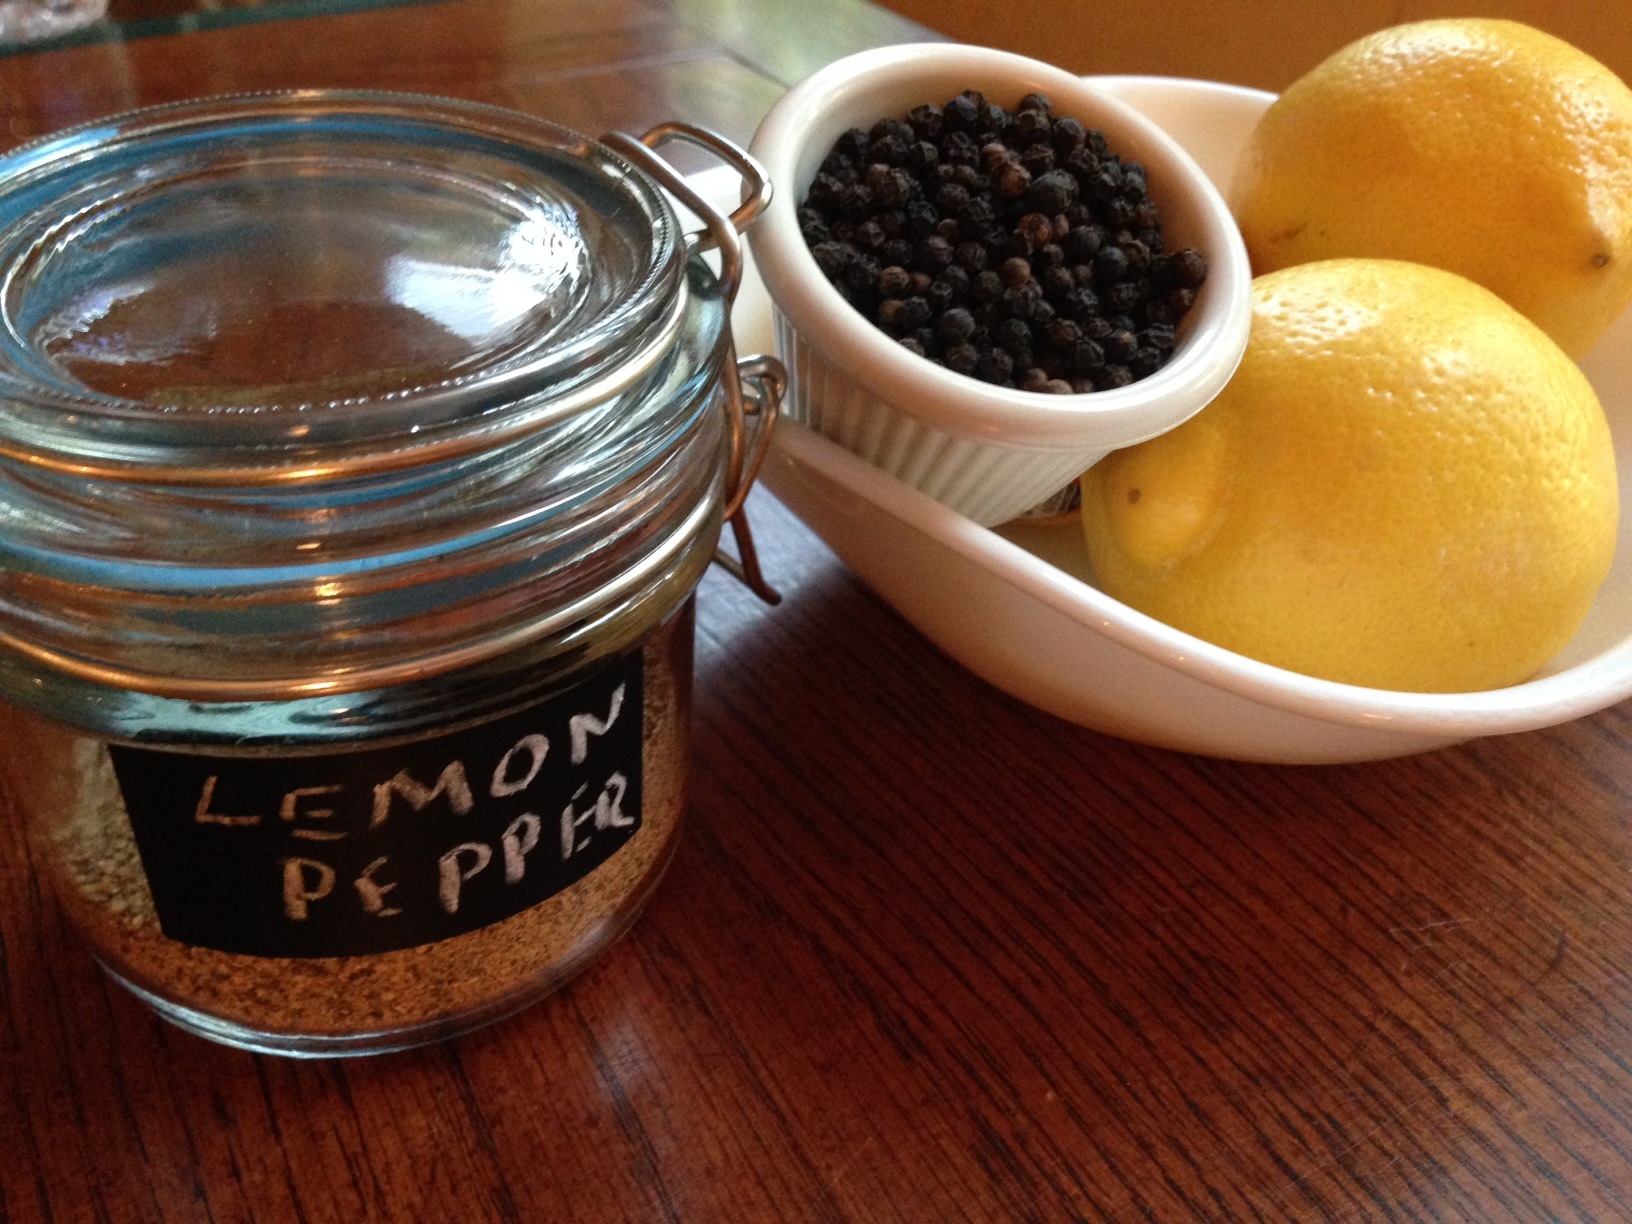
Lemon Pepper Seasoning
Homemade Lemon Pepper Seasoning, from SimpleSolutionsDiva.com.
Ingredients:
1 cup fresh lemon zest (zest approximately 10-12 lemons to get 1 cup)
1/3 cup peppercorns (black or mixed colors)
Preparation:
Place peppercorns in a food processor {or clean coffee grinder} and pulse just a few times until coarsely ground. Combine together in a bowl the fresh lemon zest and ground peppercorns and combine thoroughly. Pour out onto a parchment lined baking sheet and place in oven on lowest setting (mine was lowest at 170 degrees). Bake for about 1 hour or until zest is dried. Place mixture back into food processor and pulse until finely ground.
For ideas on what to do with all those lemons you used to get the zest, check out another Simple Solutions Diva post! (Click Here)
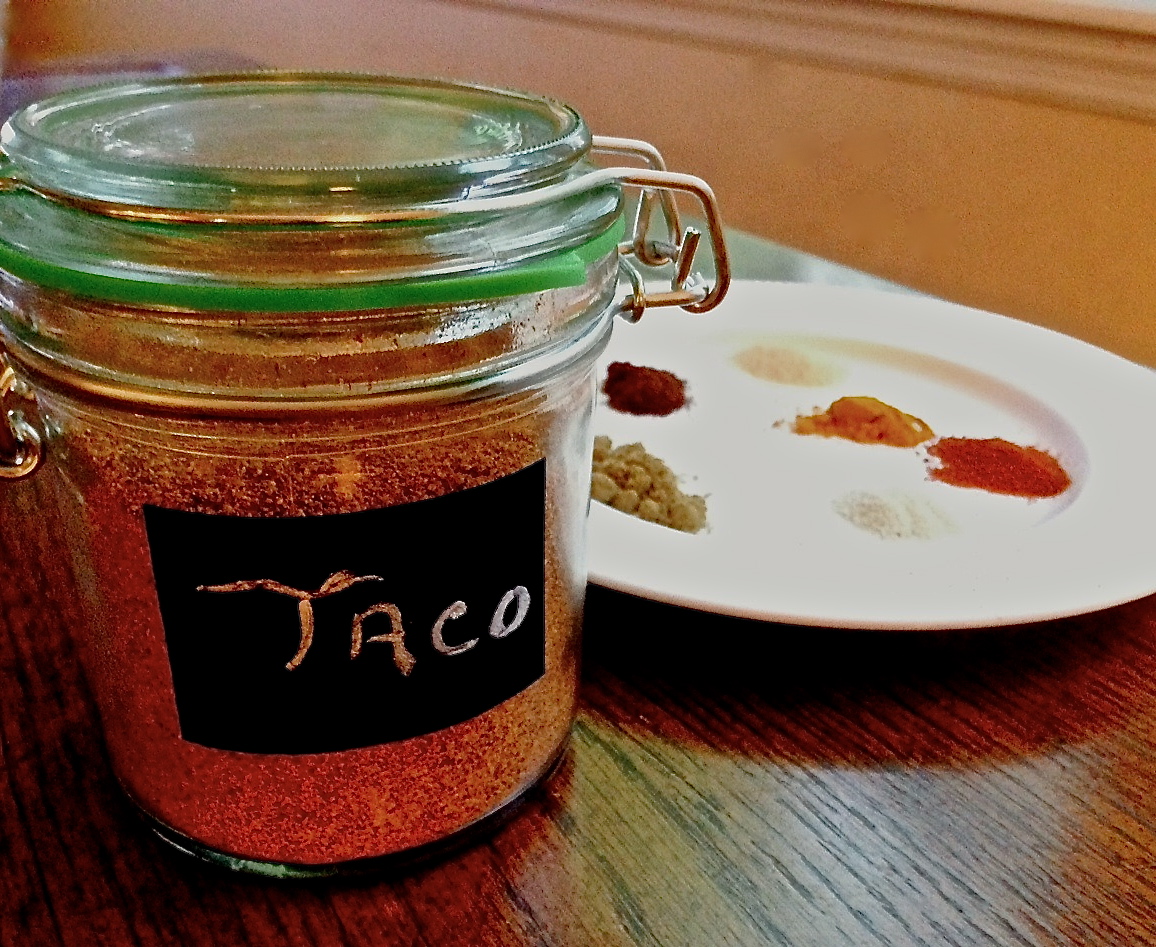
Homemade Taco Seasoning
Click Here to see my zesty, homemade Taco Seasoning recipe!
2 cans (12.4 oz each) Pillsbury flaky cinnamon rolls
1/2 cup butter, melted
1/4 cup sugar
2 eggs
1/2 cup half & half
3 tsp cinnamon
1/4 tsp nutmeg
2 tsp vanilla extract
1/2 cup finely chopped pecans (optional)
Icing from cinnamon rolls
Powdered sugar, if desired
Directions
Preheat oven to 350 degrees. Grease a 9×12 inch casserole dish.
Place butter in a large glass bowl and melt in microwave. Add sugar and mix well. Add in cream, eggs, cinnamon, nutmeg and vanilla.
Open canned cinnamon rolls, slice each cinnamon roll into eighths. Add cinnamon roll pieces into the bowl with the egg mixture and toss to thoroughly coat.
Pour the mixture, into the casserole dish and spread out evenly. Pour any remaining egg mixture over the top.
Sprinkle with pecans (if adding). Bake for 35-40 minutes.
When done, remove from oven. Warm icing from cinnamon roll packages in microwave for 15 seconds; pour evenly over bake. Sprinkle with powdered sugar, if desired.
Enjoy and Happy Mother’s Day!
This simple recipe is from GastRecipes.com – a great site to find some wonderful recipes! Check them out!
This is a simple and tasty way to get veggies into your diet, and maybe even get the kids to like zucchini!
Ingredients
2 zucchini squash, sliced in 1/4 inch slices
1 tablespoon olive oil
1/4 cup fresh grated parmesan cheese
1/4 italian-style bread crumbs (you can use less)
1/8 teaspoon salt
A couple of grinds of fresh ground pepper
1/8 teaspoon garlic powder, if desired
Cooking spray
Preparation
Preheat oven to 450 degrees. Lightly spray a cookie sheet with cooking spray. NOTE: If covering the sheet with tin foil for easy clean up, still use the cooking spray on the tin foil – keeps the chips from sticking!
Place sliced zucchini in a bowl and add olive oil. Mix until zucchini is well coated.
In a large plastic bag, combine the parmesan, bread crumbs, salt and pepper (and garlic, if using). Shake until well combined. Add the zucchini to the bag (in small batches), shaking to coat the zucchini well.
Lay the coated zucchini on the cookie sheet, in single layer. Sprinkle any leftover bread crumb mixture over the zucchini.Place in the oven for 25-30 minutes. Because all ovens are different, be sure to check the zucchini to make sure it does not burn to a crisp! It should be lightly browned and crispy.
Serve warm. You can serve this with ranch dip if you would like. Enjoy!
This recipe is adapted from Food Network. I always love looking at what they have to offer!
Meatless Mondays is a great concept – it’s a movement to get people to be conscious of their meat consumption and potentially reduce their risk for preventable health issues like high cholesterol.
I wanted to create some kid-friendly and simple recipes that will make Meatless Monday easy and stress-free! I hope you like them!
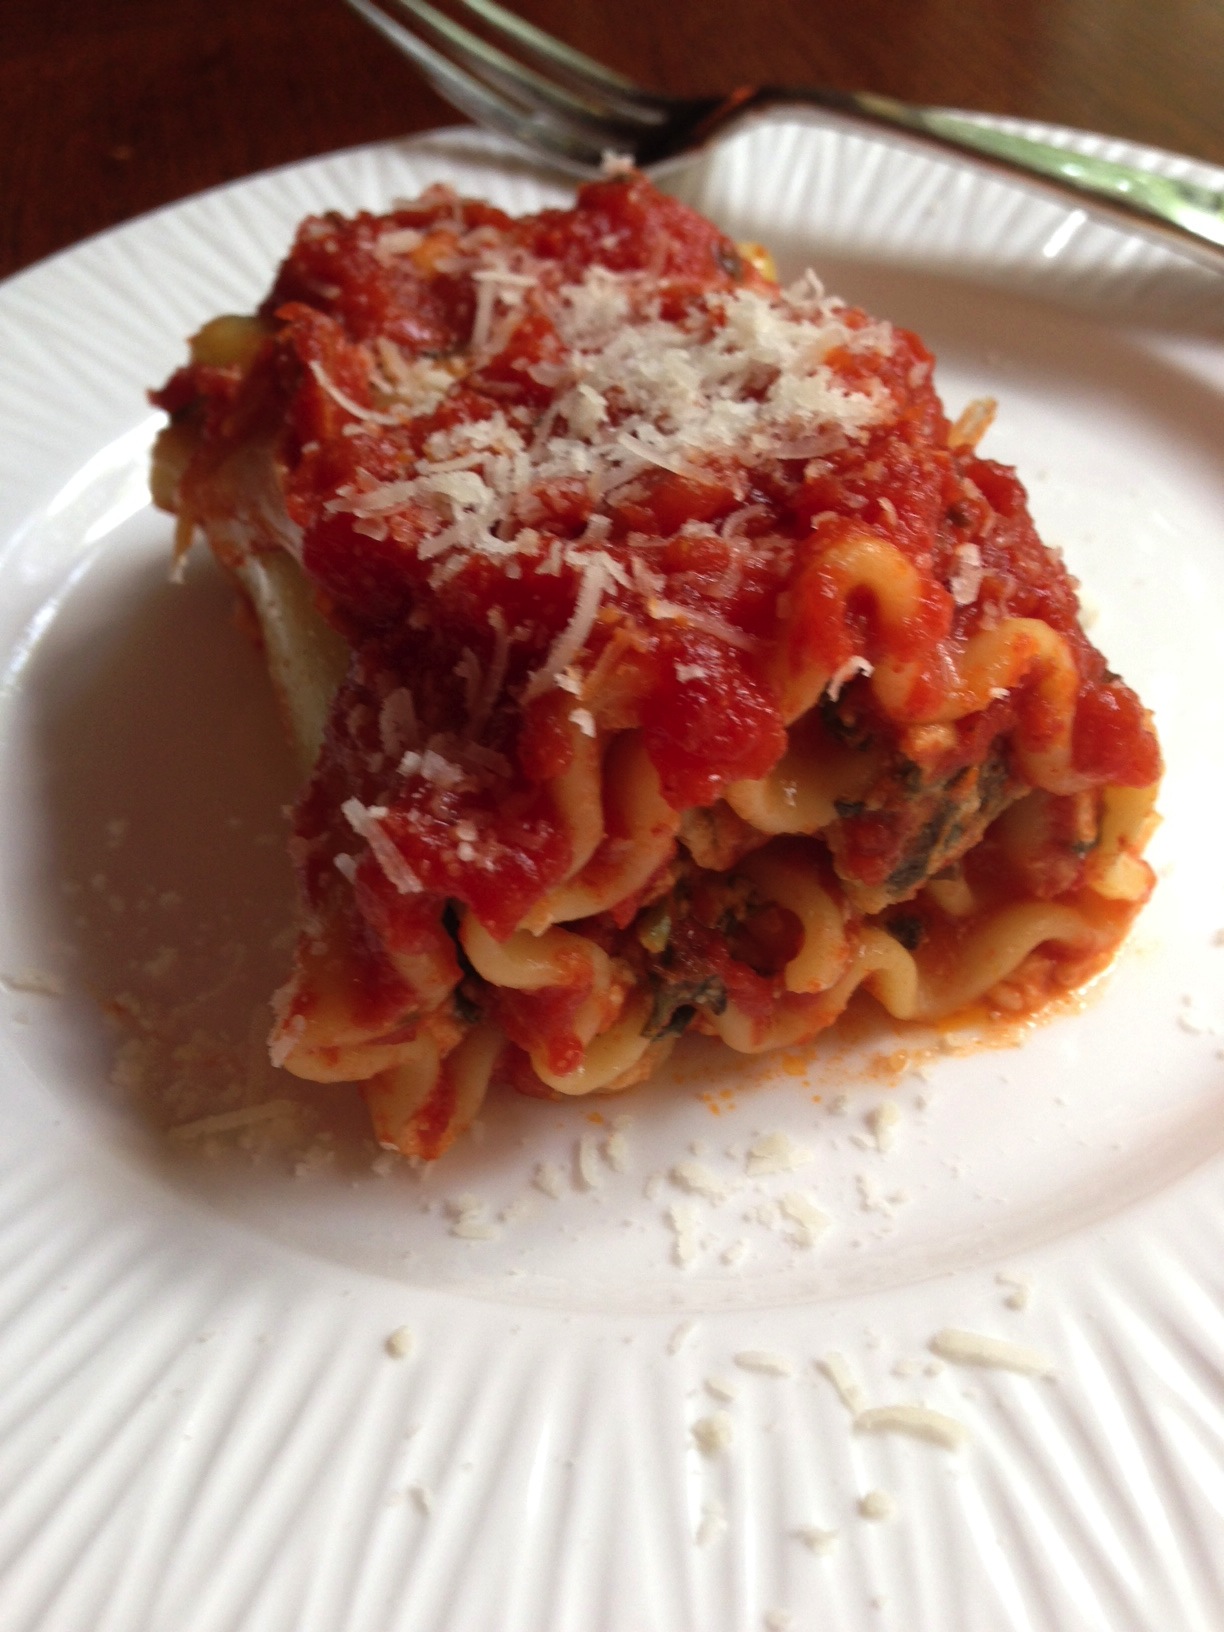
Spinach Lasagna Roll-Ups
Spinach Lasagna Roll-Ups from SimpleSolutionsDiva.com.
These are not only the perfect, single serving size, kids will enjoy making them with you! Besides, who doesn’t like to play with their food? You can assemble this on Sunday, put it in the fridge, and pull it out Monday to cook. Easy Peasy!
Ingredients
One 15 oz. container Ricotta Cheese, part skim (You can substitute cottage cheese)
One cup shredded mozzarella cheese, divided – ½ cup for cheese mixture; ½ cup to sprinkle on top of baked dish
One egg
Salt and pepper to taste
½ teaspoon garlic powder
¼ cup parmesan cheese (I used fresh grated, but you can use packaged to save time!)
1 container of frozen, chopped spinach – thawed and squeezed of liquid.
One box of lasagna noodles, cooked and drained (Note: to keep them from sticking after cooking, toss the cooked noodles with a light drizzle of olive oil).
2 cups marinara sauce – I used prepackaged sauce to make it easy.
Preparation
Preheat oven to 400 degrees. Cook noodles according to the package. Drain and toss with light drizzle of olive oil.
In a large bowl, combine the ricotta, ½ cup mozzarella, parmesan, egg, salt, pepper, and garlic powder. Add the drained, chopped spinach and mix well.
Pour about ½ cup of marinara into the bottom of a baking dish.
On a clean, flat work surface, lay out the noodles. Spread about ¼ cup of cheese mixture onto a noodle, spreading to the edges. You do not want it too thick. Starting at one end, roll the noodle up and place on it’s end in the baking dish. Repeat until you have used all the noodles.
Pour remaining marinara sauce over the top of the lasagna rolls. Cover with tin foil and bake for approximately 40 minutes. Just before it is done, sprinkle remaining mozzarella over top and cook until bubbly.
Stuffed Peppers
Meatless Monday Stuffed Peppers from SimpleSolutionsDiva.com.
My mom used to make these filled with rice and ground beef. I decided to replace the beef with Great Northern Beans – a great way to still get your protein and a very flavorful meal!
Ingredients
4 peppers (I used a combination of yellow, red and green peppers)
1 15 oz. can Bush’s Great Northern Beans, Reduced Sodium
1 15 oz. can diced tomatoes (I like to use the basil oregano flavored)
2 tablespoons olive oil
1 cup onions, chopped
1 clove garlic, minced
½ teaspoon cumin (feel free to add more to taste)
Salt and pepper to taste
2 cups brown or white rice (I used Uncle Ben’s Ready Rice to make it easier)
1 can tomato sauce
Shredded cheddar cheese – as much or as little as you like.
Preparation
Wash and then cut the tops off the peppers. Deseed the peppers. Take the tops of the peppers and chop them up (without the stem).
Pour the can of tomato sauce into the bottom of the baking dish.
In a large pan, sauté the onions, chopped pepper tops and garlic. Add the cumin, tomatoes, salt and pepper, beans, and rice – mix thoroughly. Feel free to add more or as little spices as you want!
Stuff the peppers with the rice mixture. Place the stuffed peppers upright in the baking dish. Place in oven for approximately 40 minutes. Sprinkle the cheese on top of the peppers in the last 5 minutes of cooking.
Serve warm!
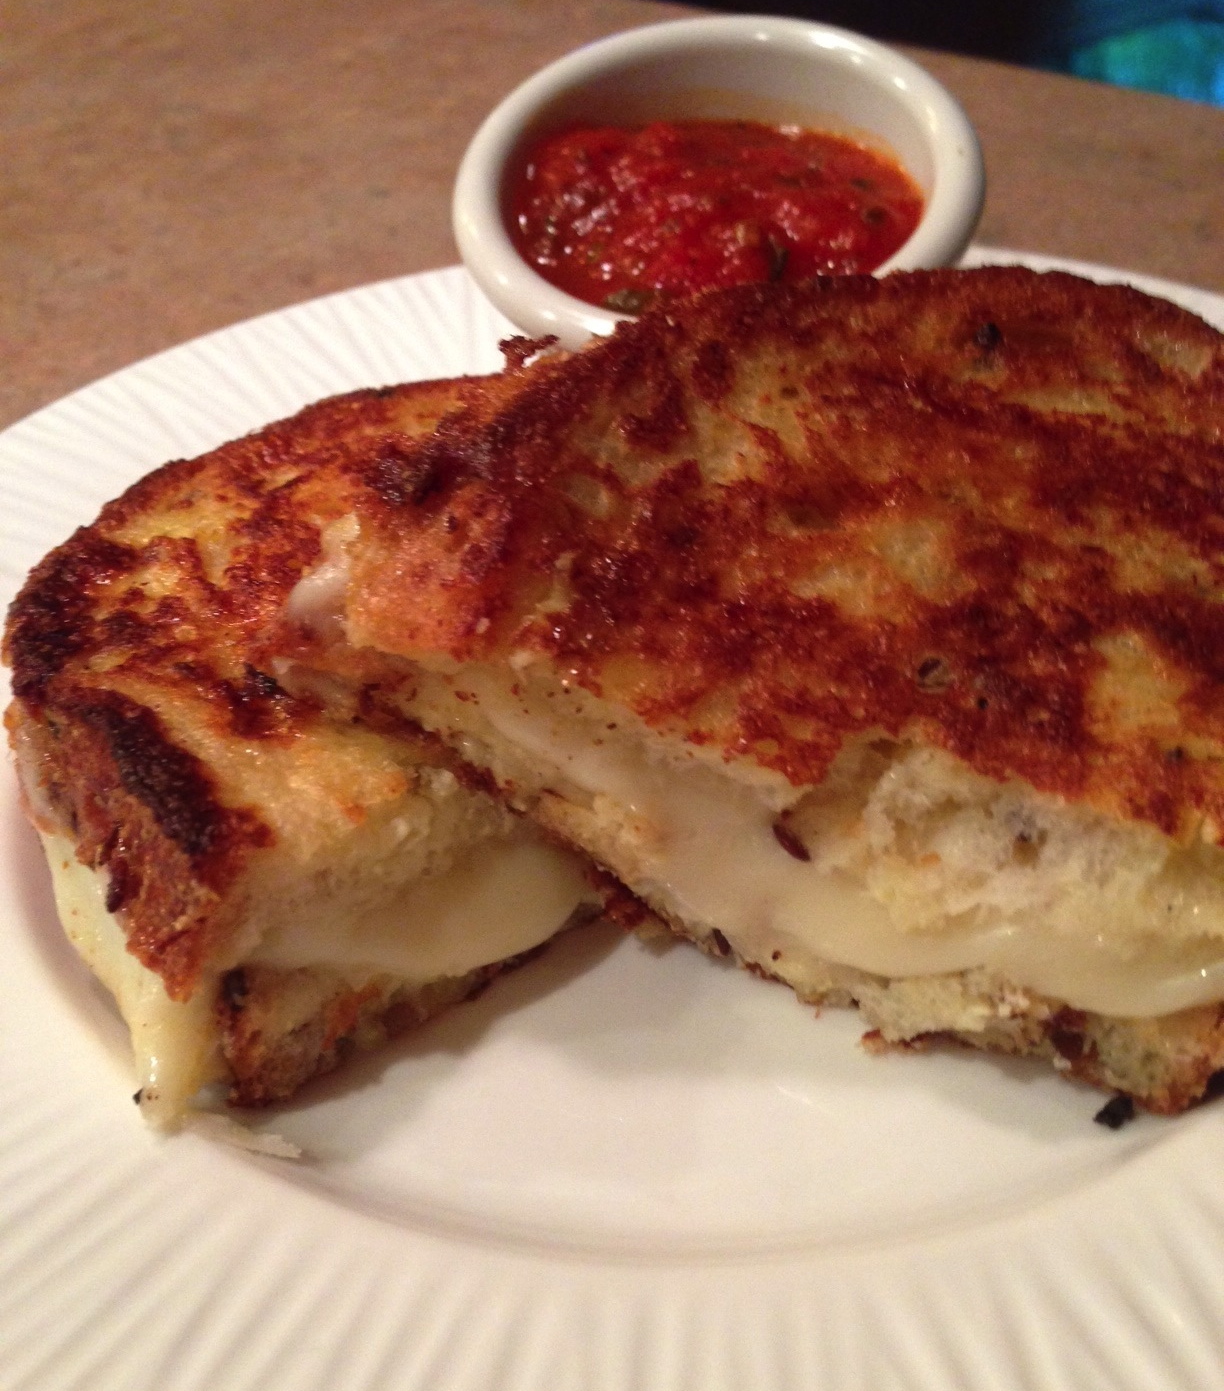
Upgraded Grilled Cheese
UpGraded Grilled Cheese from SimpleSolutionsDiva.com.
This is like having mozzarella sticks in sandwich form!
Ingredients
4 slices crusty bread
4 thick slices mozzarella
1 egg
¼ cup half & half or milk
salt to taste
1 teaspoon olive oil
butter
½ teaspoon minced garlic
Marinara sauce for dipping
Preparation
Make a sandwich with two slices of bread with two large slices of mozzarella; Repeat with second sandwich.
In a bowl, beat the egg, milk/cream, & salt.
In a fry pan, heat olive oil and garlic over medium high heat. Add butter.
Dip the sandwiches in the egg mixture and then place in fry pan. Cook until golden brown on one side (approx. 2 mins.), then flip.
Serve with warm marinara as dipping sauce.
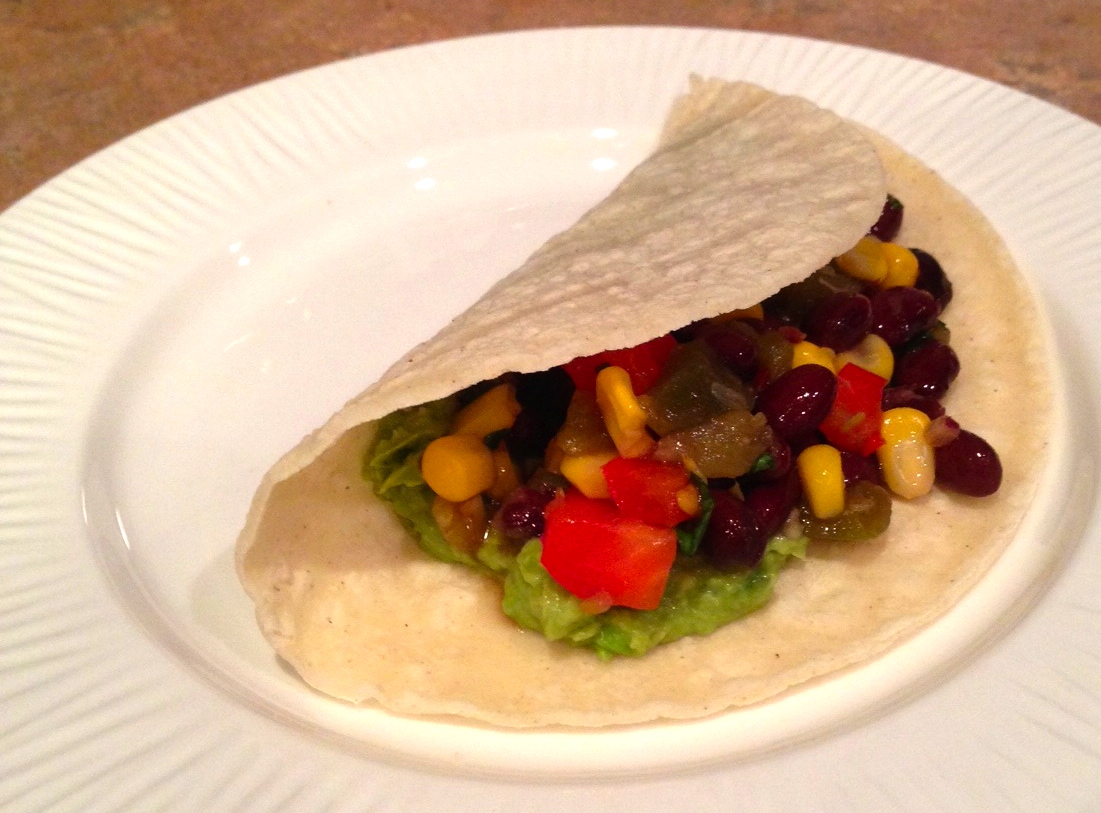
Avocado Tacos
Avocado Tacos from SimpleSolutionsDiva.com.
This is so easy and very tasty! Top these tacos with your favorite taco toppings: sour cream, lettuce, etc.
Ingredients
Corn tortillas
2 Avocados, mashed
Bean, Corn and Red Pepper Salsa (Click here for recipe)
Favorite taco toppings
Preparation
Heat corn tortillas in a fry pan. Add a couple of teaspoons of the mashed avocado, the bean salsa. Add favorite toppings! Enjoy – Yum!
If you would like to see more Meatless Monday recipes, visit my Pinterest Board or visit MeatlessMonday.com. Thank you to WTLV-TV’s First Coast Living for inviting me on to share these recipes!