SimpleSolutionsDiva.com

Simple Recipes

Asian Chicken Lettuce Wraps


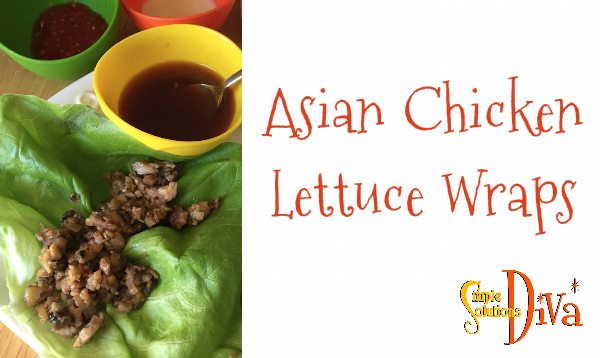
I love going to a restaurant and ordering those light & tasty Asian Chicken Lettuce Wraps! This makes a perfect amount for an appetizer or light lunch – just double the recipe if you want to feed several people!

SSD Wraps Logo
Asian Chicken Lettuce Wraps from SimpleSolutionsDiva.com.


Asian Chicken Lettuce Wraps
 
Prep time
Cook time
Total time
 
These are just like what you get in your favorite Asian Restaurant! Double the recipe for a dinner!
Author:
Recipe type: Appetizer or Light Meal
Cuisine: Asian
Serves: 2.5
Ingredients
  • 2 tablespoons oil
  • 2 cooked boneless, skinless chicken breasts, chopped into small pieces
  • 1 cup water chestnuts, chopped into small pieces
  • ⅔ cup mushrooms, chopped into small pieces
  • 3 tablespoons chopped onions
  • 1 teaspoon minced garlic
  • ASIAN SAUCE:
  • ¼ cup sugar
  • ½ cup water
  • 2 tablespoons soy sauce
  • 2 tablespoons rice wine vinegar
  • 2 tablespoons ketchup
  • 1 tablespoon lemon juice
  • STIR FRY Sauce:
  • 2 tablespoons soy sauce
  • 2 tablespoons brown sugar
  • ½ teaspoon rice wine vinegar
  • CONDIMENTS:
  • 1 tablespoon hot mustard, watered down with 2 teaspoons water
  • 1 -2 teaspoon garlic and red chile paste
  • 4 -5 leaves iceberg lettuce leaves (I used butter lettuce)- rinsed & dried
Instructions
  1. Prep the Asian Sauce and Stir Fry Sauce first: For the Asian Sauce - In a medium bowl, combine the ¼ c. sugar, ½ c. water, 2 T. soy sauce, 2 T. rice wine vinegar, 2 T. ketchup, and lemon juice. Set aside until ready to serve the wraps. Stir Fry Sauce - In a small bowl, combine the Stir Fry Sauce Ingredients (soy sauce, brown sugar, rice wine vinegar).
  2. In a large fry pan, heat oil over medium heat. Add chicken, mushrooms, water chestnuts, onions, and garlic. Cook until the onions are translucent and garlic is fragrant. Add in stir fry sauce. Stir and cook until sauce is absorbed.
  3. To Serve: Divide the asian sauce into small bowls. Use the condiments (hot mustard sauce and chile paste) to spice up and add heat (to your taste preferences) to the asian sauce.
  4. Fill leaves with the chicken mixture, pour asian sauce on mixture and then roll up! Enjoy!


Close up of the Asian Lettuce Wrap!

SSD Lettuce Wraps

Game Day Recipe Round up: Sliders, Sliders, Sliders!

Screen Shot 2016-02-01 at 8.41.21 AM


When it comes to Game Day Foods, there is nothing better than a slider! These petite sandwiches are jam-packed with flavor, yet they are easy to handle with one hand (as you sip your favorite game day beverage with the other hand!).

This is a round up of slider recipes from my site and around the web! I think they are PERFECT for the Big Game!

Game Day Roast Beef Sliders from SimpleSolutionsDiva.com.

Roast Beef and Swiss Sliders: This recipe is currently blowing up Pinterest! I’m getting around 200-300 visitors to my site just to view this recipe! So enjoy it – it’s a good one! Click HERE to go to the recipe!


IMG_9420Grilled Veggie Sliders With Sun-Dried Tomato Pesto SpreadClick HERE.


Screen Shot 2016-02-01 at 4.18.52 PM


Ropa Vieja (Cuban Shredded Chicken) – This Slow Cooker recipe is perfect for serving on slider rolls! Click HERE.


Click HERE to see even MORE Super, Game Day Recipes To Feed A Crowd from SimpleSolutionsDiva.com!

And here are a few other slider recipes from around the web (Click the name of the site to be directed to the recipe):

Turkey Bacon Ranch Sliders from WineAndGlue.com.


Turkey Bacon Ranch Sliders from Wine & Glue.


Smokey Baby Portobello Sliders from VegetarianTimes.com


Smokey Baby Portobello Sliders from VegetarianTimes.com.


Slow Cooker Corned Beef Reuben Sliders from A Southern Soul.


Slow Cooker Corned Beef Reuben Sliders from A Southern Soul.


Philly Cheesesteak Sliders from Home. Made. Interest.


Philly Cheesesteak Sliders from Home. Made. Interest.


Chicken Parmesan Sliders from WillCookForSmiles.com.


Chicken Parmesan Sliders from WillCookForSmiles.com.


Thank you to WTLV-TV/NBC12 First Coast Living for inviting me on to share my favorite slider recipe!

Grilled Veggie Sliders With Sun-Dried Tomato Pesto Spread

With the Super Bowl coming up, I wanted to create a flavorful vegetable slider that would be tasty enough for both my vegetarian teenage daughter and my carnivore friend and family! This hits the spot! Best part about it? You can grill the veggies and make the cheese spread the day before, and then just reheat the veggies and assemble ½ hour before guests arrive!

IMG_9420

This recipe is chock full of beautiful grilled vegetables! I used red, green and yellow peppers, onion and portabella mushrooms, but you can use any kind of veggie that will hold up on the grill – maybe yellow squash or zucchini, asparagus and more!

My beautiful grilled vegetables!


Grilled Veggie Sliders With Sun-Dried Tomato Pesto Spread
 
Prep time
Cook time
Total time
 
Perfect slider recipe for the Super Bowl or any game day party! Hearty AND Healthy!
Author:
Recipe type: Vegetarian Sliders
Cuisine: Vegetarian
Serves: 12 servings
Ingredients
  • 12 Slider buns of your choice, sliced in half
  • 1 onion, sliced into bun-size pieces
  • 1 red bell pepper, sliced
  • 1 green bell pepper, sliced
  • 1 yellow bell pepper, sliced
  • 3 tablespoons olive oil
  • 2 tablespoons balsamic vinegar
  • 2 teaspoons brown sugar
  • ½ teaspoon salt
  • ½ teaspoon pepper
  • ½ teaspoon smoked paprika
  • 4 large Portobello caps, stems removed and quartered
  • 8 ounces cream cheese, room temperature
  • 3 Tablespoons (or more) of sun-dried tomato pesto (or more to taste)
  • 2 cloves roasted garlic
  • 3 Tablespoons grated Parmesan cheese
  • 1 Tablespoon olive oil
Instructions
  1. (You can grill the veggies and prep the spread the day before to make it easier on you the next day!)
  2. Preheat grill to high.
  3. Using a vegetable grill rack or tin foil pan (I like the foil pan for easy cleanup!), spread the vegetables in a single layer. Keep the mushrooms to the side of the pan (they will cook faster than the rest of the veggies).
  4. Combine in a small bowl 2 Tablespoons olive oil, balsamic vinegar, brown sugar, salt & pepper, paprika. Mix thoroughly. Pour oil mixture over the veggies, stirring to coat.
  5. Grill the veggies until slightly charred. (Reminder – keep your eye on the mushrooms! Remove them from the pan when they are done). Set aside in warm oven to keep warm.
  6. In a food processor or blender, combine the cream cheese, tomato pesto, 1 tablespoon olive oil, roasted garlic, and Parmesan cheese. Blend thoroughly. Add more or less tomato pesto based on your taste preference. (I actually used 4 Tablespoons of the tomato pesto sauce to 8 oz. cream cheese).
  7. Now build your sandwiches! Take a split roll, spread the bottom portion of the roll with the sundried tomato spread, add a selection of grilled veggies, drizzle with a little balsamic reduction and put the lid (top part of roll) on top! Arrange on an oven-safe serving platter. Place platter in a warm oven until ready to serve.


Don’t know how to make a balsamic reduction? Check out this easy recipe for a balsamic glaze from Allrecipes.com!


Veggie Sliders 1

One Pan Mexican Quinoa – A Meatless Monday Recipe!


My teenage daughter decided to go vegetarian about 6 months ago, because she loves animals (especially pigs), so I have been trying to find more meals and recipes that will give her the healthy nutrients she needs, give her a little protein, and will fill her up. Quinoa seemed to fit the bill! (1 Cup cooked Quinoa = 8 g. protein, plus it is a complete protein -packing in all nine essential amino acids your body needs.)

Meatless Monday QuinoaI found this recipe and have been making it for a few months now (among other recipes I am testing out). It is a tasty, easy and flavorful Meatless Monday recipe!! I hope you might give it a try!

One Pan Mexican Quinoa - A Meatless Monday Recipe!
 
Prep time
Cook time
Total time
 
A simple and flavorful Meatless Monday recipe to try!
Author:
Recipe type: Meatless Monday recipe
Cuisine: Vegetarian
Serves: 4 servings
Ingredients
  • 1 tablespoon olive oil
  • 2 cloves garlic, minced
  • 1 jalapeno, minced (I used canned)
  • 1 cup quinoa
  • 1 cup vegetable broth (I used chicken broth because my daughter is not strictly vegan)
  • 1 (15-ounce) can black beans, drained and rinsed
  • 1 (14.5 oz) can fire-roasted diced tomatoes
  • 1 cup corn kernels (I used frozen)
  • 1 teaspoon chili powder
  • ½ teaspoon cumin
  • Kosher salt and freshly ground black pepper, to taste
  • 1 avocado, halved, seeded, peeled and diced
  • Juice of 1 lime
  • 2 tablespoons chopped fresh cilantro leaves (Optional if you don't like cilantro!)
Instructions
  1. In a large pan, heat olive oil over medium high heat. Add garlic & jalapeno, and cook, stirring frequently for about 1 minute.
  2. Stir in quinoa, vegetable broth, beans, tomatoes, corn, chili powder and cumin; season with salt and pepper, to taste. Bring to a boil; cover, reduce heat and simmer until quinoa is cooked through, about 20 minutes. Stir in avocado, lime juice and cilantro.
  3. Serve immediately.

Recipe adapted from DamnDelicious.net.

Meatless Monday Mexican Quinoa

Candied Bacon


Candied Bacon – A decadent, indulgent snack that just happens to pair beautifully with cocktails! Plus it is great as a hostess gift, or crumble a little over a nice salad!

SSD Candied bacon

This smells divine as it is cooking in the oven – Be sure to turn the bacon when it is halfway through cooking. And remember, since ovens do vary, begin checking the bacon starting at about 40 minutes into cooking to make sure it doesn’t burn! The bacon will look dark because it will be covered in that yummy spice and brown sugar mixture!

When the candied bacon comes out, rest it on clean paper towels to pull some of the fat away.  This stores best at room temperature!

Candied Bacon
 
Prep time
Cook time
Total time
 
Candied Bacon is a decadent delight! Serve it as a cocktail snack, or crumble it on top of a salad!
Author:
Recipe type: Snack recipe
Serves: 12 servings
Ingredients
  • 12 slices thick cut bacon
  • ½ cup brown sugar
  • 1½ teaspoons chili powder (adjust all spice amounts to your preferences!)
  • ½ teaspoon cumin
  • A sprinkle or 2 of ground cayenne pepper - optional
Instructions
  1. Preheat oven to 300 degrees.
  2. Cover a cookie sheet with tin foil (so you don't ruin the cookie sheet!). place a baking rack on the cookie sheet and spray generously with non stick cooking spray.
  3. Combine the brown sugar and spices on a dinner plate.
  4. Taking one piece of bacon at a time, press the bacon into the brown sugar mixture, making sure you cover both sides.
  5. Lay the pieces on the baking rack.
  6. Bake for 40-60 minutes, turning once halfway through.
  7. NOTE: Ovens do vary, so be sure to check on the bacon regularly as it cooks!


SSD Candied Bacon 2

Apple Pie Sangria

This is a perfect cocktail to serve at Thanksgiving or any Fall event! This makes a large batch – you can cut the recipe in half and have a nice amount for 6-8 people.

SSD Apple Pie Sangria 5

Apple Pie Sangria
 
Prep time
Total time
 
A sweet sangria perfect for Fall events like Thanksgiving! Make the day ahead so all the flavors blend together.
Author:
Recipe type: Cocktail - Large Batch
Cuisine: Cocktails
Serves: 12-16
Ingredients
  • 2 bottle sweet wine, like resiling or muscato
  • 5 cups fresh apple cider
  • 2 cups ginger ale
  • 2 cups caramel flavored vodka
  • 3 honey crisp apple, cored & chopped
  • 3 pears, cored & chopped
  • 2 cinnamon sticks
Instructions
  1. In a large serving container, add the pears and apples. Add the remaining ingredients, except for the cinnamon sticks. Stir well and cover. Refrigerate overnight (or at least 6 hours).
  2. About 4 hours before serving, add the cinnamon sticks.
  3. Optional: Remove a cup or two of the apples and pears and place in bowl to add to glasses. (Keep in mind, the fruit is now soaked in alcohol, so don't give to kids or pets!)
  4. Serve over ice!


SSD Apple Pie Sangria 4SSD Apple Pie Sangria 1

Hot Fudge Pudding Cake


This recipe is a taste of my childhood. I used to make this with my mother when I was a little girl and I thought it was magic! Cake on the top; Pudding on the bottom!

I’ve made a few changes to the recipe (including a name change to reflect what my kids call it), but I still cherish the handwritten recipe from 50 years ago.


SSD hot fudge pudding cake 2


Hot Fudge Pudding Cake
 
Prep time
Cook time
Total time
 
This is a delight for chocolate lovers - rich chocolate cake on top, with chocolate pudding on the bottom!
Author:
Recipe type: Dessert
Serves: 8 servings
Ingredients
  • 1¼ cups granulated sugar, divided
  • 1 cup all-purpose flour
  • ½ cup Hershey’s Cocoa, divided
  • 2 teaspoons baking powder
  • ¼ teaspoon salt
  • ½ cup milk
  • ⅓ cup unsalted butter, melted (5⅓ tablespoons butter)
  • 1½ teaspoons vanilla extract
  • ½ cup packed brown sugar
  • 1¼ cups hot water
  • Vanilla Bean ice Cream for Serving, if desired
Instructions
  1. Preheat oven to 350 degrees. Heat a pot of water on the stove to very hot (just under a simmer).
  2. In a large bowl, combine ¾ cup of the granulated sugar, flour, ¼ cup of the cocoa, baking powder and salt. Stir in milk, melted butter and vanilla and mix until smooth.
  3. Pour the batter into an lightly greased 2-quart ceramic dish (or you can use a 9-inch square baking pan). Spread batter evenly.
  4. In a small bowl, stir together the remaining ½ cup granulated sugar, brown sugar, remaining ¼ cup cocoa and mix well. Sprinkle this mixture evenly over the batter in your dish or pan. Pour the hot water over the top – but do not stir!
  5. Bake 35-40 minutes if using a glass dish (or 30-35 minutes if using a metal pan). Remove from the oven and allow it to stand for 15 minutes.
  6. After 15 minutes, spoon the cake into individual serving bowls – making sure to spoon the fudgy sauce from the bottom of the pan over the top of the cake. Add a scoop of vanilla ice cream if desired and serve immediately.


SSD Hot Fudge Pudding Cake

Simple Apple Cake

I kick off this month of being Thankful For The Season! And today, I am Thankful for Apples!

If you love apples and cinnamon, and you like things simple, this is the cake for you!! Serve it warm with vanilla ice cream, or drizzle with your favorite cream cheese glaze!

Simple Apple Cake from SimpleSolutionsDiva.com

Simple Apple Cake
 
Prep time
Cook time
Total time
 
Full of apple and cinnamon!
Author:
Recipe type: Baking
Cuisine: Cake
Serves: Approx. 16 servings
Ingredients
  • 2 Eggs
  • 1¾ Cup Sugar
  • 2-3 Heaping teaspoons of Cinnamon
  • ½ Cup Vegetable Oil
  • 6 Medium Gala, Fuji or Honey Crisp Apples
  • 2 Cups Flour
  • 2 teaspoons Baking Powder
Instructions
  1. Preheat oven to 350 degrees.
  2. In a large bowl, mix together the eggs, sugar, cinnamon and oil.
  3. Peel and slice the apples, and add to the mixture in the bowl.
  4. Mix together the baking powder and the four, then add to the bowl. Mix everything together thoroughly.
  5. Pour into 2 greased 9 " cake pans (or one greased 9x13" pan). Bake for approximately 55 minutes until a toothpick inserted in center comes out clean.
  6. Serve warm plain OR with vanilla ice cream! Enjoy!


Super Easy Halloween Party Foods

It is the day before Halloween, and you get invited at the last minute for a Halloween Party. You need to bring something to share, but you want to do something easy! Try one of these simply ghoulish treats – they are tasty, easy to make, and are kind of creepy! They are so easy, the kids can even make them!

SSD Halloween Party Foods


Spider Eggs

These are the EASIEST food to bring by far! It is as simple as getting powdered donut holes, stacking them on a plate or bowl, and placing plastic spiders around and on the donut holes. (If there are little kids at the party, they need to be supervised so they don’t eat the spiders!)

SSD Spider eggs


Witch’s Broom

Another super simple, little party treat! Reese’s minis, unwrapped and placed upside down on a serving plate. Insert into what is now the top of the Reese’s (actually the bottom), insert a small pretzel stick. Easy Peasy! (Note: You may want to use a toothpick to make a small hole first – the size of the pretzel stick may crack the Reese’s – as seen below!)

SSD Witch Broom


“Blood-Splattered” Cupcakes

You can make your own, or use store-bought, white frosted cupcakes for this treat! Using red GEL food coloring (it adds a little thickness to the “blood”), squeeze into a small bowl and add a little water. Take a BRAND NEW toothbrush (use an old one? YUCK!), dip it into the red mixture, then splatter the cupcakes with it. Looks gruesome! (Be sure to not wear a white or other light colored shirt – protect your shirt while doing this!)

SSD Blood cupcake


Pumpkin Pizza

No, not pumpkin flavored pizza, just pizza decorated to look like a Jack-0-Lantern! Take any frozen, round cheese pizza and add toppings (choose your favorites) to decorate! Here is a great example from the Papa Murphy’s Restaurant website:

Pumpkin Pizza: Photo Courtesy of Papa Murphy's Restaurant.
Pumpkin Pizza: Photo Courtesy of Papa Murphy’s Restaurant.


Spider Dogs

These cute little guys are probably the most time consuming of the bunch here(it took me 10 minutes to whip up and assemble them), but they are just so cute! Preheat your oven to 400 degrees. Cover a cookie sheet with parchment paper. Start with one hot dog (one hotdog will make 4 spider dogs), slice it length-wise. Cut each length in half. See illustration below:

hot dog

Lay each quarter dog flat. Slice 3 slits on each end of the quarters (leaving about 1/2 inch or so solid in the middle. These will make the eight legs for the spiders!

Using crescent roll dough, take slices of the dough and wrap around the middle of each spider and place on the parchment paper covered cook sheet. Black sesame seeds make the eyes. Place in the oven for 8-12 minutes, until the spiders are light brown (ovens will vary so be sure to watch them!).

SSD spider dogs


Thank you to WTLV-TV’s First Coast Living for inviting me on to share these simple Halloween recipes!

Pumpkin Peanut Butter Oatmeal Dog Biscuits

The month of October offers a HUGE variety of pumpkin treats for us humans, but don’t forget your dog likes pumpkin, too! These are the easiest dog biscuits to make and they are simple ingredients your dog will love! Plus, you can feel good feeding these to your pup! (My taste-tester, Maisie, LOVED them!)


Maisietreats


Pumpkin Peanut Butter Oatmeal Dog Biscuits
 
Prep time
Cook time
Total time
 
Dogs love pumpkin, so you can feel good about giving them this tasty treat!
Author:
Recipe type: dog biscuits
Cuisine: Dog food
Serves: 24 biscuits
Ingredients
  • 3 cups oats
  • ½ cup peanut butter
  • 1 cup pumpkin puree
  • 1 teaspoon cinnamon
  • 1 teaspoon baking powder
  • 2 eggs
Instructions
  1. Preheat oven to 375 degrees.
  2. Place the oatmeal into a food processor or blender and pulse it so it is not coarse (it does not need to be as fine as flour.)
  3. In a large bowl, add oatmeal, pumpkin, peanut butter, cinnamon, baking powder, and eggs. Using a hand mixer, blend on medium until it is thoroughly mixed.
  4. On a clean work surface, sprinkle a little flour and roll out the dough to ¼ - ½ inch thick. NOTE: Dough will be sticky, so have a little flour on hand to sprinkle on. Cut with cookie cutters.
  5. Place on a cookie sheet and bake for 15-20 minutes (ours took 18 minutes).
  6. Cool on rack until completely cooled.
  7. Place in airtight container to keep them fresh, or in the freezer.


FullSizeRender 2


This recipe is from CreatedBy-Diane.com – Definitely make it a point to visit her site – she has SO MANY recipes (Including ones for humans!) and they all look terrific!!


Maisie2


1 2 3 4 5 15

© 2015 SIMPLESOLUTIONSDIVA.COM Designed by The Web Design Chic | ADMIN LOGIN