SimpleSolutionsDiva.com

Simple Ideas

How To Make Veggie Noodles


Veggie Noodles
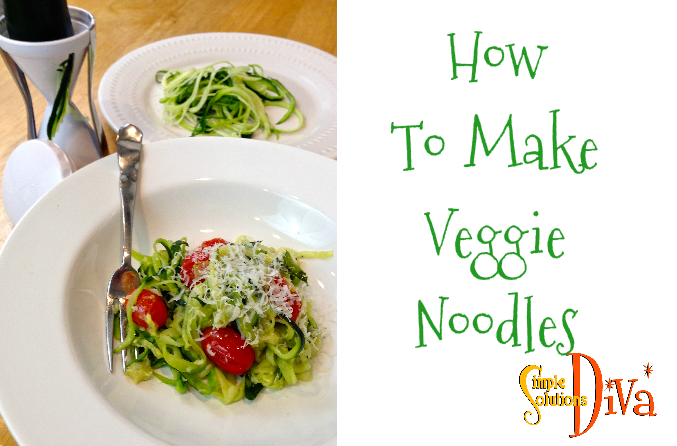
Vegetable Noodles are all the rage right now! Search “Vegetable Noodle Recipes” on Pinterest and you will find hundreds of recipes! (And click here to see them all!)  But is there a simple way to MAKE them? YES!

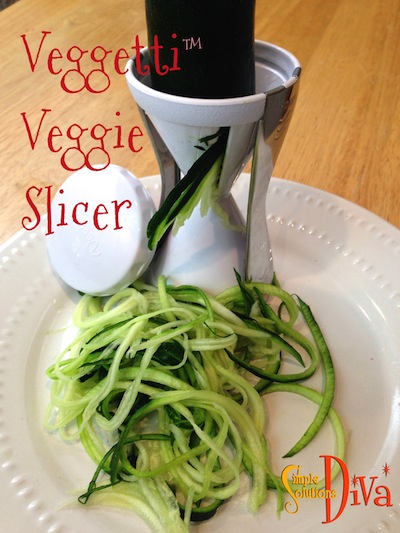
By using a specific product made to create those lovely noodles! There are many out there, some expensive, some inexpensive. I am using the Veggetti™ (I got mine at Bed, Bath & Beyond). You can find it here if you are having trouble finding one –Veggetti Spiral Vegetable Slicer, Makes Veggie Pasta

Veggetti Slicer

Now that you have these noodles, what do you do with them? Make all kinds of wonderful dishes! I found one recipe I loved on WhatsGabyCooking.com. Be sure to check out her website!

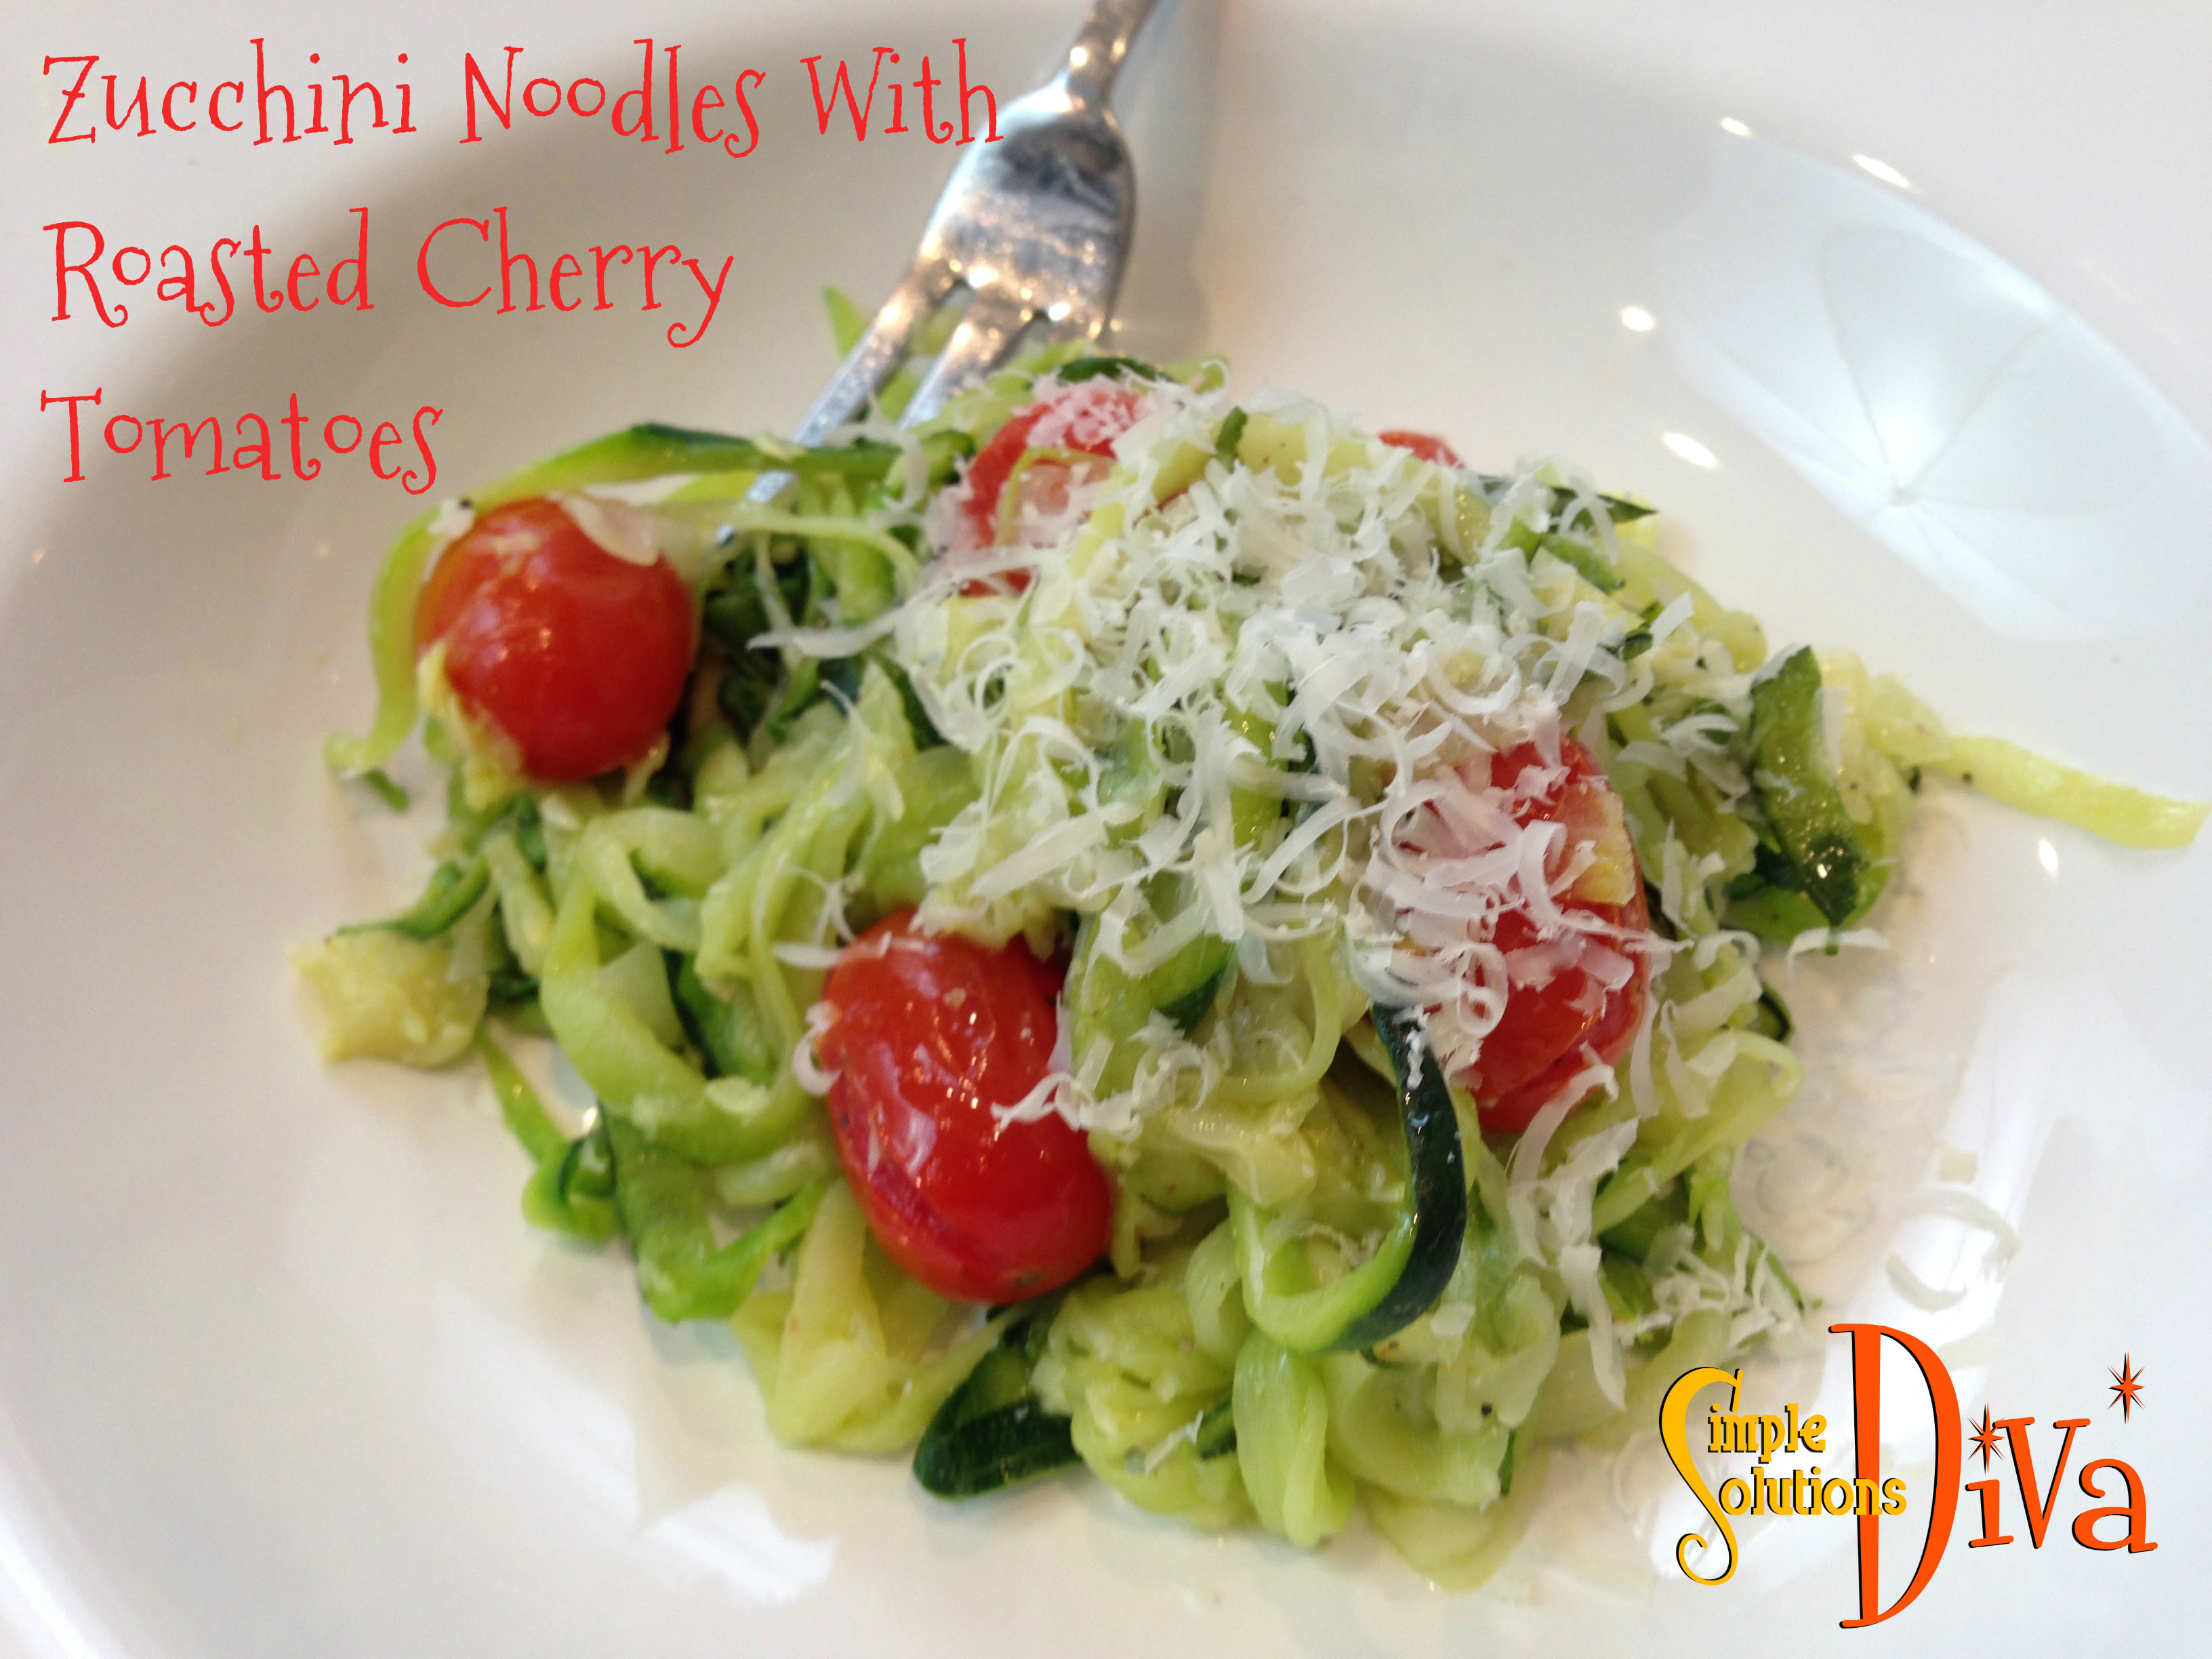
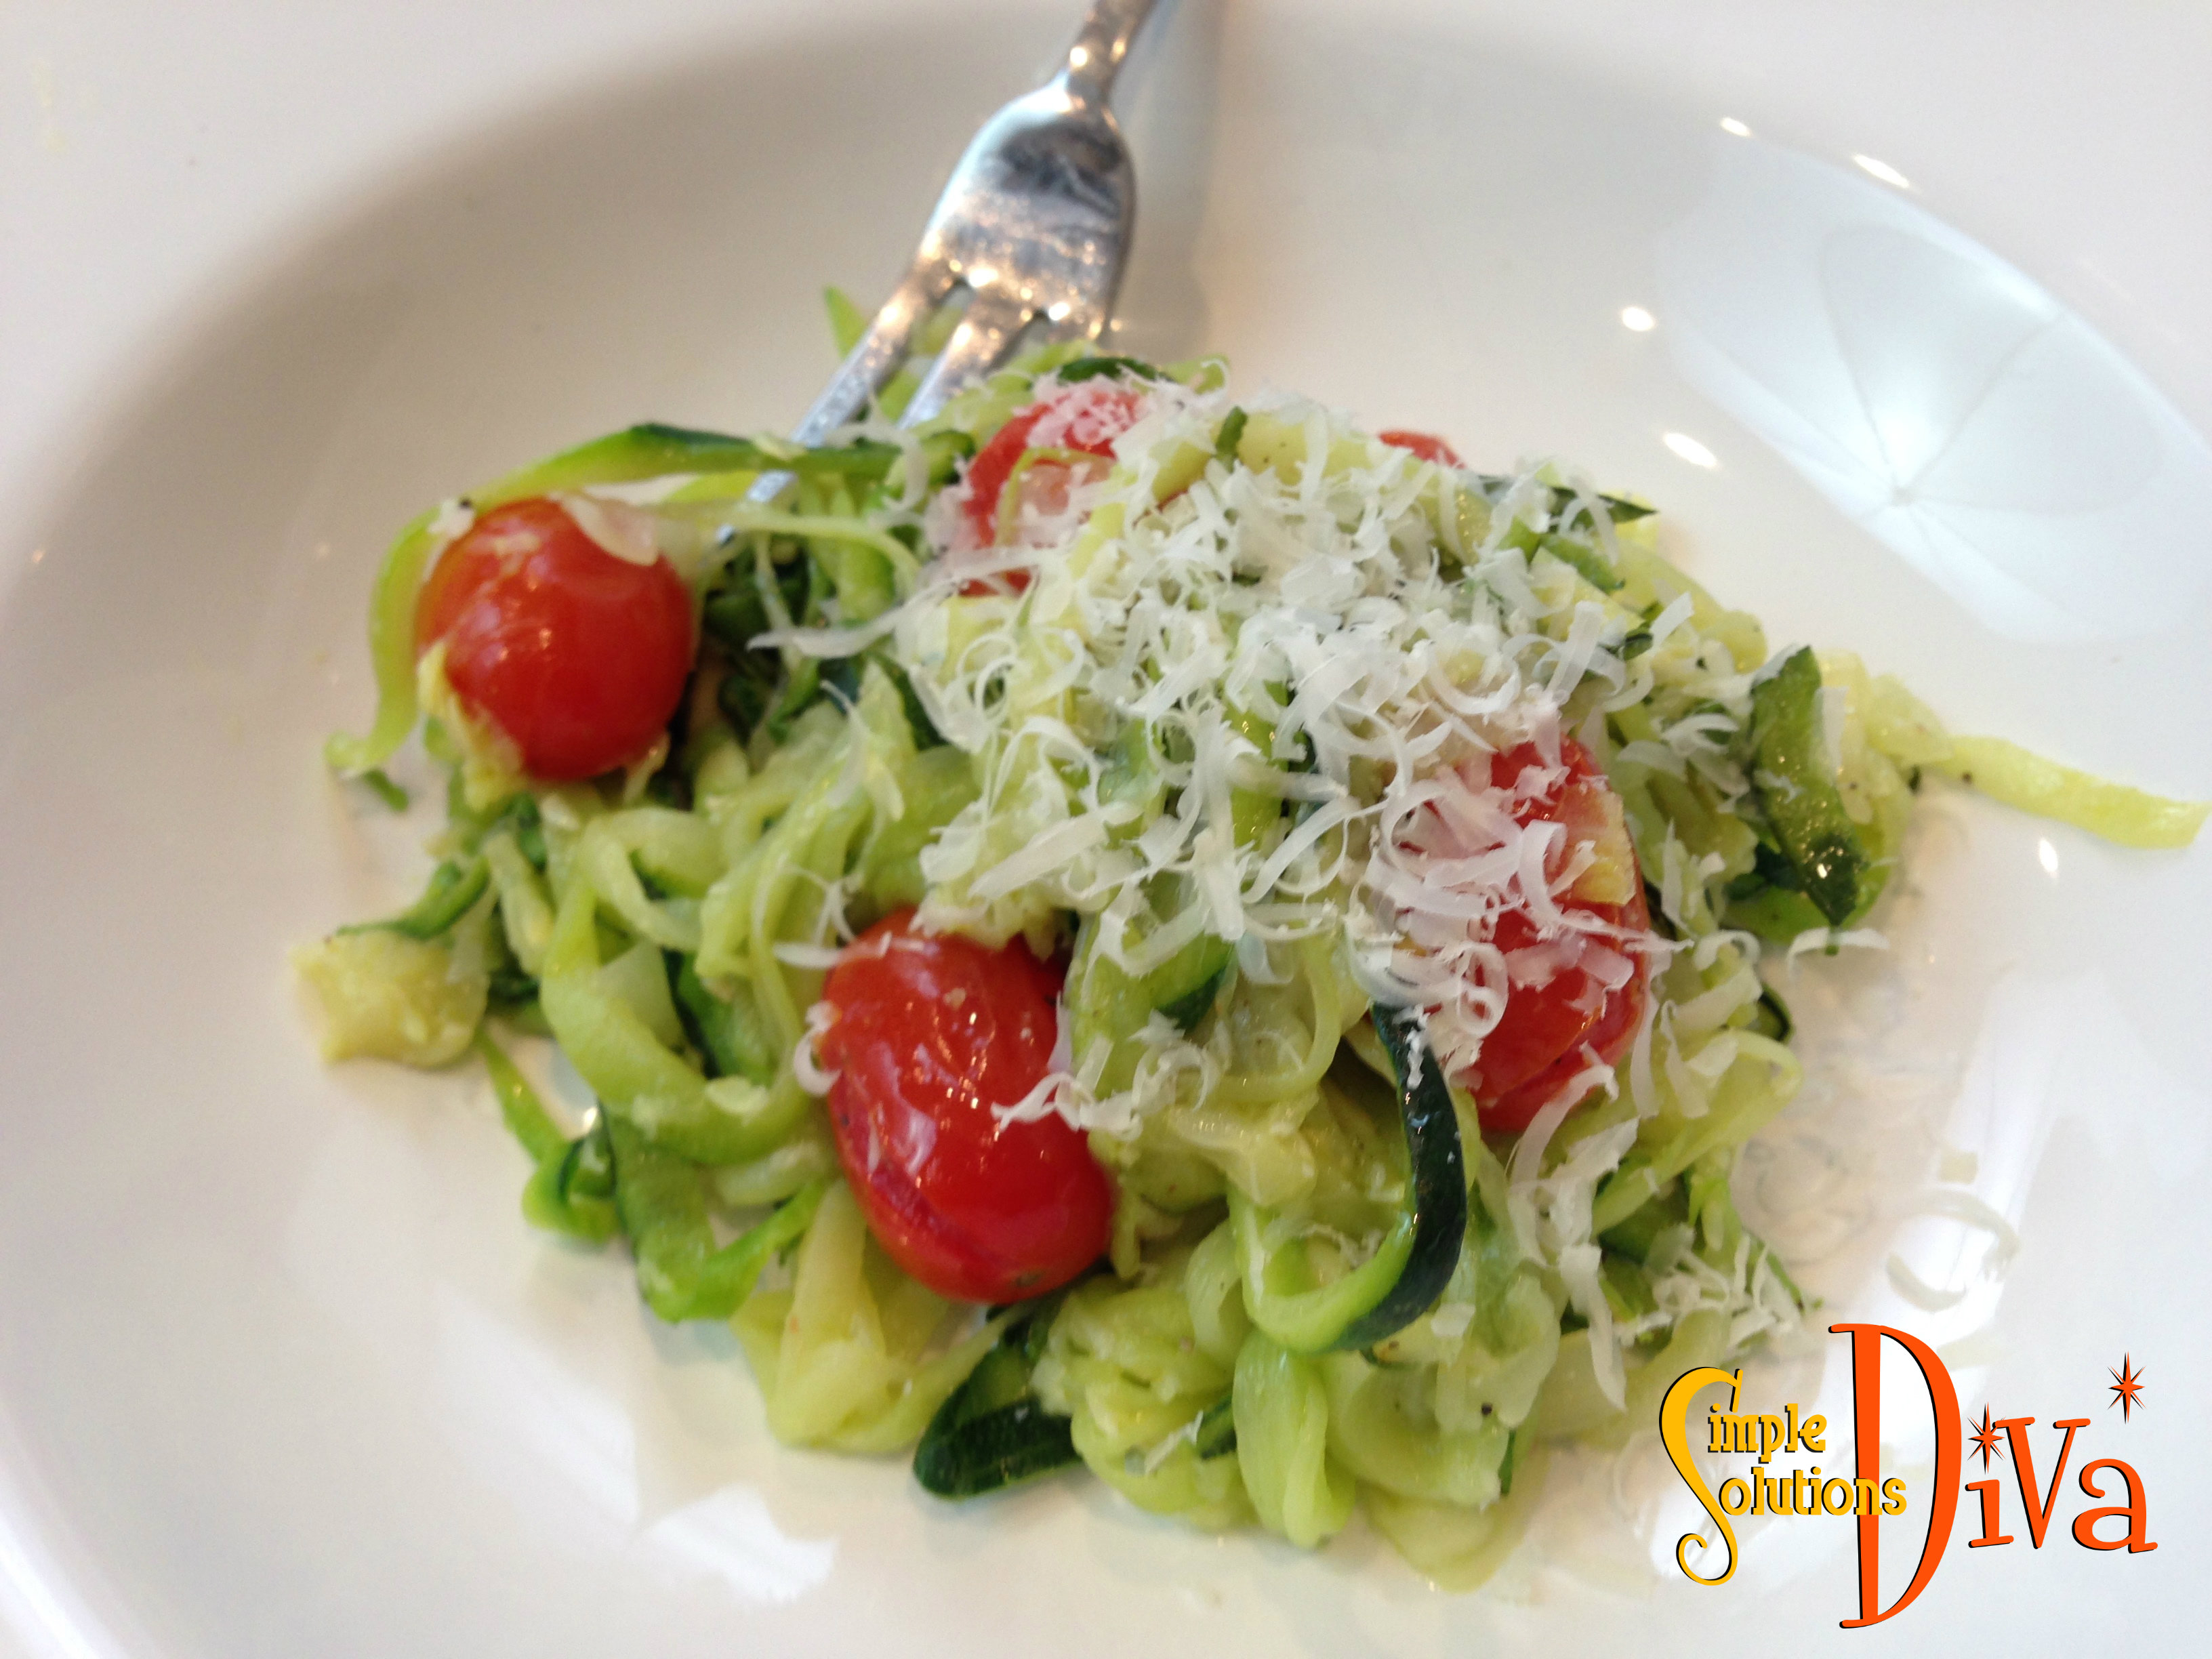
Zucchini Noodles With Roasted Tomatoes

Zuch Noodles 2

Ingredients:

  • 1 cup cherry tomatoes
  • 4 tablespoons olive oil, divided
  • 4 large zucchini
  • 1 yellow onion, thinly sliced
  • 4 cloves garlic, roughly chopped
  • kosher salt and freshly cracked black pepper to taste
  • grated pecorino cheese to serve (I used fresh parmesan!)

Directions:

Preheat the oven to 400 degrees F.

Distribute the cherry tomatoes evenly on a baking sheet. Drizzle with 2 tablespoons of olive oil and season with salt and pepper. Transfer the baking sheet into the oven and roast for 10-15 minutes until the cherry tomatoes just start to burst. Remove the baking sheet and set aside. (PS – I could eat these like they are candy!)

Using a mandolin or spiralizer (I used the Veggetti™), cut the zucchini into thin strips.

Heat a large nonstick skillet over medium heat. When hot add 2 tablespoons of the olive oil, onions and garlic and cook until fragrant, about 1 to 2 minutes.

Add the zucchini noodles to the onion and garlic mixture and sauté for 1-2 minutes. Add the cherry tomatoes to the zucchini noodles and season with salt and pepper. Toss to combine.

Dust the top of the noodles with pecorino cheese and serve.

Zuch Noodles 1

Got A Stuffy Nose? Make A Vicks Shower Bomb!

Screen Shot 2015-01-07 at 3.33.54 PM

Cold season has many of us fighting off a stuffy nose. What makes you feel better than a hot, steamy shower? A hot, steamy shower with a blast of menthol!

When you need a little relief, try making a Vicks® Shower Bomb!  They are perfect to have in the bathroom for yourself, or to give away to friends and family. Just toss one onto the drain in your shower, then take your shower as usual — the bomb dissolves, releasing that wonderful menthol smell!

You need the following:

  • One small (1.76 oz.) container of Vicks VapoRub®
  • 1/2 cup of Baking Soda
  • 1 cup of cornstarch
  • 1-2 teaspoons of water, as needed
  • A plastic ice cube tray from Dollar Tree Store (this will be a mold for the bombs!)
  • Plastic gloves, to protect your hands if you have sensitive skin.
  • Sparkles in color of choice (optional)

Directions:

Place the cornstarch in a mixing bowl**. Add your Vicks VapoRub® and mix thoroughly. (You can also add the sparkles if you are using them!) This looks similar to when you try to cut butter into flour – it forms little pellets at first, but then it blends into a good blob!

Now add your baking soda, mixing thoroughly. (I use my hands.) If it looks too dry, add a little bit of the water. Test by squeezing a handful – if it sticks together and doesn’t fall apart, it is good to go!

Press mixture into your mold, be sure to really press it in well. Place the mold into the freezer for a few hours.

Pop the bombs out of the mold. Store them in jars with lids for when you want to use them!

SSD Shower Bomb 2

** Note: Mix in a stainless steel bowl or disposable plastic bowl – the menthol will permeate the plastic.**

Simple Holiday Survival: How To Create A Beautiful Ice Lantern

An Ice Lantern – Such a pretty centerpiece, or use multiple ones to line a sidewalk leading to a holiday party!

Supplies You Need:

  • Distilled Water (or water that has been boiled and cooled off)
  • An empty and cleaned 2 liter soda bottle, with top cut off
  • A hard plastic water bottle (smaller than the 2 liter bottle)
  • Various items to freeze in the ice – flowers, cranberries, cinnamon sticks, pine needles, etc.
  • Duct tape to hold the smaller bottle in the larger bottle without floating.

See the video for the full instructions!


SSD ice lantern 2

Share The Love With A Holiday Giving Plate

The Simple Solutions Diva has an answer to an age old question:

How do you get your plate back from a holiday party?

The simple answer? Don’t ask for it back — Create a Season of Giving Plate!

The concept is: you share the plate, along with the food you bring to a party. Then the host is free to use it when THEY go to a holiday party, and the plate moves from home to home throughout the holidays!

The instructions are easy: It is as simple as buying a pretty plate from the Dollar Tree Store, writing a nice verse (for suggestion, see below) on the plate in permanent marker, baking it at 350 degrees for approximately 30 mins. This baking process will set the permanent marker so it won’t wash off.

You can write whatever you would like, but if you are in need of something, try this:

Season Of Giving

In this Season Of Giving, we share so much joy,

& plates full of cookies for all to enjoy!

This plate is for giving, not keeping for one.

So pass this plate on to others, and share all the fun!


It is a beautiful way to share the love this holiday season!

Season Of Giving Plate
Season Of Giving Plate from SimpleSolutionsDiva.com.

A Thanksgiving Thought . . .

THanksgiving Thought photo


TIME

Time moves quickly. Like a snowball rolling downhill, time builds momentum – growing in importance each passing second, minute, hour, year. For me, this year is the pivotal year that I need to soak in the love, gratitude and togetherness while I can. Why?

BECAUSE MY 1ST BORN BABY IS GOING OFF TO COLLEGE!

Don’t get me wrong; I am not upset with it, just more amazed that we (the whole family) are at that point in our lives so quickly. It is the march of time AND life, and I am thankful to be able to enjoy every minute of it.

Granted, it feels like I just brought her home from the hospital two weeks ago, and now, we are looking at colleges together, sending her off for her first college semester this summer.

This is CRAZY! How can I be that old? How can SHE be that old?!

I am keenly aware that this is one of the last holiday seasons where we will be assured that our girls will be spending the holidays with us. In a few more years, we will probably have conflicting college schedules, possible plans to go home with roommates (or boyfriends!) for Thanksgiving. Eventually, the reasons for not getting together will be because of new jobs, distance, and – someone get me the tissues – spending holidays with the new in-laws!!

Mid-life crisis aside, I know that this is such a good thing! I’ve done all that I can to give both my girls confidence, courage and a sense of security within themselves, to prepare them for the adventures their lives will bring them. (I will say, secretly I hope they will want to include me in some of their adventures!)

This year at Thanksgiving, I will soak it in. I am thankful that my family is whole, together, and enjoying life. Yes, I am very thankful this year. Though I can’t stop the snowball of time from rolling, I WILL jump on top of it, dig in my hands and feet to hold on, and enjoy the ride all the way.

May you have a wonderful Thanksgiving with those most important to you! And if you can’t be with them, enjoy those you are with!

Simple Solutions Diva & Family - Just ignore the tight grip she & her husband have on the girls!
Simple Solutions Diva & Family Just ignore the tight grip she & her husband have on the girls!

No Trick! Simple Halloween Treat Recipes

Halloween is all about the Tricks or Treats – Well, I love the treats! I have some simple recipes here for Halloween that will put a smile on your goblin’s face!

Halloween Treats

Pumpkin Peeps Brownie S’mores

There’s no pumpkin or pumpkin flavoring in these – just adorable Pumpkin Peeps!

Pumpkin Peeps Brownie S'Mores from SimpleSolutionsDiva.com.
Pumpkin Peeps Brownie S’Mores from SimpleSolutionsDiva.com.

Ingredients:

  • 1 ½ Cup Graham Cracker Crumbs
  • 1 stick butter – melted
  • 2 teaspoons sugar
  • 1 box favorite brownie mix (plus ingredients instructed on box!)
  • ¾ cup chocolate chips
  • 2 boxes marshmallow Pumpkin Peeps

Directions:

Set oven to 350 degrees. Grease the bottom of an 8×8 square baking dish.

In a microwave safe bowl, melt the butter. Add to the melted butter the sugar and graham crackers. Mix thoroughly and press into bottom of pan. Bake for 10 minutes and remove from oven.

Prepare brownie mix as directed on box. Pour batter over graham crackers, and bake according to directions on box.

In last five minutes of baking, cover top of brownie with chocolate chips. Add pumpkin peeps to top of brownie and bake for another 5 minutes, until the peeps get puffy. Remove from oven and cool. Cut carefully and serve!


Yogurt Jack-O-Lanterns/Monsters

So easy!! Almost feel guilty about this one!! 😉

Yogurt Jack-O-Lanterns from SimpleSolutionsDiva.com.

What You Need:

  • 2 large (24 oz) containers favorite vanilla yogurt
  • Green and Orange food coloring
  • Chocolate cookie wafers, smashed into crumbs (my favorite part!)
  • Clear 9 oz. plastic cups
  • Black permanent marker

Directions:

Using the back permanent marker, draw a jack-o-lantern face or Frankenstein face on the outside of the plastic cup. Divide the yogurt into two bowls. Add food coloring to each bowl (green for Frankenstein; orange for pumpkin). Fill the cups with the appropriate color yogurt. Top the Frankenstein cup with crushed chocolate wafers (his hair!). You can use the chocolate wafer crumbs to draw lines on the top of the pumpkin.

Oh so cute and easy!

Pumpkin Spice Snack Mix

Chex Mix with a pumpkin spice twist!

Pumpkin Spice Snack Mix

Ingredients:

  • 2 Cups Rice Chex
  • 2 Cups Corn Chex
  • 2 Cups Cinnamon Chex
  • 1 Cup Pretzel Twists
  • ½ Cup Pumpkin Seeds (also called “pepitas”)
  • 1/4 Cup butter
  • 1/4 Cup Canned Pumpkin
  • 1/4 Cup Packed Brown Sugar
  • 1 Tablespoon Pumpkin Pie Spice
  • 2 teaspoons Vanilla Extract

Directions:

Line a cookie sheet with wax paper. Set aside.

Combine in a large, microwave-safe bowl the Chex, pretzels, and pumpkin seeds.

In a separate microwave-safe bowl, melt butter (approx. 30-60 seconds). Add to the melted butter the pumpkin, sugar, spice and microwave another minute or so until bubbly. Add vanilla and stir.

Drizzle the butter mixture over the Chex mixture, stirring gently. Microwave on high for 5 minutes, stirring every minute. Spread out on wax paper lined pan, breaking up large pieces. Allow to cool for 10 minutes. Store in air tight container. Enjoy!

Thank you to WTLV-TV’s First Coast Living for inviting me on to share these simple recipes!

Simple Halloween Games For Kids

Everyone loves a good game or activity to do with their kids – even better when it is a Halloween party! Here are a few favorites from our family! One of our children has an October birthday, so we often had a Halloween-themed party when she was little. Thanks to WTLV-TV’s First Coast Living for inviting me on to share these activities!

Toilet Paper Mummy Race

TP Mummy Race
TP Mummy Race

Break into teams of three (or four) people. One person in each group is the mummy. Using toilet paper rolls, wrap up the person head to toe to look like a mummy. The first team done wins!

Eye Of Newt Relay Race

Screenshot 2014-10-29 17.28.59
Who’s Looking At You? Eye Of Newt Relay Race!

Purchase chocolate eyeballs (or use white grapes!), enough plastic spoons for each participant. Divide the participants into teams of three people or more. Each team splits in half and separate with about 10 feet between the two groups. They face each other. Put two “eyeballs” into the starter’s plastic spoon and begin the relay race – first person runs the 10 feet to their partner, passes the eyeballs from their spoon to their partner’s (without using their hands), and then that partner runs back across the 10 feet to do the same with the next team member. If they drop an eyeball, they need to pick it up with the spoon, not their hands. First team to pass their eyeballs through all their team members wins!

Pass The Pumpkin

Pumpkin Relay Race
Pumpkin Relay Race

Divide kids into equal teams. Each team lines up so you have each team member behind the next. Give the person in front of the line a pumpkin (you want it somewhat big, but not too big for the age group!). At the count of three, first person in line passes pumpkin backwards over their head to next in line. That person then passes it through their legs to the next person – they alternate like this until the end! First line to finish wins!

1 2 3 4 5 6 17

© 2015 SIMPLESOLUTIONSDIVA.COM Designed by The Web Design Chic | ADMIN LOGIN