SimpleSolutionsDiva.com

LauraMorey

Remove Tree Sap From Hands In Seconds


I love the timeless, holiday tradition of bringing home the fresh Christmas tree! But want to guess what the most annoying, holiday tradition is? Trying to get the tree sap off your hands!

I have to thank James, the guy at the tree lot where we bought our Christmas trees for this fantastic tip — and it really does work in seconds!

tree-sap
Who knew something so simple would work so well?


ssd-tree-sap

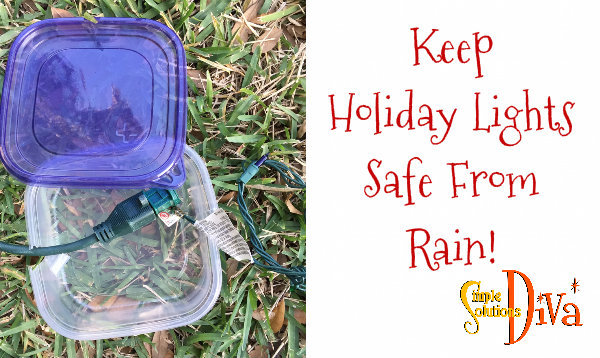
Keep Holiday Lights Safe From Rain!

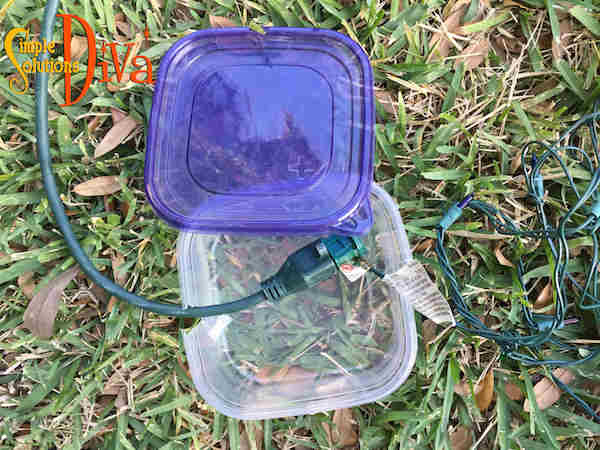
ssd-holiday-lightsDuring the holidays, have you ever come home one rainy night to see your holiday lights are out? When water gets into those electrical connections (like where extension cords connect to holiday lights), it can create a short which trips the circuit breaker – causing all your outdoor lights associated with that breaker to go out!

This Simple Holiday Survival tip is sure to help prevent that from happening!

SimpleSolutionsDiva.com's tip to keep outdoor lights from blowing out!
SimpleSolutionsDiva.com’s tip to keep outdoor lights from blowing out!

A New Way To Serve Stuffing

Tired of serving stuffing out of a bird’s behind? Try presenting your stuffing in a creative way (plus, you don’t have to worry about undercooking and getting salmonella!).

Make your stuffing in a bundt pan! It is not only healthy, but it presents the stuffing in a unique form! The key is to add eggs to your favorite recipe so it will hold together when you take it out of the bundt pan. Look how pretty it looks!

stuffing4


You can use your own, favorite recipe, just be sure to add 3-4 eggs to your mixture (mix it in with the chicken broth you use in your recipe). Bake at 400 degrees for 30-40 minutes, until it is lightly browned.

If you are in need of a recipe, try this one:

Bacon (or Sausage) Stuffing
 
Prep time
Cook time
Total time
 
Cook this recipe separately from your turkey and be sure to cook it in a bundt pan for a nice presentation!
Author:
Recipe type: Side Dish
Cuisine: American
Serves: 10 servings
Ingredients
  • 4 slices thick cut bacon (or ½ cup ground pork sausage), cooked, drained and copped into small pieces (keep the fat in the pan)
  • 1 Tablespoon chopped, fresh sage
  • ½ cup fresh chopped parsley
  • ½ teaspoon (or more) minced garlic
  • Salt & Pepper to taste
  • 1 loaf of french bread, cubed and dried in a 200 degree oven until lightly toasted - about 20 minutes.
  • 2-3 cups chicken broth
  • 3-4 eggs, beaten
Instructions
  1. Heat the oven to 400 degrees.
  2. Using the pan with the bacon (or pork sausage) grease, sauté the sage, garlic, parsley together for 30-40 seconds. Add the chopped bacon (or sausage) and stir.
  3. In a small bowl, mix the beaten eggs into the chicken broth.
  4. In a large bowl, place the bread cubes, the herb mixture, and mix together.
  5. Slowly add the chicken broth mixture, tossing the bread cubes to coat.
  6. Press mixture into a lightly greased bundt pan.
  7. Bake at 400 degrees for 30-40 minutes.
  8. Allow to rest for 20 minutes.
  9. Invert onto a serving platter.

Have a VERY Happy Holiday!

stuffing5

stuffing3

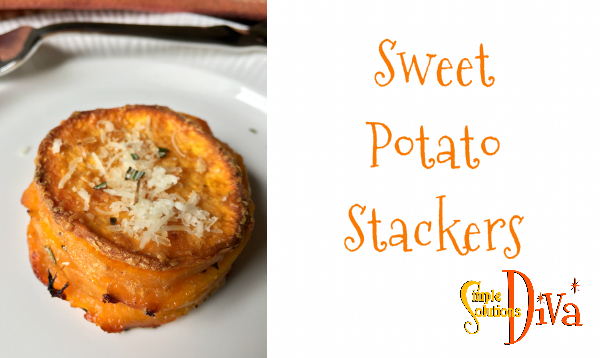
Sweet Potato Stackers


My family LOVES sweet potatoes! I served these and they were a BIG hit, so I believe I will serve them for Thanksgiving this year. Buttery layers of sweet potatoes with rosemary and garlic and fresh parmesan cheese – my mouth is watering just thinking about them!

These are a different way to serve those delectable, spuds of the South! And best part? No mini marshmallows!


ssd-sweet-potato-stackers2


Sweet Potato Stackers
 
Prep time
Cook time
Total time
 
Buttery layers of sweet potatoes, paired with rosemary, garlic and fresh parmesan - these Sweet Potato Stackers are sure to be a hit at the next family gathering!
Author:
Recipe type: Side Dish
Cuisine: American
Serves: 12
Ingredients
  • 4-5 sweet potatoes, washed, peeled and sliced into thin slices.
  • 2 Tablespoons melted butter
  • 2 Tablespoons olive oil
  • 1 teaspoon freshly chopped rosemary (plus another teaspoon for topping at end)
  • ½ teaspoon garlic powder
  • ¼ teaspoon onion powder
  • 2-4 Tablespoons fresh grated parmesan cheese (plus 2 TBS for topping at end)
  • salt & pepper to taste
Instructions
  1. Preheat the oven to 375 degrees.
  2. Combine in a large bowl the melted butter, olive oil, rosemary, garlic powder, onion powder, salt and pepper and whisk until they ingredients are blended.
  3. Add freshly grated parmesan cheese and lightly wish.
  4. Add sliced sweet potatoes to the bowl and mix until all slices are coated in the oil mixture.
  5. In a light greased muffing tin, layer the sweet potatoes until each tin is filled to the top. These will shrink down while they cook.
  6. Cook for 45-55 minutes, or until the potatoes are lightly browned and are tender.
  7. Place on a plate and top with more parmesan cheese and fresh chopped rosemary. Serve immediately.

Sweet Potato Stacker – So Simple & So GOOD!


ssd-sweet-potato-stackers

Easy Cheesy Zucchini Bites


One of my favorite vegetables, second only to broccoli, is zucchini! It is a very versatile veggie! So speaking as a Zucchini Lover, this recipe is fantastic! You can almost convince yourself it is healthy because it is mostly zucchini, with a little bit of cheese!

Seriously, how can you not want to devour these right out of the oven?!
Seriously, how can you not want to devour these right out of the oven?! Easy Cheesy Zucchini by SimpleSolutionsDiva.com.

I suggest you double the recipe – I made a single batch and literally, all of the pieces were devoured in minutes. And this recipe has my little vegetarian’s stamp of approval!

Easy Cheesy Zucchini Bites
 
Prep time
Cook time
Total time
 
These easy, cheesy zucchini bites will have carnivores, and vegetarians alike, devouring them!
Author:
Recipe type: Appetizer
Cuisine: Vegetarian
Serves: 2 dozen
Ingredients
  • 3-4 zucchini, cleaned & shredded (yields approximately 1.5-2 cups shredded)
  • 1 egg beaten
  • ½ cup shredded cheddar cheese (you can also use shredded mozzarella and add in parmesan!)
  • ¼ cup panko or Italian seasoned bread crumbs
  • ¼ teaspoon salt
  • ¼ teaspoon garlic powder
  • ¼ teaspoon dried basil
  • ⅛ teaspoon ground pepper
Instructions
  1. Preheat over to 425 degrees.
  2. After shredding the zucchini, place it into a clean, dry paper towel and squeeze out the excess water and place the zucchini in a large bowl.
  3. Add the remaining ingredients and mix thoroughly.
  4. Drop by rounded tablespoon onto greased cookie sheet (I placed parchment paper on the cookie sheet and then greased that.)
  5. Bake in the oven for 14-20 minutes until lightly browned on the edges.
  6. Eat plain or with ranch dressing for dipping (but they really don't need the dressing!)

ssd-z-bite-6

ssd-zbites-2

ssd-z-bites

A Diva Product Review: The Purse Pouch (TM)

I think I may have the BEST neighbors! When I posted on Facebook the question, “Has anyone ever used the Purse Pouch (TM)?” – my neighbor Marcia went and bought one for herself and for ME! So I decided to do a product review. FYI – The makers of Purse Pouch (TM) have not compensated me in any way. Also, the photo below is from the Purse Pouch (TM) website.

purse-pouch-2
Photo Courtesy of Purse Pouch (TM).

purse-pouch-3

Easy Halloween Treats & Decor

halloween-ssd


Halloween is almost here! Whether you are going to a Halloween party this year or you are hosting one this weekend, the Simple Solutions Diva has some simple Halloween snacks and décor you can make yourself!

Witches Broom Snacks

brooms

These are as simple as 3 ingredients – and they aren’t full of sugar! String cheese, pretzel sticks and fresh chives make up this adorable and tasty Halloween treat!

Instructions – Cut the string cheese into thirds. Slice the pieces of cheese 2/3 of the way to the top, creating the bristles of the broom. Stick a pretzel stick into the top (uncut) side of the broom. Tie the chive just above the cuts of the “broom” bristles. Keep refrigerated until ready to serve.

Spider Ice Cubes
spiders

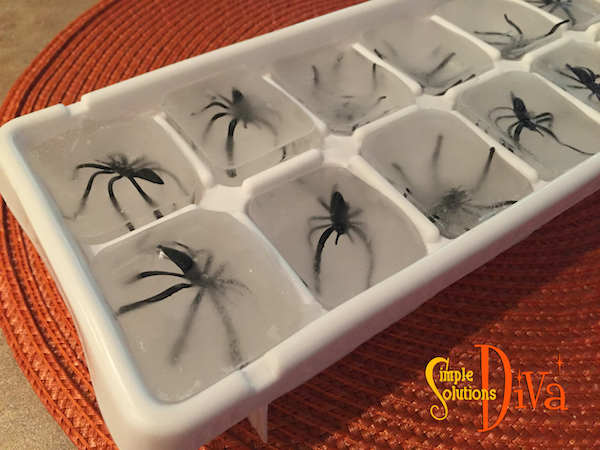
Create a surprise in your party cocktails with these creepy ice cubes! 

Instructions – Take (new) plastic spiders and wash them in soapy water, rinse and let dry. Place a spider into each space in an ice cube tray and fill with water. Freeze overnight, pop them out and use in your Halloween drinks or cocktails. (Note: If you want crystal clear ice cubes, boil the water before filling the ice cube tray.)

Carrot Finger Food – “Don’t Stick Your Fingers in The Dip” doesn’t apply here!

fingers1

Carrots carved into fingers, complete with slivered almond nails, make the perfect “Finger Food”! You only have to create a few to make the impact. Stick a few in your favorite dip and place them in and around the other veggies you supply with the dip!

Instructions – Peel and wash the carrots. Cut the carrots into finger-sized pieces. Using a knife or a vegetable peeler, carve out a “nail bed”. Secure the almond “nail” with a dot of sour cream.

Foam Pipe Insulation “Chains” 
chains

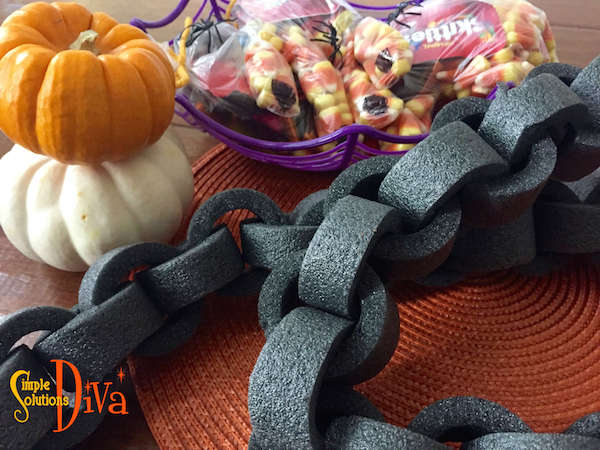
These make for some great table decor or to make your home look creepy. Simply purchase foam pipe insulation (it is dark grey). Slice the insulation into small rounds – these are the chain “links”. Attach the links together to make a chain. Hang on your stair railing, decorate your Halloween party table, or use as part of a costume! If you do decide to use them as part of a costume, you will want to secure the links closed using a hot glue gun (low temperature).

Glove Hand Treat Bag

hand

You can find plastic gloves at dollar stores or in the grocery stores. Simply fill them with favorite Halloween Candy and close and secure the bottom with string, yarn or twisty-ties.

Yarn Pumpkin

yarnpumpkin

My Confession: Sometimes, my projects don’t go as planned! Originally, I was going to create a paper mache pumpkin using yarn instead of paper. But honestly, it just didn’t work! The yarn stuck to the balloon – I couldn’t deflate the balloon without ruining the “pumpkin”. As I tried to figure out what else I could do, I realized the ball of orange yarn looked exactly like a pumpkin! So I added a pipe cleaner stem and leaf and, Voila! A cute yarn pumpkin! Couldn’t have been easier!


Thank you to WTLV-TV/NBC 12 First Coast Living for inviting me on to share these ideas!

Putting Pinterest To The Test: Can You Regrow Lettuce?


Ever thought some of those Pinterest Pins were a little too good to be true? Well, Simple Solutions Diva likes to test out some of Pinterest’s most popular pins to see how they work! Today, she features a pin that said you could easily regrow lettuce – basically giving you free lettuce! So does it work? Watch the video and see for yourself!

Also, if you want to save all that freshly cut lettuce, why not follow the Diva’s instructions on how to best store lettuce – Make Your Own Bagged Salad!

lettuce-collage

ssd-regrow-lettuce

A Round-Up Of The Diva’s Favorite Household Tips

ssd-household-tips


In honor of her LIVE appearances at the 2016 Fall Jacksonville Home + Patio Show, the Diva is sharing her favorite, simple household tips!  Come out and say “Hi” on Sunday, October 2 at 11:30 a.m. – The Diva will be cooking things up on The Jacksonville Magazine Cooking Stage! If you plan to go to the Jacksonville Home + Patio Show, use promo code DIVA to get a discount on your tickets when you buy online! Buy Tickets HERE.

How To Fold A Towel For Easy Stacking: Tired of your towels flopping over when you try to stack them? The Diva makes it easy! Check out the tip – Click Here

How To Get Your Dryer To Dry Faster: Is it taking forever for your clothes to dry? Try this little tip from the Diva – Click Here

What To Do With Dryer Lint: If you do laundry, you know it always produces lint! You can leave the lint (along with old thread) out for the birds to use in their nests! Or check out this simple tip  from the Diva – Click Here 

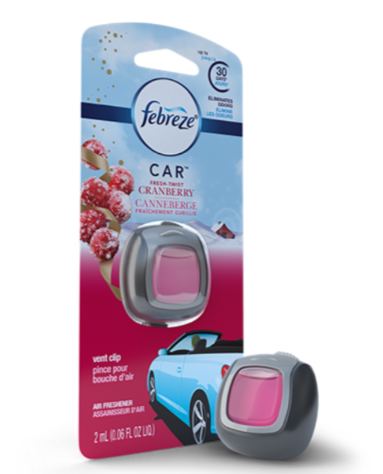
The Secret Way To Make A Room Smell Great! – Try adding a Febreze Car Vent Clip to your air conditioning vent in a room – rarely do people look up when they enter a room, so it is a great way to make a room smell great, without being too heavy a scent! Available at Pubix, Target, Walmart and more. Or, you can also add a few drops of your favorite essential oil to your air conditioning filter when you change it out every month.screen-shot-2016-09-29-at-7-20-36-am

Simple Way to Clean Blinds: Tongs & Microfiber cloths! Wrap a microfiber cloth around each end of tongs, secure them with rubber bands, and you have a simple tool to clean those blinds! Toss the cloths into the wash when done!

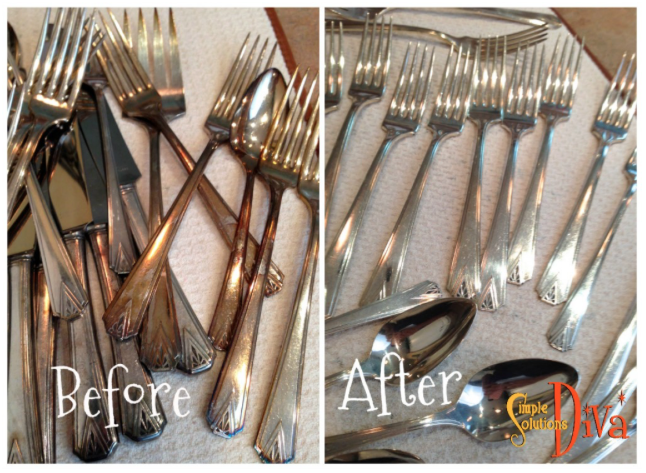
How To Clean Large Amount Of Silverware: This is my FAVORITE Simple Holiday Survival Tip! Click Here to see how to go from tarnished to clean, without having to do all that hard polishing! (And you have to watch my Simple Holiday Survival Series before the holidays!)

screen-shot-2016-09-29-at-7-27-39-am

How To Clean A Wooden Cutting Board: Lay the board on a clean work surface. Sprinkle the cutting board with salt. Using half of a lemon, place cut side down on the board and rub in a circular motion, combining the lemon and salt. The salt gently removes any built up grime, and the lemon naturally sterilizes the wood.

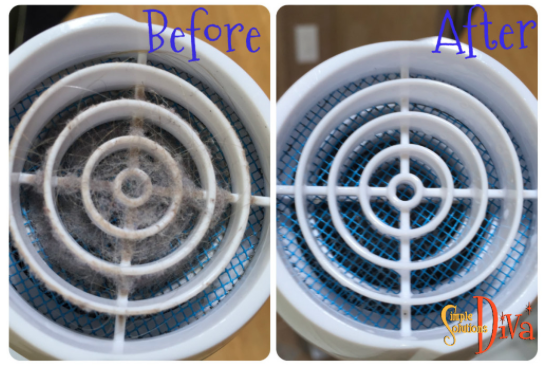
How To Clean Your Hair Dryer: Prevent your hair dryer from blowing up with this SIMPLE tip! Click Here

screen-shot-2016-09-29-at-7-27-03-am

Thank you to WTLV-TV’s First Coast Living for having me on to share these tips!


Chicken Enchilada Green Chili Soup

I love a good bowl of soup, especially on cool fall evenings! I find this soup, so thick it could almost be a stew, really hits the spot! A little spicy, a little Mexican – all my favorites in one dish!

enchilada-soup-2

I think when you try it, it will become a family favorite, too! Serve this up with some tortilla chips, a little sour cream, cheese, and maybe a little hot sauce to taste! Enjoy!

Crockpot Chicken Enchilada Green Chili Soup
 
Prep time
Cook time
Total time
 
This soup is perfect to come home to on cool nights in the fall or winter! Leave it in the crockpot all day and it will make your home smell like a Mexican fiesta!
Author:
Recipe type: soup
Cuisine: American/Mexican
Serves: 8 servings
Ingredients
  • 1 can green chili enchilada sauce
  • 4 chicken breasts, boneless
  • 2 cans diced green chilies
  • 1 can fire roasted diced tomatoes
  • 4 teaspoons chili powder
  • 1 T. cumin
  • 1 teaspoon paprika (if you use smoked, this would add a smokey flavor!)
  • 1 T. cilantro, chopped (optional)
  • 2 cans black beans, drained & rinsed
  • 1 can white beans, drained & rinsed
  • 16 oz. chicken broth (you can use more for a more soupy, soup!)
  • salt & pepper to taste (optional)
  • 8oz cream cheese, cubed
Instructions
  1. Pour half the can of green enchilada sauce on bottom of crockpot, then add chicken breasts.
  2. Top with remaining green enchilada sauce and all other ingredients, except for the cream cheese.
  3. Cover and cook on low for 8 hours, or on high for 4 hours.
  4. A half hour before serving, take 2 forks and shred the chicken. Add in the cubed cream cheese. Stir and cover, allowing the cream cheese to melt.
  5. Serve when the cream cheese is melted - enjoy!


Serve This Chicken Enchilada Green Chili Soup with Tortilla Chips, cheese and sour cream!

enchilada-soup-1

1 2 3 4 42

© 2015 SIMPLESOLUTIONSDIVA.COM Designed by The Web Design Chic | ADMIN LOGIN