SimpleSolutionsDiva.com

Gift Ideas

Make A “No Sew” Scarf

I’ve always fancied myself a seamstress. . .

As a kid, I used to make costumes for my cats, making them get married or go to a ball. I’d spend hours on costumes, and quite a bit of time trying to get them on the cats! Once done, I’d sit back and admire my work, as I applied Bandaids to my face and neck.

But I never really LEARNED to sew. Yes, I could sew on a button (Thanks Grandma!), but I never really learned on a sewing machine. I envied people who could! So over the years, as I tried to create Halloween costumes for myself and eventually my kids, I found I became very adept at using a hot glue gun to seal seams!

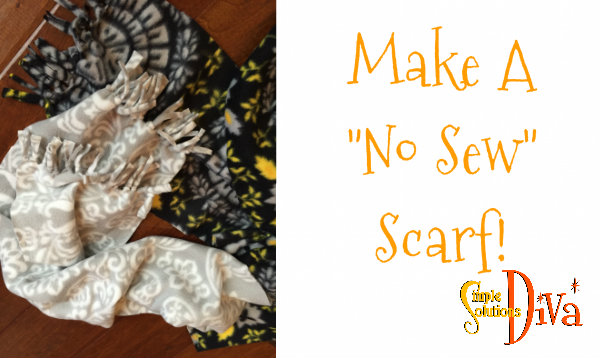
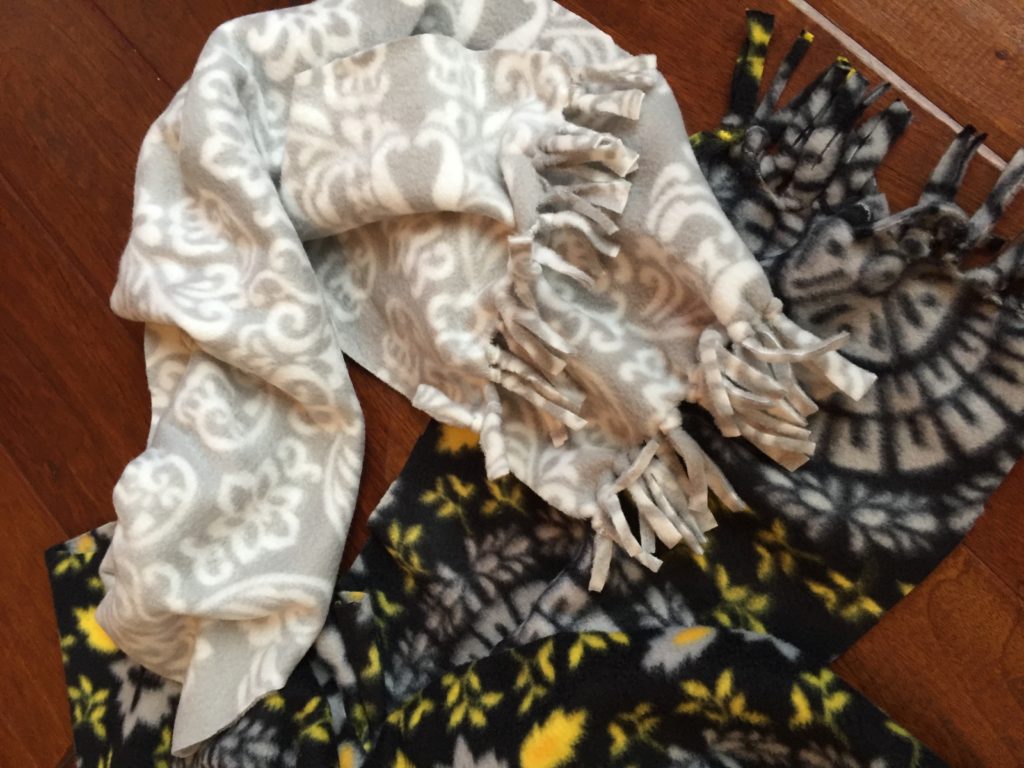
Well, with THIS project, you don’t need ANY hot glue, sewing machines, or even needle and thread! Just a yard of fleece fabric, some masking tape and sharp fabric scissors! (MY kind of sewing project!) And look how nice they are:

img_2967


This makes a great, last minute gift idea, or even better, it could become a community service project for middle school or high school students! Make a few scarves in one day and donate them to a homeless shelter!

A Few Tips:

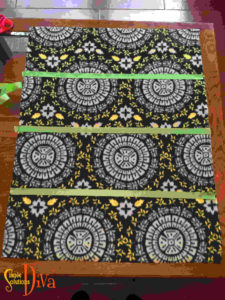
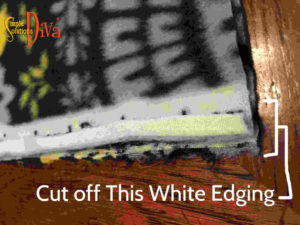
  1. Fold the yard of fleece in half, line the edges up and cut off the white edging where the print stops.
  2. ssd-scarf-3Use masking tape to mark off the four scarves and to provide a straight line to cut along. Scarves should be 8-10 inches wide – on this project I marked off 9.5 inches.

ssd-scarf-4


ssd-scarf-1


Simply Smooth Skin: Homemade Sugar Scrubs

Homemade Sugar Scrubs, from SimpleSolutionsDiva.com.

It is the peak of winter, but warm spring and summer days are just around the corner! Start making your skin smooth and soft with these great homemade sugar scrubs!  Did you know exfoliating BEFORE shaving your legs will actually allow for a closer shave?

These scrubs are simple to do, cost very little to make, and are just delicious smelling!

The Basic Sugar Scrub Recipe

Ingredients:

  • 3 Cups white sugar
  • 1 Cup (plus 2 Tablespoons) Extra Virgin Olive Oil  – you can experiment with other oils, such as almond oil, coconut oil, etc.
  • 10 drops favorite essential oils – this amount really depends on how strong you like the scent.  Add more or less to suit your preference.
  • Jars for storing sugar scrubs (The Dollar Store is where I found mine!)

Preparation: 

In a large bowl, mix sugar and olive oil well. Add essential oils and mix well. Store in jars or other oil-safe container.  Use in shower to soften hands and/or body.  Rinse well before drying. (Note: Shower Floor can be slippery after using sugar scrubs in shower. Use caution.)

Types of Essential Oil Combinations:

I found essential oils at my local health food store, and they offered a wonderful variety! Try one of these ideas, or get creative with your own!

  • Lavender and Tea Tree Oils
  • Peppermint
  • Orange Creamsicle –  A mixture of Sweet Orange and Vanilla essential oils.
  • Brown Sugar Vanilla – Replace one of the cups of white sugar with Brown Sugar. Add Vanilla essential oil. (You will want to eat this one!)

If you want a rougher texture to your scrub, replace the white sugar with turbinado sugar. It changes the look AND the feel of the scrub!

Thank you to WTLV-TV’s First Coast Living for inviting me on to share this fun idea! 


Simple Idea: A Neighborhood Goodbye Gift

Last week, I had the opportunity to celebrate the new direction a neighbor is taking.  Her husband has a fantastic job opportunity that requires them to move away from the area.  She has been a part of our neighborhood for more than 10 years.  One of my neighbors (a crafty lady!) came up with this beautiful idea to send a little piece of the neighborhood with our friend.


Neighborhood Goodbye Gift

This gift features a beautifully framed (and matted) photo of the intersection sign of the street where our friend lives.  Flip the frame over, and each neighbor signed the back with well wishes.  A space was left to insert a photo of all the ladies who attended the goodbye lunch.

What a great gift idea!

Simple Idea: Don’t Toss The Graduation Tassel!

This is the season for graduations! After the mortar board and tassel are tossed in the air in celebration, where does the tassel end up? Usually, dangling from the rear view mirror (am I showing my age?)!  But it doesn’t have to stay there! I found a great way to save those tassels and I thought I’d share it with you.

alex ornament2

Simply take a clear, refillable ornament (4-inch size would be perfect) and insert the tassel, leaving the cord wrapped around the neck of the ornament. You can add confetti that coordinates with the school colors. Replace the top on the ornament, leaving the tassel suspended inside the ornament.

Now you have a beautiful keepsake of graduation that can be displayed year-round or as holiday ornaments!

To find 4-inch Clear Acrylic Fillable Keepsake Ornaments by the case (because you KNOW your friends will want to do this, too, for their kids!), Click Below!
Bulk Case of 24 Clear Acrylic 100mm Fillable Keepsake Ball Ornaments


Tassel 2

Summer Dreaming: Cool Beach Accessory

Turtle Back Cup HolderYes, I know, it may be a tad too early to be dreaming of the beach (not in Florida, but i don’t want to make anyone jealous!), but I found these cool little cup/beverage holders that would be perfect for the beach!

They are called TurtleBacks, and they are nifty little plastic beverage holders that nestle into the sand. Prevents beverages from tipping over PLUS you don’t get sand all over the cup or bottle!

The products start at $5.00 (for a plain one), $6.00 with a symbol (like the orange one above), and for $10.00 you can even have them customized with a logo or saying (50th Birthday Party Anyone?)!  Perfect way to enjoy your summer at the beach!

Screen Shot 2013-05-08 at 3.08.40 PM

Simple Mother’s Day Project: Cup of Love

Image 12When my kids were babies, I knew that I would regret not having something that had their hand and footprints. Somehow, in my baby hormone-induced mind, I managed to come up with a cute idea that I still treasure today. A “Cup Of Love” was created in a pottery painting studio.  I chose the cup I wanted, chose my colors, then brought my babies in (my 21 month old and 1 month old at the time).  I took my oldest’s hands, painted them, and had her hold the cup on either side.

I painted a heart in the bottom of the cup and wrote on the outside of the cup, then I painted my baby’s foot, pressed it on the bottom of the mug and put the date. I came back to put the glaze on it, then the pottery studio took it from there!

I did the same project for grandparents, but wrote a “Cup of Love For Nana”, “Cup of Love For Papa”, etc. Cute little gifts that people will save forever.  I drink from this mug once a year – on Mother’s Day!

Note: In my warped sense of humor, it could be funny to do this again with my TEENAGERS’ hands and feet!  Of course, I would have to wrestle them down to do it!

Cup of Love

1 2

© 2015 SIMPLESOLUTIONSDIVA.COM Designed by The Web Design Chic | ADMIN LOGIN